
User Manual
Page 2
ENGLISH ᕢ Loading the batteries CRV3 lithium (non-rechargeable) Ni-MH (rechargeable) 2 AA lithium or Ni-MH (may be rechargeable or non-rechargeable) ᕣ Turning on the camera 2 www.kodak.com/go/easysharecenter
ENGLISH ᕢ Loading the batteries CRV3 lithium (non-rechargeable) Ni-MH (rechargeable) 2 AA lithium or Ni-MH (may be rechargeable or non-rechargeable) ᕣ Turning on the camera 2 www.kodak.com/go/easysharecenter
User Manual
Page 9
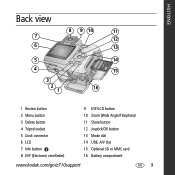
ENGLISH Back view 8 9 10 11 7 12 6 13 5 4 3 2 1 14 15 16 1 Review button 2 Menu button 3 Delete button 4 Tripod socket 5 Dock connector 6 LCD 7 Info button 8 EVF (Electronic viewfinder) 9 EVF/LCD button 10 Zoom (Wide Angle/Telephoto) 11 Share button 12 Joystick/OK button 13 Mode dial 14 USB, A/V Out 15 Optional SD or MMC card 16 Battery compartment www.kodak.com/go/z710support 9
ENGLISH Back view 8 9 10 11 7 12 6 13 5 4 3 2 1 14 15 16 1 Review button 2 Menu button 3 Delete button 4 Tripod socket 5 Dock connector 6 LCD 7 Info button 8 EVF (Electronic viewfinder) 9 EVF/LCD button 10 Zoom (Wide Angle/Telephoto) 11 Share button 12 Joystick/OK button 13 Mode dial 14 USB, A/V Out 15 Optional SD or MMC card 16 Battery compartment www.kodak.com/go/z710support 9

User Manual
Page 21
www.kodak.com/go /z710accessories.) Starting the slide show Use the Slide Show to highlight Begin Show, then press the OK button. Each picture and video is ... button, then press the Menu button. 2 Press to highlight Slide Show, then press the OK button. 3 Press to display your pictures and videos on the camera. To save battery power, use an optional Kodak 3-volt AC adapter. (Visit www.kodak.com/go /z710support 21
www.kodak.com/go /z710accessories.) Starting the slide show Use the Slide Show to highlight Begin Show, then press the OK button. Each picture and video is ... button, then press the Menu button. 2 Press to highlight Slide Show, then press the OK button. 3 Press to display your pictures and videos on the camera. To save battery power, use an optional Kodak 3-volt AC adapter. (Visit www.kodak.com/go /z710support 21
User Manual
Page 24
...turns on the camera. Cannot transfer pictures ■ Install the EasyShare software that they are the correct batteries for your camera. LCD says "Memory is full" ■ Delete unwanted pictures. ■ Insert a new memory card. ■ Change the Image Storage location. 24 www.kodak.com/go /...■ Press the EVF/LCD button on the camera back. 3 Troubleshooting Camera problems For step-by-step product support, visit www.kodak.com/go /easysharecenter confirm that came with your camera. 3 Insert a set of new or fully charged batteries. 4 Turn on and shuts off Solution 1 Turn...
...turns on the camera. Cannot transfer pictures ■ Install the EasyShare software that they are the correct batteries for your camera. LCD says "Memory is full" ■ Delete unwanted pictures. ■ Insert a new memory card. ■ Change the Image Storage location. 24 www.kodak.com/go /...■ Press the EVF/LCD button on the camera back. 3 Troubleshooting Camera problems For step-by-step product support, visit www.kodak.com/go /easysharecenter confirm that came with your camera. 3 Insert a set of new or fully charged batteries. 4 Turn on and shuts off Solution 1 Turn...

User Manual
Page 25
... in exposure to shock and/or electrical or mechanical hazards. For more information on batteries, see www.kodak.com/go/batterytypes www.kodak.com/go/z710support 25 In the unlikely event that battery fluid leaks onto your skin, wash immediately with water and contact your local health... moisture, or extreme temperatures. Refer servicing to qualified service personnel. Kodak AC adapters and battery chargers are no user-serviceable parts inside the product, contact Kodak customer support. ■ In the unlikely event that battery fluid leaks inside . If the LCD breaks, do not touch ...
... in exposure to shock and/or electrical or mechanical hazards. For more information on batteries, see www.kodak.com/go/batterytypes www.kodak.com/go/z710support 25 In the unlikely event that battery fluid leaks onto your skin, wash immediately with water and contact your local health... moisture, or extreme temperatures. Refer servicing to qualified service personnel. Kodak AC adapters and battery chargers are no user-serviceable parts inside the product, contact Kodak customer support. ■ In the unlikely event that battery fluid leaks inside . If the LCD breaks, do not touch ...

User Manual
Page 26
... may contain remanufactured materials. This warranty does not cover circumstances beyond Kodak's control, nor problems caused by Kodak (such as suntan lotion, to air-dry for at www.eiae.org or visit www.kodak.com/go /z710downloads. Warranty Kodak warrants Kodak EasyShare digital cameras and accessories (excluding batteries) to any conditions and/or limitations stated herein. Such repair or...
... may contain remanufactured materials. This warranty does not cover circumstances beyond Kodak's control, nor problems caused by Kodak (such as suntan lotion, to air-dry for at www.eiae.org or visit www.kodak.com/go /z710downloads. Warranty Kodak warrants Kodak EasyShare digital cameras and accessories (excluding batteries) to any conditions and/or limitations stated herein. Such repair or...

User Manual
Page 4
Product features Back view 8 9 10 11 7 12 6 13 5 4 3 2 1 14 15 16 1 Review button 2 Menu button 3 Delete button 4 Tripod socket 5 Dock connector 6 LCD 7 Info button 8 EVF (Electronic viewfinder) 9 EVF/LCD button 10 Zoom (Wide Angle/Telephoto) 11 Share button 12 Joystick/OK button 13 Mode dial 14 USB, A/V Out 15 Optional SD or MMC card 16 Battery compartment ii www.kodak.com/go/support
Product features Back view 8 9 10 11 7 12 6 13 5 4 3 2 1 14 15 16 1 Review button 2 Menu button 3 Delete button 4 Tripod socket 5 Dock connector 6 LCD 7 Info button 8 EVF (Electronic viewfinder) 9 EVF/LCD button 10 Zoom (Wide Angle/Telephoto) 11 Share button 12 Joystick/OK button 13 Mode dial 14 USB, A/V Out 15 Optional SD or MMC card 16 Battery compartment ii www.kodak.com/go/support

User Manual
Page 5
... the software 1 Attaching the lens cap and strap 1 Loading the batteries 2 Turning on the camera 3 Setting the language and date/time 3 Storing pictures on an SD or MMC card 4 2 Taking pictures/videos 5 Taking a picture 5 Using optical zoom 8 Using the flip-... Copying pictures and videos 17 Pre-tagging for album names 17 Tagging pictures/videos for albums 19 Sharing your pictures 20 4 Doing more with your camera 25 Changing the flash settings 25 Using the self-timer 26 Capture modes 27 Taking close-up and landscape pictures 30 Using burst 31 www...
... the software 1 Attaching the lens cap and strap 1 Loading the batteries 2 Turning on the camera 3 Setting the language and date/time 3 Storing pictures on an SD or MMC card 4 2 Taking pictures/videos 5 Taking a picture 5 Using optical zoom 8 Using the flip-... Copying pictures and videos 17 Pre-tagging for album names 17 Tagging pictures/videos for albums 19 Sharing your pictures 20 4 Doing more with your camera 25 Changing the flash settings 25 Using the self-timer 26 Capture modes 27 Taking close-up and landscape pictures 30 Using burst 31 www...
User Manual
Page 6
... 5 Transferring and printing pictures 40 Installing the software 40 Transferring pictures 41 Printing pictures 42 Dock compatibility for your camera 44 6 Troubleshooting 45 Camera problems 45 Computer/connectivity problems 47 Picture quality problems 47 Direct printing (PictBridge) problems 48 7 Getting help 49... Helpful links 49 8 Appendix 51 Camera specifications 51 Storage capacities 55 Important safety instructions 56 Battery life 57 Upgrading your software and firmware 58 Additional care and maintenance 58 Warranty...59...
... 5 Transferring and printing pictures 40 Installing the software 40 Transferring pictures 41 Printing pictures 42 Dock compatibility for your camera 44 6 Troubleshooting 45 Camera problems 45 Computer/connectivity problems 47 Picture quality problems 47 Direct printing (PictBridge) problems 48 7 Getting help 49... Helpful links 49 8 Appendix 51 Camera specifications 51 Storage capacities 55 Important safety instructions 56 Battery life 57 Upgrading your software and firmware 58 Additional care and maintenance 58 Warranty...59...
User Manual
Page 8
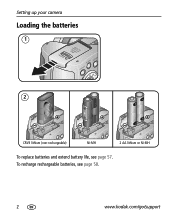
To recharge rechargeable batteries, see page 57. Setting up your camera Loading the batteries 1 2 CRV3 lithium (non-rechargeable) Ni-MH 2 AA lithium or Ni-MH To replace batteries and extend battery life, see page 58. 2 www.kodak.com/go/support
To recharge rechargeable batteries, see page 57. Setting up your camera Loading the batteries 1 2 CRV3 lithium (non-rechargeable) Ni-MH 2 AA lithium or Ni-MH To replace batteries and extend battery life, see page 58. 2 www.kodak.com/go/support
User Manual
Page 16
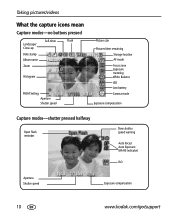
Taking pictures/videos What the capture icons mean Capture modes-no buttons pressed Self-timer Flash Landscape/ Close-up Date stamp Album name Zoom Histogram PASM Setting Aperture Shutter speed Picture size Pictures/time remaining Storage location AF mode Focus zone Exposure metering White Balance ISO Low battery Camera mode Exposure compensation Capture modes-shutter pressed halfway Open flash reminder Slow shutter speed warning Auto Focus/ Auto Exposure (AF/AE indicator) ISO Aperture Shutter speed Exposure compensation 10 www.kodak.com/go/support
Taking pictures/videos What the capture icons mean Capture modes-no buttons pressed Self-timer Flash Landscape/ Close-up Date stamp Album name Zoom Histogram PASM Setting Aperture Shutter speed Picture size Pictures/time remaining Storage location AF mode Focus zone Exposure metering White Balance ISO Low battery Camera mode Exposure compensation Capture modes-shutter pressed halfway Open flash reminder Slow shutter speed warning Auto Focus/ Auto Exposure (AF/AE indicator) ISO Aperture Shutter speed Exposure compensation 10 www.kodak.com/go/support

User Manual
Page 20
...3 To scroll through the seconds quickly, press and hold . 4 Press the OK button. To save battery power, use an optional Kodak 3-volt AC adapter. (Visit www.kodak.com/go /support Each picture and video is displayed once. to 60 seconds. 1 On the Slide ...Press to highlight Begin Show, then press the OK button. The interval setting remains until you change it. 14 www.kodak.com/go /z710accessories.) Starting the slide show display interval The default interval setting displays each picture for 5 seconds. To ... see page 15. To run a slide show on a television or on the camera.
...3 To scroll through the seconds quickly, press and hold . 4 Press the OK button. To save battery power, use an optional Kodak 3-volt AC adapter. (Visit www.kodak.com/go /support Each picture and video is displayed once. to 60 seconds. 1 On the Slide ...Press to highlight Begin Show, then press the OK button. The interval setting remains until you change it. 14 www.kodak.com/go /z710accessories.) Starting the slide show display interval The default interval setting displays each picture for 5 seconds. To ... see page 15. To run a slide show on a television or on the camera.
User Manual
Page 48
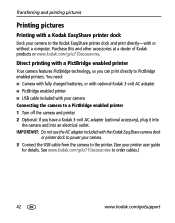
... the Kodak EasyShare camera dock or printer dock to power your camera. 3 Connect the USB cable from the camera to the printer. (See your camera Connecting the camera to a PictBridge enabled printer 1 Turn off the camera and printer. 2 Optional: If you can print directly to PictBridge enabled printers. You need: ■ Camera with fully charged batteries, or with optional Kodak 3-volt...
... the Kodak EasyShare camera dock or printer dock to power your camera. 3 Connect the USB cable from the camera to the printer. (See your camera Connecting the camera to a PictBridge enabled printer 1 Turn off the camera and printer. 2 Optional: If you can print directly to PictBridge enabled printers. You need: ■ Camera with fully charged batteries, or with optional Kodak 3-volt...
User Manual
Page 51
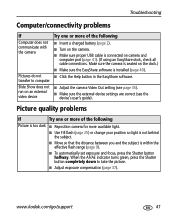
... off , then on picture size and content.) picture www.kodak.com/go /z710support and select Interactive Troubleshooting & Repairs. when camera turns on or does not retract ■ Turn camera off and the lens does not retract ■ Insert a new or charged battery. ■ Connect the camera to change the display. Pictures remaining ■ Continue taking...
... off , then on picture size and content.) picture www.kodak.com/go /z710support and select Interactive Troubleshooting & Repairs. when camera turns on or does not retract ■ Turn camera off and the lens does not retract ■ Insert a new or charged battery. ■ Connect the camera to change the display. Pictures remaining ■ Continue taking...
User Manual
Page 52
... 2). almost or entirely full ■ Delete pictures from the camera. ■ Remove the battery and wipe the contacts with card. ■ Change image storage location to the computer (page 41). Make sure the camera is ■ Transfer pictures to internal memory. 46 www.kodak.com/go/support Memory card not ■ Card may be...
... 2). almost or entirely full ■ Delete pictures from the camera. ■ Remove the battery and wipe the contacts with card. ■ Change image storage location to the computer (page 41). Make sure the camera is ■ Transfer pictures to internal memory. 46 www.kodak.com/go/support Memory card not ■ Card may be...
User Manual
Page 53
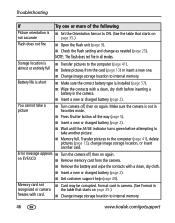
Make sure the camera is seated on camera and computer port (page 41). (If using an EasyShare dock, check all cable connections. www.kodak.com/go/support 47 When the AF/AE indicator turns green, press the Shutter button completely down to computer Slide Show does not...or more of the following Picture is too dark ■ Reposition camera for more of the following ■ Insert a charged battery (page 2). ■ Turn on the camera. ■ Make sure proper USB cable is connected on the dock.) ■ Make sure the EasyShare software is within the effective flash range (page 9). ■...
Make sure the camera is seated on camera and computer port (page 41). (If using an EasyShare dock, check all cable connections. www.kodak.com/go/support 47 When the AF/AE indicator turns green, press the Shutter button completely down to computer Slide Show does not...or more of the following Picture is too dark ■ Reposition camera for more of the following ■ Insert a charged battery (page 2). ■ Turn on the camera. ■ Make sure proper USB cable is connected on the dock.) ■ Make sure the EasyShare software is within the effective flash range (page 9). ■...
User Manual
Page 59
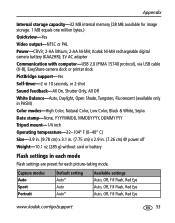
...Flash, Red Eye Auto, Off, Fill Flash, Red Eye www.kodak.com/go/support 53 Kodak Ni-MH rechargeable digital camera battery (KAA2HR); 3V AC adapter Communication with computer-USB 2.0 (PIMA 15740 protocol), via USB cable (U-8), EasyShare camera dock or printer dock PictBridge support-Yes Self-timer-2 or 10 ...Size-3.9 in. (9.78 cm) x 3.1 in. (7.75 cm) x 2.9 in. (7.26 cm) @ power off Weight-10.1 oz (285 g) without card or battery Flash settings in each picture-taking mode. Appendix Internal storage capacity-32 MB internal memory (28 MB available for each mode Flash settings are preset...
...Flash, Red Eye Auto, Off, Fill Flash, Red Eye www.kodak.com/go/support 53 Kodak Ni-MH rechargeable digital camera battery (KAA2HR); 3V AC adapter Communication with computer-USB 2.0 (PIMA 15740 protocol), via USB cable (U-8), EasyShare camera dock or printer dock PictBridge support-Yes Self-timer-2 or 10 ...Size-3.9 in. (9.78 cm) x 3.1 in. (7.75 cm) x 2.9 in. (7.26 cm) @ power off Weight-10.1 oz (285 g) without card or battery Flash settings in each picture-taking mode. Appendix Internal storage capacity-32 MB internal memory (28 MB available for each mode Flash settings are preset...

User Manual
Page 62
...to liquid, moisture, fire, or extreme temperature. 56 www.kodak.com/go/support If the LCD breaks, do not touch the glass or liquid. Battery safety and handling CAUTION: When removing the battery, allow batteries to cool; it to touch metal objects, including coins. The...use of an accessory attachment that is not recommended by the battery manufacturer. ■ Use only batteries approved for indoor use only. there are intended for this product to qualified service personnel. Kodak AC adapters and battery chargers are no user-serviceable parts inside. Refer servicing to ...
...to liquid, moisture, fire, or extreme temperature. 56 www.kodak.com/go/support If the LCD breaks, do not touch the glass or liquid. Battery safety and handling CAUTION: When removing the battery, allow batteries to cool; it to touch metal objects, including coins. The...use of an accessory attachment that is not recommended by the battery manufacturer. ■ Use only batteries approved for indoor use only. there are intended for this product to qualified service personnel. Kodak AC adapters and battery chargers are no user-serviceable parts inside. Refer servicing to ...

User Manual
Page 63
... contact your local health provider. Reviewing your camera operates dependably, use of batteries according to make sure your pictures on usage. For additional health-related information, contact your local Kodak customer support. ■ Dispose of the flash www.kodak.com/go /batterytypes. For more information on batteries, see www.kodak.com/go /support 57 Excessive use...
... contact your local health provider. Reviewing your camera operates dependably, use of batteries according to make sure your pictures on usage. For additional health-related information, contact your local Kodak customer support. ■ Dispose of the flash www.kodak.com/go /batterytypes. For more information on batteries, see www.kodak.com/go /support 57 Excessive use...

User Manual
Page 64
... a computer, transfers pictures, and charges the Kodak Ni-MH rechargeable digital camera battery. Do not use the AC adapter included with a soft, lint-free cloth or an untreated lens-cleaning tissue. Kodak 3-volt AC adapter-powers your camera, transfers pictures, and charges the Kodak Ni-MH rechargeable digital camera battery. Wipe gently with the Kodak EasyShare camera dock or printer dock to air...
... a computer, transfers pictures, and charges the Kodak Ni-MH rechargeable digital camera battery. Do not use the AC adapter included with a soft, lint-free cloth or an untreated lens-cleaning tissue. Kodak 3-volt AC adapter-powers your camera, transfers pictures, and charges the Kodak Ni-MH rechargeable digital camera battery. Wipe gently with the Kodak EasyShare camera dock or printer dock to air...


