User Manual
Page 3
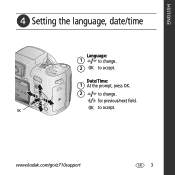
OK to change . 2 OK to accept. for previous/next field. Date/Time: 1 At the prompt, press OK. 2 to accept. OK www.kodak.com/go/z710support 3 ENGLISH ᕤ Setting the language, date/time Language: 1 to change .
OK to change . 2 OK to accept. for previous/next field. Date/Time: 1 At the prompt, press OK. 2 to accept. OK www.kodak.com/go/z710support 3 ENGLISH ᕤ Setting the language, date/time Language: 1 to change .

User Manual
Page 4
To stop recording, press the Shutter button again. 4 www.kodak.com/go/easysharecenter ENGLISH ᕥ Taking a picture/video Pictures Videos 1 1 EVF LCD AF/AE indicator 2 Press the EVF/LCD button to focus and set exposure. When the AF/AE indicator turns green, press the Shutter button completely down. 3 Press the Shutter button completely down and release. EVF LCD 3 Press the Shutter button halfway to turn LCD or EVF (electronic viewfinder) on.
To stop recording, press the Shutter button again. 4 www.kodak.com/go/easysharecenter ENGLISH ᕥ Taking a picture/video Pictures Videos 1 1 EVF LCD AF/AE indicator 2 Press the EVF/LCD button to focus and set exposure. When the AF/AE indicator turns green, press the Shutter button completely down. 3 Press the Shutter button completely down and release. EVF LCD 3 Press the Shutter button halfway to turn LCD or EVF (electronic viewfinder) on.
User Manual
Page 7
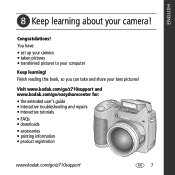
... • downloads • accessories • printing information • product registration www.kodak.com/go/z710support 7 ENGLISH ᕨ Keep learning about your best pictures! Congratulations! Finish reading this book, so you can take and share your camera! You have: • set up your camera • taken pictures • transferred pictures to your computer Keep learning!
... • downloads • accessories • printing information • product registration www.kodak.com/go/z710support 7 ENGLISH ᕨ Keep learning about your best pictures! Congratulations! Finish reading this book, so you can take and share your camera! You have: • set up your camera • taken pictures • transferred pictures to your computer Keep learning!

User Manual
Page 12
The picture is taken, press the Self-timer button. (The Self-timer setting remains active.) Use the same procedure to take a video, but: ■ Turn the Mode dial...The video stops when no storage space remains. Only the 2- and 10-second options are available in video mode. 12 www.kodak.com/go/easysharecenter delay (so you have time to Video . ■ Press the Shutter button completely down . and 18-second... Self-timer before the picture is taken after a 10- Doing more with your camera Using the self-timer 1 Place camera on a tripod) • Again for 2 pictures (after the delay.
The picture is taken, press the Self-timer button. (The Self-timer setting remains active.) Use the same procedure to take a video, but: ■ Turn the Mode dial...The video stops when no storage space remains. Only the 2- and 10-second options are available in video mode. 12 www.kodak.com/go/easysharecenter delay (so you have time to Video . ■ Press the Shutter button completely down . and 18-second... Self-timer before the picture is taken after a 10- Doing more with your camera Using the self-timer 1 Place camera on a tripod) • Again for 2 pictures (after the delay.

User Manual
Page 13
Use Telephoto to capture subject and background. Video with a head-and-shoulder pose. The camera pre-settings are in motion. For best results, position your subjects and surroundings. Use this mode Auto Sport Portrait Night For General picture-taking pictures ... Scene Video Point-and-shoot simplicity when taking -offers an excellent balance of image quality and ease of people. Capture modes Doing more with your camera Choose the mode that are Multi-Pattern Exposure Metering, Multi-Zone Focus. Allows the subject to be sharp and the background to be indistinct. ...
Use Telephoto to capture subject and background. Video with a head-and-shoulder pose. The camera pre-settings are in motion. For best results, position your subjects and surroundings. Use this mode Auto Sport Portrait Night For General picture-taking pictures ... Scene Video Point-and-shoot simplicity when taking -offers an excellent balance of image quality and ease of people. Capture modes Doing more with your camera Choose the mode that are Multi-Pattern Exposure Metering, Multi-Zone Focus. Allows the subject to be sharp and the background to be indistinct. ...
User Manual
Page 14
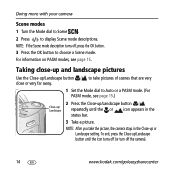
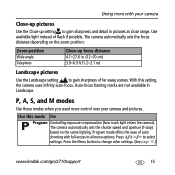
...up /Landscape button until the or icon appears in the Close-up /Landscape button close -up and landscape pictures Use the Close-up or Landscape setting. Taking close or very far away. To exit, press the Close-up /Landscape button repeatedly until the icon turns off (or turn off ,...button to take the picture, the camera stays in the status bar. 3 Take a picture. to choose a Scene mode. NOTE: If the Scene mode description turns off the camera). 14 www.kodak.com/go/easysharecenter NOTE: After you take pictures of scenes that are very 1 Set the Mode dial to display Scene mode...
...up /Landscape button until the or icon appears in the Close-up /Landscape button close -up and landscape pictures Use the Close-up or Landscape setting. Taking close or very far away. To exit, press the Close-up /Landscape button repeatedly until the icon turns off (or turn off ,...button to take the picture, the camera stays in the status bar. 3 Take a picture. to choose a Scene mode. NOTE: If the Scene mode description turns off the camera). 14 www.kodak.com/go/easysharecenter NOTE: After you take pictures of scenes that are very 1 Set the Mode dial to display Scene mode...
User Manual
Page 15
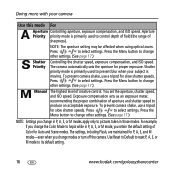
... Menu button to select settings. The camera automatically sets the focus distance depending on the scene lighting. P, A, S, and M modes Use these modes when you want more with full access to all menu options. Press to change other settings. (See page 17.) www.kodak.com/go/z710support 15 ...Auto-focus framing marks are not available in pictures at close range. Use available light instead of flash if possible. The camera automatically sets the shutter speed and aperture (f-stop)...
... Menu button to select settings. The camera automatically sets the focus distance depending on the scene lighting. P, A, S, and M modes Use these modes when you want more with full access to all menu options. Press to change other settings. (See page 17.) www.kodak.com/go/z710support 15 ...Auto-focus framing marks are not available in pictures at close range. Use available light instead of flash if possible. The camera automatically sets the shutter speed and aperture (f-stop)...
User Manual
Page 16
... P, A, S, or M mode to pictures taken in P, A, S, or M modes apply only to its default setting. 16 www.kodak.com/go/easysharecenter Press to control depth of field (the range of creative control. NOTE: The aperture setting may be affected when using optical zoom. To prevent camera shake, use a tripod for slow shutter speeds. To prevent...
... P, A, S, or M mode to pictures taken in P, A, S, or M modes apply only to its default setting. 16 www.kodak.com/go/easysharecenter Press to control depth of field (the range of creative control. NOTE: The aperture setting may be affected when using optical zoom. To prevent camera shake, use a tripod for slow shutter speeds. To prevent...

User Manual
Page 17
...the Mode dial to control all other settings. if it's too dark, increase the setting. The mode options are displayed. 2 Press to choose P, A, S, or M. 3 Press to move between settings, open . good for slow shutter speeds.) www.kodak.com/go/z710support 17 PASM Options White... the exposure; If the picture is too light, decrease the setting; Shutter speed-control how long the shutter stays open a setting, or change a setting. 4 Take a picture. Doing more with your camera Changing P, A, S, or M mode settings PASM modes control the aperture (f-number, also known as f-stop...
...the Mode dial to control all other settings. if it's too dark, increase the setting. The mode options are displayed. 2 Press to choose P, A, S, or M. 3 Press to move between settings, open . good for slow shutter speeds.) www.kodak.com/go/z710support 17 PASM Options White... the exposure; If the picture is too light, decrease the setting; Shutter speed-control how long the shutter stays open a setting, or change a setting. 4 Take a picture. Doing more with your camera Changing P, A, S, or M mode settings PASM modes control the aperture (f-number, also known as f-stop...
User Manual
Page 24
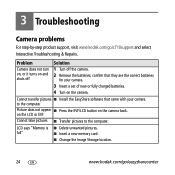
...Change the Image Storage location. 24 www.kodak.com/go /z710support and select Interactive Troubleshooting & Repairs. 3 Troubleshooting Camera problems For step-by-step product support, visit www.kodak.com/go /easysharecenter confirm that came with your camera. 3 Insert a set of new or fully charged batteries. 4... Turn on and shuts off Solution 1 Turn off the camera. 2 Remove the batteries; Cannot transfer pictures ■ Install the EasyShare software that ...
...Change the Image Storage location. 24 www.kodak.com/go /z710support and select Interactive Troubleshooting & Repairs. 3 Troubleshooting Camera problems For step-by-step product support, visit www.kodak.com/go /easysharecenter confirm that came with your camera. 3 Insert a set of new or fully charged batteries. 4... Turn on and shuts off Solution 1 Turn off the camera. 2 Remove the batteries; Cannot transfer pictures ■ Install the EasyShare software that ...

User Manual
Page 5
... the software 1 Attaching the lens cap and strap 1 Loading the batteries 2 Turning on the camera 3 Setting the language and date/time 3 Storing pictures on an SD or MMC card 4 2 Taking pictures/videos 5 Taking a picture 5 Using optical zoom 8 Using the flip-up ... Copying pictures and videos 17 Pre-tagging for album names 17 Tagging pictures/videos for albums 19 Sharing your pictures 20 4 Doing more with your camera 25 Changing the flash settings 25 Using the self-timer 26 Capture modes 27 Taking close-up and landscape pictures 30 Using burst 31 www...
... the software 1 Attaching the lens cap and strap 1 Loading the batteries 2 Turning on the camera 3 Setting the language and date/time 3 Storing pictures on an SD or MMC card 4 2 Taking pictures/videos 5 Taking a picture 5 Using optical zoom 8 Using the flip-up ... Copying pictures and videos 17 Pre-tagging for album names 17 Tagging pictures/videos for albums 19 Sharing your pictures 20 4 Doing more with your camera 25 Changing the flash settings 25 Using the self-timer 26 Capture modes 27 Taking close-up and landscape pictures 30 Using burst 31 www...
User Manual
Page 6
...Changing picture-taking settings 32 Customizing your camera 35 Adjusting exposure compensation 37 P, A, S, and M modes 38 5 Transferring and printing pictures 40 Installing the software 40 Transferring pictures 41 Printing pictures 42 Dock compatibility for your camera 44 6 Troubleshooting 45 Camera problems 45 Computer... quality problems 47 Direct printing (PictBridge) problems 48 7 Getting help 49 Helpful links 49 8 Appendix 51 Camera specifications 51 Storage capacities 55 Important safety instructions 56 Battery life 57 Upgrading your software and firmware 58 Additional ...
...Changing picture-taking settings 32 Customizing your camera 35 Adjusting exposure compensation 37 P, A, S, and M modes 38 5 Transferring and printing pictures 40 Installing the software 40 Transferring pictures 41 Printing pictures 42 Dock compatibility for your camera 44 6 Troubleshooting 45 Camera problems 45 Computer... quality problems 47 Direct printing (PictBridge) problems 48 7 Getting help 49 Helpful links 49 8 Appendix 51 Camera specifications 51 Storage capacities 55 Important safety instructions 56 Battery life 57 Upgrading your software and firmware 58 Additional ...

User Manual
Page 7
1 Setting up your camera Installing the software IMPORTANT: Before connecting any cables, install the software that was included with your camera. Attaching the lens cap and strap 1 2 3 www.kodak.com/go/support 1 We recommend Complete or Easy Install. For details, see Transferring and printing pictures, page 40. Follow the on-screen instructions.
1 Setting up your camera Installing the software IMPORTANT: Before connecting any cables, install the software that was included with your camera. Attaching the lens cap and strap 1 2 3 www.kodak.com/go/support 1 We recommend Complete or Easy Install. For details, see Transferring and printing pictures, page 40. Follow the on-screen instructions.
User Manual
Page 8
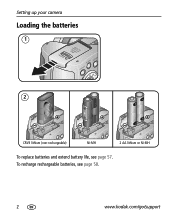
Setting up your camera Loading the batteries 1 2 CRV3 lithium (non-rechargeable) Ni-MH 2 AA lithium or Ni-MH To replace batteries and extend battery life, see page 58. 2 www.kodak.com/go/support To recharge rechargeable batteries, see page 57.
Setting up your camera Loading the batteries 1 2 CRV3 lithium (non-rechargeable) Ni-MH 2 AA lithium or Ni-MH To replace batteries and extend battery life, see page 58. 2 www.kodak.com/go/support To recharge rechargeable batteries, see page 57.
User Manual
Page 9
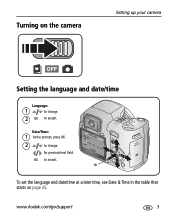
Turning on page 35. Date/Time: 1 At the prompt, press OK. 2 to accept. OK to change . 2 OK to accept. OK To set the language and date/time at a later time, see Date & Time in the table that starts on the camera Setting up your camera Setting the language and date/time Language: 1 to change . for previous/next field. www.kodak.com/go/support 3
Turning on page 35. Date/Time: 1 At the prompt, press OK. 2 to accept. OK to change . 2 OK to accept. OK To set the language and date/time at a later time, see Date & Time in the table that starts on the camera Setting up your camera Setting the language and date/time Language: 1 to change . for previous/next field. www.kodak.com/go/support 3
User Manual
Page 10
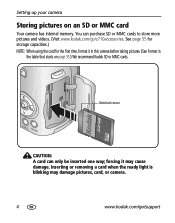
... only be inserted one way; Notched corner CAUTION: A card can purchase SD or MMC cards to store more pictures and videos. (Visit www.kodak.com/go /support Inserting or removing a card when the ready light is blinking may cause damage. See page 55 for storage capacities.) NOTE: ...the first time, format it may damage pictures, card, or camera. 4 www.kodak.com/go /z710accessories. forcing it in this camera before taking pictures. (See Format in the table that starts on an SD or MMC card Your camera has internal memory. Setting up your camera Storing pictures on page 35.) We recommend...
... only be inserted one way; Notched corner CAUTION: A card can purchase SD or MMC cards to store more pictures and videos. (Visit www.kodak.com/go /support Inserting or removing a card when the ready light is blinking may cause damage. See page 55 for storage capacities.) NOTE: ...the first time, format it may damage pictures, card, or camera. 4 www.kodak.com/go /z710accessories. forcing it in this camera before taking pictures. (See Format in the table that starts on an SD or MMC card Your camera has internal memory. Setting up your camera Storing pictures on page 35.) We recommend...

User Manual
Page 11
When the AF/AE indicator turns green, press the Shutter button completely down. AF/AE indicator: Green-successful Red-failed Failed focus Failed exposure NOTE: After you press the Delete button. The picture is saved unless you take a picture, the EVF/LCD displays a quickview for approximately 5 seconds. www.kodak.com/go/support 5 2 Taking pictures/videos Taking a picture 1 2 Press the EVF/LCD button to turn on: • LCD or EVF LCD • EVF (electronic viewfinder) 3 Press the Shutter button halfway to focus and set exposure.
When the AF/AE indicator turns green, press the Shutter button completely down. AF/AE indicator: Green-successful Red-failed Failed focus Failed exposure NOTE: After you press the Delete button. The picture is saved unless you take a picture, the EVF/LCD displays a quickview for approximately 5 seconds. www.kodak.com/go/support 5 2 Taking pictures/videos Taking a picture 1 2 Press the EVF/LCD button to turn on: • LCD or EVF LCD • EVF (electronic viewfinder) 3 Press the Shutter button halfway to focus and set exposure.
User Manual
Page 12
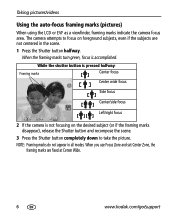
... on foreground subjects, even if the subjects are fixed at Center Wide. 6 www.kodak.com/go/support NOTE: Framing marks do not appear in the scene. 1 Press the Shutter button halfway. The camera attempts to focus on the desired subject (or if the framing marks disappear), release .... Taking pictures/videos Using the auto-focus framing marks (pictures) When using the LCD or EVF as a viewfinder, framing marks indicate the camera focus area. While the shutter button is pressed halfway: Framing marks Center focus Center wide focus Side focus Center/side focus Left/right focus ...
... on foreground subjects, even if the subjects are fixed at Center Wide. 6 www.kodak.com/go/support NOTE: Framing marks do not appear in the scene. 1 Press the Shutter button halfway. The camera attempts to focus on the desired subject (or if the framing marks disappear), release .... Taking pictures/videos Using the auto-focus framing marks (pictures) When using the LCD or EVF as a viewfinder, framing marks indicate the camera focus area. While the shutter button is pressed halfway: Framing marks Center focus Center wide focus Side focus Center/side focus Left/right focus ...
User Manual
Page 15
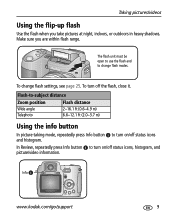
... /off status icons and histogram. To change flash modes. In Review, repeatedly press Info button to turn on /off the flash, close it. Info www.kodak.com/go/support 9 Flash-to-subject distance Zoom position Flash distance Wide angle Telephoto 2-16.1 ft (0.6-4.9 m) 6.6-12.1 ft (2.0-3.7 m) Using the info button In picture-taking...
... /off status icons and histogram. To change flash modes. In Review, repeatedly press Info button to turn on /off the flash, close it. Info www.kodak.com/go/support 9 Flash-to-subject distance Zoom position Flash distance Wide angle Telephoto 2-16.1 ft (0.6-4.9 m) 6.6-12.1 ft (2.0-3.7 m) Using the info button In picture-taking...
User Manual
Page 16
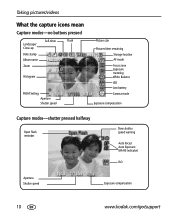
Taking pictures/videos What the capture icons mean Capture modes-no buttons pressed Self-timer Flash Landscape/ Close-up Date stamp Album name Zoom Histogram PASM Setting Aperture Shutter speed Picture size Pictures/time remaining Storage location AF mode Focus zone Exposure metering White Balance ISO Low battery Camera mode Exposure compensation Capture modes-shutter pressed halfway Open flash reminder Slow shutter speed warning Auto Focus/ Auto Exposure (AF/AE indicator) ISO Aperture Shutter speed Exposure compensation 10 www.kodak.com/go/support
Taking pictures/videos What the capture icons mean Capture modes-no buttons pressed Self-timer Flash Landscape/ Close-up Date stamp Album name Zoom Histogram PASM Setting Aperture Shutter speed Picture size Pictures/time remaining Storage location AF mode Focus zone Exposure metering White Balance ISO Low battery Camera mode Exposure compensation Capture modes-shutter pressed halfway Open flash reminder Slow shutter speed warning Auto Focus/ Auto Exposure (AF/AE indicator) ISO Aperture Shutter speed Exposure compensation 10 www.kodak.com/go/support


