
User Manual
Page 1
www.kodak.com/go/z710support 1 After installing the software, return to this Getting Started Guide. Follow the on-screen instructions. ENGLISH ᕡ Installing the software IMPORTANT: Before connecting any cables, install the software that was included with your camera.
www.kodak.com/go/z710support 1 After installing the software, return to this Getting Started Guide. Follow the on-screen instructions. ENGLISH ᕡ Installing the software IMPORTANT: Before connecting any cables, install the software that was included with your camera.

User Manual
Page 2
ENGLISH ᕢ Loading the batteries CRV3 lithium (non-rechargeable) Ni-MH (rechargeable) 2 AA lithium or Ni-MH (may be rechargeable or non-rechargeable) ᕣ Turning on the camera 2 www.kodak.com/go/easysharecenter
ENGLISH ᕢ Loading the batteries CRV3 lithium (non-rechargeable) Ni-MH (rechargeable) 2 AA lithium or Ni-MH (may be rechargeable or non-rechargeable) ᕣ Turning on the camera 2 www.kodak.com/go/easysharecenter
User Manual
Page 6
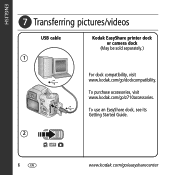
To use an EasyShare dock, see its Getting Started Guide. 2 6 www.kodak.com/go /dockcompatibility. ENGLISH ᕧ Transferring pictures/videos USB cable 1 Kodak EasyShare printer dock or camera dock (May be sold separately.) For dock compatibility, visit www.kodak.com/go /easysharecenter To purchase accessories, visit www.kodak.com/go/z710accessories.
To use an EasyShare dock, see its Getting Started Guide. 2 6 www.kodak.com/go /dockcompatibility. ENGLISH ᕧ Transferring pictures/videos USB cable 1 Kodak EasyShare printer dock or camera dock (May be sold separately.) For dock compatibility, visit www.kodak.com/go /easysharecenter To purchase accessories, visit www.kodak.com/go/z710accessories.
User Manual
Page 7
...; interactive troubleshooting and repairs • interactive tutorials • FAQs • downloads • accessories • printing information • product registration www.kodak.com/go/z710support 7 You have: • set up your camera • taken pictures • transferred pictures to your best pictures! Finish reading this book, so you can take and share your...
...; interactive troubleshooting and repairs • interactive tutorials • FAQs • downloads • accessories • printing information • product registration www.kodak.com/go/z710support 7 You have: • set up your camera • taken pictures • transferred pictures to your best pictures! Finish reading this book, so you can take and share your...
User Manual
Page 10
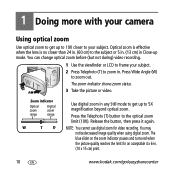
...picture or video. Release the button, then press it again. You may notice decreased image quality when using digital zoom. You can change optical zoom before (but not during) video recording. 1 Use the viewfinder or ... . (10 x 15 cm) print. 10 www.kodak.com/go/easysharecenter Zoom indicator Optical zoom range Digital zoom range W T D Use digital zoom in Close-up mode. NOTE: You cannot use digital zoom for an acceptable 4 x 6-in . The ... to zoom out. 1 Doing more with your camera Using optical zoom Use optical zoom to get up to 5X magnification beyond optical zoom.
...picture or video. Release the button, then press it again. You may notice decreased image quality when using digital zoom. You can change optical zoom before (but not during) video recording. 1 Use the viewfinder or ... . (10 x 15 cm) print. 10 www.kodak.com/go/easysharecenter Zoom indicator Optical zoom range Digital zoom range W T D Use digital zoom in Close-up mode. NOTE: You cannot use digital zoom for an acceptable 4 x 6-in . The ... to zoom out. 1 Doing more with your camera Using optical zoom Use optical zoom to get up to 5X magnification beyond optical zoom.

User Manual
Page 11
.... Fill Red Eye Off Every time you take a picture, regardless of the lighting conditions. Never www.kodak.com/go/z710support 11 In low light, hold the camera steady or use a tripod. Doing more with your camera Using the flip-up flash Use the flash when you take pictures at night, indoors, or outdoors...
.... Fill Red Eye Off Every time you take a picture, regardless of the lighting conditions. Never www.kodak.com/go/z710support 11 In low light, hold the camera steady or use a tripod. Doing more with your camera Using the flip-up flash Use the flash when you take pictures at night, indoors, or outdoors...

User Manual
Page 12
delay (so you have time to Video . ■ Press the Shutter button completely down . Only the 2- Doing more with your camera Using the self-timer 1 Place camera on a tripod) • Again for a 10-sec. delay (for a steady, shutter release on a tripod or flat surface. 2 In any Still mode, press ...: • Once for 2 pictures (after the delay. and 10-second options are available in video mode. 12 www.kodak.com/go/...
delay (so you have time to Video . ■ Press the Shutter button completely down . Only the 2- Doing more with your camera Using the self-timer 1 Place camera on a tripod) • Again for a 10-sec. delay (for a steady, shutter release on a tripod or flat surface. 2 In any Still mode, press ...: • Once for 2 pictures (after the delay. and 10-second options are available in video mode. 12 www.kodak.com/go/...

User Manual
Page 13
... the subject to be sharp and the background to exaggerate background blur. The camera pre-settings are in motion. P PASM More creative control. (See page 15.) ASM www.kodak.com/go/z710support 13 Capture modes Doing more with your camera Choose the mode that are Multi-Pattern Exposure Metering, Multi-Zone Focus. Shutter...
... the subject to be sharp and the background to exaggerate background blur. The camera pre-settings are in motion. P PASM More creative control. (See page 15.) ASM www.kodak.com/go/z710support 13 Capture modes Doing more with your camera Choose the mode that are Multi-Pattern Exposure Metering, Multi-Zone Focus. Shutter...
User Manual
Page 14
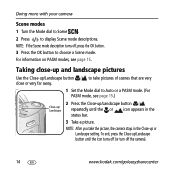
... landscape pictures Use the Close-up /Landscape button until the or icon appears in the Close-up or Landscape setting. to take the picture, the camera stays in the status bar. 3 Take a picture. To exit, press the Close-up /Landscape button close or very far away. Doing more with your... camera Scene modes 1 Turn the Mode dial to Scene . 2 Press to Auto or a PASM mode. (For PASM mode, see page 15. NOTE: If the Scene mode ...
... landscape pictures Use the Close-up /Landscape button until the or icon appears in the Close-up or Landscape setting. to take the picture, the camera stays in the status bar. 3 Take a picture. To exit, press the Close-up /Landscape button close or very far away. Doing more with your... camera Scene modes 1 Turn the Mode dial to Scene . 2 Press to Auto or a PASM mode. (For PASM mode, see page 15. NOTE: If the Scene mode ...
User Manual
Page 15
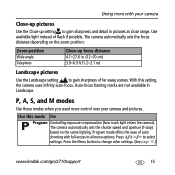
...Landscape setting to gain sharpness of far away scenes. Program mode offers the ease of flash if possible. Doing more control over your camera Close-up pictures Use the Close-up focus distance 4.7-27.6 in Landscape. Use available light instead of auto shooting with your... position: Zoom position Wide angle Telephoto Close-up setting to all menu options. Press to change other settings. (See page 17.) www.kodak.com/go/z710support 15 The camera automatically sets the focus distance depending on the scene lighting. P, A, S, and M modes Use these modes when you want more with ...
...Landscape setting to gain sharpness of far away scenes. Program mode offers the ease of flash if possible. Doing more control over your camera Close-up pictures Use the Close-up focus distance 4.7-27.6 in Landscape. Use available light instead of auto shooting with your... position: Zoom position Wide angle Telephoto Close-up setting to all menu options. Press to change other settings. (See page 17.) www.kodak.com/go/z710support 15 The camera automatically sets the focus distance depending on the scene lighting. P, A, S, and M modes Use these modes when you want more with ...
User Manual
Page 16
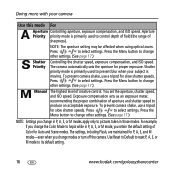
...to its default setting. 16 www.kodak.com/go/easysharecenter Use Reset to Default to reset P, A, S, or M mode to select settings. The camera automatically sets the aperture for slow shutter speeds. Press to produce an acceptable exposure. To prevent camera shake, use a tripod for Auto... level of creative control. Shutter priority mode is moving. Aperture Priority priority mode is primarily used to prevent blur when your camera Use this mode For Aperture Controlling aperture, exposure compensation, and ISO speed. Press the Menu button to change other settings. ...
...to its default setting. 16 www.kodak.com/go/easysharecenter Use Reset to Default to reset P, A, S, or M mode to select settings. The camera automatically sets the aperture for slow shutter speeds. Press to produce an acceptable exposure. To prevent camera shake, use a tripod for Auto... level of creative control. Shutter priority mode is moving. Aperture Priority priority mode is primarily used to prevent blur when your camera Use this mode For Aperture Controlling aperture, exposure compensation, and ISO speed. Press the Menu button to change other settings. ...

User Manual
Page 17
...-out of slow shutter speeds. (Use a tripod for controlling backlit or non-standard scenes. Exposure Compensation-adjust the exposure; Doing more with your camera Changing P, A, S, or M mode settings PASM modes control the aperture (f-number, also known as f-stop), shutter speed, and exposure compensation. ...Use the Menu button to PASM. good for slow shutter speeds.) www.kodak.com/go/z710support 17 A shaking hand icon warns of range Exposure compensation Shutter speed Aperture 1 Turn the Mode dial to control all other...
...-out of slow shutter speeds. (Use a tripod for controlling backlit or non-standard scenes. Exposure Compensation-adjust the exposure; Doing more with your camera Changing P, A, S, or M mode settings PASM modes control the aperture (f-number, also known as f-stop), shutter speed, and exposure compensation. ...Use the Menu button to PASM. good for slow shutter speeds.) www.kodak.com/go/z710support 17 A shaking hand icon warns of range Exposure compensation Shutter speed Aperture 1 Turn the Mode dial to control all other...
User Manual
Page 18
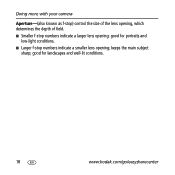
good for portraits and low-light conditions. ■ Larger f-stop numbers indicate a larger lens opening ; keeps the main subject sharp; Doing more with your camera Aperture-(also known as f-stop) control the size of the lens opening, which determines the depth of field. ■ Smaller f-stop numbers indicate a smaller lens opening ; good for landscapes and well-lit conditions. 18 www.kodak.com/go/easysharecenter
good for portraits and low-light conditions. ■ Larger f-stop numbers indicate a larger lens opening ; keeps the main subject sharp; Doing more with your camera Aperture-(also known as f-stop) control the size of the lens opening, which determines the depth of field. ■ Smaller f-stop numbers indicate a smaller lens opening ; good for landscapes and well-lit conditions. 18 www.kodak.com/go/easysharecenter

User Manual
Page 21
.../go /z710support 21 To interrupt the Slide Show, press the OK button. www.kodak.com/go /z710accessories.) Starting the slide show Use the Slide Show to highlight Begin Show, then press the OK button. What the review icons mean ... button, then press the Menu button. 2 Press to highlight Slide Show, then press the OK button. 3 Press to display your pictures and videos on the camera. Each picture and video is displayed once.
.../go /z710support 21 To interrupt the Slide Show, press the OK button. www.kodak.com/go /z710accessories.) Starting the slide show Use the Slide Show to highlight Begin Show, then press the OK button. What the review icons mean ... button, then press the Menu button. 2 Press to highlight Slide Show, then press the OK button. 3 Press to display your pictures and videos on the camera. Each picture and video is displayed once.

User Manual
Page 22
to exit the menu. 22 www.kodak.com/go/easysharecenter Press the Menu button to move the crop box. The picture is saved. A cropped picture cannot be cropped again on the camera. Working with pictures/videos Cropping pictures 1 Press Review. 2 for previous/next. 3 Press Menu, highlight Crop, then press OK. 4 Press Telephoto (T) to zoom in, or 5 Press OK, then follow the screen prompts. The original picture is copied, then cropped.
to exit the menu. 22 www.kodak.com/go/easysharecenter Press the Menu button to move the crop box. The picture is saved. A cropped picture cannot be cropped again on the camera. Working with pictures/videos Cropping pictures 1 Press Review. 2 for previous/next. 3 Press Menu, highlight Crop, then press OK. 4 Press Telephoto (T) to zoom in, or 5 Press OK, then follow the screen prompts. The original picture is copied, then cropped.
User Manual
Page 24
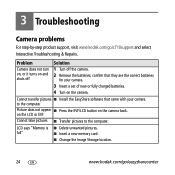
... ■ Press the EVF/LCD button on the camera back. Problem Camera does not turn on, or it turns on the camera. 3 Troubleshooting Camera problems For step-by-step product support, visit www.kodak.com/go /easysharecenter to the computer. Cannot transfer pictures ■ Install the EasyShare software that they are the correct batteries for your...
... ■ Press the EVF/LCD button on the camera back. Problem Camera does not turn on, or it turns on the camera. 3 Troubleshooting Camera problems For step-by-step product support, visit www.kodak.com/go /easysharecenter to the computer. Cannot transfer pictures ■ Install the EasyShare software that they are the correct batteries for your...

User Manual
Page 26
...cleaning solutions unless designed specifically for more information. ■ For digital camera disposal or recycling information, contact your local authorities. Such repair service will REPAIR or REPLACE Kodak EasyShare digital cameras and accessories if they fail to function properly during the warranty..., lint-free cloth or an untreated lens-cleaning tissue. If it may contain remanufactured materials. Warranty Kodak warrants Kodak EasyShare digital cameras and accessories (excluding batteries) to be remanufactured, or may be honored only within the geographical location ...
...cleaning solutions unless designed specifically for more information. ■ For digital camera disposal or recycling information, contact your local authorities. Such repair service will REPAIR or REPLACE Kodak EasyShare digital cameras and accessories if they fail to function properly during the warranty..., lint-free cloth or an untreated lens-cleaning tissue. If it may contain remanufactured materials. Warranty Kodak warrants Kodak EasyShare digital cameras and accessories (excluding batteries) to be remanufactured, or may be honored only within the geographical location ...
User Manual
Page 27
... of this warranty may have other rights which vary from the purchase, use of this product, regardless of the cause. FCC compliance and advisory Kodak EasyShare Z710 zoom digital camera This equipment has been tested and found to comply with the instructions, may not apply to state or by negligence or other express or implied...
... of this warranty may have other rights which vary from the purchase, use of this product, regardless of the cause. FCC compliance and advisory Kodak EasyShare Z710 zoom digital camera This equipment has been tested and found to comply with the instructions, may not apply to state or by negligence or other express or implied...
User Manual
Page 1
Kodak EasyShare Z710 zoom digital camera User's guide www.kodak.com For interactive tutorials, www.kodak.com/go/howto For help with your camera, www.kodak.com/go/z710support
Kodak EasyShare Z710 zoom digital camera User's guide www.kodak.com For interactive tutorials, www.kodak.com/go/howto For help with your camera, www.kodak.com/go/z710support

User Manual
Page 5
... the software 1 Attaching the lens cap and strap 1 Loading the batteries 2 Turning on the camera 3 Setting the language and date/time 3 Storing pictures on an SD or MMC card 4 2 Taking pictures/videos 5 Taking a picture 5 Using optical zoom 8 Using the flip-... Copying pictures and videos 17 Pre-tagging for album names 17 Tagging pictures/videos for albums 19 Sharing your pictures 20 4 Doing more with your camera 25 Changing the flash settings 25 Using the self-timer 26 Capture modes 27 Taking close-up and landscape pictures 30 Using burst 31 www...
... the software 1 Attaching the lens cap and strap 1 Loading the batteries 2 Turning on the camera 3 Setting the language and date/time 3 Storing pictures on an SD or MMC card 4 2 Taking pictures/videos 5 Taking a picture 5 Using optical zoom 8 Using the flip-... Copying pictures and videos 17 Pre-tagging for album names 17 Tagging pictures/videos for albums 19 Sharing your pictures 20 4 Doing more with your camera 25 Changing the flash settings 25 Using the self-timer 26 Capture modes 27 Taking close-up and landscape pictures 30 Using burst 31 www...


