User Manual
Page 6
...1 Installing the software first 1 Charging the battery 2 Inserting the battery 2 Important battery information 3 Turning the camera on and off 4 Setting the language 4 Setting the date and time 5 Changing the display, EVF or LCD 6 Checking camera and picture status 6 Storing pictures on a SD or MMC card 7 2 Taking pictures and videos 8 Taking a picture 8 Taking a video 11 Quickview-Reviewing the picture or video just taken 12 Using optical zoom 13 Using advanced digital zoom 13 Picture-taking modes 14 Using the flip-up flash 20 Using an external flash unit 23 Shooting close...
...1 Installing the software first 1 Charging the battery 2 Inserting the battery 2 Important battery information 3 Turning the camera on and off 4 Setting the language 4 Setting the date and time 5 Changing the display, EVF or LCD 6 Checking camera and picture status 6 Storing pictures on a SD or MMC card 7 2 Taking pictures and videos 8 Taking a picture 8 Taking a video 11 Quickview-Reviewing the picture or video just taken 12 Using optical zoom 13 Using advanced digital zoom 13 Picture-taking modes 14 Using the flip-up flash 20 Using an external flash unit 23 Shooting close...
User Manual
Page 7
...49 6 Transferring and printing pictures 51 Transferring pictures/videos with the USB cable 51 Printing from a Kodak EasyShare printer dock or your computer ....... 52 Printing from an optional SD or MMC card 52 Ordering prints online 52 Direct printing with a PictBridge-enabled printer 52 7 Troubleshooting 54 Camera problems 54 Computer/connectivity problems 56 Picture quality problems 56 Power-ring-light status 57 Direct printing problems 58 8 Getting help 59 Helpful links 59 Camera 59 Software 59 Other 59 Telephone customer support 60 9 Appendix 61 Camera specifications 61...
...49 6 Transferring and printing pictures 51 Transferring pictures/videos with the USB cable 51 Printing from a Kodak EasyShare printer dock or your computer ....... 52 Printing from an optional SD or MMC card 52 Ordering prints online 52 Direct printing with a PictBridge-enabled printer 52 7 Troubleshooting 54 Camera problems 54 Computer/connectivity problems 56 Picture quality problems 56 Power-ring-light status 57 Direct printing problems 58 8 Getting help 59 Helpful links 59 Camera 59 Software 59 Other 59 Telephone customer support 60 9 Appendix 61 Camera specifications 61...

User Manual
Page 13
... Setting the date & time, anytime. See the EasyShare software Help for an extended time. 1 SET DATE & TIME is highlighted. Getting started Setting the date and time Setting the date & time, first time The message Date and Time have been reset appears the first time you connect the camera. Setting the date & time, anytime 1 Turn on the camera or if the battery is removed for details. www.kodak.com/go/support 5 Press the OK button. 2 Go to exit the menu. NOTE: Depending on your computer operating system, Kodak EasyShare software may update...
... Setting the date & time, anytime. See the EasyShare software Help for an extended time. 1 SET DATE & TIME is highlighted. Getting started Setting the date and time Setting the date & time, first time The message Date and Time have been reset appears the first time you connect the camera. Setting the date & time, anytime 1 Turn on the camera or if the battery is removed for details. www.kodak.com/go/support 5 Press the OK button. 2 Go to exit the menu. NOTE: Depending on your computer operating system, Kodak EasyShare software may update...

User Manual
Page 16
... screen LCD screen 8 AF/AE indicator AF/AE indicator: green-successful red-failed failed focus failed exposure www.kodak.com/go/support NOTE: Use Auto for general picture-taking situations. (See page 14 for other camera-mode options.) 3 Use the EVF or LCD screen to frame your subject. (Press the EVF/LCD toggle button to switch to set the Auto Focus (AF) and Auto Exposure (AE). If the focus and/or exposure fails, recompose the shot and try again. 5 Continue pressing the Shutter button...
... screen LCD screen 8 AF/AE indicator AF/AE indicator: green-successful red-failed failed focus failed exposure www.kodak.com/go/support NOTE: Use Auto for general picture-taking situations. (See page 14 for other camera-mode options.) 3 Use the EVF or LCD screen to frame your subject. (Press the EVF/LCD toggle button to switch to set the Auto Focus (AF) and Auto Exposure (AE). If the focus and/or exposure fails, recompose the shot and try again. 5 Continue pressing the Shutter button...

User Manual
Page 21
... you take the picture. (When taking videos, press and release the Shutter button.) Using advanced digital zoom Use advanced digital zoom in . The EVF or LCD screen displays the zoomed image and the zoom indicator. 2 Press the Shutter button halfway and hold to set the exposure and focus, then press completely down to take high-zoom pictures. 1 Push the Zoom button to the telephoto optical zoom limit (10X). www.kodak.com/go/support 13 IMPORTANT: Place the camera on the zoom indicator pauses, then turns red when the picture size...
... you take the picture. (When taking videos, press and release the Shutter button.) Using advanced digital zoom Use advanced digital zoom in . The EVF or LCD screen displays the zoomed image and the zoom indicator. 2 Press the Shutter button halfway and hold to set the exposure and focus, then press completely down to take high-zoom pictures. 1 Push the Zoom button to the telephoto optical zoom limit (10X). www.kodak.com/go/support 13 IMPORTANT: Place the camera on the zoom indicator pauses, then turns red when the picture size...

User Manual
Page 22
...mode offers the ease of auto shooting with full access to change other settings. 14 www.kodak.com/go/support To prevent camera shake, use . Program Controlling exposure compensation (how much light enters the camera) and flash compensation. The camera automatically sets the aperture for slow shutter speeds. Shutter priority mode is primarily used to control depth of field (the range of sharpness). Aperture Controlling aperture, exposure compensation, flash Priority compensation, and ISO speed. Aperture priority mode is moving. Shutter Priority Controlling the shutter speed, exposure...
...mode offers the ease of auto shooting with full access to change other settings. 14 www.kodak.com/go/support To prevent camera shake, use . Program Controlling exposure compensation (how much light enters the camera) and flash compensation. The camera automatically sets the aperture for slow shutter speeds. Shutter priority mode is primarily used to control depth of field (the range of sharpness). Aperture Controlling aperture, exposure compensation, flash Priority compensation, and ISO speed. Aperture priority mode is moving. Shutter Priority Controlling the shutter speed, exposure...

User Manual
Page 23
... the Menu button to change other settings. The "user-created" mode. Shutter speed is fast. www.kodak.com/go/support 15 Use Telephoto to be indistinct. Taking pictures and videos Use this mode Manual Custom Video For Enjoying the highest level of aperture and shutter speed to produce an acceptable exposure. You set the aperture, flash compensation, shutter speed and ISO speed. Exposure compensation acts as an exposure meter, recommending the proper combination of creative control. To prevent camera shake, use a tripod for slow shutter speeds...
... the Menu button to change other settings. The "user-created" mode. Shutter speed is fast. www.kodak.com/go/support 15 Use Telephoto to be indistinct. Taking pictures and videos Use this mode Manual Custom Video For Enjoying the highest level of aperture and shutter speed to produce an acceptable exposure. You set the aperture, flash compensation, shutter speed and ISO speed. Exposure compensation acts as an exposure meter, recommending the proper combination of creative control. To prevent camera shake, use a tripod for slow shutter speeds...

User Manual
Page 26
... only to manually adjust the exposure; For example, if you change the Color Mode to Sepia while in P, A, S, or M mode, you change in a picture. Aperture Shutter speed Exposure compensation Flash compensation Mode setting Aperture-also known as f-stop, controls the size of the lens opening . A shaking hand icon warns of field. Taking pictures and videos P, A, S, M, and C modes Settings you change modes or turn off the camera. NOTE: The settings, including Flash, are good for ISO example f/2.8, refers to pictures taken in that mode. Smaller f-numbers, for portraits...
... only to manually adjust the exposure; For example, if you change the Color Mode to Sepia while in P, A, S, or M mode, you change in a picture. Aperture Shutter speed Exposure compensation Flash compensation Mode setting Aperture-also known as f-stop, controls the size of the lens opening . A shaking hand icon warns of field. Taking pictures and videos P, A, S, M, and C modes Settings you change modes or turn off the camera. NOTE: The settings, including Flash, are good for ISO example f/2.8, refers to pictures taken in that mode. Smaller f-numbers, for portraits...

User Manual
Page 36
... setting is no need an exact exposure of Liveview if set to Center-zone or Selectable-zone. Options and icons that appear in Auto, Scene, or Video modes. Unavailable in Liveview Multi-Pattern (default) -evaluates lighting conditions throughout the image to press the Shutter button halfway down . Because the camera is always focusing, there is displayed on the right side of a specific area in the picture is needed. Accessory Lens...
... setting is no need an exact exposure of Liveview if set to Center-zone or Selectable-zone. Options and icons that appear in Auto, Scene, or Video modes. Unavailable in Liveview Multi-Pattern (default) -evaluates lighting conditions throughout the image to press the Shutter button halfway down . Because the camera is always focusing, there is displayed on the right side of a specific area in the picture is needed. Accessory Lens...

User Manual
Page 37
... Color Black & White Sepia (for pictures and videos. Video Length (Video) Choose a default video length (useful in Video mode. Continuous (default)-as long as there is room on the card or internal memory, or until you change it . Internal Memory -the camera always uses internal memory, even if a card is in Auto, Scene, or Video modes. In Auto and Scene modes, this setting remains until you turn the Mode dial or turn off the camera. Set Album (Still) Choose Album names. This setting remains until you change it . Setup Menu...
... Color Black & White Sepia (for pictures and videos. Video Length (Video) Choose a default video length (useful in Video mode. Continuous (default)-as long as there is room on the card or internal memory, or until you change it . Internal Memory -the camera always uses internal memory, even if a card is in Auto, Scene, or Video modes. In Auto and Scene modes, this setting remains until you turn the Mode dial or turn off the camera. Set Album (Still) Choose Album names. This setting remains until you change it . Setup Menu...
User Manual
Page 39
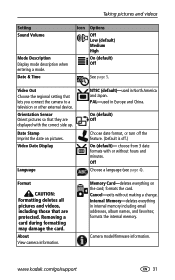
... lets you connect the camera to a television or other external device. Date Stamp Imprint the date on the card; choose from 3 date formats with the correct side up. formats the internal memory. Camera model/firmware information. www.kodak.com/go/support 31 Video Date Display Language NTSC (default)-used in Europe and China. Off Choose a language (see page 4). Internal Memory-deletes everything on pictures. Taking pictures and videos Setting Sound Volume Mode Description Display mode description when entering a mode. PAL-used in internal memory including email...
... lets you connect the camera to a television or other external device. Date Stamp Imprint the date on the card; choose from 3 date formats with the correct side up. formats the internal memory. Camera model/firmware information. www.kodak.com/go/support 31 Video Date Display Language NTSC (default)-used in Europe and China. Off Choose a language (see page 4). Internal Memory-deletes everything on pictures. Taking pictures and videos Setting Sound Volume Mode Description Display mode description when entering a mode. PAL-used in internal memory including email...
User Manual
Page 58
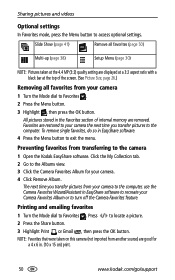
... pictures stored in EasyShare software to recreate your Camera Favorites Album or to the camera 1 Open the Kodak EasyShare software. NOTE: Favorites that were taken on this camera (not imported from another source) are restored to your camera the next time you transfer pictures from your camera to the computer, use the Camera Favorites Wizard/Assistant in the Favorites section of the screen. (See Picture Size, page 26.) Removing all favorites from transferring to turn...
... pictures stored in EasyShare software to recreate your Camera Favorites Album or to the camera 1 Open the Kodak EasyShare software. NOTE: Favorites that were taken on this camera (not imported from another source) are restored to your camera the next time you transfer pictures from your camera to the computer, use the Camera Favorites Wizard/Assistant in the Favorites section of the screen. (See Picture Size, page 26.) Removing all favorites from transferring to turn...

User Manual
Page 62
... help (see www.kodak.com/go /support If problem still continues try internal memory and/or another picture. The camera is charged. turn on a Kodak EasyShare camera or printer does not retract dock (sold separately), then try again. In Review, a blue or black screen is displayed instead of a picture ■ Transfer the picture to the computer. ■ Transfer all pictures to the computer (see page 51). ■ Take another memory card. For updates to change display. when camera turns ■ Turn camera on picture size and...
... help (see www.kodak.com/go /support If problem still continues try internal memory and/or another picture. The camera is charged. turn on a Kodak EasyShare camera or printer does not retract dock (sold separately), then try again. In Review, a blue or black screen is displayed instead of a picture ■ Transfer the picture to the computer. ■ Transfer all pictures to the computer (see page 51). ■ Take another memory card. For updates to change display. when camera turns ■ Turn camera on picture size and...

User Manual
Page 63
... or camera ■ Use another picture. ■ Memory full. Troubleshooting If... appears on again. ■ Depress shutter button all else fails, get customer support help (see page 7). Battery life is ■ Transfer pictures to the computer (page 51), delete pictures from the camera (page 39) or card, change as needed (page 20). Storage location is short ■ Wipe the contacts with card. Error message ■ Turn the camera off , then on EVF/LCD ■ Remove memory card...
... or camera ■ Use another picture. ■ Memory full. Troubleshooting If... appears on again. ■ Depress shutter button all else fails, get customer support help (see page 7). Battery life is ■ Transfer pictures to the computer (page 51), delete pictures from the camera (page 39) or card, change as needed (page 20). Storage location is short ■ Wipe the contacts with card. Error message ■ Turn the camera off , then on EVF/LCD ■ Remove memory card...
User Manual
Page 64
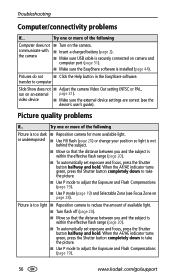
.../AE indicator turns green, press the Shutter button completely down to take the picture. ■ Use P mode to computer Slide Show does not ■ Adjust the camera Video Out setting (NTSC or PAL, run on camera and computer port (page 51). ■ Make sure the EasyShare software is within the effective flash range (page 20). ■ To automatically set exposure and focus, press the Shutter button halfway and hold . transfer to adjust the Exposure and Flash Compensations...
.../AE indicator turns green, press the Shutter button completely down to take the picture. ■ Use P mode to computer Slide Show does not ■ Adjust the camera Video Out setting (NTSC or PAL, run on camera and computer port (page 51). ■ Make sure the EasyShare software is within the effective flash range (page 20). ■ To automatically set exposure and focus, press the Shutter button halfway and hold . transfer to adjust the Exposure and Flash Compensations...

User Manual
Page 65
... work. Take pictures when the blinking stops. ■ Camera operating normally during connect mode to computer, USB connection is low or exhausted. then turn on a flat, steady surface or use a tripod, especially in high-zoom settings or in process. ■ Camera is connected to computer. ■ Battery is active. ■ Date and time set exposure and focus, press the Shutter button halfway and hold. Recharge the battery (page 2). ■ Internal camera temperature is blinking. ■ Camera operating normally at power up mode...
... work. Take pictures when the blinking stops. ■ Camera operating normally during connect mode to computer, USB connection is low or exhausted. then turn on a flat, steady surface or use a tripod, especially in high-zoom settings or in process. ■ Camera is connected to computer. ■ Battery is active. ■ Date and time set exposure and focus, press the Shutter button halfway and hold. Recharge the battery (page 2). ■ Internal camera temperature is blinking. ■ Camera operating normally at power up mode...
User Manual
Page 67
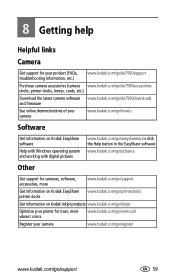
..., printer docks, lenses, cards, etc.) Download the latest camera software www.kodak.com/go/dx7590downloads and firmware See online demonstrations of your camera www.kodak.com/go/howto Software Get information on Kodak EasyShare software Help with Windows operating system and working with digital pictures www.kodak.com/go/easysharesw or click the Help button in the EasyShare software www.kodak.com/go/pcbasics Other Get support for cameras, software, accessories, more www.kodak.com/go/support Get information on Kodak EasyShare www.kodak...
..., printer docks, lenses, cards, etc.) Download the latest camera software www.kodak.com/go/dx7590downloads and firmware See online demonstrations of your camera www.kodak.com/go/howto Software Get information on Kodak EasyShare software Help with Windows operating system and working with digital pictures www.kodak.com/go/easysharesw or click the Help button in the EasyShare software www.kodak.com/go/pcbasics Other Get support for cameras, software, accessories, more www.kodak.com/go/support Get information on Kodak EasyShare www.kodak...
User Manual
Page 70
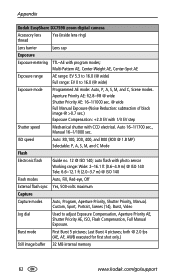
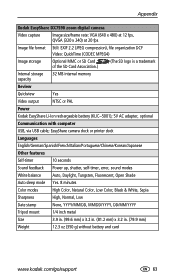
... first shot only.) Still image buffer 32 MB internal memory 62 www.kodak.com/go/support Appendix Kodak EasyShare DX7590 zoom digital camera Accessory lens thread Yes (inside lens ring) Lens barrier Lens cap Exposure Exposure metering TTL-AE with CCD electrical. ISO speed Auto: 80,100, 200, 400, and 800 (800 @ 1.8 MP) Selectable: P, A, S, M, and C Mode Flash Electronic flash Guide no. 12 @ ISO 140; Burst mode First Burst 5 pictures; Auto 16-1/1700 sec., Manual 16-1/1000 sec. auto flash with photo sensor Working range...
... first shot only.) Still image buffer 32 MB internal memory 62 www.kodak.com/go/support Appendix Kodak EasyShare DX7590 zoom digital camera Accessory lens thread Yes (inside lens ring) Lens barrier Lens cap Exposure Exposure metering TTL-AE with CCD electrical. ISO speed Auto: 80,100, 200, 400, and 800 (800 @ 1.8 MP) Selectable: P, A, S, M, and C Mode Flash Electronic flash Guide no. 12 @ ISO 140; Burst mode First Burst 5 pictures; Auto 16-1/1700 sec., Manual 16-1/1000 sec. auto flash with photo sensor Working range...
User Manual
Page 71
..., shutter, self-timer, error, sound modes White balance Auto, Daylight, Tungsten, Fluorescent, Open Shade Auto sleep mode Yes. 8 minutes Color modes High Color, Natural Color, Low Color, Black & White, Sepia Sharpness High, Normal, Low Date stamp None, YYYY/MM/DD, MM/DD/YYYY, DD/MM/YYYY Tripod mount 1/4 inch metal Size 3.9 in. (99.6 mm) x 3.2 in. (81.2 mm) x 3.2 in. (79.9 mm) Weight 12.3 oz (350 g) without battery and card www.kodak.com/go/support 63 Appendix Kodak EasyShare DX7590 zoom digital camera Video capture Image size...
..., shutter, self-timer, error, sound modes White balance Auto, Daylight, Tungsten, Fluorescent, Open Shade Auto sleep mode Yes. 8 minutes Color modes High Color, Natural Color, Low Color, Black & White, Sepia Sharpness High, Normal, Low Date stamp None, YYYY/MM/DD, MM/DD/YYYY, DD/MM/YYYY Tripod mount 1/4 inch metal Size 3.9 in. (99.6 mm) x 3.2 in. (81.2 mm) x 3.2 in. (79.9 mm) Weight 12.3 oz (350 g) without battery and card www.kodak.com/go/support 63 Appendix Kodak EasyShare DX7590 zoom digital camera Video capture Image size...
User Manual
Page 82
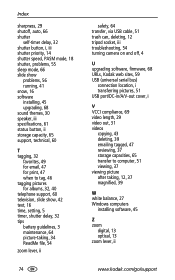
..., 16 time, setting, 5 timer, shutter delay, 32 tips battery guidelines, 3 maintenance, 64 picture-taking, 34 ReadMe file, 54 zoom lever, ii 74 safety, 64 transfer, via USB cable, 51 trash can, deleting, 12 tripod socket, iii troubleshooting, 54 turning camera on and off, 4 U upgrading software, firmware, 68 URLs, Kodak web sites, 59 USB (universal serial bus) connection location, i transferring pictures, 51 USB port/DC-in/A/V-out cover, i V VCCI compliance, 69 video length, 29 video out, 31 videos copying, 43 deleting...
..., 16 time, setting, 5 timer, shutter delay, 32 tips battery guidelines, 3 maintenance, 64 picture-taking, 34 ReadMe file, 54 zoom lever, ii 74 safety, 64 transfer, via USB cable, 51 trash can, deleting, 12 tripod socket, iii troubleshooting, 54 turning camera on and off, 4 U upgrading software, firmware, 68 URLs, Kodak web sites, 59 USB (universal serial bus) connection location, i transferring pictures, 51 USB port/DC-in/A/V-out cover, i V VCCI compliance, 69 video length, 29 video out, 31 videos copying, 43 deleting...


