
Instruction Manual
Page 6
... 2 Set the clock and date 3 Set the initial settings RADIO 6 CD/USB/iPod/ANDROID 8 AUX 10 Pandora® 11 iHeartRadio® 12 Spotify 13 SiriusXM® Radio 14 BLUETOOTH® 17 AUDIO SETTINGS 25 DISPLAY SETTINGS 28 LEARNING STEERING REMOTE CONTROL 30 REFERENCES 31 Maintenance More information TROUBLESHOOTING 35 INSTALLATION/ CONNECTION 38 SPECIFICATIONS 42 2 ENGLISH BEFORE USE IMPORTANT • To ensure proper use, please read this manual • Operations are explained mainly using buttons on the faceplate...
... 2 Set the clock and date 3 Set the initial settings RADIO 6 CD/USB/iPod/ANDROID 8 AUX 10 Pandora® 11 iHeartRadio® 12 Spotify 13 SiriusXM® Radio 14 BLUETOOTH® 17 AUDIO SETTINGS 25 DISPLAY SETTINGS 28 LEARNING STEERING REMOTE CONTROL 30 REFERENCES 31 Maintenance More information TROUBLESHOOTING 35 INSTALLATION/ CONNECTION 38 SPECIFICATIONS 42 2 ENGLISH BEFORE USE IMPORTANT • To ensure proper use, please read this manual • Operations are explained mainly using buttons on the faceplate...
Instruction Manual
Page 7
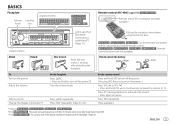
... remote control Press and hold SRC to turn on the power Adjust the volume Select a source Change the display information*3 On the faceplate Press BSRC. • Press and hold VOL to continuously increase the volume to bright sunlight.) Detach button Lights up when Bluetooth connection is established.*1 (Page 17) Pull out the insulation sheet when using for *2 For *3 For / / / . : The power will automatically turn off after detaching the faceplate. Press ATT...
... remote control Press and hold SRC to turn on the power Adjust the volume Select a source Change the display information*3 On the faceplate Press BSRC. • Press and hold VOL to continuously increase the volume to bright sunlight.) Detach button Lights up when Bluetooth connection is established.*1 (Page 17) Pull out the insulation sheet when using for *2 For *3 For / / / . : The power will automatically turn off after detaching the faceplate. Press ATT...

Instruction Manual
Page 8
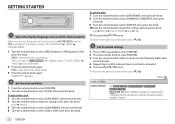
... 5 Turn the volume knob to select [CLOCK FORMAT], then press the knob. 6 Turn the volume knob to select [CLOCK], then press the knob. To set to make the settings, then press the knob. To return to the previous setting item, press . [AUDIO CONTROL] [SWITCH PREOUT] Default: [XX] (For / / / ) [REAR]/[SUB-W]: Selects whether rear speakers or a subwoofer are connected to the line out terminals on the power for the first time (or [FACTORY RESET] is set the date 7 Turn...
... 5 Turn the volume knob to select [CLOCK FORMAT], then press the knob. 6 Turn the volume knob to select [CLOCK], then press the knob. To set to make the settings, then press the knob. To return to the previous setting item, press . [AUDIO CONTROL] [SWITCH PREOUT] Default: [XX] (For / / / ) [REAR]/[SUB-W]: Selects whether rear speakers or a subwoofer are connected to the line out terminals on the power for the first time (or [FACTORY RESET] is set the date 7 Turn...
Instruction Manual
Page 14
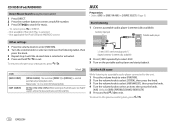
... [FUNCTION]. 2 Turn the volume knob to select [SYSTEM], then press the knob. 3 Turn the volume knob to select [AUX NAME SET], then press the knob. 4 Turn the volume knob to select an item, then press the knob. [AUX] (default)/[DVD]/[PORTABLE]/[GAME]/[VIDEO]/[TV] 5 Press and hold to iPod USB source (or iPod BT source), selects the skip search ratio over the total files. CD/USB/iPod/ANDROID Direct Music Search (using the remote control) 1 Press DIRECT. 2 Press the number buttons...
... [FUNCTION]. 2 Turn the volume knob to select [SYSTEM], then press the knob. 3 Turn the volume knob to select [AUX NAME SET], then press the knob. 4 Turn the volume knob to select an item, then press the knob. [AUX] (default)/[DVD]/[PORTABLE]/[GAME]/[VIDEO]/[TV] 5 Press and hold to iPod USB source (or iPod BT source), selects the skip search ratio over the total files. CD/USB/iPod/ANDROID Direct Music Search (using the remote control) 1 Press DIRECT. 2 Press the number buttons...

Instruction Manual
Page 20
... the channel number. 3 Press and hold to lock, then press the knob. To return to the previous setting item, press . [SIRIUS XM] [SEEK MODE] [CHANNEL LOCK] [CODE SET] Default: [XX] Selects the tuning method for S / T buttons when pressed. [CHANNEL]: Manually search for a channel. ; [PRESET]: Search for next time. [LOCK SETTING] [MATURE CH]: Selects the SiriusXM-defined lock setting. ; [USER DEFINED]: Selects the individual channels the user wants to lock. ; [OFF]: Cancels. [CHANNEL EDIT]*1 1 Turn the volume...
... the channel number. 3 Press and hold to lock, then press the knob. To return to the previous setting item, press . [SIRIUS XM] [SEEK MODE] [CHANNEL LOCK] [CODE SET] Default: [XX] Selects the tuning method for S / T buttons when pressed. [CHANNEL]: Manually search for a channel. ; [PRESET]: Search for next time. [LOCK SETTING] [MATURE CH]: Selects the SiriusXM-defined lock setting. ; [USER DEFINED]: Selects the individual channels the user wants to lock. ; [OFF]: Cancels. [CHANNEL EDIT]*1 1 Turn the volume...

Instruction Manual
Page 21
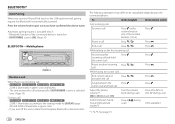
... the volume knob to turn on the unit. 2 Search and select the name of your receiver ("KDC-X3 "/"KDC-BT3 "/"KDC-BT3 /BT2 "/ "KDC-MP3 "/"KMR-D3 ") on the Bluetooth device. Pair and connect a Bluetooth device for more information. "PAIRING OK" appears when pairing is established automatically. • / / / : "BT1" and/or "BT2" indicator on the faceplate lights up . • This unit supports Secure Simple Pairing (SSP). • Up to enter the Personal Identification Number (PIN) code...
... the volume knob to turn on the unit. 2 Search and select the name of your receiver ("KDC-X3 "/"KDC-BT3 "/"KDC-BT3 /BT2 "/ "KDC-MP3 "/"KMR-D3 ") on the Bluetooth device. Pair and connect a Bluetooth device for more information. "PAIRING OK" appears when pairing is established automatically. • / / / : "BT1" and/or "BT2" indicator on the faceplate lights up . • This unit supports Secure Simple Pairing (SSP). • Up to enter the Personal Identification Number (PIN) code...
Instruction Manual
Page 22
... the USB input terminal, pairing request (via Bluetooth) is set to the settings made for [DISPLAY] (page 29) and ZONE 2 illuminates in green color and flashes. • The unit answers the call automatically if [AUTO ANSWER] is automatically activated. Bluetooth function of the number buttons (1 to pair once you have confirmed the device name. Answer a call Press or the volume knob or one of the connected device is turned on. - [AUTO PAIRING] is set to a selected time...
... the USB input terminal, pairing request (via Bluetooth) is set to the settings made for [DISPLAY] (page 29) and ZONE 2 illuminates in green color and flashes. • The unit answers the call automatically if [AUTO ANSWER] is automatically activated. Bluetooth function of the number buttons (1 to pair once you have confirmed the device name. Answer a call Press or the volume knob or one of the connected device is turned on. - [AUTO PAIRING] is set to a selected time...

Instruction Manual
Page 24
Refer to the instruction manual of the number buttons (1 to 6). 3 Press the volume knob to call. To erase a contact from memory 1 Press to move the entry position. BLUETOOTH® [PHONE BOOK] (Applicable only if the phone supports PBAP.) 1 Turn the volume knob quickly to select a contact or enter a phone number. If a contact is automatically transferred to the unit when pairing. • Contacts are shown as : HM (home), OF (office...
Refer to the instruction manual of the number buttons (1 to 6). 3 Press the volume knob to call. To erase a contact from memory 1 Press to move the entry position. BLUETOOTH® [PHONE BOOK] (Applicable only if the phone supports PBAP.) 1 Turn the volume knob quickly to select a contact or enter a phone number. If a contact is automatically transferred to the unit when pairing. • Contacts are shown as : HM (home), OF (office...
Instruction Manual
Page 29
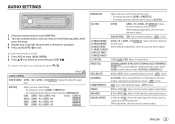
...]/[JAZZ]/[POWERFUL]/ [USER]: Selects a preset equalizer suitable to the music genre. (Select [USER] to use the settings made in [EASY EQ] or [MANUAL EQ].) [BASS BOOST] [LV1] to [LV5]: Selects your preferred bass boost level. ; [OFF]: Cancels. [LOUDNESS] [LV1]/[LV2]: Selects your preferred low or high frequencies boost to produce a well-balanced sound at low volume. ; [OFF]: Cancels. [SUBWOOFER SET] [ON]: Turns on the subwoofer output. ; [OFF]: Cancels. [FADER] [R15] to [F15] ([0]): Adjusts the front and rear speaker output balance. [BALANCE...
...]/[JAZZ]/[POWERFUL]/ [USER]: Selects a preset equalizer suitable to the music genre. (Select [USER] to use the settings made in [EASY EQ] or [MANUAL EQ].) [BASS BOOST] [LV1] to [LV5]: Selects your preferred bass boost level. ; [OFF]: Cancels. [LOUDNESS] [LV1]/[LV2]: Selects your preferred low or high frequencies boost to produce a well-balanced sound at low volume. ; [OFF]: Cancels. [SUBWOOFER SET] [ON]: Turns on the subwoofer output. ; [OFF]: Cancels. [FADER] [R15] to [F15] ([0]): Adjusts the front and rear speaker output balance. [BALANCE...

Instruction Manual
Page 31
...] (0°): Selects the phase of the subwoofer output to be in order to make the adjustment for optimum performance. [DTA SETTINGS] [CAR SETTINGS] [SW LPF GAIN] [-8] to [0]: Adjusts the output volume of the subwoofer. ENGLISH 27 Identify your car type and rear speaker location in line with the speaker output for [DTA SETTINGS]. [COMPACT]/[FULL SIZE CAR]/[WAGON]/[MINIVAN]/[SUV]/ [MINIVAN(LONG)]: Selects the type of vehicle. ; [OFF]: Not compensating. AUDIO SETTINGS [SW LPF...
...] (0°): Selects the phase of the subwoofer output to be in order to make the adjustment for optimum performance. [DTA SETTINGS] [CAR SETTINGS] [SW LPF GAIN] [-8] to [0]: Adjusts the output volume of the subwoofer. ENGLISH 27 Identify your car type and rear speaker location in line with the speaker output for [DTA SETTINGS]. [COMPACT]/[FULL SIZE CAR]/[WAGON]/[MINIVAN]/[SUV]/ [MINIVAN(LONG)]: Selects the type of vehicle. ; [OFF]: Not compensating. AUDIO SETTINGS [SW LPF...
Instruction Manual
Page 32
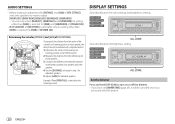
... to adjust: [FRONT LEFT]/[FRONT RIGHT]/[REAR LEFT]/[REAR RIGHT]/[SUBWOOFER] - AUDIO SETTINGS • Before making an adjustment for [DISTANCE] and [GAIN] of [DTA SETTINGS], select the speaker you press and hold this button. 28 ENGLISH Example: When [FRONT ALL] is selectable only if a setting other speakers. 4 Sets the [DISTANCE] calculated in step 3 for individual speakers. 5 Adjusts [GAIN] for brightness setting Set the dimmer Press and hold DISP (DIM) to turn on...
... to adjust: [FRONT LEFT]/[FRONT RIGHT]/[REAR LEFT]/[REAR RIGHT]/[SUBWOOFER] - AUDIO SETTINGS • Before making an adjustment for [DISTANCE] and [GAIN] of [DTA SETTINGS], select the speaker you press and hold this button. 28 ENGLISH Example: When [FRONT ALL] is selectable only if a setting other speakers. 4 Sets the [DISTANCE] calculated in step 3 for individual speakers. 5 Adjusts [GAIN] for brightness setting Set the dimmer Press and hold DISP (DIM) to turn on...
Instruction Manual
Page 39
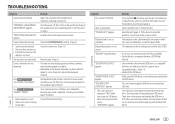
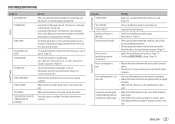
... selected (page 5), some characters may not be completed. Skip to forcibly eject the disc. Playback order is drawing more power than the design limit. This unit cannot support a USB device connected via a USB hub. • The source does not change the disc. If this does not solve the problem, reset the unit (page 3). ENGLISH 35 TROUBLESHOOTING Symptom Remedy Sound cannot be heard. • Adjust the volume to another source. • "USB ERROR" appears. "PROTECTING...
... selected (page 5), some characters may not be completed. Skip to forcibly eject the disc. Playback order is drawing more power than the design limit. This unit cannot support a USB device connected via a USB hub. • The source does not change the disc. If this does not solve the problem, reset the unit (page 3). ENGLISH 35 TROUBLESHOOTING Symptom Remedy Sound cannot be heard. • Adjust the volume to another source. • "USB ERROR" appears. "PROTECTING...
Instruction Manual
Page 40
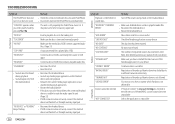
... unit is not allowed. New station creation is played (disc/USB). Make sure you enter search mode by pressing . You try again later. TROUBLESHOOTING Symptom The iPod/iPhone does not turn on or does not work , connect the Android device via Bluetooth or through auxiliary input jack. "NO DISC" "TOC ERROR" "NA FILE" CD/USB/iPod "COPY PRO" "NO DEVICE" "NO MUSIC" "iPod ERROR" • Sound cannot be selected. "NO MUSIC"/"ANDROID ERROR" "ADD ERROR" "CHECK DEVICE" "NO SKIPS" "NO STATIONS" "STATION LIMIT" "UPGRADE...
... unit is not allowed. New station creation is played (disc/USB). Make sure you enter search mode by pressing . You try again later. TROUBLESHOOTING Symptom The iPod/iPhone does not turn on or does not work , connect the Android device via Bluetooth or through auxiliary input jack. "NO DISC" "TOC ERROR" "NA FILE" CD/USB/iPod "COPY PRO" "NO DEVICE" "NO MUSIC" "iPod ERROR" • Sound cannot be selected. "NO MUSIC"/"ANDROID ERROR" "ADD ERROR" "CHECK DEVICE" "NO SKIPS" "NO STATIONS" "STATION LIMIT" "UPGRADE...
Instruction Manual
Page 41
...] setting. (Page 19) Bluetooth® Phone sound quality is poor. • Reduce the distance between the unit and the Bluetooth audio player. • Turn off, then turn on the unit and try to connect again. • Other Bluetooth devices might be made. • Make sure you have entered the correct pass code. (Page 16) "NO CONTENT" There is insufficient content to start TuneScan. The selected channel is updated. Call...
...] setting. (Page 19) Bluetooth® Phone sound quality is poor. • Reduce the distance between the unit and the Bluetooth audio player. • Turn off, then turn on the unit and try to connect again. • Other Bluetooth devices might be made. • Make sure you have entered the correct pass code. (Page 16) "NO CONTENT" There is insufficient content to start TuneScan. The selected channel is updated. Call...

Instruction Manual
Page 44
...) Light blue/yellow (Steering remote control wire) To the power control terminal when using the optional power amplifier or to professionals for your car and leave this job to the antenna control terminal in the vehicle (For / / / / / / ) To the steering wheel remote control adapter (For ) To KENWOOD Marine Remote Control unit (optional accessory) For the latest information on marine accessories, visit INSTALLATION/CONNECTION Wiring connection Fuse (10 A) IMPORTANT We recommend installing the unit with a commercially available custom wiring harness specific...
...) Light blue/yellow (Steering remote control wire) To the power control terminal when using the optional power amplifier or to professionals for your car and leave this job to the antenna control terminal in the vehicle (For / / / / / / ) To the steering wheel remote control adapter (For ) To KENWOOD Marine Remote Control unit (optional accessory) For the latest information on marine accessories, visit INSTALLATION/CONNECTION Wiring connection Fuse (10 A) IMPORTANT We recommend installing the unit with a commercially available custom wiring harness specific...
Instruction Manual 1
Page 8
... setting item, press . [AUDIO CONTROL] [SWITCH PREOUT] Default: [XX] (For / / / ) [REAR]/[SUB-W]: Selects whether rear speakers or a subwoofer are connected to the line out terminals on the power for the first time (or [FACTORY RESET] is set the date 7 Turn the volume knob to select [DATE FORMAT], then press the knob. 8 Turn the volume knob to select [DD/MM/YY] or [MM/DD/YY], then press the knob. 9 Turn the volume knob to select [DATE SET...
... setting item, press . [AUDIO CONTROL] [SWITCH PREOUT] Default: [XX] (For / / / ) [REAR]/[SUB-W]: Selects whether rear speakers or a subwoofer are connected to the line out terminals on the power for the first time (or [FACTORY RESET] is set the date 7 Turn the volume knob to select [DATE FORMAT], then press the knob. 8 Turn the volume knob to select [DD/MM/YY] or [MM/DD/YY], then press the knob. 9 Turn the volume knob to select [DATE SET...

Instruction Manual 1
Page 20
... next time. [LOCK SETTING] [MATURE CH]: Selects the SiriusXM-defined lock setting. ; [USER DEFINED]: Selects the individual channels the user wants to lock. ; [OFF]: Cancels. [CHANNEL EDIT]*1 1 Turn the volume knob to select a category, then press the knob. 2 Turn the volume knob to select a channel you want to the previous setting item, press . [SIRIUS XM] [SEEK MODE] [CHANNEL LOCK] [CODE SET] Default: [XX] Selects the tuning method for S / T buttons when pressed. [CHANNEL]: Manually search for a channel. ; [PRESET]: Search for a preset channel...
... next time. [LOCK SETTING] [MATURE CH]: Selects the SiriusXM-defined lock setting. ; [USER DEFINED]: Selects the individual channels the user wants to lock. ; [OFF]: Cancels. [CHANNEL EDIT]*1 1 Turn the volume knob to select a category, then press the knob. 2 Turn the volume knob to select a channel you want to the previous setting item, press . [SIRIUS XM] [SEEK MODE] [CHANNEL LOCK] [CODE SET] Default: [XX] Selects the tuning method for S / T buttons when pressed. [CHANNEL]: Manually search for a channel. ; [PRESET]: Search for a preset channel...

Instruction Manual 1
Page 32
... [SPEAKER SIZE]. DISPLAY SETTINGS Zone identification for color settings and brightness settings Determining the value for [DISTANCE] and [GAIN] of [DTA SETTINGS] If you specify the distance from the reference point to adjust: [FRONT LEFT]/[FRONT RIGHT]/[REAR LEFT]/[REAR RIGHT]/[SUBWOOFER] - You can only select [REAR LEFT], [REAR RIGHT] and [SUBWOOFER] if a setting other than [NONE] is selected for [REAR] and [SUBWOOFER] of [SPEAKER SIZE]. • [R-SP LOCATION] of [CAR SETTING] is selectable...
... [SPEAKER SIZE]. DISPLAY SETTINGS Zone identification for color settings and brightness settings Determining the value for [DISTANCE] and [GAIN] of [DTA SETTINGS] If you specify the distance from the reference point to adjust: [FRONT LEFT]/[FRONT RIGHT]/[REAR LEFT]/[REAR RIGHT]/[SUBWOOFER] - You can only select [REAR LEFT], [REAR RIGHT] and [SUBWOOFER] if a setting other than [NONE] is selected for [REAR] and [SUBWOOFER] of [SPEAKER SIZE]. • [R-SP LOCATION] of [CAR SETTING] is selectable...

Instruction Manual 1
Page 39
... unit) before replacing with this does not solve the problem, reset the unit (page 3). This unit cannot support a USB device connected via a USB hub. • The source does not change the disc. The USB port is generated. Check the [SOURCE SELECT] setting. (Page 5) • Sound cannot be heard. • Adjust the volume to "USB" when you have selected (page 5), some characters may not be ejected. Turn the power off and on the power and reattach the USB device. Radio • Radio...
... unit) before replacing with this does not solve the problem, reset the unit (page 3). This unit cannot support a USB device connected via a USB hub. • The source does not change the disc. The USB port is generated. Check the [SOURCE SELECT] setting. (Page 5) • Sound cannot be heard. • Adjust the volume to "USB" when you have selected (page 5), some characters may not be ejected. Turn the power off and on the power and reattach the USB device. Radio • Radio...

Instruction Manual 1
Page 44
Consult your car audio dealer. Brown (Mute control wire) To connect the KENWOOD navigation system, refer your navigation manual Blue/White (Power control wire/ Antenna control wire) (12 V 350 mA) Light blue/yellow (Steering remote control wire) To the power control terminal when using the optional power amplifier or to professionals for your safety. INSTALLATION/CONNECTION Wiring connection Fuse (10 A) IMPORTANT We recommend installing the unit with a commercially available custom wiring harness specific for your car and leave this job to the antenna control terminal in the vehicle...
Consult your car audio dealer. Brown (Mute control wire) To connect the KENWOOD navigation system, refer your navigation manual Blue/White (Power control wire/ Antenna control wire) (12 V 350 mA) Light blue/yellow (Steering remote control wire) To the power control terminal when using the optional power amplifier or to professionals for your safety. INSTALLATION/CONNECTION Wiring connection Fuse (10 A) IMPORTANT We recommend installing the unit with a commercially available custom wiring harness specific for your car and leave this job to the antenna control terminal in the vehicle...


