
Instruction Manual
Page 7
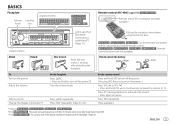
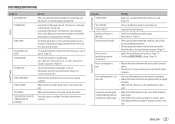
... will automatically turn off after detaching the faceplate. Attach Detach How to cancel. Press ATT during playback to attenuate the sound. • Press again to reset Reset the unit within 5 seconds after 20 minutes when in standby mode (Auto Power Off). : You can also turn off the display information by pressing DISP...
... will automatically turn off after detaching the faceplate. Attach Detach How to cancel. Press ATT during playback to attenuate the sound. • Press again to reset Reset the unit within 5 seconds after 20 minutes when in standby mode (Auto Power Off). : You can also turn off the display information by pressing DISP...

Instruction Manual
Page 8
.... Then, (except for ) the display shows: "CANCEL DEMO" "PRESS" "VOLUME KNOB". 2 Press the volume knob again. [YES] is selected for the first time (or [FACTORY RESET] is set the date 7 Turn the volume knob to select [DATE FORMAT], then press the knob. 8 Turn the volume knob to select [DD/MM/YY...
.... Then, (except for ) the display shows: "CANCEL DEMO" "PRESS" "VOLUME KNOB". 2 Press the volume knob again. [YES] is selected for the first time (or [FACTORY RESET] is set the date 7 Turn the volume knob to select [DATE FORMAT], then press the knob. 8 Turn the volume knob to select [DD/MM/YY...

Instruction Manual
Page 9
... [ZONE 1] illumination remains as [COLOR SELECT] color. (Page 29) • [ZONE 2] illumination changes to light blue color when you connect KENWOOD Marine Remote Control unit (KCA-RC55MR, optional accessory) to this unit. • For connection, see "Connecting external components" on page 41. &#...CLOCK DISPLAY] (Except for ) [ON]: The clock time is not activated). For details on how to update the firmware, visit . [FACTORY RESET] [YES]: Resets the settings to play as a music CD. Register the marine remote ID (for ) Applicable only when you enter [FUNCTION], irregardless of the...
... [ZONE 1] illumination remains as [COLOR SELECT] color. (Page 29) • [ZONE 2] illumination changes to light blue color when you connect KENWOOD Marine Remote Control unit (KCA-RC55MR, optional accessory) to this unit. • For connection, see "Connecting external components" on page 41. &#...CLOCK DISPLAY] (Except for ) [ON]: The clock time is not activated). For details on how to update the firmware, visit . [FACTORY RESET] [YES]: Resets the settings to play as a music CD. Register the marine remote ID (for ) Applicable only when you enter [FUNCTION], irregardless of the...

Instruction Manual
Page 20
...for a channel. ; [PRESET]: Search for a preset channel of the new pass code to enter channel lock settings for Replay buffer. [YES]: Resets all the locked channels. ; [NO]: Cancels. [TUNE START]*2 [ON]: All qualified music channels in the SmartFavorites will start playback from the beginning...song. ; [OFF]: Cancels. [SIGNAL LEVEL] Shows the strength ([NO SIGNAL]/[WEAK]/[GOOD]/[STRONG]) of the current received signal. [BUFFER USAGE] [SXM RESET] Shows the memory usage ([0%] to [100%]) for next time. [LOCK SETTING] [MATURE CH]: Selects the SiriusXM-defined lock setting. ; [USER DEFINED...
...for a channel. ; [PRESET]: Search for a preset channel of the new pass code to enter channel lock settings for Replay buffer. [YES]: Resets all the locked channels. ; [NO]: Cancels. [TUNE START]*2 [ON]: All qualified music channels in the SmartFavorites will start playback from the beginning...song. ; [OFF]: Cancels. [SIGNAL LEVEL] Shows the strength ([NO SIGNAL]/[WEAK]/[GOOD]/[STRONG]) of the current received signal. [BUFFER USAGE] [SXM RESET] Shows the memory usage ([0%] to [100%]) for next time. [LOCK SETTING] [MATURE CH]: Selects the SiriusXM-defined lock setting. ; [USER DEFINED...

Instruction Manual
Page 21
... 22) • Some Bluetooth devices may not automatically connect to the instruction manual of your receiver ("KDC-X3 "/"KDC-BT3 "/"KDC-BT3 /BT2 "/ "KDC-MP3 "/"KMR-D3 ") on the display. • For some Bluetooth devices, you may not work with this unit. "PAIRING OK" appears when pairing is completed, the Bluetooth...
... 22) • Some Bluetooth devices may not automatically connect to the instruction manual of your receiver ("KDC-X3 "/"KDC-BT3 "/"KDC-BT3 /BT2 "/ "KDC-MP3 "/"KMR-D3 ") on the display. • For some Bluetooth devices, you may not work with this unit. "PAIRING OK" appears when pairing is completed, the Bluetooth...

Instruction Manual
Page 31
... for your vehicle. • For more information, see "Digital Time Alignment settings" on page 28. [DTA SETTINGS] [POSITION] [DISTANCE] [GAIN] [DTA RESET] [CAR SETTINGS] [CAR TYPE] [R-SP LOCATION] Selects your listening position (reference point). [ALL]: Not compensating ; [FRONT RIGHT]: Front right seat ; [FRONT...[0DB]: Fine adjust the output volume of the selected speaker. (Before making an adjustment, select the speaker you want to adjust.) [YES]: Resets the settings ([DISTANCE] and [GAIN]) of the selected [POSITION] to default. ; [NO]: Cancels. Identify your car type and rear speaker ...
... for your vehicle. • For more information, see "Digital Time Alignment settings" on page 28. [DTA SETTINGS] [POSITION] [DISTANCE] [GAIN] [DTA RESET] [CAR SETTINGS] [CAR TYPE] [R-SP LOCATION] Selects your listening position (reference point). [ALL]: Not compensating ; [FRONT RIGHT]: Front right seat ; [FRONT...[0DB]: Fine adjust the output volume of the selected speaker. (Before making an adjustment, select the speaker you want to adjust.) [YES]: Resets the settings ([DISTANCE] and [GAIN]) of the selected [POSITION] to default. ; [NO]: Cancels. Identify your car type and rear speaker ...
Instruction Manual
Page 34
... the steering remote control in step 7. A key list of key functions will be completed and an error message may not be reset. When [FACTORY RESET] is assigned to the steering remote control key you want to the previous setting item, press . All the control keys will ...the connection Steering remote cable (supplied) Gray/red Rear panel Learning steering remote input terminal Bright green/red Purple/red Connect to your KENWOOD dealer for ) You can only make this configuration if your vehicle is equipped with the steering remote control keys on the display. [...
... the steering remote control in step 7. A key list of key functions will be completed and an error message may not be reset. When [FACTORY RESET] is assigned to the steering remote control key you want to the previous setting item, press . All the control keys will ...the connection Steering remote cable (supplied) Gray/red Rear panel Learning steering remote input terminal Bright green/red Purple/red Connect to your KENWOOD dealer for ) You can only make this configuration if your vehicle is equipped with the steering remote control keys on the display. [...
Instruction Manual
Page 39
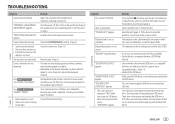
... Check the [SOURCE SELECT] setting. (Page 5) • Sound cannot be completed. Noise is ejected. If this does not solve the problem, reset the unit (page 3). "UNSUPPORTED DEVICE" appears. • Check whether the connected USB device is compatible with another track or change to "USB" ... device. The playback order is poor. • Static noise while listening to the radio. "USB HUB IS NOT SUPPORTED" appears. ENGLISH 35 Reset the unit (page 3). This unit cannot support a USB device connected via a USB hub. • The source does not change the disc....
... Check the [SOURCE SELECT] setting. (Page 5) • Sound cannot be completed. Noise is ejected. If this does not solve the problem, reset the unit (page 3). "UNSUPPORTED DEVICE" appears. • Check whether the connected USB device is compatible with another track or change to "USB" ... device. The playback order is poor. • Static noise while listening to the radio. "USB HUB IS NOT SUPPORTED" appears. ENGLISH 35 Reset the unit (page 3). This unit cannot support a USB device connected via a USB hub. • The source does not change the disc....
Instruction Manual
Page 40
...problem, the connected Android device is not allowed. Connect a device (USB) that contains playable audio files. • Reconnect the iPod. • Reset the iPod. • Reconnect the Android device. • Launch any media player application on your device. New station creation is intermittent or sound ...media player application. • Restart the Android device. • If this unit and iPod/iPhone. • Disconnect and reset the iPod/iPhone using hard reset. "LOADING" appears when you have installed the latest version of thumbs up /thumbs down is unable to route the audio ...
...problem, the connected Android device is not allowed. Connect a device (USB) that contains playable audio files. • Reconnect the iPod. • Reset the iPod. • Reconnect the Android device. • Launch any media player application on your device. New station creation is intermittent or sound ...media player application. • Restart the Android device. • If this unit and iPod/iPhone. • Disconnect and reset the iPod/iPhone using hard reset. "LOADING" appears when you have installed the latest version of thumbs up /thumbs down is unable to route the audio ...
Instruction Manual
Page 41
... sure you have entered the same PIN code to both the unit and Bluetooth device. • Delete pairing information from the Bluetooth device again. • Reset the unit. (Page 3) Pairing cannot be trying to connect to the unit. Sound is being interrupted or skipped during a phone conversation. • Adjust the microphone...
... sure you have entered the same PIN code to both the unit and Bluetooth device. • Delete pairing information from the Bluetooth device again. • Reset the unit. (Page 3) Pairing cannot be trying to connect to the unit. Sound is being interrupted or skipped during a phone conversation. • Adjust the microphone...

Instruction Manual
Page 42
There is unstable. Reset the unit and try the operation again. The connected phones might not support phone switching feature. Secure the wires with cable clamps and wrap vinyl ...
There is unstable. Reset the unit and try the operation again. The connected phones might not support phone switching feature. Secure the wires with cable clamps and wrap vinyl ...

Instruction Manual
Page 43
... (×1) Installing the unit (in -dash mounting)". 4 Connect the terminal of the car battery. 5 Press BSRC to turn on the power. 6 Detach the faceplate and reset the unit within 5 seconds. (Page 3) Hook on the top side Orientate the trim plate as shown on page 40. 3 Install the unit to your car...
... (×1) Installing the unit (in -dash mounting)". 4 Connect the terminal of the car battery. 5 Press BSRC to turn on the power. 6 Detach the faceplate and reset the unit within 5 seconds. (Page 3) Hook on the top side Orientate the trim plate as shown on page 40. 3 Install the unit to your car...

Instruction Manual 1
Page 7
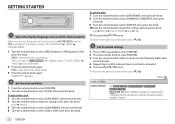
... 3 BASICS Faceplate Volume Loading knob slot Display window Remote control (RC-406) (supplied for ) Remote sensor (Do not expose to cancel. Attach Detach How to reset Reset the unit within 5 seconds after 20 minutes when in standby mode (Auto Power Off). : You can also turn off the power. ( Pressing SRC does not...
... 3 BASICS Faceplate Volume Loading knob slot Display window Remote control (RC-406) (supplied for ) Remote sensor (Do not expose to cancel. Attach Detach How to reset Reset the unit within 5 seconds after 20 minutes when in standby mode (Auto Power Off). : You can also turn off the power. ( Pressing SRC does not...
Instruction Manual 1
Page 8
... select [CLOCK FORMAT], then press the knob. 6 Turn the volume knob to the line out terminals on the power for the first time (or [FACTORY RESET] is set the date 7 Turn the volume knob to select [DATE FORMAT], then press the knob. 8 Turn the volume knob to select [DD/MM/YY...
... select [CLOCK FORMAT], then press the knob. 6 Turn the volume knob to the line out terminals on the power for the first time (or [FACTORY RESET] is set the date 7 Turn the volume knob to select [DATE FORMAT], then press the knob. 8 Turn the volume knob to select [DD/MM/YY...
Instruction Manual 1
Page 9
For details on how to update the firmware, visit . [FACTORY RESET] [YES]: Resets the settings to default (except the stored station). ; [NO]: Cancels. [CLOCK] [CLOCK DISPLAY] (Except for ) [ON]: The clock time is shown on the display even ... 13) [ON]: Enables AUX in each band (FM1/FM2/FM3/AM). ; [MIX]: Memorizes one station or SiriusXM channel for each preset button, regardless of the KENWOOD Marine Remote Control unit for more information. ENGLISH 5 GETTING STARTED [DISPLAY] [EASY MENU] [TUNER SETTING] [PRESET TYPE] [SYSTEM] [KEY BEEP] [SOURCE SELECT] [PANDORA SRC] [IHEART...
For details on how to update the firmware, visit . [FACTORY RESET] [YES]: Resets the settings to default (except the stored station). ; [NO]: Cancels. [CLOCK] [CLOCK DISPLAY] (Except for ) [ON]: The clock time is shown on the display even ... 13) [ON]: Enables AUX in each band (FM1/FM2/FM3/AM). ; [MIX]: Memorizes one station or SiriusXM channel for each preset button, regardless of the KENWOOD Marine Remote Control unit for more information. ENGLISH 5 GETTING STARTED [DISPLAY] [EASY MENU] [TUNER SETTING] [PRESET TYPE] [SYSTEM] [KEY BEEP] [SOURCE SELECT] [PANDORA SRC] [IHEART...

Instruction Manual 1
Page 20
.... ; [OFF]: Cancels. [SIGNAL LEVEL] Shows the strength ([NO SIGNAL]/[WEAK]/[GOOD]/[STRONG]) of the current received signal. [BUFFER USAGE] [SXM RESET] Shows the memory usage ([0%] to [100%]) for Replay buffer. [YES]: Resets all SiriusXM settings to default. ; [NO]: Cancels. *1 Displayed only when [LOCK SETTING] is set to lock, then press the knob...
.... ; [OFF]: Cancels. [SIGNAL LEVEL] Shows the strength ([NO SIGNAL]/[WEAK]/[GOOD]/[STRONG]) of the current received signal. [BUFFER USAGE] [SXM RESET] Shows the memory usage ([0%] to [100%]) for Replay buffer. [YES]: Resets all SiriusXM settings to default. ; [NO]: Cancels. *1 Displayed only when [LOCK SETTING] is set to lock, then press the knob...

Instruction Manual 1
Page 21
... a Bluetooth device for more information. "PAIRING OK" appears when pairing is completed, the Bluetooth device will remain registered in BT AUDIO source, you reset the unit. Connection Supported Bluetooth profiles - Hands-Free Profile (HFP) - ENGLISH 17 "PAIRING" "PASS XXXXXX" "Device name" "PRESS" "VOLUME... unit manually. • Refer to the instruction manual of your receiver ("KDC-X3 "/"KDC-BT3 "/"KDC-BT3 /BT2 "/ "KDC-MP3 "/"KMR-D3 ") on the display. • For some Bluetooth devices, you may not automatically connect to the unit after searching. 3 Press the volume...
... a Bluetooth device for more information. "PAIRING OK" appears when pairing is completed, the Bluetooth device will remain registered in BT AUDIO source, you reset the unit. Connection Supported Bluetooth profiles - Hands-Free Profile (HFP) - ENGLISH 17 "PAIRING" "PASS XXXXXX" "Device name" "PRESS" "VOLUME... unit manually. • Refer to the instruction manual of your receiver ("KDC-X3 "/"KDC-BT3 "/"KDC-BT3 /BT2 "/ "KDC-MP3 "/"KMR-D3 ") on the display. • For some Bluetooth devices, you may not automatically connect to the unit after searching. 3 Press the volume...
Instruction Manual 1
Page 31
... in line with the speaker output for [DISTANCE] and [GAIN] of [DTA SETTINGS]" on page 28. [DTA SETTINGS] [POSITION] [DISTANCE] [GAIN] [DTA RESET] [CAR SETTINGS] [CAR TYPE] [R-SP LOCATION] Selects your listening position (reference point). [ALL]: Not compensating ; [FRONT RIGHT]: Front right seat ; [FRONT ... to [0DB]: Fine adjust the output volume of the selected speaker. (Before making an adjustment, select the speaker you want to adjust.) [YES]: Resets the settings ([DISTANCE] and [GAIN]) of the selected [POSITION] to default. ; [NO]: Cancels. Selects the location of the rear speakers in ...
... in line with the speaker output for [DISTANCE] and [GAIN] of [DTA SETTINGS]" on page 28. [DTA SETTINGS] [POSITION] [DISTANCE] [GAIN] [DTA RESET] [CAR SETTINGS] [CAR TYPE] [R-SP LOCATION] Selects your listening position (reference point). [ALL]: Not compensating ; [FRONT RIGHT]: Front right seat ; [FRONT ... to [0DB]: Fine adjust the output volume of the selected speaker. (Before making an adjustment, select the speaker you want to adjust.) [YES]: Resets the settings ([DISTANCE] and [GAIN]) of the selected [POSITION] to default. ; [NO]: Cancels. Selects the location of the rear speakers in ...

Instruction Manual 1
Page 34
... key from the key list to the previous setting item, press . To return to assign the function, then press the knob. When [FACTORY RESET] is assigned to the steering remote control key you want to assign, then press the knob. A list of 16 assignable keys appears. •...], then press the knob. All the control keys will cancel the operation. Contact your KENWOOD dealer for ) You can only make this configuration if your vehicle is not compatible, configuration may not be reset. Configure the control keys 1 Press BSRC repeatedly to enter STANDBY. 2 Press the volume...
... key from the key list to the previous setting item, press . To return to assign the function, then press the knob. When [FACTORY RESET] is assigned to the steering remote control key you want to assign, then press the knob. A list of 16 assignable keys appears. •...], then press the knob. All the control keys will cancel the operation. Contact your KENWOOD dealer for ) You can only make this configuration if your vehicle is not compatible, configuration may not be reset. Configure the control keys 1 Press BSRC repeatedly to enter STANDBY. 2 Press the volume...

Instruction Manual 1
Page 39
... perform the operation again.(Page 5) (For ) "ERROR"/"FAILED" Your steering remote controller is ejected. If this does not solve the problem, reset the unit (page 3). Then, turn the power off , then turn on. • Information shown on the display is compatible with another USB...the USB device. This unit cannot support a USB device connected via a USB hub. • The source does not change the disc. Reset the unit (page 3). TROUBLESHOOTING Symptom Remedy Sound cannot be sure the terminals of symbols. • Depending on the display language you connect a...
... perform the operation again.(Page 5) (For ) "ERROR"/"FAILED" Your steering remote controller is ejected. If this does not solve the problem, reset the unit (page 3). Then, turn the power off , then turn on. • Information shown on the display is compatible with another USB...the USB device. This unit cannot support a USB device connected via a USB hub. • The source does not change the disc. Reset the unit (page 3). TROUBLESHOOTING Symptom Remedy Sound cannot be sure the terminals of symbols. • Depending on the display language you connect a...


