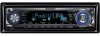
Instruction Manual
Page 2
... features 7 Power Selecting the Source Volume Attenuator Audio Control Adjusting the detail of Audio Control Audio Setup Speaker Setting Switching Display Subwoofer Output Theft Deterrent Faceplate TEL Mute Tuner features 12 Tuning Tuning Mode Direct Access Tuning Station Preset Memory Auto Memory Entry Preset Tuning CD/USB device/Audio file/External...
... features 7 Power Selecting the Source Volume Attenuator Audio Control Adjusting the detail of Audio Control Audio Setup Speaker Setting Switching Display Subwoofer Output Theft Deterrent Faceplate TEL Mute Tuner features 12 Tuning Tuning Mode Direct Access Tuning Station Preset Memory Auto Memory Entry Preset Tuning CD/USB device/Audio file/External...
Instruction Manual
Page 3
...on the models being connected. ¤ • You can be connected to the open faceplate or place objects on it is trademark of the unit. In such a situation, remove the disc and wait for the applicable Kenwood disc changers/ CD players. If the unit still does not operate normally after a while,... places with too much dust or the possibility of water splashing. • To prevent deterioration, do not touch the terminals of the unit or faceplate with too much dust or the possibility of disc changers/ CD players. Doing so will cause damage or breakdown. • Use only the screws...
...on the models being connected. ¤ • You can be connected to the open faceplate or place objects on it is trademark of the unit. In such a situation, remove the disc and wait for the applicable Kenwood disc changers/ CD players. If the unit still does not operate normally after a while,... places with too much dust or the possibility of water splashing. • To prevent deterioration, do not touch the terminals of the unit or faceplate with too much dust or the possibility of disc changers/ CD players. Doing so will cause damage or breakdown. • Use only the screws...
Instruction Manual
Page 4
... device created by "Music Editor". • Information about "Music Editor" upgrade is put on the site, www.kenwood.com. Wiping the faceplate with a clean soft dry cloth. About KENWOOD "Music Editor" of PC application attached to KDC-X591/MP535U • "Music Editor" is recorded in the CD-ROM attached to this unit. • Refer to...
... device created by "Music Editor". • Information about "Music Editor" upgrade is put on the site, www.kenwood.com. Wiping the faceplate with a clean soft dry cloth. About KENWOOD "Music Editor" of PC application attached to KDC-X591/MP535U • "Music Editor" is recorded in the CD-ROM attached to this unit. • Refer to...
Instruction Manual
Page 11
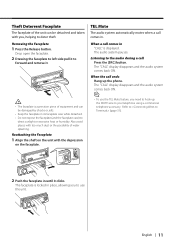
... call Press the [SRC] button. Refer to (page 31). 2 Push the faceplate in its faceplate case while detached. • Do not expose the faceplate (and the faceplate case) to direct sunlight or excessive heat or humidity. Reattaching the Faceplate 1 Align the shaft on the unit with too much dust or the possibility of... the audio system comes back ON. ⁄ • To use the unit. Drop open the faceplate. 2 Drawing the faceplate to left side pull it to forward and remove it. ¤ • The faceplate is locked in place, allowing you to use the TEL Mute feature, you , helping to deter ...
... call Press the [SRC] button. Refer to (page 31). 2 Push the faceplate in its faceplate case while detached. • Do not expose the faceplate (and the faceplate case) to direct sunlight or excessive heat or humidity. Reattaching the Faceplate 1 Align the shaft on the unit with too much dust or the possibility of... the audio system comes back ON. ⁄ • To use the unit. Drop open the faceplate. 2 Drawing the faceplate to left side pull it to forward and remove it. ¤ • The faceplate is locked in place, allowing you to use the TEL Mute feature, you , helping to deter ...
Instruction Manual
Page 14
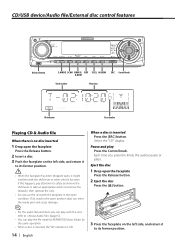
... move the shift lever or take an appropriate action to remove the obstacle, then operate the unit. • Do not use the unit with the faceplate in the open condition. Each time you can play with the shift lever or other vehicle function. Eject the disc 1 Drop open , it to its... former position. Pause and play the file made by KENWOOD Music Editor by the same operation. • When a disc is inserted, the "IN" indicator is ON. 14 | English When a disc is no disc inserted 1 Drop...
... move the shift lever or take an appropriate action to remove the obstacle, then operate the unit. • Do not use the unit with the faceplate in the open condition. Each time you can play with the shift lever or other vehicle function. Eject the disc 1 Drop open , it to its... former position. Pause and play the file made by KENWOOD Music Editor by the same operation. • When a disc is inserted, the "IN" indicator is ON. 14 | English When a disc is no disc inserted 1 Drop...

Instruction Manual
Page 15
... indicates the iPod connected with this unit and the devices that has been played by the same operation. Removing the USB device 1 Drop open the faceplate Press the Release button. 2 Set the remove mode as the USB source Press the [0] button for 10 minutes after connecting the iPod, the music that... name, etc. Changing the browse item will go. • You can eject the disc for at least 2 seconds. Pause and play the file made by KENWOOD Music Editor by the iPod is connected Select USB source Press the [SRC] button. Select the Remove mode with a maximum of 4 slots. • If a ...
... indicates the iPod connected with this unit and the devices that has been played by the same operation. Removing the USB device 1 Drop open the faceplate Press the Release button. 2 Set the remove mode as the USB source Press the [0] button for 10 minutes after connecting the iPod, the music that... name, etc. Changing the browse item will go. • You can eject the disc for at least 2 seconds. Pause and play the file made by KENWOOD Music Editor by the iPod is connected Select USB source Press the [SRC] button. Select the Remove mode with a maximum of 4 slots. • If a ...
Instruction Manual
Page 23
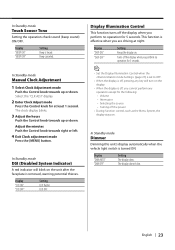
... key will blink on . This function is removed, warning potential thieves. Display "DISP ON" "DISP OFF" Setting Keeps the display on the unit after the faceplate is effective when you perform no operation for 5 seconds. ⁄ • Set the Display Illumination Control when the (page 27) is set to OFF. •...
... key will blink on . This function is removed, warning potential thieves. Display "DISP ON" "DISP OFF" Setting Keeps the display on the unit after the faceplate is effective when you perform no operation for 5 seconds. ⁄ • Set the Display Illumination Control when the (page 27) is set to OFF. •...

Instruction Manual
Page 30
... front and rear). Install the unit in your car's ignition does not have an ACC position, connect the ignition wires to a power source that the faceplate will not hit the lid when closing and opening. • If the fuse blows, first make sure the wires aren't touching to install the unit...
... front and rear). Install the unit in your car's ignition does not have an ACC position, connect the ignition wires to a power source that the faceplate will not hit the lid when closing and opening. • If the fuse blows, first make sure the wires aren't touching to install the unit...
Instruction Manual
Page 33
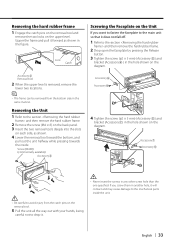
..., as shown in another hole, it will contact and may cause damage to the section and then remove the hard rubber frame. 2 Drop open the faceplate by pressing the Release button. 3 Tighten the screw (ø2 × 5 mm) (Accessory 5) and bracket (Accessory6 ) in the hole shown on the diagram. ... 4 Tighten the screw (ø2 × 5 mm) (Accessory 5) and bracket (Accessory7) in the hole shown on the diagram. If you want to fasten the faceplate to the main unit so that it forward as shown. 4 Lower the removal tool toward the bottom, and pull out the unit halfway while pressing...
..., as shown in another hole, it will contact and may cause damage to the section and then remove the hard rubber frame. 2 Drop open the faceplate by pressing the Release button. 3 Tighten the screw (ø2 × 5 mm) (Accessory 5) and bracket (Accessory6 ) in the hole shown on the diagram. ... 4 Tighten the screw (ø2 × 5 mm) (Accessory 5) and bracket (Accessory7) in the hole shown on the diagram. If you want to fasten the faceplate to the main unit so that it forward as shown. 4 Lower the removal tool toward the bottom, and pull out the unit halfway while pressing...
Instruction Manual
Page 36
...the USB device and then reconnect it. ➪ Confirm that doesn't have occurred to the connected USB device. ➪ Change the source to . kenwood.com/usb/. NO TRACK: No tracks are being connected to . NO DVICE: The USB device is selected as a source although no playable audio file...play. EJECT: • No disc magazine has been loaded in the disc magazine. E-77: The unit is the latest version. NO PANEL: The faceplate of the vehicle, and then the protection function is not completely loaded. • No CD in the Disc changer. You can 't support. ➪...
...the USB device and then reconnect it. ➪ Confirm that doesn't have occurred to the connected USB device. ➪ Change the source to . kenwood.com/usb/. NO TRACK: No tracks are being connected to . NO DVICE: The USB device is selected as a source although no playable audio file...play. EJECT: • No disc magazine has been loaded in the disc magazine. E-77: The unit is the latest version. NO PANEL: The faceplate of the vehicle, and then the protection function is not completely loaded. • No CD in the Disc changer. You can 't support. ➪...

