Instruction Manual
Page 1
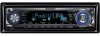
.... Refer to read through this instruction manual. Model KDC-X591/MP535U Serial number US Residence Only Register Online Register your records Record the serial number, found on the back of the unit, in the spaces designated on the product. For your Kenwood product at www.kenwoodusa.com ©... B64-3616-00/00 (KW) CD-RECEIVER KDC-X591 KDC-MP535U INSTRUCTION MANUAL Take the time to the model and serial numbers whenever you obtain the best performance from...
.... Refer to read through this instruction manual. Model KDC-X591/MP535U Serial number US Residence Only Register Online Register your records Record the serial number, found on the back of the unit, in the spaces designated on the product. For your Kenwood product at www.kenwoodusa.com ©... B64-3616-00/00 (KW) CD-RECEIVER KDC-X591 KDC-MP535U INSTRUCTION MANUAL Take the time to the model and serial numbers whenever you obtain the best performance from...
Instruction Manual
Page 2
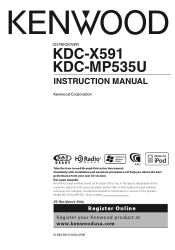
.../Title Scroll HD Radio control features 20 About HD Radio Tuning Menu system 21 Menu System Activating Security Code Deactivating Security Code Touch Sensor Tone Manual Clock Adjustment DSI (Disabled System Indicator) Display Illumination Control Dimmer Built-in Amp Setting Dual Zone System Setting Supreme Setting AMP Control CRSC (Clean Reception...
.../Title Scroll HD Radio control features 20 About HD Radio Tuning Menu system 21 Menu System Activating Security Code Deactivating Security Code Touch Sensor Tone Manual Clock Adjustment DSI (Disabled System Indicator) Display Illumination Control Dimmer Built-in Amp Setting Dual Zone System Setting Supreme Setting AMP Control CRSC (Clean Reception...
Instruction Manual
Page 4
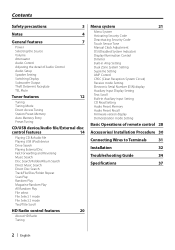
.... How to reset your area. • We recommend the use of PC application attached to KDC-X591/MP535U • "Music Editor" is recorded in the CD-ROM attached to this unit is initially set on the site, www.kenwood.com. Before using this unit for the first time, cancel the (page 27). When... • The unit can play CD/ USB device created by this unit are A-Z 0-9 • The illustrations of the display and the panel appearing in this manual are examples used to explain more clearly how the controls are used. The unit returns to factory settings when the Reset button is put on...
.... How to reset your area. • We recommend the use of PC application attached to KDC-X591/MP535U • "Music Editor" is recorded in the CD-ROM attached to this unit is initially set on the site, www.kenwood.com. Before using this unit for the first time, cancel the (page 27). When... • The unit can play CD/ USB device created by this unit are A-Z 0-9 • The illustrations of the display and the panel appearing in this manual are examples used to explain more clearly how the controls are used. The unit returns to factory settings when the Reset button is put on...
Instruction Manual
Page 5
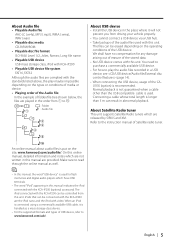
About Audio file • Playable Audio file AAC-LC (.m4a), MP3 (.mp3), WMA (.wma), WAV (.wav) • Playable disc media CD-R/RW/ROM • Playable disc file format ISO 9660 Level 1/2, Joliet, Romeo, Long file name. • Playable USB device USB mass storage class, iPod with KCA-iP200 • Playable USB device file system FAT16, FAT32 Although the audio files are complied with the standards listed above, the play maybe impossible depending on the types or conditions of media or device. • Playing order of the Audio file In the example of folder/file tree shown below, ...
About Audio file • Playable Audio file AAC-LC (.m4a), MP3 (.mp3), WMA (.wma), WAV (.wav) • Playable disc media CD-R/RW/ROM • Playable disc file format ISO 9660 Level 1/2, Joliet, Romeo, Long file name. • Playable USB device USB mass storage class, iPod with KCA-iP200 • Playable USB device file system FAT16, FAT32 Although the audio files are complied with the standards listed above, the play maybe impossible depending on the types or conditions of media or device. • Playing order of the Audio file In the example of folder/file tree shown below, ...
Instruction Manual
Page 6
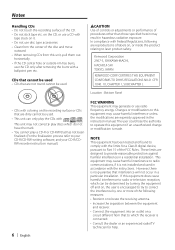
...-3, ISHIKAWA-MACHI, HACHIOJI-SHI TOKYO, JAPAN KENWOOD CORP. NOTE This equipment has been tested and found to ...play discs which the receiver is not installed and used • CDs that are expressly approved in the instruction manual. Notes Handling CDs • Do not touch the recording surface of the disc and move outward. •...been finalized. (For the finalization process refer to your CD-R/CD-RW writing software, and your CD-R/CDRW recorder instruction manual.) 6 | English FCC WARNING This equipment may not correctly play the CDs with the instructions. Location : Bottom Panel ...
...-3, ISHIKAWA-MACHI, HACHIOJI-SHI TOKYO, JAPAN KENWOOD CORP. NOTE This equipment has been tested and found to ...play discs which the receiver is not installed and used • CDs that are expressly approved in the instruction manual. Notes Handling CDs • Do not touch the recording surface of the disc and move outward. •...been finalized. (For the finalization process refer to your CD-R/CD-RW writing software, and your CD-R/CDRW recorder instruction manual.) 6 | English FCC WARNING This equipment may not correctly play the CDs with the instructions. Location : Bottom Panel ...
Instruction Manual
Page 12
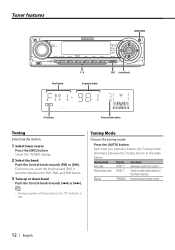
Press the [AUTO] button. Tuning Mode Choose the tuning mode. Tuning mode Auto seek Preset station seek Manual Display "AUTO 1" "AUTO 2" "MANUAL" Operation Automatic search for a station. Search in order of stereo stations the "ST" indicator is ON. Each time you press the button, the Tuning mode ... the "TUNER" display. 2 Select the band Push the Control knob towards [4] or [¢]. ⁄ • During reception of the stations in the table below. Normal manual tuning control. 12 | English
Press the [AUTO] button. Tuning Mode Choose the tuning mode. Tuning mode Auto seek Preset station seek Manual Display "AUTO 1" "AUTO 2" "MANUAL" Operation Automatic search for a station. Search in order of stereo stations the "ST" indicator is ON. Each time you press the button, the Tuning mode ... the "TUNER" display. 2 Select the band Push the Control knob towards [4] or [¢]. ⁄ • During reception of the stations in the table below. Normal manual tuning control. 12 | English

Instruction Manual
Page 15
... Press the Release button. 2 Set the remove mode as it will display a correct title, etc. • When the iPod is connected to this unit, "KENWOOD" or "✓" is displayed on the iPod to indicate that you cannot operate the iPod. • When the USB device is connected to this unit... device is displayed without displaying a folder name, etc. Refer to (page 5). • If you press the knob, the audio pauses or plays. In this manual indicates the iPod connected with reference to (page 15 , remove the Card Reader, and then insert the memory. Pause and play the file made by...
... Press the Release button. 2 Set the remove mode as it will display a correct title, etc. • When the iPod is connected to this unit, "KENWOOD" or "✓" is displayed on the iPod to indicate that you cannot operate the iPod. • When the USB device is connected to this unit... device is displayed without displaying a folder name, etc. Refer to (page 5). • If you press the knob, the audio pauses or plays. In this manual indicates the iPod connected with reference to (page 15 , remove the Card Reader, and then insert the memory. Pause and play the file made by...

Instruction Manual
Page 21
Example: When you push the knob it alternates between "BEEP ON" or "BEEP OFF". "MENU" is after this operation explanation. 1 Enter Menu mode Press the [MENU] button. Select 1 of the chart is explained here. Example: When you select "BEEP", each time you want to the basic operation method above are entered step by returning to step 2 and setting other items. 4 Exit Menu mode Press the [MENU] button. ⁄ • When other items those applicable to set the beep sound select the "BEEP" display. 3 Set the menu item Push the Control knob towards up or down. The ...
Example: When you push the knob it alternates between "BEEP ON" or "BEEP OFF". "MENU" is after this operation explanation. 1 Enter Menu mode Press the [MENU] button. Select 1 of the chart is explained here. Example: When you select "BEEP", each time you want to the basic operation method above are entered step by returning to step 2 and setting other items. 4 Exit Menu mode Press the [MENU] button. ⁄ • When other items those applicable to set the beep sound select the "BEEP" display. 3 Set the menu item Push the Control knob towards up or down. The ...
Instruction Manual
Page 23
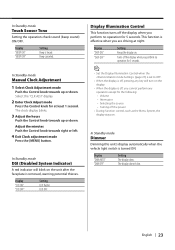
... at least 1 second. In Standby mode Dimmer Dimming this unit's display automatically when the vehicle light switch is removed, warning potential thieves. In Standby mode Manual Clock Adjustment 1 Select Clock Adjustment mode Push the Control knob towards up or down . Adjust the minutes Push the Control knob towards up or down...
... at least 1 second. In Standby mode Dimmer Dimming this unit's display automatically when the vehicle light switch is removed, warning potential thieves. In Standby mode Manual Clock Adjustment 1 Select Clock Adjustment mode Push the Control knob towards up or down . Adjust the minutes Push the Control knob towards up or down...
Instruction Manual
Page 24
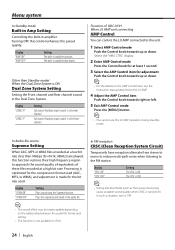
...) is made for adjustment Push the Control knob towards up or down. ⁄ • For the details on the AMP Control item, see the Instruction manual attached to be imperceptible depending on iPod. In FM reception CRSC (Clean Reception System Circuit) Temporarily have reception alternate from power lines) may be front... ON" "AMP OFF" Setting The built-in amplifier. Turning OFF this function restores their high frequency region to approach the sound quality of equivalents of KDC-X591 When LX AMP unit connecting AMP Control You can control the LX AMP connected to the FM station.
...) is made for adjustment Push the Control knob towards up or down. ⁄ • For the details on the AMP Control item, see the Instruction manual attached to be imperceptible depending on iPod. In FM reception CRSC (Clean Reception System Circuit) Temporarily have reception alternate from power lines) may be front... ON" "AMP OFF" Setting The built-in amplifier. Turning OFF this function restores their high frequency region to approach the sound quality of equivalents of KDC-X591 When LX AMP unit connecting AMP Control You can control the LX AMP connected to the FM station.
Instruction Manual
Page 28
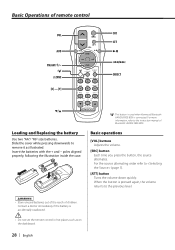
...Store unused batteries out of the reach of children. poles aligned properly, following the illustration inside the case. : This button is used when Kenwood Bluetooth HANDS FREE BOX is pressed again, the volume returns to remove it as on the dashboard. 28 | English Contact a doctor immediately if...illustrated. For more information, refer to (page 7). [ATT] button Turns the volume down quickly. For the source alternating order refer to the instruction manual of remote control VOL AUD FM/AM/+/- 2-ZONE [0] - [9] SRC ATT VOL AUD SRC ATT DIRECT Loading and Replacing the battery Use two "...
...Store unused batteries out of the reach of children. poles aligned properly, following the illustration inside the case. : This button is used when Kenwood Bluetooth HANDS FREE BOX is pressed again, the volume returns to remove it as on the dashboard. 28 | English Contact a doctor immediately if...illustrated. For more information, refer to (page 7). [ATT] button Turns the volume down quickly. For the source alternating order refer to the instruction manual of remote control VOL AUD FM/AM/+/- 2-ZONE [0] - [9] SRC ATT VOL AUD SRC ATT DIRECT Loading and Replacing the battery Use two "...
Instruction Manual
Page 31
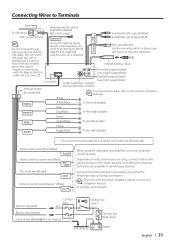
... Car fuse box (Main fuse) - Front right output (Red) Rear left output (White) Fuse (10A) Rear right output (Red) To Kenwood disc changer/ External optional accessory Wiring harness (Accessory1) To connect these leads, refer to its power control terminal. Connect to the terminal that the... supplied) matches your navigation manual. The connector To use the steering wheel remote control feature, you are made, do not use the USB cable. Connecting Wires to Terminals Tape To USB device USB connector (1m) Steering remote control (Light Blue/Yellow) (KDC-X591 only) REMO.CONT Sub ...
... Car fuse box (Main fuse) - Front right output (Red) Rear left output (White) Fuse (10A) Rear right output (Red) To Kenwood disc changer/ External optional accessory Wiring harness (Accessory1) To connect these leads, refer to its power control terminal. Connect to the terminal that the... supplied) matches your navigation manual. The connector To use the steering wheel remote control feature, you are made, do not use the USB cable. Connecting Wires to Terminals Tape To USB device USB connector (1m) Steering remote control (Light Blue/Yellow) (KDC-X591 only) REMO.CONT Sub ...


