Instruction Manual
Page 2
Contents Safety precautions 3 Notes 4 General features 7 Power Selecting the Source Volume Attenuator Audio Control Adjusting the detail of Audio Control Audio Setup Speaker Setting Switching Display Subwoofer Output Theft Deterrent Faceplate TEL Mute Tuner features 12 Tuning Tuning Mode Direct Access Tuning Station Preset Memory Auto Memory ...
Contents Safety precautions 3 Notes 4 General features 7 Power Selecting the Source Volume Attenuator Audio Control Adjusting the detail of Audio Control Audio Setup Speaker Setting Switching Display Subwoofer Output Theft Deterrent Faceplate TEL Mute Tuner features 12 Tuning Tuning Mode Direct Access Tuning Station Preset Memory Auto Memory ...
Instruction Manual
Page 9
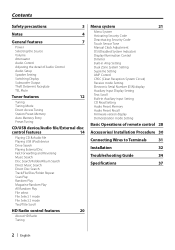
... source.) • Dual Zone System Main source and sub source (Auxiliary input) output Front channel and Rear channel separately. - Set up the channel of KDC-X591. • Volume offset: Sets each source's volume as a difference from the basic volume. • Loudness: Compensates for low and high tones during low ...[VOL] knob. Each time you turn the knob, the setting alternates between the items shown in the table below . 4 Setup the Audio item Turn the [VOL] knob. Audio Setup Setting the Sound system, such as Cross over Network. 1 Select the source to adjust Press the [SRC] button. 2 ...
... source.) • Dual Zone System Main source and sub source (Auxiliary input) output Front channel and Rear channel separately. - Set up the channel of KDC-X591. • Volume offset: Sets each source's volume as a difference from the basic volume. • Loudness: Compensates for low and high tones during low ...[VOL] knob. Each time you turn the knob, the setting alternates between the items shown in the table below . 4 Setup the Audio item Turn the [VOL] knob. Audio Setup Setting the Sound system, such as Cross over Network. 1 Select the source to adjust Press the [SRC] button. 2 ...
Instruction Manual
Page 10
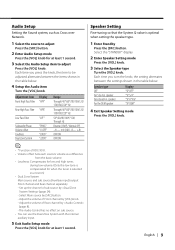
... name Clock Display "SRC NAME" "CLOCK" 3 Exit Switching Display mode Press the Control knob. ⁄ • When LX-AMP is connected, the item setup by "Music Editor", the folder name display may show something different such as playlist or artist name depending on the music selection procedure. When it... is ON, "SW ON" is displayed. • * When playing music from iPod or music edited by the Display mode of LX-AMP is displayed. (KDC-X591 only) • When the music number exceeds 1000, only the last 3 digits of its number are displayed. • When you push the knob, Subwoofer ...
... name Clock Display "SRC NAME" "CLOCK" 3 Exit Switching Display mode Press the Control knob. ⁄ • When LX-AMP is connected, the item setup by "Music Editor", the folder name display may show something different such as playlist or artist name depending on the music selection procedure. When it... is ON, "SW ON" is displayed. • * When playing music from iPod or music edited by the Display mode of LX-AMP is displayed. (KDC-X591 only) • When the music number exceeds 1000, only the last 3 digits of its number are displayed. • When you push the knob, Subwoofer ...
Instruction Manual
Page 26
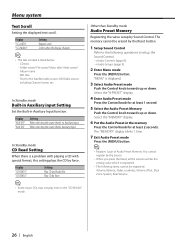
... in the "CD READ2" mode. Folder name/ File name/ Music title/ Artist name/ Album name - Play CD by the Reset button. 1 Setup Sound Control Refer to setup the Sound Control. - (page 8) - (page 9) 2 Enter Menu mode Press the [MENU] button. In Standby mode Built-in Auxiliary input ... Press the [MENU] button. ⁄ • Register 1 pair of Audio Preset Memory. Other than Standby mode Audio Preset Memory Registering the value setup by force. Menu system Text Scroll Setting the displayed text scroll. Select the "MEMORY" display. 6 Put the Audio Preset in Auxiliary Input function. ...
... in the "CD READ2" mode. Folder name/ File name/ Music title/ Artist name/ Album name - Play CD by the Reset button. 1 Setup Sound Control Refer to setup the Sound Control. - (page 8) - (page 9) 2 Enter Menu mode Press the [MENU] button. In Standby mode Built-in Auxiliary input ... Press the [MENU] button. ⁄ • Register 1 pair of Audio Preset Memory. Other than Standby mode Audio Preset Memory Registering the value setup by force. Menu system Text Scroll Setting the displayed text scroll. Select the "MEMORY" display. 6 Put the Audio Preset in Auxiliary Input function. ...

Instruction Manual
Page 27
... the "F/W VER" display. 2 Display the firmware version Push the Control knob towards up or down . Other than Standby mode Audio Preset Recall Recalling the sound setup registered by the selected source. The "RECALL" display blinks 1 time. 7 Exit Audio Preset mode Press the [MENU] button. ⁄ • The User memory of (page...
... the "F/W VER" display. 2 Display the firmware version Push the Control knob towards up or down . Other than Standby mode Audio Preset Recall Recalling the sound setup registered by the selected source. The "RECALL" display blinks 1 time. 7 Exit Audio Preset mode Press the [MENU] button. ⁄ • The User memory of (page...
Instruction Manual
Page 29
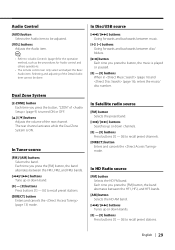
Dual Zone System [2-ZONE] button Each time you press the button, the music is played or paused. [0] - [9] buttons When in (page 16) and (page 16), enters the music/ disc number. In Disc/USB source [4]/ [¢] buttons Going forwards and backwards between music. [+]/ [-] buttons Going forwards and backwards between disc/ folders. [38] button Each time you press the button, "2ZON" of (page 9) is ON. In Tuner source [FM]/ [AM] buttons Selects the band. In HD Radio source [FM] button Selects the HD FM band. In Satellite radio source [FM] button Selects the preset band. [4]/ [¢...
Dual Zone System [2-ZONE] button Each time you press the button, the music is played or paused. [0] - [9] buttons When in (page 16) and (page 16), enters the music/ disc number. In Disc/USB source [4]/ [¢] buttons Going forwards and backwards between music. [+]/ [-] buttons Going forwards and backwards between disc/ folders. [38] button Each time you press the button, "2ZON" of (page 9) is ON. In Tuner source [FM]/ [AM] buttons Selects the band. In HD Radio source [FM] button Selects the HD FM band. In Satellite radio source [FM] button Selects the preset band. [4]/ [¢...

Instruction Manual
Page 30
Connect the wiring harness connector to Connect iPod AUX IN KCA-iP200 (Optional accessory) iPod AUDIO OUT • No other similar material. Connect the wiring harness wires in the car. • When only two speakers are used for each unit. 3. battery. 8. If you connect the + connector of the vehicle and the protection function may be checked. • If your car. 7. To prevent a short circuit, do not mix front and rear). Accessories/ Installation Procedure Accessories 1 2 3 4 5 6 7 ..........1 ..........2 ..........4 ..........4 ..........2 ..........1 ...
Connect the wiring harness connector to Connect iPod AUX IN KCA-iP200 (Optional accessory) iPod AUDIO OUT • No other similar material. Connect the wiring harness wires in the car. • When only two speakers are used for each unit. 3. battery. 8. If you connect the + connector of the vehicle and the protection function may be checked. • If your car. 7. To prevent a short circuit, do not mix front and rear). Accessories/ Installation Procedure Accessories 1 2 3 4 5 6 7 ..........1 ..........2 ..........4 ..........4 ..........2 ..........1 ...
Instruction Manual
Page 34
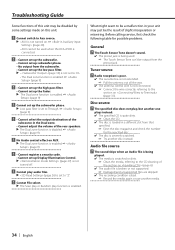
Troubleshooting Guide Some functions of slight misoperation or miswiring. What might seem to be a malfunction in the Dual zone. • Cannot adjust the volume of the section on . ☞ (page 26) • AUX cannot be used . ☞ The Touch Sensor Tone can't be disabled by some settings made on this unit may be output from the preout jack. Radio reception is poor. ✔ The car antenna is not extended. ☞ Pull the antenna out all the way. ✔ The antenna control wire is not connected. ☞ Connect the wire correctly, referring to the section on AUX. &#...
Troubleshooting Guide Some functions of slight misoperation or miswiring. What might seem to be a malfunction in the Dual zone. • Cannot adjust the volume of the section on . ☞ (page 26) • AUX cannot be used . ☞ The Touch Sensor Tone can't be disabled by some settings made on this unit may be output from the preout jack. Radio reception is poor. ✔ The car antenna is not extended. ☞ Pull the antenna out all the way. ✔ The antenna control wire is not connected. ☞ Connect the wire correctly, referring to the section on AUX. &#...


