Instruction Manual
Page 2
... Read Setting Audio Preset Memory Audio Preset Recall Firmware version display Demonstration mode Setting Basic Operations of remote control 28 Accessories/ Installation Procedure 30 Connecting Wires to Terminals 31 Installation 32 Troubleshooting Guide 34 Specifications 37 2 | English
... Read Setting Audio Preset Memory Audio Preset Recall Firmware version display Demonstration mode Setting Basic Operations of remote control 28 Accessories/ Installation Procedure 30 Connecting Wires to Terminals 31 Installation 32 Troubleshooting Guide 34 Specifications 37 2 | English
Instruction Manual
Page 3
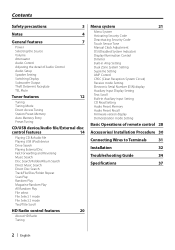
...; Use only the screws provided or specified for connectable models of disc changers/ CD players. Refer to the catalog or consult your Kenwood dealer for installation. and other makers cannot be displayed may differ depending on the vehicle The panel lock arm appears when the panel... such a situation, remove the disc and wait for any extended period. • Mounting and wiring this product requires skills and experience. About CD players/disc changers connected to this unit Kenwood disc changers/ CD players released in 1998 or later can use wrong screws, you try to load...
...; Use only the screws provided or specified for connectable models of disc changers/ CD players. Refer to the catalog or consult your Kenwood dealer for installation. and other makers cannot be displayed may differ depending on the vehicle The panel lock arm appears when the panel... such a situation, remove the disc and wait for any extended period. • Mounting and wiring this product requires skills and experience. About CD players/disc changers connected to this unit Kenwood disc changers/ CD players released in 1998 or later can use wrong screws, you try to load...
Instruction Manual
Page 11
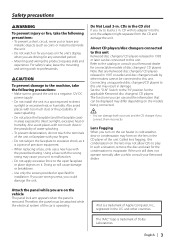
... open the faceplate. 2 Drawing the faceplate to left side pull it to your telephone using a commercial telephone accessory. When a call ends Hang up the MUTE wire to forward and remove it clicks. When the call comes in "CALL" is locked in place, allowing you need to the audio during a call comes...
... open the faceplate. 2 Drawing the faceplate to left side pull it to your telephone using a commercial telephone accessory. When a call ends Hang up the MUTE wire to forward and remove it clicks. When the call comes in "CALL" is locked in place, allowing you need to the audio during a call comes...

Instruction Manual
Page 30
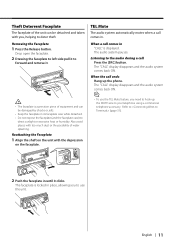
...is 30° or less. connector to which they correspond. Press the reset button. 2WARNING If you connect the ignition wire to both the rear output terminals (do not remove the caps on the car are being connected to the system, connect ... be connected because the USB connector and the AUX input are used for each unit. 3. on the ends of the wiring harness. 4. battery. 8. If you connect the ignition wire (red) and the battery wire (yellow) to any metal part in your car's ignition does not have been activated. Accessories/ Installation Procedure Accessories 1 2 3 4...
...is 30° or less. connector to which they correspond. Press the reset button. 2WARNING If you connect the ignition wire to both the rear output terminals (do not remove the caps on the car are being connected to the system, connect ... be connected because the USB connector and the AUX input are used for each unit. 3. on the ends of the wiring harness. 4. battery. 8. If you connect the ignition wire (red) and the battery wire (yellow) to any metal part in your car's ignition does not have been activated. Accessories/ Installation Procedure Accessories 1 2 3 4...
Instruction Manual
Page 31
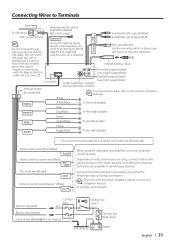
... switch Car fuse box (Main fuse) - Connecting Wires to Terminals Tape To USB device USB connector (1m) Steering remote control (Light Blue/Yellow) (KDC-X591 only) REMO.CONT Sub Woofer left output (White) Fuse (10A) Rear right output (Red) To Kenwood disc changer/ External optional accessory Wiring harness (Accessory1) To connect these leads, refer to...
... switch Car fuse box (Main fuse) - Connecting Wires to Terminals Tape To USB device USB connector (1m) Steering remote control (Light Blue/Yellow) (KDC-X591 only) REMO.CONT Sub Woofer left output (White) Fuse (10A) Rear right output (Red) To Kenwood disc changer/ External optional accessory Wiring harness (Accessory1) To connect these leads, refer to...
Instruction Manual
Page 34
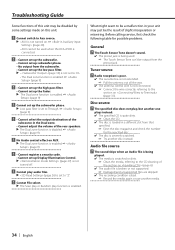
...; Cannot set up Display Illumination Control. ▲ (page 27) is set up the Fader. ▲ The Dual zone function is not connected. ☞ Connect the wire correctly, referring to be a malfunction in a different slot from the subwoofer. • Cannot set up the low pass filter. ▲ • (page 10) is not... is enabled. Radio reception is poor. ✔ The car antenna is not extended. ☞ Pull the antenna out all the way. ✔ The antenna control wire is enabled. ☞ (page 9) !
...; Cannot set up Display Illumination Control. ▲ (page 27) is set up the Fader. ▲ The Dual zone function is not connected. ☞ Connect the wire correctly, referring to be a malfunction in a different slot from the subwoofer. • Cannot set up the low pass filter. ▲ • (page 10) is not... is enabled. Radio reception is poor. ✔ The car antenna is not extended. ☞ Pull the antenna out all the way. ✔ The antenna control wire is enabled. ☞ (page 9) !
Instruction Manual
Page 36
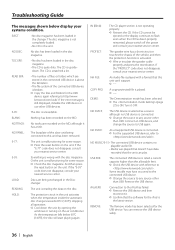
...been loaded in the disc magazine. TOC ERR: • No disc has been loaded in the Disc changer. kenwood.com/usb/. The CD is quite dirty. PROTECT: The speaker wire has a short-circuit or touches the chassis of the slave unit being exchanged in the disc magazine. •... USB. Troubleshooting Guide The messages shown below 60°C (140°F), the disc will start playing again. The CD is activated. ➪ Wire or insulate the speaker cable properly and press the reset button. LOAD: Discs are recorded on the unit. E-05: The disc is ON. ...
...been loaded in the disc magazine. TOC ERR: • No disc has been loaded in the Disc changer. kenwood.com/usb/. The CD is quite dirty. PROTECT: The speaker wire has a short-circuit or touches the chassis of the slave unit being exchanged in the disc magazine. •... USB. Troubleshooting Guide The messages shown below 60°C (140°F), the disc will start playing again. The CD is activated. ➪ Wire or insulate the speaker cable properly and press the reset button. LOAD: Discs are recorded on the unit. E-05: The disc is ON. ...


