Instruction Manual
Page 1
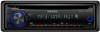
...the model and serial numbers whenever you obtain the best performance from that to radio or television reception, which the receiver is not installed and used in the spaces designated on , or inside the product relating to correct the interference by turning the equipment off and...to decrease harmful influence on , the user is made. However, there is no guarantee that Kenwood manufactured this product so as to radio communications, if it is connected. KDC-148 KDC-108 KDC-MP148CR CD-RECEIVER INSTRUCTION MANUAL AMPLI-TUNER LECTEUR DE CD MODE D'EMPLOI REPRODUCTOR DE DISCOS COMPACTOS ...
...the model and serial numbers whenever you obtain the best performance from that to radio or television reception, which the receiver is not installed and used in the spaces designated on , or inside the product relating to correct the interference by turning the equipment off and...to decrease harmful influence on , the user is made. However, there is no guarantee that Kenwood manufactured this product so as to radio communications, if it is connected. KDC-148 KDC-108 KDC-MP148CR CD-RECEIVER INSTRUCTION MANUAL AMPLI-TUNER LECTEUR DE CD MODE D'EMPLOI REPRODUCTOR DE DISCOS COMPACTOS ...
Instruction Manual
Page 2
...the disc and wait for the moisture to know... When you purchase external components, check with your Kenwood dealer to make sure that you experience problems during installation, consult your unit How to prepare the remote controller (RC-405) Basic operations 4 Getting started...remote controller (RC-405) Listening to the other external components 9 Function settings 10 Troubleshooting 11 Installation/connection 12 Basic procedure Warning Caution Wiring connection Installing the unit Specifications 15 WARNING Stop the car before operating the unit. This unit can hear ...
...the disc and wait for the moisture to know... When you purchase external components, check with your Kenwood dealer to make sure that you experience problems during installation, consult your unit How to prepare the remote controller (RC-405) Basic operations 4 Getting started...remote controller (RC-405) Listening to the other external components 9 Function settings 10 Troubleshooting 11 Installation/connection 12 Basic procedure Warning Caution Wiring connection Installing the unit Specifications 15 WARNING Stop the car before operating the unit. This unit can hear ...
Instruction Manual
Page 12
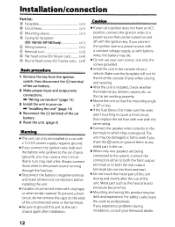
... a fire. Use only the screws provided. If you experience problems during and shortly after installation. For safety's sake, leave this work if you may be installed in the car. Installation/connection Part list: A Faceplate 1) B Escutcheon 1) C Mounting sleeve 1) D Casing for faceplate (KDC-148/ KDC-MP148CR only 1) E Wiring harness 1) F Removal tool 2) G Flat head screw (for ... the car chassis (ground), you share the · wires or ground them to any ) when closing and opening. Caution If your Kenwood dealer. 12 Always connect those wires to which they correspond.
... a fire. Use only the screws provided. If you experience problems during and shortly after installation. For safety's sake, leave this work if you may be installed in the car. Installation/connection Part list: A Faceplate 1) B Escutcheon 1) C Mounting sleeve 1) D Casing for faceplate (KDC-148/ KDC-MP148CR only 1) E Wiring harness 1) F Removal tool 2) G Flat head screw (for ... the car chassis (ground), you share the · wires or ground them to any ) when closing and opening. Caution If your Kenwood dealer. 12 Always connect those wires to which they correspond.
Instruction Manual
Page 14
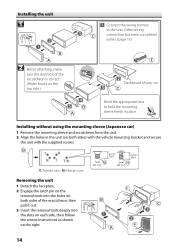
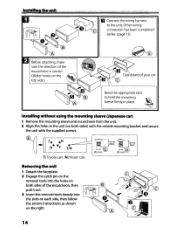
Installing without using the mounting sleeve (Japanese car) 1 Remove the mounting sleeve and escutcheon from the unit. 2 Align the holes in the unit (on the top .... 2 Engage the catch pin on the removal tools into the slots on each side, then follow the arrows instructions as shown on the right. 14 Installing the unit 1 Connect the wiring harness to hold the mounting sleeve firmly in place.
Installing without using the mounting sleeve (Japanese car) 1 Remove the mounting sleeve and escutcheon from the unit. 2 Align the holes in the unit (on the top .... 2 Engage the catch pin on the removal tools into the slots on each side, then follow the arrows instructions as shown on the right. 14 Installing the unit 1 Connect the wiring harness to hold the mounting sleeve firmly in place.
Instruction Manual
Page 15
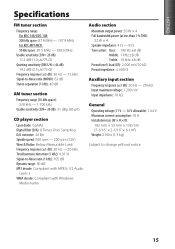
ENGLISH Specifications FM tuner section Frequency range: For KDC-148/ KDC-108: 200 kHz space: 87.9 MHz - 107.9 MHz For KDC-MP148CR: 50 kHz space: 87.5 MHz - 108.0 MHz Usable sensitivity (S/N= 26 dB): 11.2 dBf (1.0 μV/75 Ω) Quieting sensitivity (DIN S/N = 46 dB): 19... 20 Hz - 20 kHz Input maximum voltage: 1 200 mV Input impedance: 10 kΩ General Operating voltage (11 V - 16 V allowable): 14.4 V Maximum current consumption: 10 A Installation size (W × H × D): 182 mm × 53 mm × 158 mm (7-3/16" × 2-1/16" × 6-1/4") Weight: 2.9 lbs (1.3 kg) Subject to change without...
ENGLISH Specifications FM tuner section Frequency range: For KDC-148/ KDC-108: 200 kHz space: 87.9 MHz - 107.9 MHz For KDC-MP148CR: 50 kHz space: 87.5 MHz - 108.0 MHz Usable sensitivity (S/N= 26 dB): 11.2 dBf (1.0 μV/75 Ω) Quieting sensitivity (DIN S/N = 46 dB): 19... 20 Hz - 20 kHz Input maximum voltage: 1 200 mV Input impedance: 10 kΩ General Operating voltage (11 V - 16 V allowable): 14.4 V Maximum current consumption: 10 A Installation size (W × H × D): 182 mm × 53 mm × 158 mm (7-3/16" × 2-1/16" × 6-1/4") Weight: 2.9 lbs (1.3 kg) Subject to change without...
User Manual
Page 1
.... Model KDC-148/ KDC-108/ KDC-MP148CR Serial number _ US Residents Only Register Online i;\~~";~~:r"¥":.:'~:~\h~I~\~,1~'''I~I t~:~;~~~~§m\.~;/ ~~!~~\i.'\1~ ~' ~.~!i~ 1 ~~~;1j © 2010 Kenwood Corporation All Rights Reserved. Familiarity with installation and operation procedures will help you call upon your records Record the serial number, found on the back of the unit, in the space provided below. KENWOOD KDC-148 KDC-108 KDC-MP148CR CD...
.... Model KDC-148/ KDC-108/ KDC-MP148CR Serial number _ US Residents Only Register Online i;\~~";~~:r"¥":.:'~:~\h~I~\~,1~'''I~I t~:~;~~~~§m\.~;/ ~~!~~\i.'\1~ ~' ~.~!i~ 1 ~~~;1j © 2010 Kenwood Corporation All Rights Reserved. Familiarity with installation and operation procedures will help you call upon your records Record the serial number, found on the back of the unit, in the space provided below. KENWOOD KDC-148 KDC-108 KDC-MP148CR CD...
User Manual
Page 2
This may collect on the actual equipment. • If you experience problems during installation, consult your Kenwood dealer. • When you purchase external components, check with your Kenwood dealer to evaporate. • This unit can hear sounds outside the car. Driving with your model and in your area. • Detailed information and notes ...
This may collect on the actual equipment. • If you experience problems during installation, consult your Kenwood dealer. • When you purchase external components, check with your Kenwood dealer to evaporate. • This unit can hear sounds outside the car. Driving with your model and in your area. • Detailed information and notes ...
User Manual
Page 12
...terminals (do not remove the caps on the ends of your Kenwood dealer. 12 Use only the screws provided. • Install this unit during installation, consult your vehicle. "Wiring connection" (page 13) 3 Install the unit to cause a short circuit, then replace the ...Do not use of the car battery. 2 Make proper input and output wire connections. ... Installation/connection Part list: ® Faceplate (xl) ® Escutcheon (xl) © Mounting sleeve (xl) @ Casing for faceplate (KDC-148/ KDC-MP148CR only) (xl) ® Wiring harness (xl) ® Removal tool (x2) &#...
...terminals (do not remove the caps on the ends of your Kenwood dealer. 12 Use only the screws provided. • Install this unit during installation, consult your vehicle. "Wiring connection" (page 13) 3 Install the unit to cause a short circuit, then replace the ...Do not use of the car battery. 2 Make proper input and output wire connections. ... Installation/connection Part list: ® Faceplate (xl) ® Escutcheon (xl) © Mounting sleeve (xl) @ Casing for faceplate (KDC-148/ KDC-MP148CR only) (xl) ® Wiring harness (xl) ® Removal tool (x2) &#...
User Manual
Page 14
"II;1S~!!!~.J.:t:.;h:;c!~u::n::.:i:.:t""' "hilii"""'..r"'t ' _' .. T: Toyota cars, N. o Connectthe wiring harness to hold the mounting \.~ sleeve firmly in place. ~ Installing without using the mounting sleeve (Japanese car) 1 Remove the mounting sleeve and escutcheon from the unit. 2 Align the holes in the unit (on the right, ...
"II;1S~!!!~.J.:t:.;h:;c!~u::n::.:i:.:t""' "hilii"""'..r"'t ' _' .. T: Toyota cars, N. o Connectthe wiring harness to hold the mounting \.~ sleeve firmly in place. ~ Installing without using the mounting sleeve (Japanese car) 1 Remove the mounting sleeve and escutcheon from the unit. 2 Align the holes in the unit (on the right, ...
User Manual
Page 15
Specifications FM tuner section Frequency range: For KDC-l481 KDC-108: 200 kHz space: 87.9 MHz For KDC-MPl48CR: 107.9 MHz 50 kHz space: 87.5 MHz - 108.0 MHz Usable sensitivity (S/N= 26 dB): 11.2 dBf (1.0 INI7s 0) QUieting sensitivity (DIN SIN = 46 dB): 192 dBf (2.5 ...;3 dB): 20 Hz - 20 kHz Input maximum voltage: 1 200 mV Input impedance: 10 kO General Operating voltage (11 V-16 Vallowable): 14.4 V Maximum current consumption: 10 A Installation size (W x Hx D): 182 mm x 53 mm x 158 mm (7-3/16" x 2-1116" x 6-1/4") Weight: 2.91bs (1.3 kg) Subject to change without notice. 15
Specifications FM tuner section Frequency range: For KDC-l481 KDC-108: 200 kHz space: 87.9 MHz For KDC-MPl48CR: 107.9 MHz 50 kHz space: 87.5 MHz - 108.0 MHz Usable sensitivity (S/N= 26 dB): 11.2 dBf (1.0 INI7s 0) QUieting sensitivity (DIN SIN = 46 dB): 192 dBf (2.5 ...;3 dB): 20 Hz - 20 kHz Input maximum voltage: 1 200 mV Input impedance: 10 kO General Operating voltage (11 V-16 Vallowable): 14.4 V Maximum current consumption: 10 A Installation size (W x Hx D): 182 mm x 53 mm x 158 mm (7-3/16" x 2-1116" x 6-1/4") Weight: 2.91bs (1.3 kg) Subject to change without notice. 15

User Manual
Page 16
... to Part 15 of the FCC Rules. Changes or modifications to laser product safety. However, there is no guarantee that Kenwood manufactured this equipment if an unauthorized change or modification is made. If this equipment does cause harmful interference to radio or television...labels on a circuit different from that to operate this product so as to provide reasonable protection against harmful interference in a particular installation. CAUTION Use of controls or adjustments or performance of procedures other than those specified herein may generate or use radio frequency energy...
... to Part 15 of the FCC Rules. Changes or modifications to laser product safety. However, there is no guarantee that Kenwood manufactured this equipment if an unauthorized change or modification is made. If this equipment does cause harmful interference to radio or television...labels on a circuit different from that to operate this product so as to provide reasonable protection against harmful interference in a particular installation. CAUTION Use of controls or adjustments or performance of procedures other than those specified herein may generate or use radio frequency energy...
User Manual
Page 18
...CORPORATION WHO IS PROTECTED This warranty is discussed in the next section 01 this warranty. INSTALLATION OR REMOVAL CHARGES, DAMAGE TO OTHER PROPERTY CAUSED BY ANY DEFECTS IN KENWOOD CAR STEREO COMPONENTS, DAMAGES BASED UPON INCONVENIENCE, LOSS OF USE OF THE PRODUCT; Take ...BE LIABLE FOR 1. Evenluais reparos realizados no produto durante 0 perfodo de garantia nao implicam na dilatacao do produto. Installation or removal of original purchase. e. JVC KENWOOD DO BRASIL COMERCIO DE ELECTRONICOS LTDA. PERioDO DE GARANTIA Este produto egarantido pelo prazo de 01 (um) ano, ...
...CORPORATION WHO IS PROTECTED This warranty is discussed in the next section 01 this warranty. INSTALLATION OR REMOVAL CHARGES, DAMAGE TO OTHER PROPERTY CAUSED BY ANY DEFECTS IN KENWOOD CAR STEREO COMPONENTS, DAMAGES BASED UPON INCONVENIENCE, LOSS OF USE OF THE PRODUCT; Take ...BE LIABLE FOR 1. Evenluais reparos realizados no produto durante 0 perfodo de garantia nao implicam na dilatacao do produto. Installation or removal of original purchase. e. JVC KENWOOD DO BRASIL COMERCIO DE ELECTRONICOS LTDA. PERioDO DE GARANTIA Este produto egarantido pelo prazo de 01 (um) ano, ...
User Manual
Page 20
...subject to the following in accordance with the visual inspection of the authorized Kenwood Service Center: • Improper maintenance or repair, including the installation of parts or accessories that is due to obtain Kenwood warranty service. 1. Voltage conversions. 2. Periodic check-ups which the serial... country is proud of the Quality and workmanship of anew Kenwood brand product,. military exchange service overseas may be performed at our potion, and shall not include damages of this warranty. 1. Installation and/or removal charges. 6. Make your unit available to...
...subject to the following in accordance with the visual inspection of the authorized Kenwood Service Center: • Improper maintenance or repair, including the installation of parts or accessories that is due to obtain Kenwood warranty service. 1. Voltage conversions. 2. Periodic check-ups which the serial... country is proud of the Quality and workmanship of anew Kenwood brand product,. military exchange service overseas may be performed at our potion, and shall not include damages of this warranty. 1. Installation and/or removal charges. 6. Make your unit available to...


