Instruction Manual
Page 2
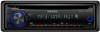
Driving with : The illustrations in this case, remove the disc and wait for the moisture to evaporate. This unit can hear sounds outside the car. Caution: Adjust the volume so that they work with your Kenwood dealer to make sure that you experience problems during installation... moisture may differ from what appears on the illustrations may collect on the laser lens. When you purchase external components, check with your Kenwood dealer. Important to know... CONTENTS Safety Safety 2 Preparation 3 How to attach/detach the faceplate How to reset your area. To prevent...
Driving with : The illustrations in this case, remove the disc and wait for the moisture to evaporate. This unit can hear sounds outside the car. Caution: Adjust the volume so that they work with your Kenwood dealer to make sure that you experience problems during installation... moisture may differ from what appears on the illustrations may collect on the laser lens. When you purchase external components, check with your Kenwood dealer. Important to know... CONTENTS Safety Safety 2 Preparation 3 How to attach/detach the faceplate How to reset your area. To prevent...
Instruction Manual
Page 4
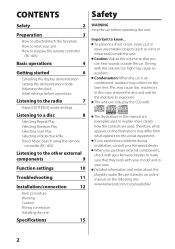
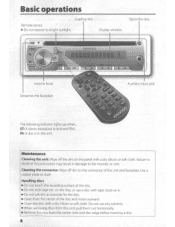
... operations Loading slot Remote sensor Do not expose to observe this unit, pull them out horizontally. Cleaning the connector: Wipe off the dirt on it. Remove the rims from the center of the disc and move outward. on the connector of the disc. Clean from the center hole and disc edge... on the disc, or use any accessories for the disc. Failure to bright sunlight. Do not use a disc with a dry silicon or soft cloth. When removing discs from this precaution may result in the unit.
... operations Loading slot Remote sensor Do not expose to observe this unit, pull them out horizontally. Cleaning the connector: Wipe off the dirt on it. Remove the rims from the center of the disc and move outward. on the connector of the disc. Clean from the center hole and disc edge... on the disc, or use any accessories for the disc. Failure to bright sunlight. Do not use a disc with a dry silicon or soft cloth. When removing discs from this precaution may result in the unit.
Instruction Manual
Page 12
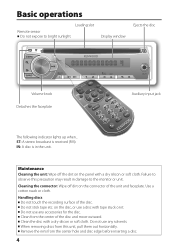
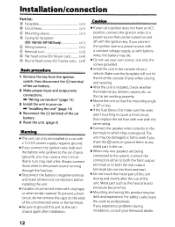
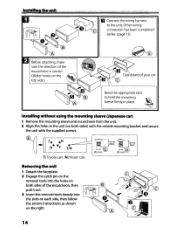
...the mounting angle is installed, check whether the brake lamps, blinkers, wipers, etc. Install this unit during installation, consult your Kenwood dealer. 12 After the unit is 30° or less. on the car are being connected to the system, connect ... A Faceplate 1) B Escutcheon 1) C Mounting sleeve 1) D Casing for faceplate (KDC-148/ KDC-MP148CR only 1) E Wiring harness 1) F Removal tool 2) G Flat head screw (for Nissan cars 4) H Round head screw (for Toyota cars).... (×4) Basic procedure 1 Remove the key from the ignition switch, then disconnect the · terminal of the ...
...the mounting angle is installed, check whether the brake lamps, blinkers, wipers, etc. Install this unit during installation, consult your Kenwood dealer. 12 After the unit is 30° or less. on the car are being connected to the system, connect ... A Faceplate 1) B Escutcheon 1) C Mounting sleeve 1) D Casing for faceplate (KDC-148/ KDC-MP148CR only 1) E Wiring harness 1) F Removal tool 2) G Flat head screw (for Nissan cars 4) H Round head screw (for Toyota cars).... (×4) Basic procedure 1 Remove the key from the ignition switch, then disconnect the · terminal of the ...
Instruction Manual
Page 14
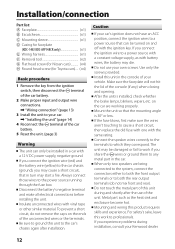
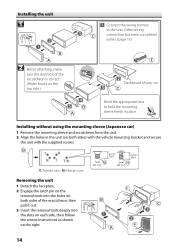
...the direction of the escutcheon is correct. (Wider hooks on the top side.) Dashboard of the escutcheon, then pull it out. 3 Insert the removal tools deeply into the holes on both sides) with the vehicle mounting bracket and secure the unit with the supplied screws. N: Nissan cars...each side, then follow the arrows instructions as shown on the right. 14 T: Toyota cars ; Installing without using the mounting sleeve (Japanese car) 1 Remove the mounting sleeve and escutcheon from the unit. 2 Align the holes in place. Installing the unit 1 Connect the wiring harness to hold the mounting ...
...the direction of the escutcheon is correct. (Wider hooks on the top side.) Dashboard of the escutcheon, then pull it out. 3 Insert the removal tools deeply into the holes on both sides) with the vehicle mounting bracket and secure the unit with the supplied screws. N: Nissan cars...each side, then follow the arrows instructions as shown on the right. 14 T: Toyota cars ; Installing without using the mounting sleeve (Japanese car) 1 Remove the mounting sleeve and escutcheon from the unit. 2 Align the holes in place. Installing the unit 1 Connect the wiring harness to hold the mounting ...
User Manual
Page 2
... purchase external components, check with your area. • Detailed information and notes about the playable audio files are stated in this case, remove the disc and wait for the moisture to explain more clearly how the controls are examples used to evaporate. • This unit can... Caution Wiring connection Installing the unit Specifications 15 WARNING Stop the car before operating the unit. This may collect on the follOWing site: www.kenwood.com/cs/ce/audiofile/ 2 Driving with the volume too high may cause an accident. • Condensation: When the car is airconditioned, ...
... purchase external components, check with your area. • Detailed information and notes about the playable audio files are stated in this case, remove the disc and wait for the moisture to explain more clearly how the controls are examples used to evaporate. • This unit can... Caution Wiring connection Installing the unit Specifications 15 WARNING Stop the car before operating the unit. This may collect on the follOWing site: www.kenwood.com/cs/ce/audiofile/ 2 Driving with the volume too high may cause an accident. • Condensation: When the car is airconditioned, ...
User Manual
Page 4
...use a disc with a dry silicon or soft cloth. Failure to bright sunlight. Use a cotton swab or cloth. Do not use any solvents. • When removing discs from this precaution may result in the unit. Basic operations Loading slot Remote sensor • Do not expose to observe this unit, pull them... out horizontally. • Remove the rims from the center of the disc and move outward. • Clean the disc with tape stuck on the connector of the disc. &#...
...use a disc with a dry silicon or soft cloth. Failure to bright sunlight. Use a cotton swab or cloth. Do not use any solvents. • When removing discs from this precaution may result in the unit. Basic operations Loading slot Remote sensor • Do not expose to observe this unit, pull them... out horizontally. • Remove the rims from the center of the disc and move outward. • Clean the disc with tape stuck on the connector of the disc. &#...
User Manual
Page 12
...For safety's sake, leave this unit during installation, consult your vehicle. "Installing the unit" (page 14) 8 4 Reconnect the terminal of your Kenwood dealer. 12 To prevent a short circuit, do not mix front and rear). • Do not touch the metal part of the unit. ...Installation/connection Part list: ® Faceplate (xl) ® Escutcheon (xl) © Mounting sleeve (xl) @ Casing for faceplate (KDC-148/ KDC-MP148CR only) (xl) ® Wiring harness (xl) ® Removal tool (x2) ® Flat head screw (for Nissan cars) (x4) (8) Round head screw (for Toyota cars) (x4...
...For safety's sake, leave this unit during installation, consult your vehicle. "Installing the unit" (page 14) 8 4 Reconnect the terminal of your Kenwood dealer. 12 To prevent a short circuit, do not mix front and rear). • Do not touch the metal part of the unit. ...Installation/connection Part list: ® Faceplate (xl) ® Escutcheon (xl) © Mounting sleeve (xl) @ Casing for faceplate (KDC-148/ KDC-MP148CR only) (xl) ® Wiring harness (xl) ® Removal tool (x2) ® Flat head screw (for Nissan cars) (x4) (8) Round head screw (for Toyota cars) (x4...
User Manual
Page 14
... unit 1 Detach the faceplate. 2 Engage the catch pin on the removal tools into the slots on each side, then follow the arrows instructions as shown on the right, 14 T: Toyota cars, N. "II;1S~!!!~.J.:t:.;h:;c!~u::n::.:i:.:t""' "hilii"""'..r"'t...@N N@@T @ TIN MAX. !dsmMmAX. 0SHmmG 05:-.m.:;" H . o Connectthe wiring harness to hold the mounting \.~ sleeve firmly in place. ~ Installing without using the mounting sleeve (Japanese car) 1 Remove the mounting sleeve and escutcheon from the unit. 2 Align the holes in the unit (on both sides of the escutcheon, then pull it out. 3 Insert...
... unit 1 Detach the faceplate. 2 Engage the catch pin on the removal tools into the slots on each side, then follow the arrows instructions as shown on the right, 14 T: Toyota cars, N. "II;1S~!!!~.J.:t:.;h:;c!~u::n::.:i:.:t""' "hilii"""'..r"'t...@N N@@T @ TIN MAX. !dsmMmAX. 0SHmmG 05:-.m.:;" H . o Connectthe wiring harness to hold the mounting \.~ sleeve firmly in place. ~ Installing without using the mounting sleeve (Japanese car) 1 Remove the mounting sleeve and escutcheon from the unit. 2 Align the holes in the unit (on both sides of the escutcheon, then pull it out. 3 Insert...
User Manual
Page 18
...for all detects in material and workmanship in Ihe U.S.A. lrom an authorized Kenwood car stereo dealer or an automobile dealer, unless the product is enforceable only by the original purchaser. Installation or removal of original purchase. OR 2. ANY OTHER DAMAGES, WHETHER INCIDENTAL, CONSEQUENTIAL OR... vary from state to your units are covered by Kenwood or which the serial number has been defaced, modilied or removed. 3. INSTALLATION OR REMOVAL CHARGES, DAMAGE TO OTHER PROPERTY CAUSED BY ANY DEFECTS IN KENWOOD CAR STEREO COMPONENTS, DAMAGES BASED UPON INCONVENIENCE, LOSS OF...
...for all detects in material and workmanship in Ihe U.S.A. lrom an authorized Kenwood car stereo dealer or an automobile dealer, unless the product is enforceable only by the original purchaser. Installation or removal of original purchase. OR 2. ANY OTHER DAMAGES, WHETHER INCIDENTAL, CONSEQUENTIAL OR... vary from state to your units are covered by Kenwood or which the serial number has been defaced, modilied or removed. 3. INSTALLATION OR REMOVAL CHARGES, DAMAGE TO OTHER PROPERTY CAUSED BY ANY DEFECTS IN KENWOOD CAR STEREO COMPONENTS, DAMAGES BASED UPON INCONVENIENCE, LOSS OF...
User Manual
Page 20
... accordance with instructions furnished, it was shipped to you are not covered by the warranty. 3. WARRANTY FOR MILITARY MARKET Kenwood corporation is limited to the carrier). • Damages or deteriorations resulling from removal and/ or replacement. If properly installed and operated in materials or workmanship. The following in materials and workmanship of...
... accordance with instructions furnished, it was shipped to you are not covered by the warranty. 3. WARRANTY FOR MILITARY MARKET Kenwood corporation is limited to the carrier). • Damages or deteriorations resulling from removal and/ or replacement. If properly installed and operated in materials or workmanship. The following in materials and workmanship of...


