Instruction Manual
Page 1
... the best performance from that to laser product safety. Model KDC-148/ KDC-108/ KDC-MP148CR Serial number US Residents Only Register Online Register your Kenwood dealer for help you call upon your Kenwood product at www.Kenwoodusa.com © 2010 Kenwood Corporation All Rights Reserved. Location : Top Panel FCC WARNING...by one or more of the following are reproductions of labels on, or inside the product relating to which can be determined by turning the equipment off and on a circuit different from your records Record the serial number, found to read through this equipment if ...
... the best performance from that to laser product safety. Model KDC-148/ KDC-108/ KDC-MP148CR Serial number US Residents Only Register Online Register your Kenwood dealer for help you call upon your Kenwood product at www.Kenwoodusa.com © 2010 Kenwood Corporation All Rights Reserved. Location : Top Panel FCC WARNING...by one or more of the following are reproductions of labels on, or inside the product relating to which can be determined by turning the equipment off and on a circuit different from your records Record the serial number, found to read through this equipment if ...
Instruction Manual
Page 5
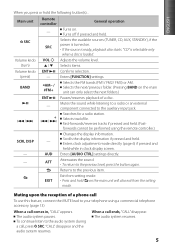
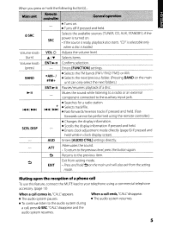
... button(s)... The audio system resumes. 5 ENGLISH When you press or hold on the main unit will also exit from setting mode. Turns on the main unit can only select the next folders.) ENT Pauses/resumes playback of a phone call comes in clock display screen.... (Pressing BAND on . Exit from the setting mode. "CALL" disappear and the audio system resumes. Main unit Remote controller General operation - Turns off if pressed and held . (Fastforwards cannot be performed using a commercial telephone accessory. (page 13) When a call To use this feature,...
... button(s)... The audio system resumes. 5 ENGLISH When you press or hold on the main unit will also exit from setting mode. Turns on the main unit can only select the next folders.) ENT Pauses/resumes playback of a phone call comes in clock display screen.... (Pressing BAND on . Exit from the setting mode. "CALL" disappear and the audio system resumes. Main unit Remote controller General operation - Turns off if pressed and held . (Fastforwards cannot be performed using a commercial telephone accessory. (page 13) When a call To use this feature,...
Instruction Manual
Page 6
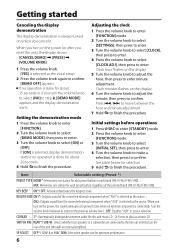
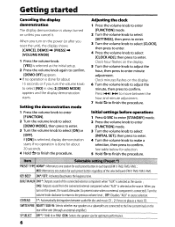
... if no external component is connected). Adjusting the clock 1 Press the volume knob to enter [FUNCTION] mode. 2 Turn the volume knob to select [SETTINGS], then press to enter. 3 Turn the volume knob to select [CLOCK], then press to enter. 4 Press the volume knob to select [CLOCK ADJ],...the unit), the display shows: [CANCEL DEMO] \ [PRESS] \ [VOLUME KNOB] 1 Press the volume knob. [YES] is selected as a music CD. When you turn on the rear of the unit (through an external amplifier). CD READ 1*: Automatically distinguishes between the hour and minute adjustment. 7 Hold to play as the...
... if no external component is connected). Adjusting the clock 1 Press the volume knob to enter [FUNCTION] mode. 2 Turn the volume knob to select [SETTINGS], then press to enter. 3 Turn the volume knob to select [CLOCK], then press to enter. 4 Press the volume knob to select [CLOCK ADJ],...the unit), the display shows: [CANCEL DEMO] \ [PRESS] \ [VOLUME KNOB] 1 Press the volume knob. [YES] is selected as a music CD. When you turn on the rear of the unit (through an external amplifier). CD READ 1*: Automatically distinguishes between the hour and minute adjustment. 7 Hold to play as the...
Instruction Manual
Page 7
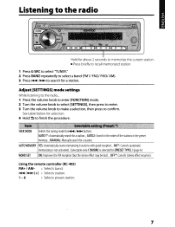
... may be lost). ; Adjust [SETTINGS] mode settings While listening to the radio... 1 Press the volume knob to enter [FUNCTION] mode. 2 Turn the volume knob to select [SETTINGS], then press to enter. 3 Turn the volume knob to make a selection, then press to finish the procedure. See table below for selection. 4 Hold to confirm...
... may be lost). ; Adjust [SETTINGS] mode settings While listening to the radio... 1 Press the volume knob to enter [FUNCTION] mode. 2 Turn the volume knob to select [SETTINGS], then press to enter. 3 Turn the volume knob to make a selection, then press to finish the procedure. See table below for selection. 4 Hold to confirm...
Instruction Manual
Page 8
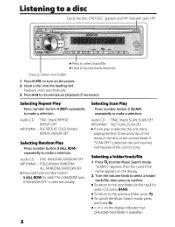
... unit starts playing the first 10-second intro of the current song. If "SCAN OFF" is selected initially. Selecting a folder/track/file 1 Press to turn on the display. 2 Turn the volume knob to select a folder/ track/file, then press to make a selection. Press to select next folder. 1 Press SRC to enter Music...
... unit starts playing the first 10-second intro of the current song. If "SCAN OFF" is selected initially. Selecting a folder/track/file 1 Press to turn on the display. 2 Turn the volume knob to select a folder/ track/file, then press to make a selection. Press to select next folder. 1 Press SRC to enter Music...
Instruction Manual
Page 9
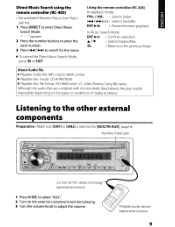
...Although the audio files are complied with the standards listed above, the play maybe impossible depending on the external component and start playing. 3 Turn the volume knob to search for the music. ENGLISH Direct Music Search using the remote controller (RC-405) • Not available if ...selected for [BUILTIN AUX]. (page 6) Auxiliary input jack 3.5 mm (3/16") stereo mini plug (optional accessory) 1 Press SRC to select "AUX." 2 Turn on the types or conditions of media or device. To cancel the Direct Music Search Mode, press or EXIT. Portable audio device (optional accessory) 9 ...
...Although the audio files are complied with the standards listed above, the play maybe impossible depending on the external component and start playing. 3 Turn the volume knob to search for the music. ENGLISH Direct Music Search using the remote controller (RC-405) • Not available if ...selected for [BUILTIN AUX]. (page 6) Auxiliary input jack 3.5 mm (3/16") stereo mini plug (optional accessory) 1 Press SRC to select "AUX." 2 Turn on the types or conditions of media or device. To cancel the Direct Music Search Mode, press or EXIT. Portable audio device (optional accessory) 9 ...
Instruction Manual
Page 10
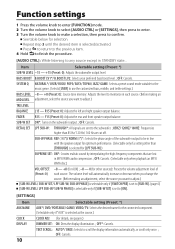
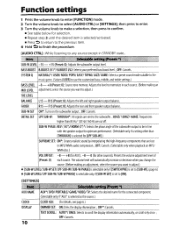
... BALANCE FADER L15 - OFF: Cancels. Function settings 1 Press the volume knob to enter [FUNCTION] mode. 2 Turn the volume knob to select [AUDIO CTRL] or [SETTINGS], then press to enter. 3 Turn the volume knob to make a selection, then press to [ON]. [SETTINGS] Item Selectable setting (Preset: *) ...selected as the source.) CLOCK CLOCK ADJ: (For details, see page 6.) DISPLAY DIMMER SET: ON: Dims the display illumination. ; SUB-W SET ON*: Turns on the subwoofer output. ; See table below for other than 85 Hz/ 120 Hz/ 160 Hz are sent to the subwoofer. ; 85HZ/ 120HZ/...
... BALANCE FADER L15 - OFF: Cancels. Function settings 1 Press the volume knob to enter [FUNCTION] mode. 2 Turn the volume knob to select [AUDIO CTRL] or [SETTINGS], then press to enter. 3 Turn the volume knob to make a selection, then press to [ON]. [SETTINGS] Item Selectable setting (Preset: *) ...selected as the source.) CLOCK CLOCK ADJ: (For details, see page 6.) DISPLAY DIMMER SET: ON: Dims the display illumination. ; SUB-W SET ON*: Turns on the subwoofer output. ; See table below for other than 85 Hz/ 120 Hz/ 160 Hz are sent to the subwoofer. ; 85HZ/ 120HZ/...
Instruction Manual
Page 11
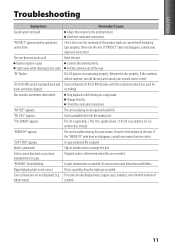
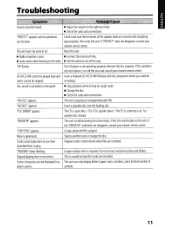
... done. Static noise while listening to play back as you used for some reason. Pull the antenna out all . If the condition did not improve, turn off the unit and consult your nearest service center. "NA FILE" appears. Insert a playable disc into the loading slot. "TOC ERROR" appears. "ERROR 99" appears...
... done. Static noise while listening to play back as you used for some reason. Pull the antenna out all . If the condition did not improve, turn off the unit and consult your nearest service center. "NA FILE" appears. Insert a playable disc into the loading slot. "TOC ERROR" appears. "ERROR 99" appears...
Instruction Manual
Page 12
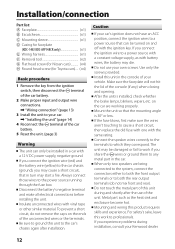
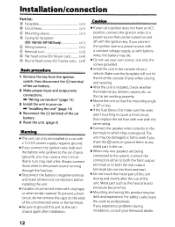
...To prevent a short circuit, do not mix front and rear). Mount the unit so that can only be turned on the ends of your Kenwood dealer. 12 If the fuse blows, first make all electrical connections before installing the unit. Metal part such... unit may be damaged or fail to work to professionals. Installation/connection Part list: A Faceplate 1) B Escutcheon 1) C Mounting sleeve 1) D Casing for faceplate (KDC-148/ KDC-MP148CR only 1) E Wiring harness 1) F Removal tool 2) G Flat head screw (for Nissan cars 4) H Round head screw (for Toyota cars).... (×4) Basic...
...To prevent a short circuit, do not mix front and rear). Mount the unit so that can only be turned on the ends of your Kenwood dealer. 12 If the fuse blows, first make all electrical connections before installing the unit. Metal part such... unit may be damaged or fail to work to professionals. Installation/connection Part list: A Faceplate 1) B Escutcheon 1) C Mounting sleeve 1) D Casing for faceplate (KDC-148/ KDC-MP148CR only 1) E Wiring harness 1) F Removal tool 2) G Flat head screw (for Nissan cars 4) H Round head screw (for Toyota cars).... (×4) Basic...
User Manual
Page 5
"CO" is selectable only when a disc is turned on . • Turns off if pressed and held . (Fast- IfCALL" disappear and the audio system resumes. forwards cannot be performed using a commercial telephone accessory. (page 13) When a call ... BAND on the main unit will also exit from setting mode. • Press and hold the following button(s) ... (!) SRC Volume knob (turn) Volume knob (press) BAND ~II SCRL DISP • Turns on . • If the source is ready, playback also starts. Returns to the previous level, press the button again. ATT Attenuates...
"CO" is selectable only when a disc is turned on . • Turns off if pressed and held . (Fast- IfCALL" disappear and the audio system resumes. forwards cannot be performed using a commercial telephone accessory. (page 13) When a call ... BAND on the main unit will also exit from setting mode. • Press and hold the following button(s) ... (!) SRC Volume knob (turn) Volume knob (press) BAND ~II SCRL DISP • Turns on . • If the source is ready, playback also starts. Returns to the previous level, press the button again. ATT Attenuates...
User Manual
Page 6
...noise when no external component is done for each band (FM1/ FM2/ FM3/ AM).; KEY BEEP ON*/ OFF: Activates/deactivates the keypress tone. S Turn the volume knob to adjust the hour, then press to confirm. Initial settings before operations 1 Press t!) SRC to enter [STANDBY] mode. 2 Press... the rear ofthe unit (through an external amplifier). BUILTIN AUX ON1 *: Outputs sound ofthe connected external component when"AUX" is always turned on the display. 6 Turn the volume knob to adjust the minute, then press to select [NO] in step 2, [DEMO MODE] appears and the display demonstration...
...noise when no external component is done for each band (FM1/ FM2/ FM3/ AM).; KEY BEEP ON*/ OFF: Activates/deactivates the keypress tone. S Turn the volume knob to adjust the hour, then press to confirm. Initial settings before operations 1 Press t!) SRC to enter [STANDBY] mode. 2 Press... the rear ofthe unit (through an external amplifier). BUILTIN AUX ON1 *: Outputs sound ofthe connected external component when"AUX" is always turned on the display. 6 Turn the volume knob to adjust the minute, then press to select [NO] in step 2, [DEMO MODE] appears and the display demonstration...
User Manual
Page 7
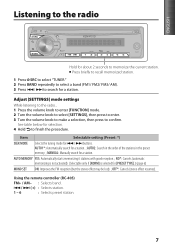
.... 1- 6 : Selects preset station. 7 Adjust [SETTINGS] mode settings While listening to the radio... 1 Press the volume knob to enter [FUNCTION] mode. 2 Turn the volume knob to select [SETTINGS], then press to enter. 3 Turn the volume knob to make a selection, then press to finish the procedure. Listening to the radio Hold for about 2 seconds...
.... 1- 6 : Selects preset station. 7 Adjust [SETTINGS] mode settings While listening to the radio... 1 Press the volume knob to enter [FUNCTION] mode. 2 Turn the volume knob to select [SETTINGS], then press to enter. 3 Turn the volume knob to make a selection, then press to finish the procedure. Listening to the radio Hold for about 2 seconds...
User Manual
Page 8
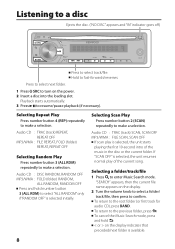
...8226; If scan play of the music in the disc or the current folder. "SEARCH" appears, then the current file name appears on the display. 2 Turn the volume knob to select a folder/ track/file, then press to confirm. • To return to the root folder (or first track for audio CD... folder, press~. • To cancel the Music Search mode, press and hold~. • < or > on the power. 2 Insert a disc into the loading slot. to turn on . Press to select next folder. 1 Press c.!> SRC to enter Music Search mode. Listening to a disc Ejects the disc. ("NO DISC appears and "IN" indicator...
...8226; If scan play of the music in the disc or the current folder. "SEARCH" appears, then the current file name appears on the display. 2 Turn the volume knob to select a folder/ track/file, then press to confirm. • To return to the root folder (or first track for audio CD... folder, press~. • To cancel the Music Search mode, press and hold~. • < or > on the power. 2 Insert a disc into the loading slot. to turn on . Press to select next folder. 1 Press c.!> SRC to enter Music Search mode. Listening to a disc Ejects the disc. ("NO DISC appears and "IN" indicator...
User Manual
Page 9
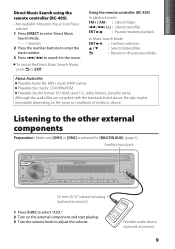
...~ to search for [BUILTIN AUXl (page 6) Auxiliary input jack 3.5 mm (3/16") stereo mini plug (optional accessory) 1 Press SRC to select "AUX." 2 Turn on the types or conditions of media or device. About Audio file • Playable Audio file: MP3 (.mp3), WMA (.wma) • Playable disc media:.... Although the audio files are complied with the standards listed above, the play maybe impossible depending on the external component and start playing. 3 Turn the volume knob to the previous folder. In Music Search Mode: ENT ~II : Confirms selection. ... Using the remote controller (RC-405...
...~ to search for [BUILTIN AUXl (page 6) Auxiliary input jack 3.5 mm (3/16") stereo mini plug (optional accessory) 1 Press SRC to select "AUX." 2 Turn on the types or conditions of media or device. About Audio file • Playable Audio file: MP3 (.mp3), WMA (.wma) • Playable disc media:.... Although the audio files are complied with the standards listed above, the play maybe impossible depending on the external component and start playing. 3 Turn the volume knob to the previous folder. In Music Search Mode: ENT ~II : Confirms selection. ... Using the remote controller (RC-405...
User Manual
Page 10
SUB-WSET ON *: Turns on the subwoofer output. ; OFF: Cancels. OFF: Cancels. (Selectable only when playback an MP3/ WMA disc.) VOL OFFSET: -8 - +8 (for AUX) ; -8 - 0 (for other than 85 Hz/ ... AUX*I ONCE: Selects to memorize in each source. Function settings 1 Press the volume knob to enter [FUNCTION] mode. 2 Turn the volume knob to select [AUDIO CTRL] or [SETTINGS], then press to enter. 3 Turn the volume knob to make a selection, then press to confirm. • See table below for selection. • Repeat step...
SUB-WSET ON *: Turns on the subwoofer output. ; OFF: Cancels. OFF: Cancels. (Selectable only when playback an MP3/ WMA disc.) VOL OFFSET: -8 - +8 (for AUX) ; -8 - 0 (for other than 85 Hz/ ... AUX*I ONCE: Selects to memorize in each source. Function settings 1 Press the volume knob to enter [FUNCTION] mode. 2 Turn the volume knob to select [AUDIO CTRL] or [SETTINGS], then press to enter. 3 Turn the volume knob to make a selection, then press to confirm. • See table below for selection. • Repeat step...
User Manual
Page 11
..., and alimited number of the speaker leads are not displayed (e.g. The unit does not work at all the way. If the condition did not improve, turn off the unit and consult your nearest service center. "NO DISCII appears. The unit is determined when files are recorded. "COpy PROII appears. Acopy-protected...
..., and alimited number of the speaker leads are not displayed (e.g. The unit does not work at all the way. If the condition did not improve, turn off the unit and consult your nearest service center. "NO DISCII appears. The unit is determined when files are recorded. "COpy PROII appears. Acopy-protected...
User Manual
Page 12
...the brake lamps, blinkers, wipers, etc. Make sure the faceplate will not hit the lid of the console (if any metal part in turn may die. • Do not use of your car. ... "Wiring connection" (page 13) 3 Install the unit to both the rear...sake, leave this unit during installation, consult your Kenwood dealer. 12 Metal part such as with battery wires, the battery may start a fire. Installation/connection Part list: ® Faceplate (xl) ® Escutcheon (xl) © Mounting sleeve (xl) @ Casing for faceplate (KDC-148/ KDC-MP148CR only) (xl) ® Wiring harness...
...the brake lamps, blinkers, wipers, etc. Make sure the faceplate will not hit the lid of the console (if any metal part in turn may die. • Do not use of your car. ... "Wiring connection" (page 13) 3 Install the unit to both the rear...sake, leave this unit during installation, consult your Kenwood dealer. 12 Metal part such as with battery wires, the battery may start a fire. Installation/connection Part list: ® Faceplate (xl) ® Escutcheon (xl) © Mounting sleeve (xl) @ Casing for faceplate (KDC-148/ KDC-MP148CR only) (xl) ® Wiring harness...

User Manual
Page 16
...more ofthe following are reproductions of labels on the environment. However, there is no guarantee that to which can be determined by turning the equipment off and on, the user is encouraged to try to radio communications, if it is made. This symbol mark indicates that....21 CFR. 1040. 10, CHAPTER 1, SUBCHAPTER J. CAUTION Use of controls or adjustments or performance of the FCC Rules. Kenwood Corporation 2967-3, ISHIKAWA-MACHI, HACHIOJI-SHI TOKYO, JAPAN KENWOOD CORP. The user could lose the authority to operate this product so as to decrease harmful influence on , or inside the...
...more ofthe following are reproductions of labels on the environment. However, there is no guarantee that to which can be determined by turning the equipment off and on, the user is encouraged to try to radio communications, if it is made. This symbol mark indicates that....21 CFR. 1040. 10, CHAPTER 1, SUBCHAPTER J. CAUTION Use of controls or adjustments or performance of the FCC Rules. Kenwood Corporation 2967-3, ISHIKAWA-MACHI, HACHIOJI-SHI TOKYO, JAPAN KENWOOD CORP. The user could lose the authority to operate this product so as to decrease harmful influence on , or inside the...


