Instruction Manual
Page 2
...or metal tools) inside the unit. In this manual are examples used . When you purchase external components, check with your Kenwood dealer to the other external components 9 Function settings 10 Troubleshooting 11 Installation/connection 12 Basic procedure Warning Caution Wiring connection Installing...WARNING Stop the car before operating the unit. CONTENTS Safety Safety 2 Preparation 3 How to attach/detach the faceplate How to reset your unit How to prepare the remote controller (RC-405) Basic operations 4 Getting started 6 Canceling the display demonstration Setting the...
...or metal tools) inside the unit. In this manual are examples used . When you purchase external components, check with your Kenwood dealer to the other external components 9 Function settings 10 Troubleshooting 11 Installation/connection 12 Basic procedure Warning Caution Wiring connection Installing...WARNING Stop the car before operating the unit. CONTENTS Safety Safety 2 Preparation 3 How to attach/detach the faceplate How to reset your unit How to prepare the remote controller (RC-405) Basic operations 4 Getting started 6 Canceling the display demonstration Setting the...
Instruction Manual
Page 3
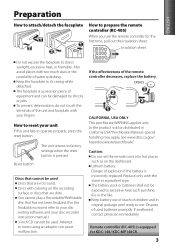
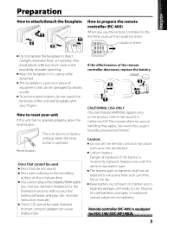
...If the effectiveness of water splashing. Caution: Do not set the remote control in original package until ready to use the remote controller for KDC-148/ KDC-MP148CR. 3 Keep battery out of reach of used . Dispose of children and in hot places such as on the recording surface or ... is equipped for the first time, pull out the insulation sheet. Replace only with your unit If this unit fails to operate properly, press the reset button. ENGLISH Preparation How to attach/detach the faceplate 1 1 2 2 How to prepare the remote controller (RC-405) When you use . Remote ...
...If the effectiveness of water splashing. Caution: Do not set the remote control in original package until ready to use the remote controller for KDC-148/ KDC-MP148CR. 3 Keep battery out of reach of used . Dispose of children and in hot places such as on the recording surface or ... is equipped for the first time, pull out the insulation sheet. Replace only with your unit If this unit fails to operate properly, press the reset button. ENGLISH Preparation How to attach/detach the faceplate 1 1 2 2 How to prepare the remote controller (RC-405) When you use . Remote ...
Instruction Manual
Page 6
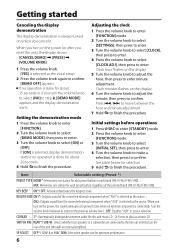
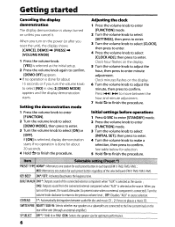
.... 5 Turn the volume knob to adjust the hour, then press to enter minute adjustment. MIX: Memorizes one station for about 15 seconds or if you reset the unit), the display shows: [CANCEL DEMO] \ [PRESS] \ [VOLUME KNOB] 1 Press the volume knob. [YES] is selected as the initial setup. 2 Press the volume knob...
.... 5 Turn the volume knob to adjust the hour, then press to enter minute adjustment. MIX: Memorizes one station for about 15 seconds or if you reset the unit), the display shows: [CANCEL DEMO] \ [PRESS] \ [VOLUME KNOB] 1 Press the volume knob. [YES] is selected as the initial setup. 2 Press the volume knob...
Instruction Manual
Page 11
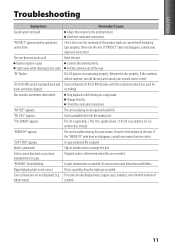
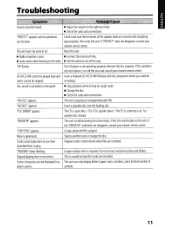
..." appears. Do not use too many hierarchies and folders. Pull the antenna out all . The CD player is played. recording). Press the reset button on rough roads. If the "ERROR 99" code does not disappear, consult your nearest service center. A copy-protected file is not operating... to the optimum level. Check the cords and connections. The unit is required. Noise is poor. Change the disc. "TOC ERROR" appears. Reset the unit. Radio reception is generated. Longer readout time is malfunctioning for tracks cannot be done. "IN" flashes. CD-R/CD-RW cannot be...
..." appears. Do not use too many hierarchies and folders. Pull the antenna out all . The CD player is played. recording). Press the reset button on rough roads. If the "ERROR 99" code does not disappear, consult your nearest service center. A copy-protected file is not operating... to the optimum level. Check the cords and connections. The unit is required. Noise is poor. Change the disc. "TOC ERROR" appears. Reset the unit. Radio reception is generated. Longer readout time is malfunctioning for tracks cannot be done. "IN" flashes. CD-R/CD-RW cannot be...
Instruction Manual
Page 12
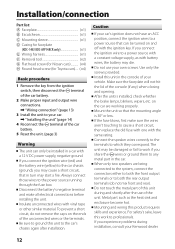
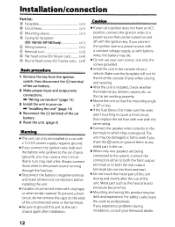
.../connection Part list: A Faceplate 1) B Escutcheon 1) C Mounting sleeve 1) D Casing for faceplate (KDC-148/ KDC-MP148CR only 1) E Wiring harness 1) F Removal tool 2) G Flat head screw (for Nissan cars...and shortly after installation. Make sure the faceplate will not hit the lid of the car battery. 5 Reset the unit. (page 3) Warning The unit can be damaged or fail to work to a power ...you share the · wires or ground them to the car's chassis again after the use your Kenwood dealer. 12 Metal part such as with vinyl tape or other similar material. Do not touch the ...
.../connection Part list: A Faceplate 1) B Escutcheon 1) C Mounting sleeve 1) D Casing for faceplate (KDC-148/ KDC-MP148CR only 1) E Wiring harness 1) F Removal tool 2) G Flat head screw (for Nissan cars...and shortly after installation. Make sure the faceplate will not hit the lid of the car battery. 5 Reset the unit. (page 3) Warning The unit can be damaged or fail to work to a power ...you share the · wires or ground them to the car's chassis again after the use your Kenwood dealer. 12 Metal part such as with vinyl tape or other similar material. Do not touch the ...
User Manual
Page 2
...Safety 2 Preparation 3 How to attach/detach the faceplate How to reset your area. • Detailed information and notes about the playable audio... may differ from what appears on the actual equipment. • If you experience problems during installation, consult your Kenwood dealer. • When you can only play the CDs with the volume too high may cause an accident. ... the car is airconditioned, moisture may cause disc read errors. This may collect on the follOWing site: www.kenwood.com/cs/ce/audiofile/ 2 In this case, remove the disc and wait for the moisture to the other...
...Safety 2 Preparation 3 How to attach/detach the faceplate How to reset your area. • Detailed information and notes about the playable audio... may differ from what appears on the actual equipment. • If you experience problems during installation, consult your Kenwood dealer. • When you can only play the CDs with the volume too high may cause an accident. ... the car is airconditioned, moisture may cause disc read errors. This may collect on the follOWing site: www.kenwood.com/cs/ce/audiofile/ 2 In this case, remove the disc and wait for the moisture to the other...
User Manual
Page 3
...terminals of the unit and faceplate with your unit If this unit fails to factory settings when the reset button is incorrectly replaced. If swallowed contact physician immediately. Reset button The unit returns to operate properly, press the reset button. Replace only with coloring on the dashboard. • Lithium battery. How to... reset your fingers. Preparation if AA.t\ J1&4 n&at1l1i&lli&£ 1 n 1 1~UL:111 IbI!Ullfi\M\ll'Mlllliilt umn JII~ mmr.m,.., n n _1111 Ui• • Iii - ...
...terminals of the unit and faceplate with your unit If this unit fails to factory settings when the reset button is incorrectly replaced. If swallowed contact physician immediately. Reset button The unit returns to operate properly, press the reset button. Replace only with coloring on the dashboard. • Lithium battery. How to... reset your fingers. Preparation if AA.t\ J1&4 n&at1l1i&lli&£ 1 n 1 1~UL:111 IbI!Ullfi\M\ll'Mlllliilt umn JII~ mmr.m,.., n n _1111 Ui• • Iii - ...
User Manual
Page 6
... READ 1*: Automatically distinguishes between the hour and minute adjustment. 7 Hold ~ to select [NO] in step 2, [DEMO MODE] appears and the display demonstration starts. When you reset the unit), the display shows: [CANCEL DEMO] ~ [PRESS] ~ [VOLUME KNOB] 1 Press the volume knob. [YES] is selected as the source. ; SP SELECT OFF*/ 5/4/ 6x 9/6/ OEM...
... READ 1*: Automatically distinguishes between the hour and minute adjustment. 7 Hold ~ to select [NO] in step 2, [DEMO MODE] appears and the display demonstration starts. When you reset the unit), the display shows: [CANCEL DEMO] ~ [PRESS] ~ [VOLUME KNOB] 1 Press the volume knob. [YES] is selected as the source. ; SP SELECT OFF*/ 5/4/ 6x 9/6/ OEM...
User Manual
Page 11
... be played back and Insert afinalized CD-R/CD-RW (finalize with insulating tape properly, then reset the unit. "TOC ERRORII appears. Insert aplayable disc into the loading slot. Press the reset button on rough roads. • Change the disc. • Check the cords and ...skipped. IIPROTECTII appears and no operations can only display letters (upper case), numbers, and alimited number of the speaker leads are recorded. Reset the unit. • Radio reception is generated. The unit is played. Playback order is malfunctioning for tracks cannot be done. Reinsert the...
... be played back and Insert afinalized CD-R/CD-RW (finalize with insulating tape properly, then reset the unit. "TOC ERRORII appears. Insert aplayable disc into the loading slot. Press the reset button on rough roads. • Change the disc. • Check the cords and ...skipped. IIPROTECTII appears and no operations can only display letters (upper case), numbers, and alimited number of the speaker leads are recorded. Reset the unit. • Radio reception is generated. The unit is played. Playback order is malfunctioning for tracks cannot be done. Reinsert the...
User Manual
Page 12
... Part list: ® Faceplate (xl) ® Escutcheon (xl) © Mounting sleeve (xl) @ Casing for faceplate (KDC-148/ KDC-MP148CR only) (xl) ® Wiring harness (xl) ® Removal tool (x2) ® Flat head screw (for ... (x4) 1 Remove the key from the ignition 8 switch, then disconnect the terminal of the car battery. 5 Reset the unit. (page 3) • The unit can only be installed in a car with a 12 V DC power... (page 13) 3 Install the unit to the car's chassis again after the use your Kenwood dealer. 12 Make sure the faceplate will not hit the lid of the unit. on and...
... Part list: ® Faceplate (xl) ® Escutcheon (xl) © Mounting sleeve (xl) @ Casing for faceplate (KDC-148/ KDC-MP148CR only) (xl) ® Wiring harness (xl) ® Removal tool (x2) ® Flat head screw (for ... (x4) 1 Remove the key from the ignition 8 switch, then disconnect the terminal of the car battery. 5 Reset the unit. (page 3) • The unit can only be installed in a car with a 12 V DC power... (page 13) 3 Install the unit to the car's chassis again after the use your Kenwood dealer. 12 Make sure the faceplate will not hit the lid of the unit. on and...


