Instruction Manual
Page 2
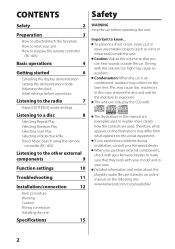
...How to prepare the remote controller (RC-405) Basic operations 4 Getting started 6 Canceling the display demonstration Setting the demonstration mode Adjusting the clock Initial settings before operating the unit. To prevent a short circuit, never put or leave any metallic objects (such as coins or metal tools...) inside the unit. Therefore, what appears on the following site: www.kenwood.com/cs/ce/audiofile/ 2 Detailed information and notes about the playable audio files are used to know... Condensation: When the car is ...
...How to prepare the remote controller (RC-405) Basic operations 4 Getting started 6 Canceling the display demonstration Setting the demonstration mode Adjusting the clock Initial settings before operating the unit. To prevent a short circuit, never put or leave any metallic objects (such as coins or metal tools...) inside the unit. Therefore, what appears on the following site: www.kenwood.com/cs/ce/audiofile/ 2 Detailed information and notes about the playable audio files are used to know... Condensation: When the car is ...
Instruction Manual
Page 5
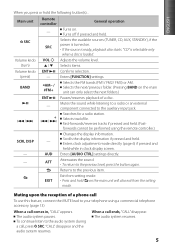
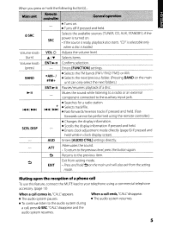
...following button(s)... "CALL" disappear and the audio system resumes. Fast-forwards/reverses tracks if pressed and held while in , "CALL" appears. Enters clock adjustment mode directly (page 6) if pressed and held . (Fastforwards cannot be performed using a commercial telephone accessory. (page 13) When a call ... a disc is turned on the main unit can only select the next folders.) ENT Pauses/resumes playback of a phone call comes in clock display screen. - Selects the next/previous folder. (Pressing BAND on . • If the source is ready, playback also starts. SRC...
...following button(s)... "CALL" disappear and the audio system resumes. Fast-forwards/reverses tracks if pressed and held while in , "CALL" appears. Enters clock adjustment mode directly (page 6) if pressed and held . (Fastforwards cannot be performed using a commercial telephone accessory. (page 13) When a call ... a disc is turned on the main unit can only select the next folders.) ENT Pauses/resumes playback of a phone call comes in clock display screen. - Selects the next/previous folder. (Pressing BAND on . • If the source is ready, playback also starts. SRC...
Instruction Manual
Page 6
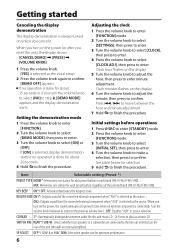
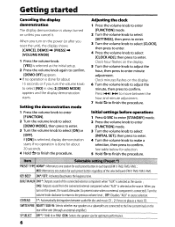
... when no operation is always turned on the display. 6 Turn the volume knob to adjust the minute, then press to enter minute adjustment. Clock hour flashes on the rear of the connected external component when "AUX" is selected as the initial setup. 2 Press the volume knob again...appears. ON2: Outputs sound from the connected external component when "AUX" is selected as a music CD. OFF: Disables "AUX" in source selection. Adjusting the clock 1 Press the volume knob to enter [FUNCTION] mode. 2 Turn the volume knob to select [SETTINGS], then press to enter. 3 Turn the volume knob...
... when no operation is always turned on the display. 6 Turn the volume knob to adjust the minute, then press to enter minute adjustment. Clock hour flashes on the rear of the connected external component when "AUX" is selected as the initial setup. 2 Press the volume knob again...appears. ON2: Outputs sound from the connected external component when "AUX" is selected as a music CD. OFF: Disables "AUX" in source selection. Adjusting the clock 1 Press the volume knob to enter [FUNCTION] mode. 2 Turn the volume knob to select [SETTINGS], then press to enter. 3 Turn the volume knob...
Instruction Manual
Page 10
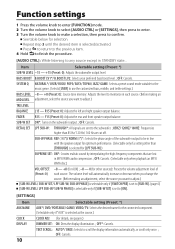
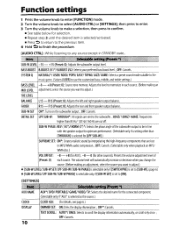
... to the subwoofer. ; 85HZ/ 120HZ/ 160HZ: Frequencies higher than [THROUGH] is selected for the connected component. (Selectable only if "AUX" is selected as the source.) CLOCK CLOCK ADJ: (For details, see page 6.) DISPLAY DIMMER SET: ON: Dims the display illumination. ; OFF: Cancels. Repeat step 3 until the desired item is set to scroll...
... to the subwoofer. ; 85HZ/ 120HZ/ 160HZ: Frequencies higher than [THROUGH] is selected for the connected component. (Selectable only if "AUX" is selected as the source.) CLOCK CLOCK ADJ: (For details, see page 6.) DISPLAY DIMMER SET: ON: Dims the display illumination. ; OFF: Cancels. Repeat step 3 until the desired item is set to scroll...
User Manual
Page 2
... [Q]Nm0'5 DIGITAL AUDIO DIOITAL AUDIO nlOlTAL l;iijliM1mtil fleWritabl4!. • The illustrations in an online manual on the follOWing site: www.kenwood.com/cs/ce/audiofile/ 2 This may collect on the actual equipment. • If you experience problems during installation, consult your ... the remote controller (RC-405) Basic operations 4 Getting started 6 Canceling the display demonstration Setting the demonstration mode Adjusting the clock Initial settings before operations Listening to the radio 7 Adjust [SETIINGS] mode settings Listening to a disc 8 Selecting Repeat Play ...
... [Q]Nm0'5 DIGITAL AUDIO DIOITAL AUDIO nlOlTAL l;iijliM1mtil fleWritabl4!. • The illustrations in an online manual on the follOWing site: www.kenwood.com/cs/ce/audiofile/ 2 This may collect on the actual equipment. • If you experience problems during installation, consult your ... the remote controller (RC-405) Basic operations 4 Getting started 6 Canceling the display demonstration Setting the demonstration mode Adjusting the clock Initial settings before operations Listening to the radio 7 Adjust [SETIINGS] mode settings Listening to a disc 8 Selecting Repeat Play ...
User Manual
Page 5
...your telephone using the remote controller.) • Changes the display information. • Scrolls the display information if pressed and held. • Enters clock adjustment mode directly (page 6) if pressed and held while in , "CALL" appears. • The audio system pauses. • To ...When a call ends, "CALL" disappear. • The audio system resumes. 5 Muting upon the reception of a disc. When a call comes in clock display screen. AUD Enters [AUDIO CTRL] settings directly. EXIT Exit from the setting mode. IfCALL" disappear and the audio system resumes. When you press ...
...your telephone using the remote controller.) • Changes the display information. • Scrolls the display information if pressed and held. • Enters clock adjustment mode directly (page 6) if pressed and held while in , "CALL" appears. • The audio system pauses. • To ...When a call ends, "CALL" disappear. • The audio system resumes. 5 Muting upon the reception of a disc. When a call comes in clock display screen. AUD Enters [AUDIO CTRL] settings directly. EXIT Exit from the setting mode. IfCALL" disappear and the audio system resumes. When you press ...
User Manual
Page 6
... knob to enter. If [ON] is selected, display demonstration starts if no operation is done for about 20 seconds. 4 Hold ~ to confirm. Adjusting the clock 1 Press the volume knob to enter [FUNCTION] mode. 2 Turn the volume knob to select [SETTINGS], then press to enter. 3 Turn the volume knob...are connected to the line out terminals on the display. 6 Turn the volume knob to adjust the minute, then press to finish the procedure. Clock minutes flashes on the rear ofthe unit (through an external amplifier). BUILTIN AUX ON1 *: Outputs sound ofthe connected external component when"AUX" is ...
... knob to enter. If [ON] is selected, display demonstration starts if no operation is done for about 20 seconds. 4 Hold ~ to confirm. Adjusting the clock 1 Press the volume knob to enter [FUNCTION] mode. 2 Turn the volume knob to select [SETTINGS], then press to enter. 3 Turn the volume knob...are connected to the line out terminals on the display. 6 Turn the volume knob to adjust the minute, then press to finish the procedure. Clock minutes flashes on the rear ofthe unit (through an external amplifier). BUILTIN AUX ON1 *: Outputs sound ofthe connected external component when"AUX" is ...
User Manual
Page 10
... the high-frequency components that are lost in MP3/WMA audio compression. ; TEXT SCROLL: AUTO*I ONCE: Selects to [ON]. [SETIINGS] AUXNAME CLOCK DISPLAY 10 AUX*I DVDI PORTABLEI GAMEl VIDEOI TV: Selects the desired name for the connected component. (Selectable only if"AUX" is selected as the... source.) ClOCK ADJ: (For details, see page 6.) DIMMER SET: ON: Dims the display illumination. ;OFF*: Cancels. OFF: Cancels. SUB-W LEVEL -15 - + 15 (Preset: ...
... the high-frequency components that are lost in MP3/WMA audio compression. ; TEXT SCROLL: AUTO*I ONCE: Selects to [ON]. [SETIINGS] AUXNAME CLOCK DISPLAY 10 AUX*I DVDI PORTABLEI GAMEl VIDEOI TV: Selects the desired name for the connected component. (Selectable only if"AUX" is selected as the... source.) ClOCK ADJ: (For details, see page 6.) DIMMER SET: ON: Dims the display illumination. ;OFF*: Cancels. OFF: Cancels. SUB-W LEVEL -15 - + 15 (Preset: ...


