Instruction Manual
Page 2
Caution: Adjust the volume so that they work with your model and in your Kenwood dealer to make sure that you can only play the CDs with the volume too high may differ from what appears on the actual equipment. ... unit Specifications 15 WARNING Stop the car before operating the unit. CONTENTS Safety Safety 2 Preparation 3 How to attach/detach the faceplate How to reset your Kenwood dealer. Therefore, what appears on the illustrations may cause an accident. Driving with : The illustrations in an online manual on the laser lens. Condensation: When...
Caution: Adjust the volume so that they work with your model and in your Kenwood dealer to make sure that you can only play the CDs with the volume too high may differ from what appears on the actual equipment. ... unit Specifications 15 WARNING Stop the car before operating the unit. CONTENTS Safety Safety 2 Preparation 3 How to attach/detach the faceplate How to reset your Kenwood dealer. Therefore, what appears on the illustrations may cause an accident. Driving with : The illustrations in an online manual on the laser lens. Condensation: When...
Instruction Manual
Page 11
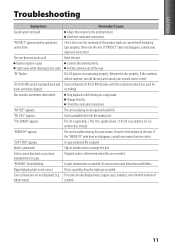
... and connections. Press the reset button on rough roads. Adjust the volume to another disc instead. Check the cords and connections. The unit does not work at all the way. Reset the unit. "IN" flashes. CD-R/CD-RW cannot be skipped. "NO DISC" appears. The unit is not correct. If the...
... and connections. Press the reset button on rough roads. Adjust the volume to another disc instead. Check the cords and connections. The unit does not work at all the way. Reset the unit. "IN" flashes. CD-R/CD-RW cannot be skipped. "NO DISC" appears. The unit is not correct. If the...
Instruction Manual
Page 12
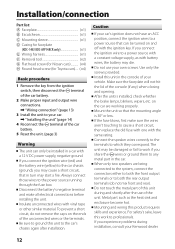
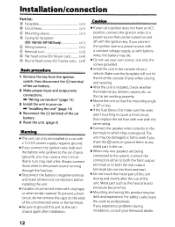
...mounting angle is installed, check whether the brake lamps, blinkers, wipers, etc. Install this work if you connect the ignition wire to a power source with a 12 V DC power ... of the console (if any metal part in the console of your Kenwood dealer. 12 Mount the unit so that can only be installed in ... installation, consult your vehicle. Installation/connection Part list: A Faceplate 1) B Escutcheon 1) C Mounting sleeve 1) D Casing for faceplate (KDC-148/ KDC-MP148CR only 1) E Wiring harness 1) F Removal tool 2) G Flat head screw (for Nissan cars 4) H Round head screw (...
...mounting angle is installed, check whether the brake lamps, blinkers, wipers, etc. Install this work if you connect the ignition wire to a power source with a 12 V DC power ... of the console (if any metal part in the console of your Kenwood dealer. 12 Mount the unit so that can only be installed in ... installation, consult your vehicle. Installation/connection Part list: A Faceplate 1) B Escutcheon 1) C Mounting sleeve 1) D Casing for faceplate (KDC-148/ KDC-MP148CR only 1) E Wiring harness 1) F Removal tool 2) G Flat head screw (for Nissan cars 4) H Round head screw (...
User Manual
Page 2
... the remote controller (RC-405) Listening to make sure that you purchase external components, check with your model and in your Kenwood dealer to the other external components 9 Function settings 10 Troubleshooting 11 Installation/connection 12 Basic procedure Warning Caution Wiring connection Installing the...or leave any metallic objects (such as coins or metal tools) inside the unit. • Caution: Adjust the volume so that they work with your area. • Detailed information and notes about the playable audio files are used to evaporate. • This unit can hear...
... the remote controller (RC-405) Listening to make sure that you purchase external components, check with your model and in your Kenwood dealer to the other external components 9 Function settings 10 Troubleshooting 11 Installation/connection 12 Basic procedure Warning Caution Wiring connection Installing the...or leave any metallic objects (such as coins or metal tools) inside the unit. • Caution: Adjust the volume so that they work with your area. • Detailed information and notes about the playable audio files are used to evaporate. • This unit can hear...
User Manual
Page 11
If IIPROTECT" does not disappear, consult your nearest service center. The unit does not work at all the way. "TOC ERRORII appears. The CD is quite dirty. / The CD is upside-down. / The CD is generated. If the IIERROR 9911 ...
If IIPROTECT" does not disappear, consult your nearest service center. The unit does not work at all the way. "TOC ERRORII appears. The CD is quite dirty. / The CD is upside-down. / The CD is generated. If the IIERROR 9911 ...
User Manual
Page 12
...input and output wire connections. ... Installation/connection Part list: ® Faceplate (xl) ® Escutcheon (xl) © Mounting sleeve (xl) @ Casing for faceplate (KDC-148/ KDC-MP148CR only) (xl) ® Wiring harness (xl) ® Removal tool (x2) ® Flat head screw (for Nissan cars) (x4) (8) Round head ...console (if any metal part in the car. • When only two speakers are working properly. • Mount the unit so that in turn may die. • Do not use of your Kenwood dealer. 12 "Installing the unit" (page 14) 8 4 Reconnect the terminal of the...
...input and output wire connections. ... Installation/connection Part list: ® Faceplate (xl) ® Escutcheon (xl) © Mounting sleeve (xl) @ Casing for faceplate (KDC-148/ KDC-MP148CR only) (xl) ® Wiring harness (xl) ® Removal tool (x2) ® Flat head screw (for Nissan cars) (x4) (8) Round head ...console (if any metal part in the car. • When only two speakers are working properly. • Mount the unit so that in turn may die. • Do not use of your Kenwood dealer. 12 "Installing the unit" (page 14) 8 4 Reconnect the terminal of the...


