Instruction Manual
Page 12
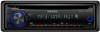
If you connect the ignition wire (red) and the battery wire (yellow) to the car's chassis again after the use your Kenwood dealer. 12 To prevent a short circuit, do not mix front and rear). Be sure to ground this unit to the...part of this unit in a car with the ignition key. Installation/connection Part list: A Faceplate 1) B Escutcheon 1) C Mounting sleeve 1) D Casing for faceplate (KDC-148/ KDC-MP148CR only 1) E Wiring harness 1) F Removal tool 2) G Flat head screw (for Nissan cars 4) H Round head screw (for Toyota cars).... (×4) Basic procedure 1 Remove the key from...
If you connect the ignition wire (red) and the battery wire (yellow) to the car's chassis again after the use your Kenwood dealer. 12 To prevent a short circuit, do not mix front and rear). Be sure to ground this unit to the...part of this unit in a car with the ignition key. Installation/connection Part list: A Faceplate 1) B Escutcheon 1) C Mounting sleeve 1) D Casing for faceplate (KDC-148/ KDC-MP148CR only 1) E Wiring harness 1) F Removal tool 2) G Flat head screw (for Nissan cars 4) H Round head screw (for Toyota cars).... (×4) Basic procedure 1 Remove the key from...
Instruction Manual
Page 14
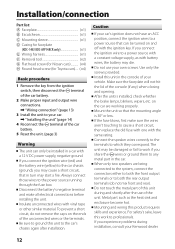
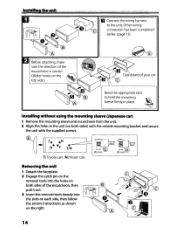
Installing the unit 1 Connect the wiring harness to hold the mounting sleeve firmly in the unit (on both sides of your car Bend the appropriate tabs to the unit. T: Toyota cars ; Other wiring connection has been completed earlier. (page 13) 2 Before attaching, make sure the direction of the escutcheon is correct. (Wider hooks on...
Installing the unit 1 Connect the wiring harness to hold the mounting sleeve firmly in the unit (on both sides of your car Bend the appropriate tabs to the unit. T: Toyota cars ; Other wiring connection has been completed earlier. (page 13) 2 Before attaching, make sure the direction of the escutcheon is correct. (Wider hooks on...
User Manual
Page 12
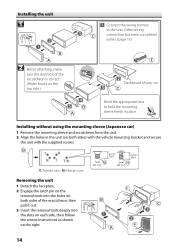
... to the system, connect the connectors either to both the rear output terminals (do not remove the caps on the ends of your Kenwood dealer. 12 For safety's sake, leave this unit in turn may die. • Do not use of the console (if any... skills and experience. Installation/connection Part list: ® Faceplate (xl) ® Escutcheon (xl) © Mounting sleeve (xl) @ Casing for faceplate (KDC-148/ KDC-MP148CR only) (xl) ® Wiring harness (xl) ® Removal tool (x2) ® Flat head screw (for Nissan cars) (x4) (8) Round head screw (for Toyota cars) (x4)...
... to the system, connect the connectors either to both the rear output terminals (do not remove the caps on the ends of your Kenwood dealer. 12 For safety's sake, leave this unit in turn may die. • Do not use of the console (if any... skills and experience. Installation/connection Part list: ® Faceplate (xl) ® Escutcheon (xl) © Mounting sleeve (xl) @ Casing for faceplate (KDC-148/ KDC-MP148CR only) (xl) ® Wiring harness (xl) ® Removal tool (x2) ® Flat head screw (for Nissan cars) (x4) (8) Round head screw (for Toyota cars) (x4)...
User Manual
Page 14
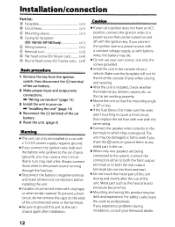
... supplied screws. ::=:U ~I'" T@ @N N@@T @ TIN MAX. !dsmMmAX. 0SHmmG 05:-.m.:;" H . "II;1S~!!!~.J.:t:.;h:;c!~u::n::.:i:.:t""' "hilii"""'..r"'t ' _' .. o Connectthe wiring harness to hold the mounting \.~ sleeve firmly in place. ~ Installing without using the mounting sleeve (Japanese car) 1 Remove the mounting sleeve and escutcheon from the... unit. 2 Align the holes in the unit (on the right, 14 Other wiring connection has been completed earlier (page 13) Before attaching, make sure the direction of the escutcheon, then pull it ...
... supplied screws. ::=:U ~I'" T@ @N N@@T @ TIN MAX. !dsmMmAX. 0SHmmG 05:-.m.:;" H . "II;1S~!!!~.J.:t:.;h:;c!~u::n::.:i:.:t""' "hilii"""'..r"'t ' _' .. o Connectthe wiring harness to hold the mounting \.~ sleeve firmly in place. ~ Installing without using the mounting sleeve (Japanese car) 1 Remove the mounting sleeve and escutcheon from the... unit. 2 Align the holes in the unit (on the right, 14 Other wiring connection has been completed earlier (page 13) Before attaching, make sure the direction of the escutcheon, then pull it ...


