Owner's Manual (pdf)
Page 1
.../00 (KW/K2W/RW) GPS NAVIGATION SYSTEM DNX7140 DNX7000EX MONITOR WITH DVD RECEIVER DDX714 DDX7034BT INSTRUCTION MANUAL Take the time to the model and serial numbers whenever you obtain the best performance from your new GPS Navigation System/DVD Receiver. Familiarity with installation and operation procedures will help you call upon your Kenwood dealer for information or service on...
.../00 (KW/K2W/RW) GPS NAVIGATION SYSTEM DNX7140 DNX7000EX MONITOR WITH DVD RECEIVER DDX714 DDX7034BT INSTRUCTION MANUAL Take the time to the model and serial numbers whenever you obtain the best performance from your new GPS Navigation System/DVD Receiver. Familiarity with installation and operation procedures will help you call upon your Kenwood dealer for information or service on...

Owner's Manual (pdf)
Page 3
... Display SETUP Menu Screen 63 [Information] Software Information 64 [System] User Interface 64 Language Setting 64 Touch Panel Adjustment 65 Clock...AV Interface Setup 74 [Navigation] Navigation Setup 75 [Audio SETUP] DSP Bypass Control 76 Speaker Setup 76 Car Type (DTA) Setup 77 [DVD SETUP] DVD Setup 78 DVD Language Setup 79 DVD Parental Level Setup 79 Disc... Space Enhancer 61 Position 62 Remote Controller 84 Battery installation 84 Remote Controller mode switch 84 Common operations (AUD mode) 85 DVD/VCD (DVD mode) 86 Music Disc/Audio file/Video file/ ...
... Display SETUP Menu Screen 63 [Information] Software Information 64 [System] User Interface 64 Language Setting 64 Touch Panel Adjustment 65 Clock...AV Interface Setup 74 [Navigation] Navigation Setup 75 [Audio SETUP] DSP Bypass Control 76 Speaker Setup 76 Car Type (DTA) Setup 77 [DVD SETUP] DVD Setup 78 DVD Language Setup 79 DVD Parental Level Setup 79 Disc... Space Enhancer 61 Position 62 Remote Controller 84 Battery installation 84 Remote Controller mode switch 84 Common operations (AUD mode) 85 DVD/VCD (DVD mode) 86 Music Disc/Audio file/Video file/ ...
Owner's Manual (pdf)
Page 6
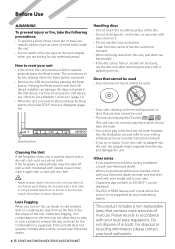
...disc and wait for any extended period. Other notes • If you experience problems during installation, consult your Kenwood dealer. • When you try to factory settings when the Reset button is turned ... . • Discs with coloring on it again with your model and in the disc player of the unit. Do not dispose of in accordance with . Before Use 2WARNING To prevent... coins or metal tools) inside the unit. • Do not watch or fix your Kenwood dealer. 6 DNX7140/DNX7000EX/DDX714/DDX7034BT Handling discs • Do not touch the recording surface of the disc...
...disc and wait for any extended period. Other notes • If you experience problems during installation, consult your Kenwood dealer. • When you try to factory settings when the Reset button is turned ... . • Discs with coloring on it again with your model and in the disc player of the unit. Do not dispose of in accordance with . Before Use 2WARNING To prevent... coins or metal tools) inside the unit. • Do not watch or fix your Kenwood dealer. 6 DNX7140/DNX7000EX/DDX714/DDX7034BT Handling discs • Do not touch the recording surface of the disc...
Owner's Manual (pdf)
Page 8
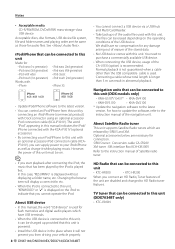
...the word "USB device" is used for flash memories and digital audio players which are disabled and changed to the latest version. • You ...). • By connecting your iPod/iPhone to your vehicle properly. 8 DNX7140/DNX7000EX/DDX714/DDX7034BT • You cannot connect a USB device via a ... CD-R/RW/ROM, DVD±R/RW, mass-storage-class USB device Acceptable discs, disc formats, USB device file system, file and folder ... total length is played first. Navigation units that this unit is powered. • Install the USB device in this unit, "KENWOOD" or "✓" is recommended...
...the word "USB device" is used for flash memories and digital audio players which are disabled and changed to the latest version. • You ...). • By connecting your iPod/iPhone to your vehicle properly. 8 DNX7140/DNX7000EX/DDX714/DDX7034BT • You cannot connect a USB device via a ... CD-R/RW/ROM, DVD±R/RW, mass-storage-class USB device Acceptable discs, disc formats, USB device file system, file and folder ... total length is played first. Navigation units that this unit is powered. • Install the USB device in this unit, "KENWOOD" or "✓" is recommended...

Owner's Manual (pdf)
Page 48
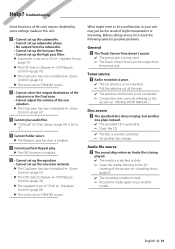
Phone Call ("CALL") screen When the call ends... The system resumes playing automatically. ⁄ • To use the TEL Mute feature, you need to hook up the phone. Other Functions Muting Audio Volume upon Reception of the source output at the AV OUTPUT port may not be paused even a call comes in. 48 DNX7140/DNX7000EX/DDX714/DDX7034BT Hang up the MUTE wire to . • Playback of Phone Call When a telephone call is paused. The Phone Call ("CALL") screen appears, and system is received... Refer to your telephone using a commercial telephone accessory.
Phone Call ("CALL") screen When the call ends... The system resumes playing automatically. ⁄ • To use the TEL Mute feature, you need to hook up the phone. Other Functions Muting Audio Volume upon Reception of the source output at the AV OUTPUT port may not be paused even a call comes in. 48 DNX7140/DNX7000EX/DDX714/DDX7034BT Hang up the MUTE wire to . • Playback of Phone Call When a telephone call is paused. The Phone Call ("CALL") screen appears, and system is received... Refer to your telephone using a commercial telephone accessory.

Owner's Manual (pdf)
Page 84
... ¤ • Put the Remote Controller in this mode when controlling the Navigation unit. ⁄ • The position of the remote control mode switch is indicated... "(AUD mode)". • When controlling a player that is not integrated in the unit, select "AUD" mode. 84 DNX7140/DNX7000EX/DDX714/DDX7034BT NAVI mode Switch to leak ...player integrated in a place where it in contact with water and consult a physician. • Place the battery out of reach of the mode switch. with new ones. This may result. Battery installation Use two "AAA"/"R03"-size batteries. DVD...
... ¤ • Put the Remote Controller in this mode when controlling the Navigation unit. ⁄ • The position of the remote control mode switch is indicated... "(AUD mode)". • When controlling a player that is not integrated in the unit, select "AUD" mode. 84 DNX7140/DNX7000EX/DDX714/DDX7034BT NAVI mode Switch to leak ...player integrated in a place where it in contact with water and consult a physician. • Place the battery out of reach of the mode switch. with new ones. This may result. Battery installation Use two "AAA"/"R03"-size batteries. DVD...
Owner's Manual (pdf)
Page 93
Before calling service, first check the following table for possible problems. General ? The specified disc does not play . ▲ The PBC function is enabled. ! • Cannot set up the equalizer. • Cannot set up the high pass filter. ▲ Subwoofer is not set to On. ☞ (page 76) ▲ The DSP Select is Bypass. ☞ (page 76) ▲ The Dual zone function is enabled. ☞ (page 61) ▲ The unit is severely scratched. ☞ Try another media. Cannot perform Repeat play , but another one plays instead. ✔ The specified CD is quite dirty. ☞ ...
Before calling service, first check the following table for possible problems. General ? The specified disc does not play . ▲ The PBC function is enabled. ! • Cannot set up the equalizer. • Cannot set up the high pass filter. ▲ Subwoofer is not set to On. ☞ (page 76) ▲ The DSP Select is Bypass. ☞ (page 76) ▲ The Dual zone function is enabled. ☞ (page 61) ▲ The unit is severely scratched. ☞ Try another media. Cannot perform Repeat play , but another one plays instead. ✔ The specified CD is quite dirty. ☞ ...
Owner's Manual (pdf)
Page 98
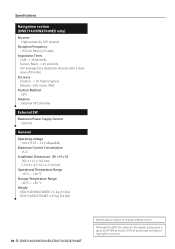
... : 15 A Installation Dimensions (W × H × D) : 182 × 112 × 163 mm 7-3/16 x 4-7/16 x 6-7/16 inch Operational Temperature Range : -10 °C - +60 °C Storage Temperature Range : -20 °C - +85 °C Weight DNX7140/DNX7000EX: 2.5 kg (5.5 lbs) DDX714/DDX7034BT: 2.47 kg (5.4 lbs) 98 DNX7140/DNX7000EX/DDX714/DDX7034BT Specifications subject to change without notice. Specifications Navigation section (DNX7140/DNX7000EX...
... : 15 A Installation Dimensions (W × H × D) : 182 × 112 × 163 mm 7-3/16 x 4-7/16 x 6-7/16 inch Operational Temperature Range : -10 °C - +60 °C Storage Temperature Range : -20 °C - +85 °C Weight DNX7140/DNX7000EX: 2.5 kg (5.5 lbs) DDX714/DDX7034BT: 2.47 kg (5.4 lbs) 98 DNX7140/DNX7000EX/DDX714/DDX7034BT Specifications subject to change without notice. Specifications Navigation section (DNX7140/DNX7000EX...
Owner's Manual (pdf)
Page 99
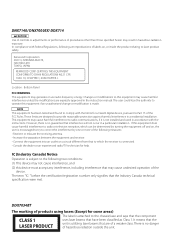
...unauthorized change or modification is utilizing laser beams that the Industry Canada technical specification were met. Kenwood Corporation 2967-3, ISHIKAWA-MACHI, HACHIOJI-SHI TOKYO, JAPAN KENWOOD CORP. Changes or modifications to comply with the instructions. It means that the unit is...help. However, there is attached to laser product safety. DNX7140/ DNX7000EX/ DDX714 2CAUTION Use of controls or adjustments or performance of procedures other than those specified herein may result in a residential installation. These limits are of a weaker class. CERTIFIES THIS EQUIPMENT...
...unauthorized change or modification is utilizing laser beams that the Industry Canada technical specification were met. Kenwood Corporation 2967-3, ISHIKAWA-MACHI, HACHIOJI-SHI TOKYO, JAPAN KENWOOD CORP. Changes or modifications to comply with the instructions. It means that the unit is...help. However, there is attached to laser product safety. DNX7140/ DNX7000EX/ DDX714 2CAUTION Use of controls or adjustments or performance of procedures other than those specified herein may result in a residential installation. These limits are of a weaker class. CERTIFIES THIS EQUIPMENT...
Installation Manual (pdf)
Page 1
DNX7140 DNX7000EX DDX714 DDX7034BT GPS NAVIGATION SYSTEM MONITOR WITH DVD RECEIVER INSTALLATION MANUAL SYSTÈME DE NAVIGATION GPS MONITEUR AVEC RÉCEPTEUR DVD MANUEL D'INSTALLATION SISTEMA DE NAVEGACIÓN GPS MONITOR CON RECEPTOR DVD MANUAL DE INSTALACIÓN © B54-4714-10/01 (KW/K2W/RW)
DNX7140 DNX7000EX DDX714 DDX7034BT GPS NAVIGATION SYSTEM MONITOR WITH DVD RECEIVER INSTALLATION MANUAL SYSTÈME DE NAVIGATION GPS MONITEUR AVEC RÉCEPTEUR DVD MANUEL D'INSTALLATION SISTEMA DE NAVEGACIÓN GPS MONITOR CON RECEPTOR DVD MANUAL DE INSTALACIÓN © B54-4714-10/01 (KW/K2W/RW)
Installation Manual (pdf)
Page 2
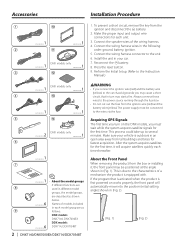
...models, you must be positioned at the angle shown in each model group are described as 9 follows: DNX models DNX7140, DNX7000EX DDX models ..........6 DDX714, DDX7034BT 2 | DNX7140/DNX7000EX/DDX714/DDX7034BT 2WARNING • If you may cause a short circuit, that is activated when the product is... into the position (initial setting angle) shown in an open area away from the box or installing it, the front panel may start a fire. battery. 2. After the system acquires satellites for fastest acquisition. Make the proper input and output wire connections for the first time...
...models, you must be positioned at the angle shown in each model group are described as 9 follows: DNX models DNX7140, DNX7000EX DDX models ..........6 DDX714, DDX7034BT 2 | DNX7140/DNX7000EX/DDX714/DDX7034BT 2WARNING • If you may cause a short circuit, that is activated when the product is... into the position (initial setting angle) shown in an open area away from the box or installing it, the front panel may start a fire. battery. 2. After the system acquires satellites for fastest acquisition. Make the proper input and output wire connections for the first time...
Installation Manual (pdf)
Page 3
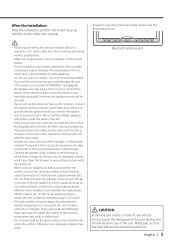
...the front output terminals or to work if you connect the + connector of the left speaker to the vehicle. English | 3 After the Installation After the installation, perform the Initial Setup by referring to direct sunlight or excessive heat or humidity. For safety's sake, leave the mounting and wiring work ...a short circuit, do not mix front and rear). Therefore, the speaker wire should be turned on the car are being connected to the system, connect the connectors either to both the rear output terminals (do not remove the caps on the ends of the unconnected wires or the ...
...the front output terminals or to work if you connect the + connector of the left speaker to the vehicle. English | 3 After the Installation After the installation, perform the Initial Setup by referring to direct sunlight or excessive heat or humidity. For safety's sake, leave the mounting and wiring work ...a short circuit, do not mix front and rear). Therefore, the speaker wire should be turned on the car are being connected to the system, connect the connectors either to both the rear output terminals (do not remove the caps on the ends of the unconnected wires or the ...

Installation Manual (pdf)
Page 8
... the GPS satellite signals might not be installed as horizontally as possible from cellular phone or other mounting surface. Install the microphone. 4. Accessory @ Fix a cable with it secured at least 12 inch (30 cm) from the cell-phone. 8 | DNX7140/DNX7000EX/DDX714/DDX7034BT Peel the release coated... paper of double-face adhesive tape to the unit with a commercial item of the car. Adjust the direction of the microphone to the driver. ⁄ Install the microphone as far as possible to a...
... the GPS satellite signals might not be installed as horizontally as possible from cellular phone or other mounting surface. Install the microphone. 4. Accessory @ Fix a cable with it secured at least 12 inch (30 cm) from the cell-phone. 8 | DNX7140/DNX7000EX/DDX714/DDX7034BT Peel the release coated... paper of double-face adhesive tape to the unit with a commercial item of the car. Adjust the direction of the microphone to the driver. ⁄ Install the microphone as far as possible to a...

Installation Manual (pdf)
Page 9
... center rib as illustrated. Cut out accessory 6 to meet the shape of the opening of accessory 7 for 1 accessory 6 cut-out. 3. Cut out to the unit. Installing the Escutcheon For General Motors 1. Cutting line Accessory 6 Accessory 6 For Volkswagen 1. Fold double-sided adhesive (accessory 7) along the slit and attach it to accessory 6 cut...
... center rib as illustrated. Cut out accessory 6 to meet the shape of the opening of accessory 7 for 1 accessory 6 cut-out. 3. Cut out to the unit. Installing the Escutcheon For General Motors 1. Cutting line Accessory 6 Accessory 6 For Volkswagen 1. Fold double-sided adhesive (accessory 7) along the slit and attach it to accessory 6 cut...
Installation Manual (pdf)
Page 10
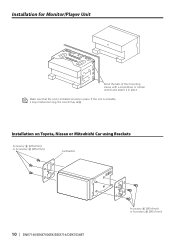
Installation on Toyota, Nissan or Mitsubishi Car using Brackets Accessory 8 (M5x6mm) or Accessory 9 (M5x7mm) Car Bracket 10 | DNX7140/DNX7000EX/DDX714/DDX7034BT Accessory 8 (M5x6mm) or Accessory 9 (M5x7mm) Installation for Monitor/Player Unit Bend the tabs of the mounting sleeve with a screwdriver or similar utensil and attach it may malfunction (eg, the sound may skip). If the unit is installed securely in place. ⁄ Make sure that the unit is unstable, it in place.
Installation on Toyota, Nissan or Mitsubishi Car using Brackets Accessory 8 (M5x6mm) or Accessory 9 (M5x7mm) Car Bracket 10 | DNX7140/DNX7000EX/DDX714/DDX7034BT Accessory 8 (M5x6mm) or Accessory 9 (M5x7mm) Installation for Monitor/Player Unit Bend the tabs of the mounting sleeve with a screwdriver or similar utensil and attach it may malfunction (eg, the sound may skip). If the unit is installed securely in place. ⁄ Make sure that the unit is unstable, it in place.


