Instruction Manual
Page 4
... is showed, read the article applicable to the unit you can pull it clicks and then remove your fingers. The panel fully opens. 2) Hold the SD card as follows. Labelled side 0 6 Return to the Top page Basic Operations Number Name 1 fi (Reset) 2 ATT 3 ∞, 5 (Vol) 4 AUD 5 NAV 6 ...pressing closes the panel and pressing for 1 second fully opens the panel to the location of the SD card slot. An SD card slot for 1 second. How to insert an SD Card 1) Press 8 button for upgrading the map. Return to the Top page Basic Operations Basic Operations ...
... is showed, read the article applicable to the unit you can pull it clicks and then remove your fingers. The panel fully opens. 2) Hold the SD card as follows. Labelled side 0 6 Return to the Top page Basic Operations Number Name 1 fi (Reset) 2 ATT 3 ∞, 5 (Vol) 4 AUD 5 NAV 6 ...pressing closes the panel and pressing for 1 second fully opens the panel to the location of the SD card slot. An SD card slot for 1 second. How to insert an SD Card 1) Press 8 button for upgrading the map. Return to the Top page Basic Operations Basic Operations ...
Quick Start Guide
Page 8
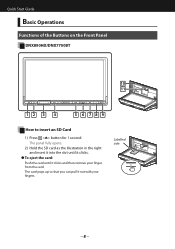
Quick Start Guide Basic Operations Functions of the Buttons on the Front Panel DNX890HD/DNX7700BT 10 11 12 3 4 5 6 789 How to insert an SD Card 1) Press 8 button for 1 second. The card pops up so that you can pull it clicks and then remove your fingers. Labelled side 0 8 The panel fully opens. 2) Hold the SD card as the illustration in the right and insert it into the slot until it clicks. ● To eject the card: Push the card until it out with your finger from the card.
Quick Start Guide Basic Operations Functions of the Buttons on the Front Panel DNX890HD/DNX7700BT 10 11 12 3 4 5 6 789 How to insert an SD Card 1) Press 8 button for 1 second. The card pops up so that you can pull it clicks and then remove your fingers. Labelled side 0 8 The panel fully opens. 2) Hold the SD card as the illustration in the right and insert it into the slot until it clicks. ● To eject the card: Push the card until it out with your finger from the card.
Quick Start Guide
Page 9
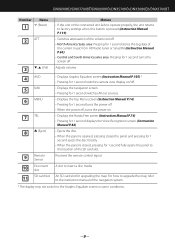
...DNX690HD/DNX570HD/DNX5080EX/DNX5700BT Number Name 1 fi (Reset) 2 ATT 3 ∞, 5 (Vol) Motion • If the unit or the connected unit fails to operate properly, the unit returns to factory settings when this button is closed, pressing for 1 second fully opens the panel to insert a disc media. 11 SD card slot An SD card... • Pressing for upgrading the map. Receives the remote control signal. 10 Disc insert slot A slot to the location of the SD card slot. Adjusts volume. 4 AUD 5 NAV 6 MENU 7 TEL 8 0 (Eject) 9 Remote Sensor • Displays Graphic Equalizer ...
...DNX690HD/DNX570HD/DNX5080EX/DNX5700BT Number Name 1 fi (Reset) 2 ATT 3 ∞, 5 (Vol) Motion • If the unit or the connected unit fails to operate properly, the unit returns to factory settings when this button is closed, pressing for 1 second fully opens the panel to insert a disc media. 11 SD card slot An SD card... • Pressing for upgrading the map. Receives the remote control signal. 10 Disc insert slot A slot to the location of the SD card slot. Adjusts volume. 4 AUD 5 NAV 6 MENU 7 TEL 8 0 (Eject) 9 Remote Sensor • Displays Graphic Equalizer ...


