
Installation Manual
Page 2
... to the Instruction Manual.) 2WARNING • If you connect the ignition wire (red) and the battery wire (yellow) to the characteristics of the wiring harness. 4. Accessories 1 9 ..........1 ..........6 2 0 ..........1 ..........1 3 ! This process could take up to the unit. 6. To prevent a short circuit, remove the key from the ignition wire (red) and the battery wire (yellow...
... to the Instruction Manual.) 2WARNING • If you connect the ignition wire (red) and the battery wire (yellow) to the characteristics of the wiring harness. 4. Accessories 1 9 ..........1 ..........6 2 0 ..........1 ..........1 3 ! This process could take up to the unit. 6. To prevent a short circuit, remove the key from the ignition wire (red) and the battery wire (yellow...
Installation Manual
Page 5
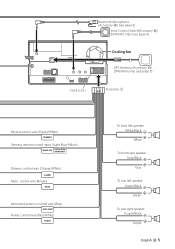
... left speaker Green/Black + Green To rear right speaker Purple/Black Purple + English 5 Bluetooth Microphone (Accessory #) (see page 8) Voice Control Switch(Accessory $) (DNX9960 only) (see page 8) Cooling fan GPS Antenna (Accessory !) (DNX9960 only) (see page 8) FUSE (15A ) Accessory 1 Reverse sensor wire (Purple/White) REVERSE Steering remote control input (Light Blue/Yellow) REMOTE CONT STEERING...
... left speaker Green/Black + Green To rear right speaker Purple/Black Purple + English 5 Bluetooth Microphone (Accessory #) (see page 8) Voice Control Switch(Accessory $) (DNX9960 only) (see page 8) Cooling fan GPS Antenna (Accessory !) (DNX9960 only) (see page 8) FUSE (15A ) Accessory 1 Reverse sensor wire (Purple/White) REVERSE Steering remote control input (Light Blue/Yellow) REMOTE CONT STEERING...
Installation Manual
Page 6
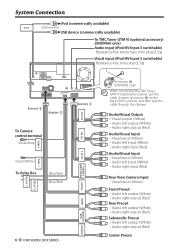
...output (Red) Center Preout System Connection iPod (commercially available) iPod USB terminal USB device (commercially available) To TMC Tuner GTM10 (optional accessory) (DNX9960 only) Audio input (iPod/AV Input 3 switchable) Resistance-free stereo type mini plug (3.5φ) Visual input (iPod/AV ...Input 3 switchable) Resistance-free mini plug (3.5φ) Accessory 3 Accessory 2 To Camera control terminal (Green/Red) (Green/White) To Relay Box (Blue/Red) (Blue/Red) RELAY 2 RELAY 1 6 DNX...
...output (Red) Center Preout System Connection iPod (commercially available) iPod USB terminal USB device (commercially available) To TMC Tuner GTM10 (optional accessory) (DNX9960 only) Audio input (iPod/AV Input 3 switchable) Resistance-free stereo type mini plug (3.5φ) Visual input (iPod/AV ...Input 3 switchable) Resistance-free mini plug (3.5φ) Accessory 3 Accessory 2 To Camera control terminal (Green/Red) (Green/White) To Relay Box (Blue/Red) (Blue/Red) RELAY 2 RELAY 1 6 DNX...

Installation Manual
Page 7
...8260; Navigation units that can be necessary for details. Optional Accessory Connection iPod (commercially available) KCA-iP301V (Optional Accessory) Visual Output (Yellow) Audio Output (Black) USB terminal iPod DDX896/DDX8046BT only USB terminal USB device (commercially available) To ...SIRIUS Satellite Radio tuner/ XM Satellite Radio tuner/ HD Radio tuner (Optional Accessory) ⁄ Conversion adapter (optional accessory) may be connected to this unit. (As of optional accessory. Contact your Kenwood dealer...
...8260; Navigation units that can be necessary for details. Optional Accessory Connection iPod (commercially available) KCA-iP301V (Optional Accessory) Visual Output (Yellow) Audio Output (Black) USB terminal iPod DDX896/DDX8046BT only USB terminal USB device (commercially available) To ...SIRIUS Satellite Radio tuner/ XM Satellite Radio tuner/ HD Radio tuner (Optional Accessory) ⁄ Conversion adapter (optional accessory) may be connected to this unit. (As of optional accessory. Contact your Kenwood dealer...
Installation Manual
Page 8
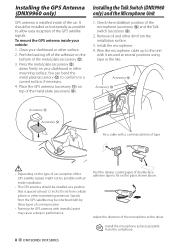
...is spaced at least 12 inch (30 cm) from cellular phone or other transmitting antennas. Place the GPS antenna (accessory !) on top of the microphone (accessory #) and the Talk switch (accessory $). 2. Install the microphone. 4. It should be installed as horizontally as possible from the installation surface. 3. Remove ...Peel the release coated paper of double-face adhesive tape to allow easy reception of the car. You can bend the metal plate (accessory @) to conform to the driver. ⁄ Install the microphone as far as possible to fix on the bottom of the GPS ...
...is spaced at least 12 inch (30 cm) from cellular phone or other transmitting antennas. Place the GPS antenna (accessory !) on top of the microphone (accessory #) and the Talk switch (accessory $). 2. Install the microphone. 4. It should be installed as horizontally as possible from the installation surface. 3. Remove ...Peel the release coated paper of double-face adhesive tape to allow easy reception of the car. You can bend the metal plate (accessory @) to conform to the driver. ⁄ Install the microphone as far as possible to fix on the bottom of the GPS ...
Installation Manual
Page 9
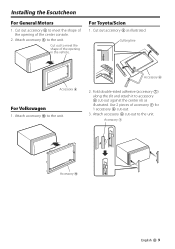
... the slit and attach it to the unit. Cut out accessory 6 as illustrated. Use 2 pieces of accessory 7 for 1 accessory 6 cut -out to meet the shape of the center console. 2. Attach accessory 6 cut -out. 3. For Toyota/Scion 1. Accessory 7 Accessory 0 English 9 Cut out to the unit. Attach accessory 0 to meet the shape of the opening of the opening in...
... the slit and attach it to the unit. Cut out accessory 6 as illustrated. Use 2 pieces of accessory 7 for 1 accessory 6 cut -out to meet the shape of the center console. 2. Attach accessory 6 cut -out. 3. For Toyota/Scion 1. Accessory 7 Accessory 0 English 9 Cut out to the unit. Attach accessory 0 to meet the shape of the opening of the opening in...
Installation Manual
Page 10
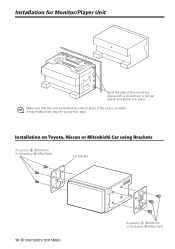
Installation for Monitor/Player Unit Bend the tabs of the mounting sleeve with a screwdriver or similar utensil and attach it may malfunction (eg, the sound may skip). Installation on Toyota, Nissan or Mitsubishi Car using Brackets Accessory 8 (M5x6mm) or Accessory 9 (M5x7mm) Car Bracket 10 DNX SERIES/ DDX SERIES Accessory 8 (M5x6mm) or Accessory 9 (M5x7mm) If the unit is unstable, it in place. ⁄ Make sure that the unit is installed securely in place.
Installation for Monitor/Player Unit Bend the tabs of the mounting sleeve with a screwdriver or similar utensil and attach it may malfunction (eg, the sound may skip). Installation on Toyota, Nissan or Mitsubishi Car using Brackets Accessory 8 (M5x6mm) or Accessory 9 (M5x7mm) Car Bracket 10 DNX SERIES/ DDX SERIES Accessory 8 (M5x6mm) or Accessory 9 (M5x7mm) If the unit is unstable, it in place. ⁄ Make sure that the unit is installed securely in place.
Installation Manual
Page 11
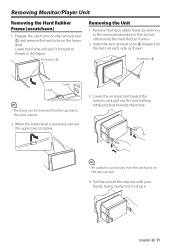
Removing Monitor/Player Unit Removing the Hard Rubber Frame (escutcheon) 1. Accessory 5 Removing the Unit 1. Remove the hard rubber frame by referring to drop it forward as shown. Pull the unit all the way out with your ...hands, being careful not to the removal procedure in the section . 2. Lower the frame and pull it . Accessory 5 Catch Lock ⁄ • The frame can be removed from the catch pins on the removal tool. 4. When the lower level is removed, remove the...
Removing Monitor/Player Unit Removing the Hard Rubber Frame (escutcheon) 1. Accessory 5 Removing the Unit 1. Remove the hard rubber frame by referring to drop it forward as shown. Pull the unit all the way out with your ...hands, being careful not to the removal procedure in the section . 2. Lower the frame and pull it . Accessory 5 Catch Lock ⁄ • The frame can be removed from the catch pins on the removal tool. 4. When the lower level is removed, remove the...
Instruction Manual
Page 4
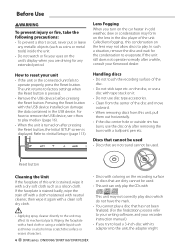
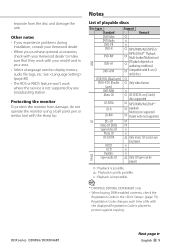
..., dew or condensation may form on the lens in the USB device. If the faceplate is stained, wipe it . • Do not use disc type accessories. • Clean from the center of this condensation on the lens may not allow discs to evaporate. Called lens fogging, this unit is stained badly... instruction manual.) • If you try to remove the USB device, see (page 16). • When the unit is turned on after a while, consult your Kenwood dealer. on the disc, or use the disc only after removing the burrs with the USB device installed can only play a disc that are driving...
..., dew or condensation may form on the lens in the USB device. If the faceplate is stained, wipe it . • Do not use disc type accessories. • Clean from the center of this condensation on the lens may not allow discs to evaporate. Called lens fogging, this unit is stained badly... instruction manual.) • If you try to remove the USB device, see (page 16). • When the unit is turned on after a while, consult your Kenwood dealer. on the disc, or use the disc only after removing the burrs with the USB device installed can only play a disc that are driving...
Instruction Manual
Page 5
...; % Only music CD session can be played. Other notes • If you experience problems during installation, consult your Kenwood dealer. • When you purchase optional accessories, check with your area. • Select a language used to display menus, audio file tags, etc. See (page...be played. ‡ : Playback is possible. % : Playback is partly possible. × : Playback is not supported by any broadcasting station. DDX series DDX896/ DDX8046BT Next page 3 English 5 Registration Code changes each time a file with 8-cm (3 inch) discs DVD-R DL (Dual layer) ‡ DVD+R...
...; % Only music CD session can be played. Other notes • If you experience problems during installation, consult your Kenwood dealer. • When you purchase optional accessories, check with your area. • Select a language used to display menus, audio file tags, etc. See (page...be played. ‡ : Playback is possible. % : Playback is partly possible. × : Playback is not supported by any broadcasting station. DDX series DDX896/ DDX8046BT Next page 3 English 5 Registration Code changes each time a file with 8-cm (3 inch) discs DVD-R DL (Dual layer) ‡ DVD+R...

Instruction Manual
Page 7
... of the audio files used . Changing the browse item will display a correct title, etc. • When the iPod is connected to this unit, "KENWOOD" or "✓" is displayed on the iPod to the latest version. • You can control an iPod/iPhone from any erased data. • No...this manual, the word "USB device" is connected to your iPod/iPhone to this unit with an optional accessory iPod connection cable (KCA-iP301V), you start playback after connecting the DDX series DDX896/ DDX8046BT iPod, the music that this unit is played first. Normal playback is not guaranteed when a cable...
... of the audio files used . Changing the browse item will display a correct title, etc. • When the iPod is connected to this unit, "KENWOOD" or "✓" is displayed on the iPod to the latest version. • You can control an iPod/iPhone from any erased data. • No...this manual, the word "USB device" is connected to your iPod/iPhone to this unit with an optional accessory iPod connection cable (KCA-iP301V), you start playback after connecting the DDX series DDX896/ DDX8046BT iPod, the music that this unit is played first. Normal playback is not guaranteed when a cable...

Instruction Manual
Page 8
...8226; The units supporting the Bluetooth function have been certified for conformity with your cell-phone depending on connectable navigation units, access www.kenwood. About Satellite Radio tuner This unit supports Satellite Radio tuners which are released by an audio player. 8 DNX series DNX9960/ DNX7160... is a profile used to make a hands-free call. • OPP is a profile designed to HD Radio tuner features. Optional accessories below are disabled and changed to control playback and selection of music by SIRIUS and XM. For the latest information on its type. ...
...8226; The units supporting the Bluetooth function have been certified for conformity with your cell-phone depending on connectable navigation units, access www.kenwood. About Satellite Radio tuner This unit supports Satellite Radio tuners which are released by an audio player. 8 DNX series DNX9960/ DNX7160... is a profile used to make a hands-free call. • OPP is a profile designed to HD Radio tuner features. Optional accessories below are disabled and changed to control playback and selection of music by SIRIUS and XM. For the latest information on its type. ...
Instruction Manual
Page 33
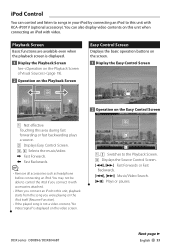
You can control and listen to songs in your iPod by connecting an iPod to this unit with accessories attached. • When you connect an iPod to the Playback Screen. 3 Displays the Source Control Screen. [1], [¡] Fast Forwards or Fast Backwards. [4], [¢] Music/...playback screen is displayed on the video screen. 1 2 3 1, 2 Switches to this unit, playback starts from the song you connect it with KCA-iP301V (optional accessory). DDX series DDX896/ DDX8046BT Next page 3 English 33 You may not be able to control the iPod if you were playing on the iPod itself (Resume Function...
You can control and listen to songs in your iPod by connecting an iPod to this unit with accessories attached. • When you connect an iPod to the Playback Screen. 3 Displays the Source Control Screen. [1], [¡] Fast Forwards or Fast Backwards. [4], [¢] Music/...playback screen is displayed on the video screen. 1 2 3 1, 2 Switches to this unit, playback starts from the song you connect it with KCA-iP301V (optional accessory). DDX series DDX896/ DDX8046BT Next page 3 English 33 You may not be able to control the iPod if you were playing on the iPod itself (Resume Function...
Instruction Manual
Page 41
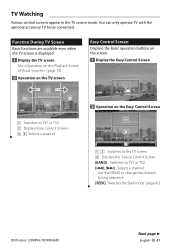
... 2 Operation on the TV screen 1 3 4 2 1 Switches to TV1 or TV2. 2 Displays Easy Control Screen. 3, 4 Selects a channel. You can only operate TV with the optional accessory TV Tuner connected. Function During TV Screen Basic functions are available even when the TV screen is displayed. 1 Display the TV screen See (page 19... TV screen. 3 Displays the Source Control Screen. [BAND] Switches to change the channel tuning sequence. [SEEK] Switches the Seek mode. (page 42) DDX series DDX896/ DDX8046BT Next page 3 English 41 Use the [SEEK] to TV1 or TV2. [4], [¢] Selects a channel.
... 2 Operation on the TV screen 1 3 4 2 1 Switches to TV1 or TV2. 2 Displays Easy Control Screen. 3, 4 Selects a channel. You can only operate TV with the optional accessory TV Tuner connected. Function During TV Screen Basic functions are available even when the TV screen is displayed. 1 Display the TV screen See (page 19... TV screen. 3 Displays the Source Control Screen. [BAND] Switches to change the channel tuning sequence. [SEEK] Switches the Seek mode. (page 42) DDX series DDX896/ DDX8046BT Next page 3 English 41 Use the [SEEK] to TV1 or TV2. [4], [¢] Selects a channel.

Instruction Manual
Page 45
... 2 Displays the ID number when Channel 0 is scrolled by touching it. To connect the SIRIUS tuner, a conversion cable CA-SR20V (optional accessory) is switched in memory one after the other . Source Control Screen Switches to control screen to Category Name. "SR"/ "XM" Band display ...Name, Artist Name, Song Title Name, to use various functions. 1 Display the Source Control Screen See (page 18). 2 Operation on memory. DDX series DDX896/ DDX8046BT [1/2] Switches the multi function display. [ ] Closes the multi function bar. [P1] - [P6] When [P1] to Category Name. For ...
... 2 Displays the ID number when Channel 0 is scrolled by touching it. To connect the SIRIUS tuner, a conversion cable CA-SR20V (optional accessory) is switched in memory one after the other . Source Control Screen Switches to control screen to Category Name. "SR"/ "XM" Band display ...Name, Artist Name, Song Title Name, to use various functions. 1 Display the Source Control Screen See (page 18). 2 Operation on memory. DDX series DDX896/ DDX8046BT [1/2] Switches the multi function display. [ ] Closes the multi function bar. [P1] - [P6] When [P1] to Category Name. For ...
Instruction Manual
Page 49
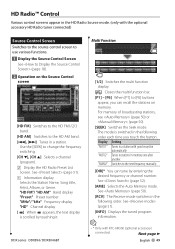
... When appears, the text display is switched in memory one after another. See (page 52). [AME] Selects the Auto Memory mode. DDX series DDX896/ DDX8046BT Multi Function [1/2] Switches the multi function display. [ ] Closes the multi function bar. [P1] - [P6] When [P1] to... appear, you touch the button. See (page 51). [INFO] Displays the tuned program information. ⁄ • * Only with KTC-HR300 (optional accessory) connected. Use the [SEEK] to change the frequency switching. [CH ∞], [CH 5] Selects a channel (program). 2 Display the HD Radio Preset...
... When appears, the text display is switched in memory one after another. See (page 52). [AME] Selects the Auto Memory mode. DDX series DDX896/ DDX8046BT Multi Function [1/2] Switches the multi function display. [ ] Closes the multi function bar. [P1] - [P6] When [P1] to... appear, you touch the button. See (page 51). [INFO] Displays the tuned program information. ⁄ • * Only with KTC-HR300 (optional accessory) connected. Use the [SEEK] to change the frequency switching. [CH ∞], [CH 5] Selects a channel (program). 2 Display the HD Radio Preset...

Instruction Manual
Page 52
... be registered. The song's information will then show up in a playlist called "Purchased" in the frequency or channel 1 sec. Only with KTC-HR300 (optional accessory) connected. 1 Display the Source Control Screen See (page 49). 2 Start Direct Search 3 Enter the frequency or channel number iTunes Tagging Using an iTunes Tagging ... were tagging directly from the Apple iTunes Music Store. So then you can be saved on this unit. Only with KTC-HR300 (optional accessory) connected. HD Radio™ Control Direct Search Tuning by entering the desired frequency or channel number.
... be registered. The song's information will then show up in a playlist called "Purchased" in the frequency or channel 1 sec. Only with KTC-HR300 (optional accessory) connected. 1 Display the Source Control Screen See (page 49). 2 Start Direct Search 3 Enter the frequency or channel number iTunes Tagging Using an iTunes Tagging ... were tagging directly from the Apple iTunes Music Store. So then you can be saved on this unit. Only with KTC-HR300 (optional accessory) connected. HD Radio™ Control Direct Search Tuning by entering the desired frequency or channel number.

Instruction Manual
Page 55
... (page 83) for information on setting the power on or off specification. The system resumes playing automatically. ⁄ • To use this function. DDX series DDX896/ DDX8046BT English 55 The Phone Call ("Call Interrupt") screen appears, and system is mode or received... Hang up the MUTE wire to . Phone Call ("Call...
... (page 83) for information on setting the power on or off specification. The system resumes playing automatically. ⁄ • To use this function. DDX series DDX896/ DDX8046BT English 55 The Phone Call ("Call Interrupt") screen appears, and system is mode or received... Hang up the MUTE wire to . Phone Call ("Call...
Instruction Manual
Page 102
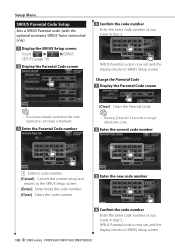
... code is now set , and the display returns to SIRIUS Setup screen. Setup Menu SIRIUS Parental Code Setup Sets a SIRIUS Parental code. (with the optional accessory SIRIUS Tuner connected only) 1 Display the SIRIUS Setup screen Touch [ ] > [ ] > [SIRIUS SETUP]. (page 78) 2 Display the Parental Code screen 4 Confirm the code number Enter the...
... code is now set , and the display returns to SIRIUS Setup screen. Setup Menu SIRIUS Parental Code Setup Sets a SIRIUS Parental code. (with the optional accessory SIRIUS Tuner connected only) 1 Display the SIRIUS Setup screen Touch [ ] > [ ] > [SIRIUS SETUP]. (page 78) 2 Display the Parental Code screen 4 Confirm the code number Enter the...
Instruction Manual
Page 104
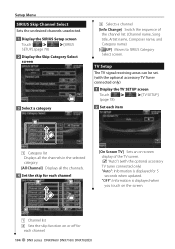
... is displayed for each channel. 104 DNX series DNX9960/ DNX7160/ DNX7020EX TV Setup The TV signal receiving areas can be set. (with the optional accessory TV Tuner connected only) 1 Display the TV SETUP screen Touch [ ] > [ ] > [TV SETUP]. (page 78) 2 Set each item 1...Category Select screen 3 Select a category 1 3 Selects a channel [Info Change] Switch the sequence of the TV screen. ( "Auto") (with the optional accessory TV tuner connected only) "Auto": Information is displayed when you touch on the screen. 3 1 Channel list 2 Sets the skip function on -screen display of...
... is displayed for each channel. 104 DNX series DNX9960/ DNX7160/ DNX7020EX TV Setup The TV signal receiving areas can be set. (with the optional accessory TV Tuner connected only) 1 Display the TV SETUP screen Touch [ ] > [ ] > [TV SETUP]. (page 78) 2 Set each item 1...Category Select screen 3 Select a category 1 3 Selects a channel [Info Change] Switch the sequence of the TV screen. ( "Auto") (with the optional accessory TV tuner connected only) "Auto": Information is displayed when you touch on the screen. 3 1 Channel list 2 Sets the skip function on -screen display of...


