
Installation Manual
Page 2
... reset button. 9. Always connect those wires to the wires via the fuse. This process could take up to the unit. 6. When the product is outdoors in turn on works Connect the wiring harness connector to several minutes. Install the unit in your vehicle is first powered on DNX9960, you connect the ignition wire (red) and the battery wire (yellow) to the characteristics of the wiring harness. 4. Make the proper input and output wire connections for the first time...
... reset button. 9. Always connect those wires to the wires via the fuse. This process could take up to the unit. 6. When the product is outdoors in turn on works Connect the wiring harness connector to several minutes. Install the unit in your vehicle is first powered on DNX9960, you connect the ignition wire (red) and the battery wire (yellow) to the characteristics of the wiring harness. 4. Make the proper input and output wire connections for the first time...
Installation Manual
Page 3
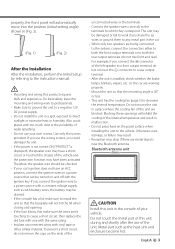
... near the Bluetooth antenna. Bluetooth antenna unit ¤ CAUTION Install this product requires skills and experience. English 3 If you use of the unit. If you share the wires or ground them to any metal part in the car. • When only two speakers are blocked. For example, if you could damage the unit. • If the power is not turned ON ("PROTECT" is displayed), the speaker wire may have...
... near the Bluetooth antenna. Bluetooth antenna unit ¤ CAUTION Install this product requires skills and experience. English 3 If you use of the unit. If you share the wires or ground them to any metal part in the car. • When only two speakers are blocked. For example, if you could damage the unit. • If the power is not turned ON ("PROTECT" is displayed), the speaker wire may have...
Installation Manual
Page 4
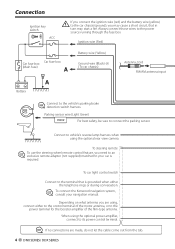
... fuse) Car fuse box A A Battery Battery wire (Yellow) Ground wire (Black) (To car chassis) Antenna Cord FM/AM antenna input ⁄ Connect to connect the parking sensor. To steering remote ⁄ To use the steering wheel remote control feature, you need to an exclusive remote adapter (not supplied) matched to your navigation manual. Parking sensor wire (Light Green) PRK SW For best safety, be sure to the vehicle's parking brake detection switch harness. When using the optional power amplifier, connect...
... fuse) Car fuse box A A Battery Battery wire (Yellow) Ground wire (Black) (To car chassis) Antenna Cord FM/AM antenna input ⁄ Connect to connect the parking sensor. To steering remote ⁄ To use the steering wheel remote control feature, you need to an exclusive remote adapter (not supplied) matched to your navigation manual. Parking sensor wire (Light Green) PRK SW For best safety, be sure to the vehicle's parking brake detection switch harness. When using the optional power amplifier, connect...

Instruction Manual
Page 3
... 85 Panel Color Coordinate 86 Screen Control 87 Registering Bluetooth Unit 88 Registering Bluetooth Unit PIN Code 89 Bluetooth Unit Connection 90 Bluetooth Hands-Free/Audio Output Setup 90 AV Input Setup 91 AV Output Interface Setup 91 Camera Setup 92 Navigation Setup 93 DSP Bypass Control (DNX7 series) 93 Speaker Setup 94 Car Type (DTA) Setup 95 Channel Level (DNX9/ DDX8 series) 97 DVD Setup 98 DVD Language Setup 99 DVD Parental Level Setup 99 Disc Setup 100 USB Setup 101 iPod Setup 101 SIRIUS Parental Code Setup 102 SIRIUS Parental Lock Setup 103...
... 85 Panel Color Coordinate 86 Screen Control 87 Registering Bluetooth Unit 88 Registering Bluetooth Unit PIN Code 89 Bluetooth Unit Connection 90 Bluetooth Hands-Free/Audio Output Setup 90 AV Input Setup 91 AV Output Interface Setup 91 Camera Setup 92 Navigation Setup 93 DSP Bypass Control (DNX7 series) 93 Speaker Setup 94 Car Type (DTA) Setup 95 Channel Level (DNX9/ DDX8 series) 97 DVD Setup 98 DVD Language Setup 99 DVD Parental Level Setup 99 Disc Setup 100 USB Setup 101 iPod Setup 101 SIRIUS Parental Code Setup 102 SIRIUS Parental Lock Setup 103...
Instruction Manual
Page 4
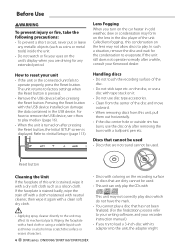
... connected unit fails to operate properly, press the Reset button. Reset button Cleaning the Unit If the faceplate of this unit is pressed. • Remove the USB device before pressing the Reset button. This unit may not correctly play discs which do not have the mark. • You cannot play . Lens Fogging When you turn on the unit's display when you try to load a 3-inch-disc with its mechanical parts. Refer to factory settings when the Reset button...
... connected unit fails to operate properly, press the Reset button. Reset button Cleaning the Unit If the faceplate of this unit is pressed. • Remove the USB device before pressing the Reset button. This unit may not correctly play discs which do not have the mark. • You cannot play . Lens Fogging When you turn on the unit's display when you try to load a 3-inch-disc with its mechanical parts. Refer to factory settings when the Reset button...
Instruction Manual
Page 5
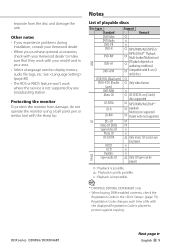
... displayed Registration Code is not supported by any broadcasting station. Notes List of playable discs Disc types Standard DVD Video DVD Audio DVD-VR DVD-R Support Remark MP3/WMA/AAC/MPEG1/ DVD-RW ‡ MPEG2/DivX*1 Playback Multi-border/Multisession/ DVD DVD+R ‡ (Playback depends on authoring conditions) DVD+RW ‡ Compatible with the sharp tip. Protecting the monitor To protect the monitor from the disc and damage the unit. Registration Code changes each time...
... displayed Registration Code is not supported by any broadcasting station. Notes List of playable discs Disc types Standard DVD Video DVD Audio DVD-VR DVD-R Support Remark MP3/WMA/AAC/MPEG1/ DVD-RW ‡ MPEG2/DivX*1 Playback Multi-border/Multisession/ DVD DVD+R ‡ (Playback depends on authoring conditions) DVD+RW ‡ Compatible with the sharp tip. Protecting the monitor To protect the monitor from the disc and damage the unit. Registration Code changes each time...

Instruction Manual
Page 7
... connected to this unit with an optional accessory iPod connection cable (KCA-iP301V), you start playback after connecting the DDX series DDX896/ DDX8046BT iPod, the music that has been played by connecting an iPod/iPhone (commercial product) with the KCAiP301V (optional accessory). • By connecting your iPod/iPhone to this unit, "KENWOOD" or "✓" is displayed on . ⁄ • If you can supply power to this unit Made for a flash memory device and digital audio players...
... connected to this unit with an optional accessory iPod connection cable (KCA-iP301V), you start playback after connecting the DDX series DDX896/ DDX8046BT iPod, the music that has been played by connecting an iPod/iPhone (commercial product) with the KCAiP301V (optional accessory). • By connecting your iPod/iPhone to this unit, "KENWOOD" or "✓" is displayed on . ⁄ • If you can supply power to this unit Made for a flash memory device and digital audio players...
Instruction Manual
Page 10
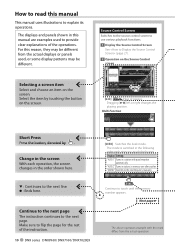
... [SEEK] Switches the Seek mode. Display Setting "AUTO1" Tunes in memory one after another. Multi Function Short Press Press the button, denoted by touching the button on the screen. Continue to the next page The instruction continues to the next frequency manually. 2 sec. "MANU" Switches to the next page. Select the item by . "AUTO2" Tunes in stations in a station with the mark differs from the actual displays or panels used to...
... [SEEK] Switches the Seek mode. Display Setting "AUTO1" Tunes in memory one after another. Multi Function Short Press Press the button, denoted by touching the button on the screen. Continue to the next page The instruction continues to the next frequency manually. 2 sec. "MANU" Switches to the next page. Select the item by . "AUTO2" Tunes in stations in a station with the mark differs from the actual displays or panels used to...
Instruction Manual
Page 44
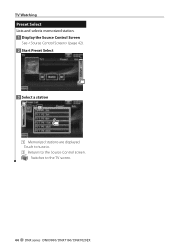
TV Watching Preset Select Lists and selects memorized station. 1 Display the Source Control Screen See (page 42). 2 Start Preset Select 3 Select a station 2 1 1 Memorized stations are displayed. Touch to tune in. 2 Returns to the Source Control screen. [ ] Switches to the TV screen. 44 DNX series DNX9960/ DNX7160/ DNX7020EX
TV Watching Preset Select Lists and selects memorized station. 1 Display the Source Control Screen See (page 42). 2 Start Preset Select 3 Select a station 2 1 1 Memorized stations are displayed. Touch to tune in. 2 Returns to the Source Control screen. [ ] Switches to the TV screen. 44 DNX series DNX9960/ DNX7160/ DNX7020EX
Instruction Manual
Page 59
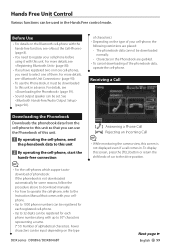
...; You need to select one of your cellphone. • Up to 1000 phone numbers can be registered for each registered cell-phone. • Up to the drive position. Hands Free Unit Control Various functions can be input depending on the type DDX series DDX896/ DDX8046BT [ ] Answering a Phone Call [ ] Rejecting an Incoming Call ⁄ • While monitoring the camera view, this screen is not downloaded automatically for...
...; You need to select one of your cellphone. • Up to 1000 phone numbers can be registered for each registered cell-phone. • Up to the drive position. Hands Free Unit Control Various functions can be input depending on the type DDX series DDX896/ DDX8046BT [ ] Answering a Phone Call [ ] Rejecting an Incoming Call ⁄ • While monitoring the camera view, this screen is not downloaded automatically for...
Instruction Manual
Page 72
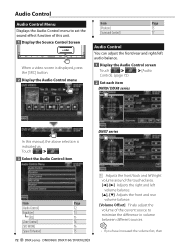
... menu to set the sound effect function of this unit. 1 Display the Source Control Screen When a video screen is displayed, press the [SRC] button. 2 Display the Audio Control menu Item Page [Position] 75 [Surround Control] 77 Audio Control You can adjust the front/rear and right/left audio balance. 1 Display the Audio Control screen Touch [ ] > [ ] > [Audio Control]. (page 72) 2 Set each item DNX9/ DDX8 series 1 In this manual, the above selection is indicated as: Touch [ ] > [ ]. 3 Select the Audio Control item DNX7 series 1 Item Page [Audio Control] 72 [Equalizer...
... menu to set the sound effect function of this unit. 1 Display the Source Control Screen When a video screen is displayed, press the [SRC] button. 2 Display the Audio Control menu Item Page [Position] 75 [Surround Control] 77 Audio Control You can adjust the front/rear and right/left audio balance. 1 Display the Audio Control screen Touch [ ] > [ ] > [Audio Control]. (page 72) 2 Set each item DNX9/ DDX8 series 1 In this manual, the above selection is indicated as: Touch [ ] > [ ]. 3 Select the Audio Control item DNX7 series 1 Item Page [Audio Control] 72 [Equalizer...
Instruction Manual
Page 73
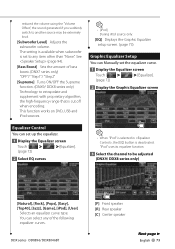
...frequency range that is set to any of the following equalizer curves. "iPod" uses its equalizer function. 3 Select the channel to be extremely loud. [Subwoofer Level] Adjusts the subwoofer volume. DDX series DDX896/ DDX8046BT [F] Front speaker [R] Rear speaker [C] Center speaker Next page 3 English 73 You can set the equalizer curve. 1 Display the Equalizer screen Touch [ ] > [ ] > [Equalizer]. (page 72) 2 Display the Graphic Equalizer screen Equalizer Control You can select any item other than "None". This function works on DVD, USB and iPod sources. ⁄ • [iPod...
...frequency range that is set to any of the following equalizer curves. "iPod" uses its equalizer function. 3 Select the channel to be extremely loud. [Subwoofer Level] Adjusts the subwoofer volume. DDX series DDX896/ DDX8046BT [F] Front speaker [R] Rear speaker [C] Center speaker Next page 3 English 73 You can set the equalizer curve. 1 Display the Equalizer screen Touch [ ] > [ ] > [Equalizer]. (page 72) 2 Display the Graphic Equalizer screen Equalizer Control You can select any item other than "None". This function works on DVD, USB and iPod sources. ⁄ • [iPod...
Instruction Manual
Page 77
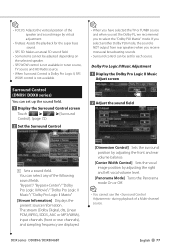
... front and rear volume balance. [Center Width Control] Sets the vocal image position by virtual adjustment. • TruBass: Assists the playback for each source. If you select another Dolby PLII mode, the sound is NOT output from rear speakers when you receive monaural broadcasting sounds. • Surround control can be set the Dolby PL, we recommend you set for the super bass sound. • SRS 3D: Makes a natural 3D sound field. •...
... front and rear volume balance. [Center Width Control] Sets the vocal image position by virtual adjustment. • TruBass: Assists the playback for each source. If you select another Dolby PLII mode, the sound is NOT output from rear speakers when you receive monaural broadcasting sounds. • Surround control can be set the Dolby PL, we recommend you set for the super bass sound. • SRS 3D: Makes a natural 3D sound field. •...
Instruction Manual
Page 88
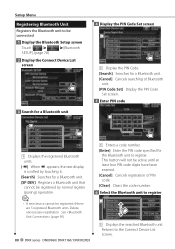
... Bluetooth units. This button will not be active until at least four PIN code digits have been entered. [Cancel] Cancels registration of Bluetooth unit. [PIN Code Set] Display the PIN Code Set screen. 5 Enter PIN code 1 1 Displays the registered Bluetooth units. [ ] When appears, the text display is scrolled by touching it. [Search] Searches for a Bluetooth unit. [SP DEV] Registers a Bluetooth unit that cannot be registered by normal register (pairing) operation. ⁄ • A new device cannot be connected. 1 Display the Bluetooth Setup screen Touch [ ] > [ ] > [Bluetooth SETUP...
... Bluetooth units. This button will not be active until at least four PIN code digits have been entered. [Cancel] Cancels registration of Bluetooth unit. [PIN Code Set] Display the PIN Code Set screen. 5 Enter PIN code 1 1 Displays the registered Bluetooth units. [ ] When appears, the text display is scrolled by touching it. [Search] Searches for a Bluetooth unit. [SP DEV] Registers a Bluetooth unit that cannot be registered by normal register (pairing) operation. ⁄ • A new device cannot be connected. 1 Display the Bluetooth Setup screen Touch [ ] > [ ] > [Bluetooth SETUP...

Instruction Manual
Page 89
...-phone or audio player side. 1 Display the Bluetooth Setup screen Touch [ ] > [ ] > [Bluetooth SETUP]. (page 78) 2 Display the Receiver PIN Code screen 2 Select a model name 3 Enter PIN code Displays the Bluetooth unit name that results in Bluetooth unit name list can also register from model name. 1 Display the Special Device List screen 4 Go through the procedure of and complete the registration (pairing) Registering Bluetooth Unit PIN Code Sets the PIN code of PIN code. [Enter] Enters PIN code. [Clear] Clears the code number. Registering Special Bluetooth Unit Registers...
...-phone or audio player side. 1 Display the Bluetooth Setup screen Touch [ ] > [ ] > [Bluetooth SETUP]. (page 78) 2 Display the Receiver PIN Code screen 2 Select a model name 3 Enter PIN code Displays the Bluetooth unit name that results in Bluetooth unit name list can also register from model name. 1 Display the Special Device List screen 4 Go through the procedure of and complete the registration (pairing) Registering Bluetooth Unit PIN Code Sets the PIN code of PIN code. [Enter] Enters PIN code. [Clear] Clears the code number. Registering Special Bluetooth Unit Registers...

Instruction Manual
Page 90
...Outputs from the front speakers. Setup Menu Bluetooth Unit Connection Selects the Bluetooth unit to connect. 1 Display the Bluetooth Setup screen Touch [ ] > [ ] > [Bluetooth SETUP]. (page 78) 2 Display the Connect Device List screen Bluetooth Hands-Free/Audio Output Setup Selects speakers to output the sound of hands-free phoning (such as phone call voice and ringing tone) and Bluetooth audio. 1 Display the Bluetooth Setup screen Touch [ ] > [ ] > [Bluetooth SETUP]. (page 78) 3 Select a registered Bluetooth unit 4 Select the service to use [Bluetooth HF/Audio] Sets the output...
...Outputs from the front speakers. Setup Menu Bluetooth Unit Connection Selects the Bluetooth unit to connect. 1 Display the Bluetooth Setup screen Touch [ ] > [ ] > [Bluetooth SETUP]. (page 78) 2 Display the Connect Device List screen Bluetooth Hands-Free/Audio Output Setup Selects speakers to output the sound of hands-free phoning (such as phone call voice and ringing tone) and Bluetooth audio. 1 Display the Bluetooth Setup screen Touch [ ] > [ ] > [Bluetooth SETUP]. (page 78) 3 Select a registered Bluetooth unit 4 Select the service to use [Bluetooth HF/Audio] Sets the output...

Instruction Manual
Page 93
... track/file/song has changed to connect via its interface cable. "Front R": Uses the front right side speaker for voice guidance. [Navigation Input] Selects a navigation system connection. ( "RGB") (DDX series only) "RGB": Allows the Kenwood's Navigation System to "AVIN". DSP Bypass Control (DNX7 series) Temporarily bypassing DSP (Digital Signal Processor) System. 1 Display the Audio SETUP screen Touch [ ] > [ ] > [Audio SETUP]. (page 78) 2 Set the DSP Select [Bypass] There is...
... track/file/song has changed to connect via its interface cable. "Front R": Uses the front right side speaker for voice guidance. [Navigation Input] Selects a navigation system connection. ( "RGB") (DDX series only) "RGB": Allows the Kenwood's Navigation System to "AVIN". DSP Bypass Control (DNX7 series) Temporarily bypassing DSP (Digital Signal Processor) System. 1 Display the Audio SETUP screen Touch [ ] > [ ] > [Audio SETUP]. (page 78) 2 Set the DSP Select [Bypass] There is...
Instruction Manual
Page 94
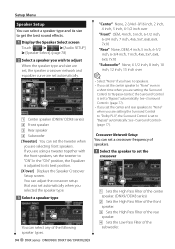
..., the Equalizer is adjusted to set a crossover frequency of speakers. 1 Select the speaker to its size to get the best sound effects. 1 Display the Speaker Select screen Touch [ ] > [ ] > [Audio SETUP] > [Speaker Select]. (page 78) 2 Select a speaker you are setting the Surround Control to "Bypass+Center", the Surround Control is set automatically when you are using a tweeter together with the front speakers, set the tweeter when you selected the speaker type. 3 Select a speaker type You can select any of the subwoofer. 94...
..., the Equalizer is adjusted to set a crossover frequency of speakers. 1 Select the speaker to its size to get the best sound effects. 1 Display the Speaker Select screen Touch [ ] > [ ] > [Audio SETUP] > [Speaker Select]. (page 78) 2 Select a speaker you are setting the Surround Control to "Bypass+Center", the Surround Control is set automatically when you are using a tweeter together with the front speakers, set the tweeter when you selected the speaker type. 3 Select a speaker type You can select any of the subwoofer. 94...
Instruction Manual
Page 96
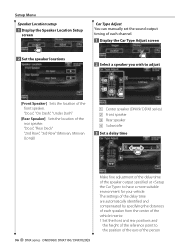
...", "Rear Deck" "2nd Row", "3rd Row" (Minivan, Minivan (Long)) 1 Center speaker (DNX9/ DDX8 series) 2 Front speaker 3 Rear speaker 4 Subwoofer 3 Set a delay time 96 DNX series DNX9960/ DNX7160/ DNX7020EX Make fine adjustment of the delay time of the speaker output specified at to adjust 1 2 3 4 [Front Speaker] Sets the location of the front speaker. Setup Menu Speaker Location setup 1 Display the Speaker Location Setup screen Car Type Adjust You can manually set the sound output timing of each speaker from the center of the vehicle interior. 1 Set the front and rear...
...", "Rear Deck" "2nd Row", "3rd Row" (Minivan, Minivan (Long)) 1 Center speaker (DNX9/ DDX8 series) 2 Front speaker 3 Rear speaker 4 Subwoofer 3 Set a delay time 96 DNX series DNX9960/ DNX7160/ DNX7020EX Make fine adjustment of the delay time of the speaker output specified at to adjust 1 2 3 4 [Front Speaker] Sets the location of the front speaker. Setup Menu Speaker Location setup 1 Display the Speaker Location Setup screen Car Type Adjust You can manually set the sound output timing of each speaker from the center of the vehicle interior. 1 Set the front and rear...

Instruction Manual
Page 116
... rear speakers. ▲ The Dual zone function is bad. ☞ Record the media again or use another disc instead. Radio reception is poor. ✔ The car antenna is not extended. ☞ Pull the antenna out all the way. ✔ The antenna control wire is not connected. ☞ Connect the wire correctly, referring to the CD cleaning of slight misoperation or miswiring. Disc source ? The sound skips when an Audio...
... rear speakers. ▲ The Dual zone function is bad. ☞ Record the media again or use another disc instead. Radio reception is poor. ✔ The car antenna is not extended. ☞ Pull the antenna out all the way. ✔ The antenna control wire is not connected. ☞ Connect the wire correctly, referring to the CD cleaning of slight misoperation or miswiring. Disc source ? The sound skips when an Audio...


