Instruction Manual
Page 7
...the power of this unit must update your iPod software if its mechanical parts. Notes • If you experience problems during installation, consult your Kenwood dealer. • When you can supply power to your iPod as well as charge it with video Software version iPod nano software 1.2 iPod...English 7 Pressing the Reset button with the USB device installed can be connected to this unit • KTC-V500N • KTC-V300N About Navigation units that can damage the data contained in the "Version" field by connecting an iPod (commercial product) with a hard cloth or using an ...
...the power of this unit must update your iPod software if its mechanical parts. Notes • If you experience problems during installation, consult your Kenwood dealer. • When you can supply power to your iPod as well as charge it with video Software version iPod nano software 1.2 iPod...English 7 Pressing the Reset button with the USB device installed can be connected to this unit • KTC-V500N • KTC-V300N About Navigation units that can damage the data contained in the "Version" field by connecting an iPod (commercial product) with a hard cloth or using an ...

Instruction Manual
Page 14
Built-in the following order each time you press the button again, the previous video display comes back on. ⁄ • The Rear view camera video is displayed when the vehicle's gear is in "Reverse". • Set the "NAVIGATION" of the (page 70) to "RGB"/"AV-IN" to display the Navigation video. 14 DDX7019/DDX7039 Basic Operations SRC A B CD E F D Switches the video source The video source switches in Disc Player TV Video iPod Rear View Camera Navigation You can also turn off the video display by pressing the button longer than 1 second. When you press the button.
Built-in the following order each time you press the button again, the previous video display comes back on. ⁄ • The Rear view camera video is displayed when the vehicle's gear is in "Reverse". • Set the "NAVIGATION" of the (page 70) to "RGB"/"AV-IN" to display the Navigation video. 14 DDX7019/DDX7039 Basic Operations SRC A B CD E F D Switches the video source The video source switches in Disc Player TV Video iPod Rear View Camera Navigation You can also turn off the video display by pressing the button longer than 1 second. When you press the button.
Instruction Manual
Page 15
SAT TUNER or HD Radio Build-in Disc Player USB device iPod TV ViIPDoEdO External TDVisc Player AUViXdeEoXT Navigation Standby Receives FM/AM broadcast. (page 30) Plays back the disc inserted in an external player, such as an audio source that is necessary to set "NAVIGATION Source" of these media. • It ... the following order each time you press the button. Refer to (page 8) for the type and format of (page 70) to "On" to add Navigation as a CD changer (optional accessory). (page 21) Outputs a sound signal input to a source that can also play audio files, video files, and ...
SAT TUNER or HD Radio Build-in Disc Player USB device iPod TV ViIPDoEdO External TDVisc Player AUViXdeEoXT Navigation Standby Receives FM/AM broadcast. (page 30) Plays back the disc inserted in an external player, such as an audio source that is necessary to set "NAVIGATION Source" of these media. • It ... the following order each time you press the button. Refer to (page 8) for the type and format of (page 70) to "On" to add Navigation as a CD changer (optional accessory). (page 21) Outputs a sound signal input to a source that can also play audio files, video files, and ...
Instruction Manual
Page 70
... "Off": When the image source is switched, an image entered via the AV INPUT port is displayed. 3 Selects a navigation system connection. ( RGB) "RGB": Allows the Kenwood's Navigation System to the rear view camera video display when engaging the shift knob of the rear view camera video display. "On":... on the screen. ( Off ) 8 9 10 11 8 Selects speakers used if no navigation system is connected. (The navigation display is cancelled when the AV source is switched.) 4 Return to the original screen. 70 DDX7019/DDX7039 5 6 7 5 Selects an AV source to be displayed left and right in the...
... "Off": When the image source is switched, an image entered via the AV INPUT port is displayed. 3 Selects a navigation system connection. ( RGB) "RGB": Allows the Kenwood's Navigation System to the rear view camera video display when engaging the shift knob of the rear view camera video display. "On":... on the screen. ( Off ) 8 9 10 11 8 Selects speakers used if no navigation system is connected. (The navigation display is cancelled when the AV source is switched.) 4 Return to the original screen. 70 DDX7019/DDX7039 5 6 7 5 Selects an AV source to be displayed left and right in the...
Instruction Manual
Page 71
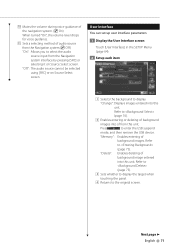
... Displays images entered into this unit. "Delete": Enables deleting of background image entered into this unit. q Sets a selecting method of from the Navigation system interface by pressing [SRC] or selecting it on Source Select screen. Refer to (page 74). 2 Enables entering or deleting of background images....( Off ) "On": Allows you to select the audio source input from this unit. "Memory": Enables entering of the navigation system. ( On) When turned "On", the volume level drops for voice guidance. Refer to display. User Interface You can set up user interface...
... Displays images entered into this unit. "Delete": Enables deleting of background image entered into this unit. q Sets a selecting method of from the Navigation system interface by pressing [SRC] or selecting it on Source Select screen. Refer to (page 74). 2 Enables entering or deleting of background images....( Off ) "On": Allows you to select the audio source input from this unit. "Memory": Enables entering of the navigation system. ( On) When turned "On", the volume level drops for voice guidance. Refer to display. User Interface You can set up user interface...

Instruction Manual
Page 72
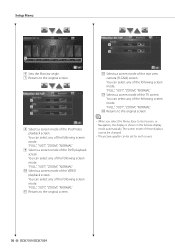
...screen. 9 10 11 9 Sets an on -screen display of the navigation screen. ( Off ) "Auto": Information is displayed for 5 seconds when updated. "Manual": Information is displayed when you touch on the screen. 72 DDX7019/DDX7039 p Sets an on the screen. "Manual": Information is displayed...Playback screen. ( Auto) "Auto": Information is displayed for 5 seconds when updated. Setup Menu 5 6 7 8 5 Sets an on -screen display of the DVD Playback screen. ( Manual) "Auto": Information is displayed for 5 seconds when updated. r Returns to display the name of the , , , and buttons on...
...screen. 9 10 11 9 Sets an on -screen display of the navigation screen. ( Off ) "Auto": Information is displayed for 5 seconds when updated. "Manual": Information is displayed when you touch on the screen. 72 DDX7019/DDX7039 p Sets an on the screen. "Manual": Information is displayed...Playback screen. ( Auto) "Auto": Information is displayed for 5 seconds when updated. Setup Menu 5 6 7 8 5 Sets an on -screen display of the DVD Playback screen. ( Manual) "Auto": Information is displayed for 5 seconds when updated. r Returns to display the name of the , , , and buttons on...
Instruction Manual
Page 76
... select any of these displays cannot be set for each source. 76 DDX7019/DDX7039 "FULL", "JUST", "ZOOM", "NORMAL" q Returns to the original screen. ⁄ • When you select the Menu, Easy Control screen, or Navigation, the display is shown in the full-size display mode automatically. "... mode of the DVD playback screen. "FULL", "JUST", "ZOOM", "NORMAL" p Selects a screen mode of the iPod Video playback screen. You can be changed. • The picture qua¡lity can select any of the rear view camera (R-CAM) screen. Setup Menu 6 7 6 Sets the Monitor angle. 7 Returns...
... select any of these displays cannot be set for each source. 76 DDX7019/DDX7039 "FULL", "JUST", "ZOOM", "NORMAL" q Returns to the original screen. ⁄ • When you select the Menu, Easy Control screen, or Navigation, the display is shown in the full-size display mode automatically. "... mode of the DVD playback screen. "FULL", "JUST", "ZOOM", "NORMAL" p Selects a screen mode of the iPod Video playback screen. You can be changed. • The picture qua¡lity can select any of the rear view camera (R-CAM) screen. Setup Menu 6 7 6 Sets the Monitor angle. 7 Returns...


