Instruction Manual
Page 1
... your Kenwood dealer for information or service on the warranty card, and in the space provided below. Refer to read through this instruction manual. Model DDX7019/DDX7039 Serial number US Residence Only Register Online Register your records Record the serial number, found on the back of the unit, in the spaces designated on the product. MONITOR WITH DVD RECEIVER DDX7019 DDX7039 INSTRUCTION MANUAL Take the time...
... your Kenwood dealer for information or service on the warranty card, and in the space provided below. Refer to read through this instruction manual. Model DDX7019/DDX7039 Serial number US Residence Only Register Online Register your records Record the serial number, found on the back of the unit, in the spaces designated on the product. MONITOR WITH DVD RECEIVER DDX7019 DDX7039 INSTRUCTION MANUAL Take the time...

Instruction Manual
Page 2
...Video File/Picture File Watching 27 Function During Playback Screen 27 Functions When Displaying the Easy Control Panel 27 Functions While Displaying the Control Screen 28 Picture Control 29 Folder Select 29 Radio Listening 30 Functions When Displaying the Easy Control Panel 30 Functions While Displaying the Control Screen 30 Seek Mode 31 Auto Memory 32 Manual Memory 32 Preset Select 33 Radio Text 33 Set Station Name 34 Direct Search 34 Traffic Information 35 Search for Program Type 35 2 DDX7019/DDX7039 Basic Operations 12 iPod Control 36 Connecting...
...Video File/Picture File Watching 27 Function During Playback Screen 27 Functions When Displaying the Easy Control Panel 27 Functions While Displaying the Control Screen 28 Picture Control 29 Folder Select 29 Radio Listening 30 Functions When Displaying the Easy Control Panel 30 Functions While Displaying the Control Screen 30 Seek Mode 31 Auto Memory 32 Manual Memory 32 Preset Select 33 Radio Text 33 Set Station Name 34 Direct Search 34 Traffic Information 35 Search for Program Type 35 2 DDX7019/DDX7039 Basic Operations 12 iPod Control 36 Connecting...
Instruction Manual
Page 3
HD Radio Control 50 Functions When Displaying the Easy Control Panel 50 Functions While Displaying the Control Screen 50 Seek Mode 51 Auto Memory 52 Manual Memory 52 Source Select 53 Displaying the Control Screen 53 Muting Audio Volume upon Reception of Phone call 54 Muting Audio Volume upon Reception of Phone Call 54 Setup Menu 64 Setup Menu 64 Audio Setup 64 Crossover Network Setup 65 DVD Setup 65 Language Setup 66 Parental Level Setup 67 DivX Setup 68 Software Information 68 iPod Setup 69 System Setup 69 AV Interface Setup 70 User Interface ...
HD Radio Control 50 Functions When Displaying the Easy Control Panel 50 Functions While Displaying the Control Screen 50 Seek Mode 51 Auto Memory 52 Manual Memory 52 Source Select 53 Displaying the Control Screen 53 Muting Audio Volume upon Reception of Phone call 54 Muting Audio Volume upon Reception of Phone Call 54 Setup Menu 64 Setup Menu 64 Audio Setup 64 Crossover Network Setup 65 DVD Setup 65 Language Setup 66 Parental Level Setup 67 DivX Setup 68 Software Information 68 iPod Setup 69 System Setup 69 AV Interface Setup 70 User Interface ...
Instruction Manual
Page 6
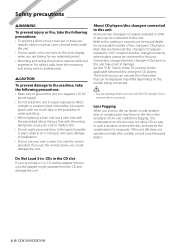
... the models being connected. ¤ • You can use your eyes on the lens in . Using a fuse with its adapter into the unit, the adapter might separate from the CD and damage the unit. 6 DDX7019/DDX7039 Doing so will cause damage or breakdown. • Do not use and the information that any Kenwood disc changers/ CD players released in a spot exposed to play. Set the "O-N" Switch to...
... the models being connected. ¤ • You can use your eyes on the lens in . Using a fuse with its adapter into the unit, the adapter might separate from the CD and damage the unit. 6 DDX7019/DDX7039 Doing so will cause damage or breakdown. • Do not use and the information that any Kenwood disc changers/ CD players released in a spot exposed to play. Set the "O-N" Switch to...
Instruction Manual
Page 7
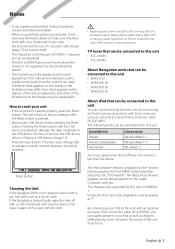
... the Reset button with video Software version iPod nano software 1.2 iPod nano software 1.1.1 iPod software 1.2 You must be inapplicable. For how to remove the USB device, refer to (page 13). • Press the reset button if the disc auto changer fails to this unit with your model and in the USB device. Controllable iPod iPod nano iPod nano second generation iPod with the USB device installed can be displayed correctly appear as "*". Notes • If you experience problems during installation, consult your Kenwood dealer...
... the Reset button with video Software version iPod nano software 1.2 iPod nano software 1.1.1 iPod software 1.2 You must be inapplicable. For how to remove the USB device, refer to (page 13). • Press the reset button if the disc auto changer fails to this unit with your model and in the USB device. Controllable iPod iPod nano iPod nano second generation iPod with the USB device installed can be displayed correctly appear as "*". Notes • If you experience problems during installation, consult your Kenwood dealer...
Instruction Manual
Page 8
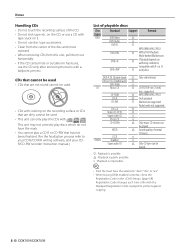
... played. This unit may not correctly play the CDs with 8-cm (3 ‡ inch) discs DVD-R DL (Double layer) ‡ Only video format DVD+R DL (Double layer) ‡ DVD-RAM × CD Music CD ‡ CD-TEXT/8-cm (3 inch) discs supported. CD-ROM ‡ MP3/WMA/AAC/JPEG/ CD-R CD-RW ‡ DivX playback ‡ Multisession supported Packet write not supported. Registration Code changes each time a file with the displayed Registration Code...
... played. This unit may not correctly play the CDs with 8-cm (3 ‡ inch) discs DVD-R DL (Double layer) ‡ Only video format DVD+R DL (Double layer) ‡ DVD-RAM × CD Music CD ‡ CD-TEXT/8-cm (3 inch) discs supported. CD-ROM ‡ MP3/WMA/AAC/JPEG/ CD-R CD-RW ‡ DivX playback ‡ Multisession supported Packet write not supported. Registration Code changes each time a file with the displayed Registration Code...

Instruction Manual
Page 10
... or device. 10 DDX7019/DDX7039 • Playing order of the Audio file In the example of the CA-U1EX (option) is longer than the USB compatible cable is played. • Playable AAC file ".m4a" file encoded by AAC-LC format. Although the audio files are complied with KCA-iP300V • Playable USB device file system FAT16, FAT32 • About the Connection of the USB device If an extension cable is needed for USB device connection...
... or device. 10 DDX7019/DDX7039 • Playing order of the Audio file In the example of the CA-U1EX (option) is longer than the USB compatible cable is played. • Playable AAC file ".m4a" file encoded by AAC-LC format. Although the audio files are complied with KCA-iP300V • Playable USB device file system FAT16, FAT32 • About the Connection of the USB device If an extension cable is needed for USB device connection...

Instruction Manual
Page 13
...button. Refer to the original screen. Remove the USB device. Next page 3 English 13 Press on the source control screen. 6 1 Displays the Source Select screen. (page 53) 1 2 Returns to the Source Control screen. 2 3 Displays the Audio Control Menu screen. (page 82) 4 Displays the SETUP Menu screen. (page 64) 3 5 Adjusts the Volume. 4 6 Clock display ⁄ 5 5 • Touch displayed at the last time. Playing a USB device When connecting a USB device, playback starts automatically. C Switches the function screen The function control screen switches in the USB device...
...button. Refer to the original screen. Remove the USB device. Next page 3 English 13 Press on the source control screen. 6 1 Displays the Source Select screen. (page 53) 1 2 Returns to the Source Control screen. 2 3 Displays the Audio Control Menu screen. (page 82) 4 Displays the SETUP Menu screen. (page 64) 3 5 Adjusts the Volume. 4 6 Clock display ⁄ 5 5 • Touch displayed at the last time. Playing a USB device When connecting a USB device, playback starts automatically. C Switches the function screen The function control screen switches in the USB device...

Instruction Manual
Page 14
Built-in "Reverse". • Set the "NAVIGATION" of the (page 70) to "RGB"/"AV-IN" to display the Navigation video. 14 DDX7019/DDX7039 When you press the button. Basic Operations SRC A B CD E F D Switches the video source The video source switches in the following order each time you press the button again, the previous video display comes back on. ⁄ • The Rear view camera video is displayed when the vehicle's gear is in Disc Player TV Video iPod Rear View Camera Navigation You can also turn off the video display by pressing the button longer than 1 second.
Built-in "Reverse". • Set the "NAVIGATION" of the (page 70) to "RGB"/"AV-IN" to display the Navigation video. 14 DDX7019/DDX7039 When you press the button. Basic Operations SRC A B CD E F D Switches the video source The video source switches in the following order each time you press the button again, the previous video display comes back on. ⁄ • The Rear view camera video is displayed when the vehicle's gear is in Disc Player TV Video iPod Rear View Camera Navigation You can also turn off the video display by pressing the button longer than 1 second.
Instruction Manual
Page 15
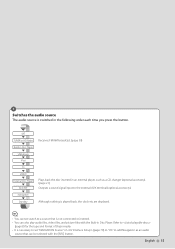
... Built-in Disc Player. Although nothing is played back, the clock etc are displayed. ⁄ • You cannot switch to a source that can also play audio files, video files, and picture files with the [SRC] button. English 15 E Switches the audio source The audio source is switched in an external player, such as an audio source that is necessary to the external AUX terminal (optional accessory). SAT TUNER or HD Radio Build-in Disc Player USB device iPod TV ViIPDoEdO External TDVisc Player AUViXdeEoXT Navigation Standby Receives FM...
... Built-in Disc Player. Although nothing is played back, the clock etc are displayed. ⁄ • You cannot switch to a source that can also play audio files, video files, and picture files with the [SRC] button. English 15 E Switches the audio source The audio source is switched in an external player, such as an audio source that is necessary to the external AUX terminal (optional accessory). SAT TUNER or HD Radio Build-in Disc Player USB device iPod TV ViIPDoEdO External TDVisc Player AUViXdeEoXT Navigation Standby Receives FM...
Instruction Manual
Page 30
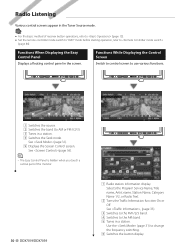
... part of receiver button operations, refer to (page 12). • Set the remote controller mode switch to "AUD" mode before starting operation, refer to the AM band. 5 Tunes in the screen. Functions When Displaying the Easy Control Panel Displays a floating control panel in a station. Functions While Displaying the Control Screen Switch to control screen to change the frequency switching. 6 Switches the button display. Use the (page 31) to use various functions. See , (page 35). 3 Switches to the FM1/2/3 band. 4 Switches to (page 86). Selects the Program Service...
... part of receiver button operations, refer to (page 12). • Set the remote controller mode switch to "AUD" mode before starting operation, refer to the AM band. 5 Tunes in the screen. Functions When Displaying the Easy Control Panel Displays a floating control panel in a station. Functions While Displaying the Control Screen Switch to control screen to change the frequency switching. 6 Switches the button display. Use the (page 31) to use various functions. See , (page 35). 3 Switches to the FM1/2/3 band. 4 Switches to (page 86). Selects the Program Service...
Instruction Manual
Page 31
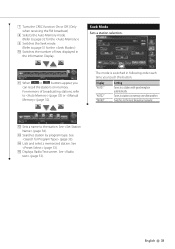
... screen. English 31 See (page 34). r Lists and selects memorized station. For memory of lines displayed in memory one after another. 7 Turns the CRSC function On or Off. (Only when receiving the FM broadcast) 8 Selects the Auto Memory mode. (Refer to page 32 for the ) 9 Switches the Seek mode. (Refer to buttons appear, you touch the button. Seek Mode Sets a station selection. 11 q When to page 31 for the ) p Switches the number...
... screen. English 31 See (page 34). r Lists and selects memorized station. For memory of lines displayed in memory one after another. 7 Turns the CRSC function On or Off. (Only when receiving the FM broadcast) 8 Selects the Auto Memory mode. (Refer to page 32 for the ) 9 Switches the Seek mode. (Refer to buttons appear, you touch the button. Seek Mode Sets a station selection. 11 q When to page 31 for the ) p Switches the number...
Instruction Manual
Page 54
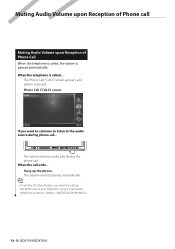
Phone Call ("CALL") screen If you need to hook up the phone. Hang up the MUTE wire to your telephone using a commercial telephone accessory. SRC The system resumes audio play during phone call... Muting Audio Volume upon Reception of Phone call Muting Audio Volume upon Reception of Phone Call When the telephone is called, the system is called... The system resumes playing automatically. ⁄ • To use the TEL Mute feature, you want...
Phone Call ("CALL") screen If you need to hook up the phone. Hang up the MUTE wire to your telephone using a commercial telephone accessory. SRC The system resumes audio play during phone call... Muting Audio Volume upon Reception of Phone call Muting Audio Volume upon Reception of Phone Call When the telephone is called, the system is called... The system resumes playing automatically. ⁄ • To use the TEL Mute feature, you want...

Instruction Manual
Page 56
... applied the parking brake. • The picture quality can be set for each source. • You can set image quality of screens such as menu from (page 75) of the . 3 Adjust the picture quality 6 1 1 2 2 3 3 4 4 5 5 7 1 Brightness Control 2 Tint Control Displayed for an NTSC system image on TV, Video, iPod or Rear View Camera. 3 Color Control Displayed on the TV, Video, iPod or Rear View Camera screen only. 4 Contrast Control 5 Black Level Adjustment 6 Dimmer Mode Setup "SYNC": Turning the Dimmer function On or Off when the vehicle light control switch is turned On...
... applied the parking brake. • The picture quality can be set for each source. • You can set image quality of screens such as menu from (page 75) of the . 3 Adjust the picture quality 6 1 1 2 2 3 3 4 4 5 5 7 1 Brightness Control 2 Tint Control Displayed for an NTSC system image on TV, Video, iPod or Rear View Camera. 3 Color Control Displayed on the TV, Video, iPod or Rear View Camera screen only. 4 Contrast Control 5 Black Level Adjustment 6 Dimmer Mode Setup "SYNC": Turning the Dimmer function On or Off when the vehicle light control switch is turned On...
Instruction Manual
Page 67
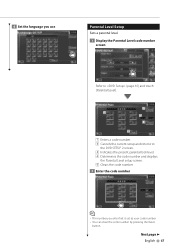
... 4 Set the language you use Parental Level Setup Sets a parental level. 1 Display the Parental Level code number screen Refer to (page 65) and touch [Parental Level]. 2 1 3 4 5 1 Enters a code number. 2 Cancels the current setup and returns to the DVD SETUP 2 screen. 3 Indicates the present parental lock level. 4 Determines the code number and displays the Parental Level setup screen. 5 Clears the code number. 2 Enter the code number ⁄ • The number you enter first is set as your code number. •...
... 4 Set the language you use Parental Level Setup Sets a parental level. 1 Display the Parental Level code number screen Refer to (page 65) and touch [Parental Level]. 2 1 3 4 5 1 Enters a code number. 2 Cancels the current setup and returns to the DVD SETUP 2 screen. 3 Indicates the present parental lock level. 4 Determines the code number and displays the Parental Level setup screen. 5 Clears the code number. 2 Enter the code number ⁄ • The number you enter first is set as your code number. •...
Instruction Manual
Page 68
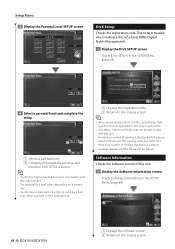
...; • When downloading a DivX VOD file controlled by DRM, register the code appeared on a loaded disc. • If a disc has no parental lock, anybody can play with the viewing restriction. This code is displayed when playing a DivX VOD file with this unit. 1 Display the Software Information screen Touch [Software Information] in the SETUP Menu (page 64). 1 4 Select a parental level and complete the setup 1 1 2 1 Selects a parental level. 2 Complete the parental level setup and returns to DVD SETUP 2 screen. ⁄ •...
...; • When downloading a DivX VOD file controlled by DRM, register the code appeared on a loaded disc. • If a disc has no parental lock, anybody can play with the viewing restriction. This code is displayed when playing a DivX VOD file with this unit. 1 Display the Software Information screen Touch [Software Information] in the SETUP Menu (page 64). 1 4 Select a parental level and complete the setup 1 1 2 1 Selects a parental level. 2 Complete the parental level setup and returns to DVD SETUP 2 screen. ⁄ •...
Instruction Manual
Page 69
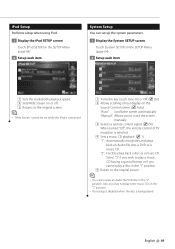
.... 4 Sets a music CD playback. ( 1) "1": Automatically recognizes and plays back an Audio file disc, a DVD or a music CD. "2": Forcibly plays back a disc as a music CD. "Manual": Allows you cannot play a disc in the "1" position. 5 Return to the original screen. ⁄ • You cannot play some music CDs in the "2" position. • Your setup is disabled when the disc is being played. English 69 iPod Setup Performs setup when using iPod. 1 Display the iPod SETUP screen Touch [iPod SETUP] in the SETUP Menu (page 64). 2 Setup each...
.... 4 Sets a music CD playback. ( 1) "1": Automatically recognizes and plays back an Audio file disc, a DVD or a music CD. "2": Forcibly plays back a disc as a music CD. "Manual": Allows you cannot play a disc in the "1" position. 5 Return to the original screen. ⁄ • You cannot play some music CDs in the "2" position. • Your setup is disabled when the disc is being played. English 69 iPod Setup Performs setup when using iPod. 1 Display the iPod SETUP screen Touch [iPod SETUP] in the SETUP Menu (page 64). 2 Setup each...
Instruction Manual
Page 70
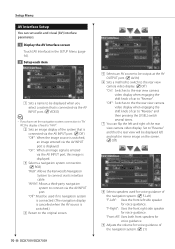
... screen. 70 DDX7019/DDX7039 5 6 7 5 Selects an AV source to be output at the AV OUTPUT port. ( AV-IN) 6 Sets a method to switch to the rear view camera video display. ( Off ) "On": Switches to "Reverse" and the the rear view will be displayed when you select a system that is connected via the AV INPUT port. ( Off ) "Off": When the image source is switched, an image entered via the AV INPUT port is displayed. 3 Selects a navigation system connection. ( RGB) "RGB": Allows the Kenwood's Navigation...
... screen. 70 DDX7019/DDX7039 5 6 7 5 Selects an AV source to be output at the AV OUTPUT port. ( AV-IN) 6 Sets a method to switch to the rear view camera video display. ( Off ) "On": Switches to "Reverse" and the the rear view will be displayed when you select a system that is connected via the AV INPUT port. ( Off ) "Off": When the image source is switched, an image entered via the AV INPUT port is displayed. 3 Selects a navigation system connection. ( RGB) "RGB": Allows the Kenwood's Navigation...

Instruction Manual
Page 92
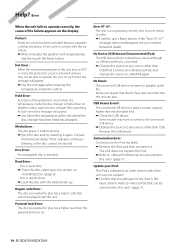
... being played. ✔ The media is set up subwoofer phase. • No output from the preout jack. Audio file source ? The sound skips when an Audio file is being used. ☞ The Touch Sensor Tone can't be a malfunction in use another disc instead. Help? Radio reception is poor. ✔ The car antenna is not extended. ☞ Pull the antenna out all the way. ✔ The antenna control wire is not connected. ☞ Connect the wire...
... being played. ✔ The media is set up subwoofer phase. • No output from the preout jack. Audio file source ? The sound skips when an Audio file is being used. ☞ The Touch Sensor Tone can't be a malfunction in use another disc instead. Help? Radio reception is poor. ✔ The car antenna is not extended. ☞ Pull the antenna out all the way. ✔ The antenna control wire is not connected. ☞ Connect the wire...
Instruction Manual
Page 94
... from operating. Update your nearest Kenwood dealer. Help? Read Error : • Disc is selected as appropriate and then push the Reset button. No Device (USB device)/Disconnected (iPod): The USB device/iPod is quite dirty. ➡ Clean the disc, referring to operate correctly, the cause of this indicator continues blinking or the disc cannot be played with the car chassis. ➡ Wire or insulate the speaker cord as a source although no playable audio file. Media was played...
... from operating. Update your nearest Kenwood dealer. Help? Read Error : • Disc is selected as appropriate and then push the Reset button. No Device (USB device)/Disconnected (iPod): The USB device/iPod is quite dirty. ➡ Clean the disc, referring to operate correctly, the cause of this indicator continues blinking or the disc cannot be played with the car chassis. ➡ Wire or insulate the speaker cord as a source although no playable audio file. Media was played...


