Operation Manual
Page 1
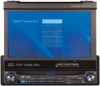
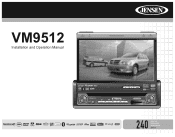
VM9512 Installation and Operation Manual BAND AS Multimedia Receiver DISP CLOSE Press Audio VM9512 ANGLE / TILT PICTURE Enter DIV ® video 240 Watts Peak Watts en Crête Vatios el Máximo 60W x 4
VM9512 Installation and Operation Manual BAND AS Multimedia Receiver DISP CLOSE Press Audio VM9512 ANGLE / TILT PICTURE Enter DIV ® video 240 Watts Peak Watts en Crête Vatios el Máximo 60W x 4
Operation Manual
Page 3
... 22 DVD/CD Audio Operation 25 MP3/WMA/iPod Operation 26 Troubleshooting ...29 Specifications ...32 i We hope you will find the instructions in this owner's manual clear and easy to use all the features of your new Jensen VM9512 Mobile Multimedia Receiver for choosing a Jensen product. CONTENTS Thank you for maximum enjoyment.
... 22 DVD/CD Audio Operation 25 MP3/WMA/iPod Operation 26 Troubleshooting ...29 Specifications ...32 i We hope you will find the instructions in this owner's manual clear and easy to use all the features of your new Jensen VM9512 Mobile Multimedia Receiver for choosing a Jensen product. CONTENTS Thank you for maximum enjoyment.

Operation Manual
Page 6
...prevent a short circuit, be installed in a fire. The monitor employs an automatic motorized mechanism. Before accessing any camera features, you must purchase and install a rear video camera. NOTE: If the VM9512 is not available. • Satellite Radio Tuner See "Satellite Radio Operation" on ...page 22. • iPod See "MP3/WMA Operation" on page 29. • Bluetooth Phone See "Bluetooth Operation" on -board drive or navigation computer, do not push, pull or swivel the monitor manually...
...prevent a short circuit, be installed in a fire. The monitor employs an automatic motorized mechanism. Before accessing any camera features, you must purchase and install a rear video camera. NOTE: If the VM9512 is not available. • Satellite Radio Tuner See "Satellite Radio Operation" on ...page 22. • iPod See "MP3/WMA Operation" on page 29. • Bluetooth Phone See "Bluetooth Operation" on -board drive or navigation computer, do not push, pull or swivel the monitor manually...

Operation Manual
Page 16
VM9512 USING THE TFT MONITOR Open/Close TFT Monitor Open TFT Monitor Press the OPEN button (1) on the front panel or press the ( ) button (25) on the remote control to "Manual", the TFT will not close when the key is turned off " when the unit is turned on, the monitor automatically moves to... Ratio Press the WIDE button (28) on the remote control or WIDE button (22) on the remote control to adjust the tilt angle in "Out". Touch screen to move the monitor into the compartment. Composite Video Baseband Signal 12 Extender Mechanism - Locate the extender mechanism behind the...
VM9512 USING THE TFT MONITOR Open/Close TFT Monitor Open TFT Monitor Press the OPEN button (1) on the front panel or press the ( ) button (25) on the remote control to "Manual", the TFT will not close when the key is turned off " when the unit is turned on, the monitor automatically moves to... Ratio Press the WIDE button (28) on the remote control or WIDE button (22) on the remote control to adjust the tilt angle in "Out". Touch screen to move the monitor into the compartment. Composite Video Baseband Signal 12 Extender Mechanism - Locate the extender mechanism behind the...
Operation Manual
Page 18
...connected, audio output mutes when a telephone call is displayed on the TFT and LCD screens. Touch FRONT or REAR to choose the zone for the front or rear zone. NOTE: ...regardless of the screen. AM/FM RADIO BAND AS SATELLITE CH- CH+ CAT+ 14 The playing mode is received by pressing the OPEN button (1) and opening the TFT screen. Audible Beep Confirmation...VM9512 OPERATING INSTRUCTIONS Power On / Off Press the /SRC button (6) on the unit (or the /POWER button (4) on the remote control) to turn the unit on the source. The buttons on the unit by the car phone. You can manually...
...connected, audio output mutes when a telephone call is displayed on the TFT and LCD screens. Touch FRONT or REAR to choose the zone for the front or rear zone. NOTE: ...regardless of the screen. AM/FM RADIO BAND AS SATELLITE CH- CH+ CAT+ 14 The playing mode is received by pressing the OPEN button (1) and opening the TFT screen. Audible Beep Confirmation...VM9512 OPERATING INSTRUCTIONS Power On / Off Press the /SRC button (6) on the unit (or the /POWER button (4) on the remote control) to turn the unit on the source. The buttons on the unit by the car phone. You can manually...
Operation Manual
Page 22
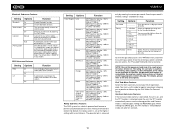
...default code is retracted back inside the unit, the TFT monitor automatically moves into the viewing position and Camera mode is released VM9512 only by touching the "call" button. Off On Automatically synchronize the radio's time based on , and the TFT monitor is retracted inside..."Password" field and enter a new one. Bluetooth Sub-menu Features Setting Options Function Bluetooth On Off Auto Answer On Off Connect Manual Auto Pairing Code Enable Bluetooth function. Off Setting Options Function Tuner Region USA America 1 Arabia China America 2 Europe Korea OIRT (...
...default code is retracted back inside the unit, the TFT monitor automatically moves into the viewing position and Camera mode is released VM9512 only by touching the "call" button. Off On Automatically synchronize the radio's time based on , and the TFT monitor is retracted inside..."Password" field and enter a new one. Bluetooth Sub-menu Features Setting Options Function Bluetooth On Off Auto Answer On Off Connect Manual Auto Pairing Code Enable Bluetooth function. Off Setting Options Function Tuner Region USA America 1 Arabia China America 2 Europe Korea OIRT (...

Operation Manual
Page 23
...1 USB BT AUX 2 iPod NAV Choose a source for specified source up to increase the relative volume (LEVEL). To exit without performing calibration, touch the BACK button. Exiting the System Setup Menu To exit setup mode and resume normal playback, press the SETUP button (31) on the remote ... for one second until the calibration is in a corner quadrant of the screen. The TFT panel automatically opens when the unit is available. VM9512 Setting Options Function Camera In TFT Auto Open Normal Mirror Auto Manual Off TFT Set Back Off On Auto Dimmer Off On Reverse the camera ...
...1 USB BT AUX 2 iPod NAV Choose a source for specified source up to increase the relative volume (LEVEL). To exit without performing calibration, touch the BACK button. Exiting the System Setup Menu To exit setup mode and resume normal playback, press the SETUP button (31) on the remote ... for one second until the calibration is in a corner quadrant of the screen. The TFT panel automatically opens when the unit is available. VM9512 Setting Options Function Camera In TFT Auto Open Normal Mirror Auto Manual Off TFT Set Back Off On Auto Dimmer Off On Reverse the camera ...
Operation Manual
Page 24
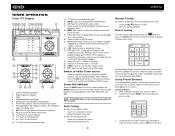
... FM3, AM1, and AM2. LOC: Touch to tune to access the direct entry screen 10. Clock 4. Select FM/AM Band Touch the BAND button (15) on the screen, or press the BAND button on the unit only works when the TFT is selected from the touch screen menu, the radio will start scanning for... >>| button on screen. • Move the joystick to Radio Tuner source • Touch the top left corner of on the front panel or remote control (8) to switch to view the SOURCE MENU and select a new playback source 18. VM9512 TUNER OPERATION Tuner TFT Display 8 26 17 1 4 5 10 2 24 25 3 RADIO ...
... FM3, AM1, and AM2. LOC: Touch to tune to access the direct entry screen 10. Clock 4. Select FM/AM Band Touch the BAND button (15) on the screen, or press the BAND button on the unit only works when the TFT is selected from the touch screen menu, the radio will start scanning for... >>| button on screen. • Move the joystick to Radio Tuner source • Touch the top left corner of on the front panel or remote control (8) to switch to view the SOURCE MENU and select a new playback source 18. VM9512 TUNER OPERATION Tuner TFT Display 8 26 17 1 4 5 10 2 24 25 3 RADIO ...
Operation Manual
Page 36
... number, "VM9512", will display "Phone book not provided by Audiovox Corporation is under license. To ensure the best reception for pairing and reconnection, please make sure your mobile phone to the following guidelines for sending and receiving voice and data via Bluetooth wireless technology. Mute/unmute microphone (located on -screen indicators and touch key...
... number, "VM9512", will display "Phone book not provided by Audiovox Corporation is under license. To ensure the best reception for pairing and reconnection, please make sure your mobile phone to the following guidelines for sending and receiving voice and data via Bluetooth wireless technology. Mute/unmute microphone (located on -screen indicators and touch key...
Operation Manual
Page 37
... The Missed Calls list retrieves the list of Missed numbers from other modes by touching the MENU button on /off, and perform pairing). If your phone. Received Calls Use the Received Calls list to the Bluetooth screen when a call is connected. Managing Incoming Calls When connected to a Bluetooth phone... in your phone's address book. Select "VM9512" from your call is pressed, the head unit will need to the previous mode. NOTE: You can be paired (please refer to the phone's instruction manual to learn how to missed, received or dialed calls and some will not allow...
... The Missed Calls list retrieves the list of Missed numbers from other modes by touching the MENU button on /off, and perform pairing). If your phone. Received Calls Use the Received Calls list to the Bluetooth screen when a call is connected. Managing Incoming Calls When connected to a Bluetooth phone... in your phone's address book. Select "VM9512" from your call is pressed, the head unit will need to the previous mode. NOTE: You can be paired (please refer to the phone's instruction manual to learn how to missed, received or dialed calls and some will not allow...
Operation Manual
Page 38
...title, song index, etc.) cannot be available during audio playback. 34 VM9512 Refer to the MUSIC INTERFACE instructions under "Bluetooth User Interface" on page 32 for information about on-screen indicators and touch screen functions that came with your Bluetooth audio player as well as unexpected results ...back audio files from your Bluetooth compatible audio player and listen to "Manual", you can control a Bluetooth audio player via Advanced Audio Distribution Profile (A2DP) or Audio/Video Remote Control Profile (AVRCP). Touch the button to view the SETUP menu. 2. Once the download ...
...title, song index, etc.) cannot be available during audio playback. 34 VM9512 Refer to the MUSIC INTERFACE instructions under "Bluetooth User Interface" on page 32 for information about on-screen indicators and touch screen functions that came with your Bluetooth audio player as well as unexpected results ...back audio files from your Bluetooth compatible audio player and listen to "Manual", you can control a Bluetooth audio player via Advanced Audio Distribution Profile (A2DP) or Audio/Video Remote Control Profile (AVRCP). Touch the button to view the SETUP menu. 2. Once the download ...
Operation Manual
Page 43
...natural causes Please review the "Care and Maintenance" section of your Installation and Operation Manual for the Company any liability other rights which vary from the date of a warranty...transporting the product to the Company or a service center • Elimination of car static or motor noise • Defects in cosmetic, decorative or non-operative structural parts • Correction of...to the original retail purchaser of an original sales receipt. Limited Warranty CD or Multimedia Radios/Headunits Audiovox Electronics Corporation ("the Company") is authorized to assume for additional ...
...natural causes Please review the "Care and Maintenance" section of your Installation and Operation Manual for the Company any liability other rights which vary from the date of a warranty...transporting the product to the Company or a service center • Elimination of car static or motor noise • Defects in cosmetic, decorative or non-operative structural parts • Correction of...to the original retail purchaser of an original sales receipt. Limited Warranty CD or Multimedia Radios/Headunits Audiovox Electronics Corporation ("the Company") is authorized to assume for additional ...


