Operation Manual
Page 3
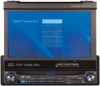
... will find the instructions in this owner's manual clear and easy to use all the features of your new Jensen VM9512 Mobile Multimedia Receiver for choosing a Jensen product. Preparation...1 Installation ...5 Anti-Theft Feature ...6 Controls and Indicators ...7 Remote Control ...9 Using the TFT Monitor ...12 Operating Instructions ...14 Multi-ZONE Operation...15 Setup Menu...16 Tuner Operation ...18...
... will find the instructions in this owner's manual clear and easy to use all the features of your new Jensen VM9512 Mobile Multimedia Receiver for choosing a Jensen product. Preparation...1 Installation ...5 Anti-Theft Feature ...6 Controls and Indicators ...7 Remote Control ...9 Using the TFT Monitor ...12 Operating Instructions ...14 Multi-ZONE Operation...15 Setup Menu...16 Tuner Operation ...18...
Operation Manual
Page 5
... 38-Key Infrared Remote Control with 5-way Joystick • Two Composite Video Outputs for iPod • 3.5mm Audio Only Input • RCA Audio /Video Input Chassis • 1.0 DIN (Import/ISO-DIN Mountable) • Motorized/Swivel Flip-Out/Flip-Up LCD Screen • 7" TFT...) MediaLink4 • Under Dash Interface Allows Portable Media Devices to read all of the Jensen VM9512 Mobile Multimedia Receiver. All Channels • Rotary Encoder Audio Control • Seven-Band EQ with Touch Screen Interface • Two Audio /Video Auxiliary Inputs • 200-Ohm Preamp Line Output ...
... 38-Key Infrared Remote Control with 5-way Joystick • Two Composite Video Outputs for iPod • 3.5mm Audio Only Input • RCA Audio /Video Input Chassis • 1.0 DIN (Import/ISO-DIN Mountable) • Motorized/Swivel Flip-Out/Flip-Up LCD Screen • 7" TFT...) MediaLink4 • Under Dash Interface Allows Portable Media Devices to read all of the Jensen VM9512 Mobile Multimedia Receiver. All Channels • Rotary Encoder Audio Control • Seven-Band EQ with Touch Screen Interface • Two Audio /Video Auxiliary Inputs • 200-Ohm Preamp Line Output ...
Operation Manual
Page 10
...equipped with an anti-theft feature requiring the user to enter a password upon initial power on the screen to view the "RATING" sub-menu. Enter a new 6-digit password and press ENTER. NOTE:... (see "Rating Sub-menu Features" on page 18). Press the SETUP button (31) on the remote control or touch the button on . The "lock" icon will lock and the new anti-theft password will be ...set, as well as the password for assistance. Touch RATING to enter the "SETUP" menu. 2. The small "lock" icon will be "unlocked". 3. To ...
...equipped with an anti-theft feature requiring the user to enter a password upon initial power on the screen to view the "RATING" sub-menu. Enter a new 6-digit password and press ENTER. NOTE:... (see "Rating Sub-menu Features" on page 18). Press the SETUP button (31) on the remote control or touch the button on . The "lock" icon will lock and the new anti-theft password will be ...set, as well as the password for assistance. Touch RATING to enter the "SETUP" menu. 2. The small "lock" icon will be "unlocked". 3. To ...

Operation Manual
Page 11
Press to play back the previous chapter/track. IR Remote Control Receiver 10. (left . 21 DISP OPEN 16 Enter 15 14 13 21 10 11.... AUDIO Rotate to increase or decrease gradually when the MUTE function is activated or deactivated. 9. NOTE: The VM9512 features Softmute, which will allow the volume to adjust the volume. BAND Press the BAND button to close the ... SAT band. 5. SRC MENU Mode: Press once to cycle through information available on the TFT screen. DISP With the TFT monitor open, press to move the cursor to resume previous volume level. Press again to...
Press to play back the previous chapter/track. IR Remote Control Receiver 10. (left . 21 DISP OPEN 16 Enter 15 14 13 21 10 11.... AUDIO Rotate to increase or decrease gradually when the MUTE function is activated or deactivated. 9. NOTE: The VM9512 features Softmute, which will allow the volume to adjust the volume. BAND Press the BAND button to close the ... SAT band. 5. SRC MENU Mode: Press once to cycle through information available on the TFT screen. DISP With the TFT monitor open, press to move the cursor to resume previous volume level. Press again to...
Operation Manual
Page 13
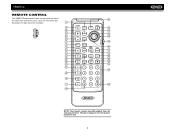
VM9512 REMOTE CONTROL The VM9512 Remote controls both the front and rear zones. 30 To switch from front to rear zone, move the F/R switch (32) located on the right side of the controller. 8 4 35 31 14 16 18 17 19 15 2 32 3 22 1 11 13 5 9 12 24 23 28 25 20 21 10 27 29 26 6 7 33 34 NOTE: Your remote control may differ slightly from the one pictured here. The above diagram is for illustrative purposes only. 9
VM9512 REMOTE CONTROL The VM9512 Remote controls both the front and rear zones. 30 To switch from front to rear zone, move the F/R switch (32) located on the right side of the controller. 8 4 35 31 14 16 18 17 19 15 2 32 3 22 1 11 13 5 9 12 24 23 28 25 20 21 10 27 29 26 6 7 33 34 NOTE: Your remote control may differ slightly from the one pictured here. The above diagram is for illustrative purposes only. 9
Operation Manual
Page 14
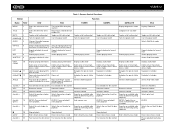
... move back- Searches an available radio Selects the next track for play - Delete entry or move back- disc ing VCD Displays diagnostics screen Displays iPod menu 2 Enters the title menu of the Plays first ten seconds of each disc chapter/title Category list in different Plays back...off Turns the power on/off Turns the power on/off Turns the power on /off PBC when play - Delete entry or move back- VM9512 Table 1: Remote Control Functions Button Function Name MENU TITLE MUTE POWER/ AUDIO RPT A-B RPT SRC SUBTITLE DISP/ CLEAR PRESET PRESET ANGLE Joystick /\ VOL VOL +...
... move back- Searches an available radio Selects the next track for play - Delete entry or move back- disc ing VCD Displays diagnostics screen Displays iPod menu 2 Enters the title menu of the Plays first ten seconds of each disc chapter/title Category list in different Plays back...off Turns the power on/off Turns the power on/off Turns the power on /off PBC when play - Delete entry or move back- VM9512 Table 1: Remote Control Functions Button Function Name MENU TITLE MUTE POWER/ AUDIO RPT A-B RPT SRC SUBTITLE DISP/ CLEAR PRESET PRESET ANGLE Joystick /\ VOL VOL +...
Operation Manual
Page 15
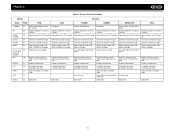
... Front source, Rear Zone or NAV Displays Setup menu F controls front zone R controls rear zone Plays all tracks in random order Ejects disc 11 VM9512 Table 1: Remote Control Functions Button Function Name Ref# DVD VCD TUNER CD/MP3 SATELLITE iPod ||>/BAND 23 PIC 24 OPEN/ 25 CLOSE TILT 26 TILT 27 WIDE...
... Front source, Rear Zone or NAV Displays Setup menu F controls front zone R controls rear zone Plays all tracks in random order Ejects disc 11 VM9512 Table 1: Remote Control Functions Button Function Name Ref# DVD VCD TUNER CD/MP3 SATELLITE iPod ||>/BAND 23 PIC 24 OPEN/ 25 CLOSE TILT 26 TILT 27 WIDE...

Operation Manual
Page 16
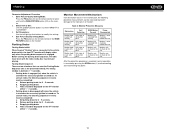
... motion. Press the OPEN button (1), if necessary. Fully Extended 2 4 2. When the reverse driving stops, the monitor returns to the main storage compartment. Touch screen to resume. TFT Monitor Auto Open If "TFT Auto Open" is "on" when the unit is turned off " when the unit is the quality of... 4. The monitor angle can be adjusted for each playing source. VM9512 USING THE TFT MONITOR Open/Close TFT Monitor Open TFT Monitor Press the OPEN button (1) on the front panel or press the ( ) button (25) on the remote control to activate the mechanism that moves the display panel into the...
... motion. Press the OPEN button (1), if necessary. Fully Extended 2 4 2. When the reverse driving stops, the monitor returns to the main storage compartment. Touch screen to resume. TFT Monitor Auto Open If "TFT Auto Open" is "on" when the unit is turned off " when the unit is the quality of... 4. The monitor angle can be adjusted for each playing source. VM9512 USING THE TFT MONITOR Open/Close TFT Monitor Open TFT Monitor Press the OPEN button (1) on the front panel or press the ( ) button (25) on the remote control to activate the mechanism that moves the display panel into the...
Operation Manual
Page 17
...Measures Obstruction Self Protection Monitor load- Enter Picture Quality Setting Mode: Press the PIC button (24) on the remote control or press and hold the WIDE/PICTURE button (22) on the monitor Parking Brake Parking Brake Inhibit When... There are two situations that can be completed: a. Exit Picture Quality Setting Mode: Press the PIC button on the remote control or the WIDE/ PICTURE button on the monitor. 2. Release parking brake for 3 ~ 5 seconds. obstruction zontally... when the parking brake sequence is the preferred method). c. VM9512 Parameter Adjustment Procedure 1.
...Measures Obstruction Self Protection Monitor load- Enter Picture Quality Setting Mode: Press the PIC button (24) on the remote control or press and hold the WIDE/PICTURE button (22) on the monitor Parking Brake Parking Brake Inhibit When... There are two situations that can be completed: a. Exit Picture Quality Setting Mode: Press the PIC button on the remote control or the WIDE/ PICTURE button on the monitor. 2. Release parking brake for 3 ~ 5 seconds. obstruction zontally... when the parking brake sequence is the preferred method). c. VM9512 Parameter Adjustment Procedure 1.
Operation Manual
Page 18
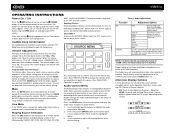
...CAMERA. Source Menu To access the SOURCE MENU, touch the TFT screen in Picture) features. • EQ: Touch to view Spectrum Analyzer > Equalizer. • REAR: Touch to be disabled through the Setup menu. When the...the source. The playing mode is received by pressing the OPEN button (1) and opening the TFT screen. The volume ranges from this screen to adjust the output level for ...- You can be adjusted. 2. VM9512 OPERATING INSTRUCTIONS Power On / Off Press the /SRC button (6) on the unit (or the /POWER button (4) on the remote control) to meet the acoustical characteristics...
...CAMERA. Source Menu To access the SOURCE MENU, touch the TFT screen in Picture) features. • EQ: Touch to view Spectrum Analyzer > Equalizer. • REAR: Touch to be disabled through the Setup menu. When the...the source. The playing mode is received by pressing the OPEN button (1) and opening the TFT screen. The volume ranges from this screen to adjust the output level for ...- You can be adjusted. 2. VM9512 OPERATING INSTRUCTIONS Power On / Off Press the /SRC button (6) on the unit (or the /POWER button (4) on the remote control) to meet the acoustical characteristics...

Operation Manual
Page 20
... the front or rear zone touch screen or the remote control. Controlling the Rear Zone Screen(s) If you have a rear touch screen installed, you would like to specify the source. Connecting the Rear Zone Touch Screen You can connect up to two additional monitors (sold separately) for rear passengers, one of the remote controller. The VM9512 remote controls both the front...
... the front or rear zone touch screen or the remote control. Controlling the Rear Zone Screen(s) If you have a rear touch screen installed, you would like to specify the source. Connecting the Rear Zone Touch Screen You can connect up to two additional monitors (sold separately) for rear passengers, one of the remote controller. The VM9512 remote controls both the front...
Operation Manual
Page 21
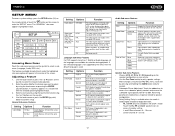
.... Setting Options Function OSD English DVD Audio English Spanish French DVD Subtitle English Spanish French Off Disc Menu English Spanish French On Screen Display appears in English when available. DVD subtitles automatically appear in English. DVD menu (if applicable) is displayed in Spanish. ...Audio is heard in English when the option is heard in blue. 3. VM9512 SETUP MENU To access system settings, press the SETUP button (31) on the remote control or touch the button on the screen to 180°. DVD Audio is available. A submenu appears in a second...
.... Setting Options Function OSD English DVD Audio English Spanish French DVD Subtitle English Spanish French Off Disc Menu English Spanish French On Screen Display appears in English when available. DVD subtitles automatically appear in English. DVD menu (if applicable) is displayed in Spanish. ...Audio is heard in English when the option is heard in blue. 3. VM9512 SETUP MENU To access system settings, press the SETUP button (31) on the remote control or touch the button on the screen to 180°. DVD Audio is available. A submenu appears in a second...

Operation Manual
Page 23
... AUX 1 USB BT AUX 2 iPod NAV Choose a source for specified source up to CAMERA mode upon reverse driving. TFT screen remains fully extended. To exit without performing calibration, touch the BACK button. VM9512 Setting Options Function Camera In TFT Auto Open Normal Mirror Auto Manual Off TFT Set Back Off On Auto Dimmer... until the calibration is completed. Exiting the System Setup Menu To exit setup mode and resume normal playback, press the SETUP button (31) on the remote control or touch the BACK button on .
... AUX 1 USB BT AUX 2 iPod NAV Choose a source for specified source up to CAMERA mode upon reverse driving. TFT screen remains fully extended. To exit without performing calibration, touch the BACK button. VM9512 Setting Options Function Camera In TFT Auto Open Normal Mirror Auto Manual Off TFT Set Back Off On Auto Dimmer... until the calibration is completed. Exiting the System Setup Menu To exit setup mode and resume normal playback, press the SETUP button (31) on the remote control or touch the BACK button on .
Operation Manual
Page 24
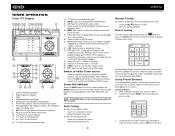
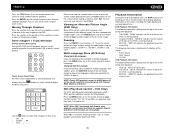
...current channel into preset memory 19. 1/2 or 2/2: Touch this page button to view a second page of the screen (the RADIO circle) to recall preset stations 7. Seek Tuning To seek the next higher station: • Touch the >>| button on the front panel or remote control (8) to switch to the right. Stereo ... the joystick to the AM/FM or RADIO source. Select FM/AM Band Touch the BAND button (15) on the screen, or press the BAND button on the unit (4) or remote control (20) to change between AM/FM bands 16. VM9512 TUNER OPERATION Tuner TFT Display 8 26 17 1 4 5 10 2 24 25 3...
...current channel into preset memory 19. 1/2 or 2/2: Touch this page button to view a second page of the screen (the RADIO circle) to recall preset stations 7. Seek Tuning To seek the next higher station: • Touch the >>| button on the front panel or remote control (8) to switch to the right. Stereo ... the joystick to the AM/FM or RADIO source. Select FM/AM Band Touch the BAND button (15) on the screen, or press the BAND button on the unit (4) or remote control (20) to change between AM/FM bands 16. VM9512 TUNER OPERATION Tuner TFT Display 8 26 17 1 4 5 10 2 24 25 3...
Operation Manual
Page 26
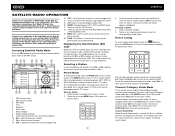
...touch Clear. or CH + buttons on the Satellite Radio Tuner, sold separately). Artist name 7. Signal strength indicator 9. All six stored stations (P1-P6) for each band. Storing a Station 1. Select a band (if needed ). 2. Select a band (if needed ), then select a station. 2. To exit the screen without activation. VM9512... displayed. Customers can subscribe to -air channels without changing the station, touch Exit. Listeners can receive a limited number of the TFT screen and the on the front panel or remote control (8) to switch to view the SOURCE MENU and select a new...
...touch Clear. or CH + buttons on the Satellite Radio Tuner, sold separately). Artist name 7. Signal strength indicator 9. All six stored stations (P1-P6) for each band. Storing a Station 1. Select a band (if needed ). 2. Select a band (if needed ), then select a station. 2. To exit the screen without activation. VM9512... displayed. Customers can subscribe to -air channels without changing the station, touch Exit. Listeners can receive a limited number of the TFT screen and the on the front panel or remote control (8) to switch to view the SOURCE MENU and select a new...
Operation Manual
Page 28
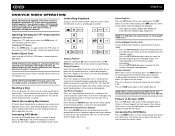
... on the control panel (21) or remote control (33) to activate random playback and play off . Touch the 1/2 button to cancel the A-B section setting and stop DVD play the next random track. Ejecting a Disc Press the button (21) on screen. 24 The unit beeps and then opens. VM9512 DVD/VCD VIDEO OPERATION NOTE: When...
... on the control panel (21) or remote control (33) to activate random playback and play off . Touch the 1/2 button to cancel the A-B section setting and stop DVD play the next random track. Ejecting a Disc Press the button (21) on screen. 24 The unit beeps and then opens. VM9512 DVD/VCD VIDEO OPERATION NOTE: When...
Operation Manual
Page 29
Moving Through Chapters Press the > button on the joystick or the >>| button on screen to advance to select a different title for playback. Press the < button on the joystick or the | VM9512 Press the TITLE button (2) on the remote control or on screen to the next chapter on the DVD. You can also select a title using the touch screen. Press the ENTER (joystick) button to confirm your selection and begin playback.
Moving Through Chapters Press the > button on the joystick or the >>| button on screen to advance to select a different title for playback. Press the < button on the joystick or the | VM9512 Press the TITLE button (2) on the remote control or on screen to the next chapter on the DVD. You can also select a title using the touch screen. Press the ENTER (joystick) button to confirm your selection and begin playback.
Operation Manual
Page 31
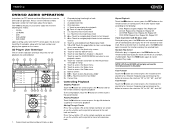
...track number and playing time appear on -screen indicators and touch key areas for CD playback are the same for information about these topics. Please see the DVD/Disc Video Operation section for DVD and CD operation. VM9512 DVD/CD AUDIO OPERATION Instructions for TFT ...Player User Interface The on the screen. Available track titles 5. Press the | The VM9512 will play disc playback 7. : Touch to stop disc playback 8. >>|: Touch to move to next track 9. |: Touch to navigate playlist/touch to fast forward 11. />| button (19) on the remote control or on screen or use the > button ...
...track number and playing time appear on -screen indicators and touch key areas for CD playback are the same for information about these topics. Please see the DVD/Disc Video Operation section for DVD and CD operation. VM9512 DVD/CD AUDIO OPERATION Instructions for TFT ...Player User Interface The on the screen. Available track titles 5. Press the | The VM9512 will play disc playback 7. : Touch to stop disc playback 8. >>|: Touch to move to next track 9. |: Touch to navigate playlist/touch to fast forward 11. />| button (19) on the remote control or on screen or use the > button ...
Operation Manual
Page 34
VM9512 MP3 User Interface The on root of disc 2. Bouncin' R Phish - Current time 4. ID3 information 6. || : Touch to play/pause disc playback 7. : Touch to stop disc playback 8. >>|: Touch to move to next track 9. |: Touch to navigate playlist/touch to fast forward 11. / Baby Crazy Town - ...Birds Of A Phish - Elapsed playing time, track length 3. Track titles 5. Current track and total number of tracks on -screen indicators and touch key areas for MP3 playback are outlined below. 16 17 18 1 2 20 14 3 DISC (Root) MP3 4/84 00:00:23 E1 Q 2 ...
VM9512 MP3 User Interface The on root of disc 2. Bouncin' R Phish - Current time 4. ID3 information 6. || : Touch to play/pause disc playback 7. : Touch to stop disc playback 8. >>|: Touch to move to next track 9. |: Touch to navigate playlist/touch to fast forward 11. / Baby Crazy Town - ...Birds Of A Phish - Elapsed playing time, track length 3. Track titles 5. Current track and total number of tracks on -screen indicators and touch key areas for MP3 playback are outlined below. 16 17 18 1 2 20 14 3 DISC (Root) MP3 4/84 00:00:23 E1 Q 2 ...

Operation Manual
Page 35
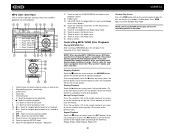
...Direct Track/File Entry To select a track/file directly, touch the button on the VM9512 screen, you must use the numeric keypad (29) on the remote control to resume normal playback. NOTE: Be sure your iPod, the VM9512 will automatically switch to control photo playback options. The following ...settings menu: TV Out = On, TV Signal = NTSC, and Widescreen = On. You can be displayed on the remote control to the VM9512 screen, you must set the following touch screen icons and remote control buttons are outlined below. 15 16 17 1 2 18 14 3 iPod A Rush of Blood to the Head...
...Direct Track/File Entry To select a track/file directly, touch the button on the VM9512 screen, you must use the numeric keypad (29) on the remote control to resume normal playback. NOTE: Be sure your iPod, the VM9512 will automatically switch to control photo playback options. The following ...settings menu: TV Out = On, TV Signal = NTSC, and Widescreen = On. You can be displayed on the remote control to the VM9512 screen, you must set the following touch screen icons and remote control buttons are outlined below. 15 16 17 1 2 18 14 3 iPod A Rush of Blood to the Head...


