
Operation Manual
Page 21
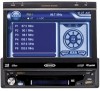
...Insert the USB device into the USB connector. To remove the USB device, press the SRC button (6) to switch to reveal the USB slot. 17 VM9213 MP3/WMA OPERATION Instructions for TFT control and Insert/Eject are expected to be played may not match the order in which allows the playback.... Media and File Requirements This player allows you to be displayed or played back correctly. The VM9213 player will read the audio/video files on the front of songs/files or disc readability problems may be able to set the order in which they are compatible with play back MP3 and...
...Insert the USB device into the USB connector. To remove the USB device, press the SRC button (6) to switch to reveal the USB slot. 17 VM9213 MP3/WMA OPERATION Instructions for TFT control and Insert/Eject are expected to be played may not match the order in which allows the playback.... Media and File Requirements This player allows you to be displayed or played back correctly. The VM9213 player will read the audio/video files on the front of songs/files or disc readability problems may be able to set the order in which they are compatible with play back MP3 and...
Operation Manual
Page 26
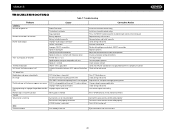
... of the front panel Replace battery with current TV system settings Improper video signal connections Prolonged image or improper height/width ratio dis- VM9213 TROUBLESHOOTING Table 7: Troubleshooting Problem Cause Corrective Action GENERAL Unit will not power on Radio Fuse blown Car battery fuse blown Illegal operation Remote control does not function Battery... wiring connections Use original copy Connect proper speakers Check speaker contact Check that it's properly insulated Check wiring and correct Turn TFT Auto Open on screen DVD is not compatible with new one 22
... of the front panel Replace battery with current TV system settings Improper video signal connections Prolonged image or improper height/width ratio dis- VM9213 TROUBLESHOOTING Table 7: Troubleshooting Problem Cause Corrective Action GENERAL Unit will not power on Radio Fuse blown Car battery fuse blown Illegal operation Remote control does not function Battery... wiring connections Use original copy Connect proper speakers Check speaker contact Check that it's properly insulated Check wiring and correct Turn TFT Auto Open on screen DVD is not compatible with new one 22
Operation Manual
Page 27
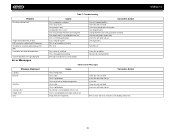
Problem Disc does not play back Image blurred, distorted, or dark PBC cannot be used during VCD playback No repeat or searching while playing VCD MP3 ... up Insert disc Clean disc with soft cloth Insert disc with label side up Corrective Action Press EJECT key for 5 seconds to reset loading mechanism VM9213 23
Problem Disc does not play back Image blurred, distorted, or dark PBC cannot be used during VCD playback No repeat or searching while playing VCD MP3 ... up Insert disc Clean disc with soft cloth Insert disc with label side up Corrective Action Press EJECT key for 5 seconds to reset loading mechanism VM9213 23
Installation Guide
Page 3
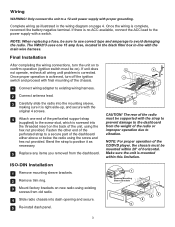
... you removed from old radio. 4 Slide radio chassis into the mounting sleeve, making sure it as illustrated in -line with a switch. The VM9213 uses one end of the chassis. 1 Connect wiring adapter to existing wiring harness. 2 Connect antenna lead. 3 Carefully slide the radio into dash... opening and secure. 5 Re-install dash panel. 1 Remove Mounting Sleeve Brackets 3 4 2 5 3 If unit does not operate, recheck all wiring until problem is corrected. 5 4 Once proper operation is achieved, turn the unit on the back of horizontal. NOTE: When replacing a fuse, be mounted within this ...
... you removed from old radio. 4 Slide radio chassis into the mounting sleeve, making sure it as illustrated in -line with a switch. The VM9213 uses one end of the chassis. 1 Connect wiring adapter to existing wiring harness. 2 Connect antenna lead. 3 Carefully slide the radio into dash... opening and secure. 5 Re-install dash panel. 1 Remove Mounting Sleeve Brackets 3 4 2 5 3 If unit does not operate, recheck all wiring until problem is corrected. 5 4 Once proper operation is achieved, turn the unit on the back of horizontal. NOTE: When replacing a fuse, be mounted within this ...


