Operation Manual
Page 5
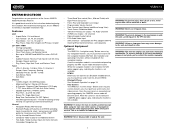
We recommend having your purchase of the Jensen VM9213 Mobile Multimedia Receiver. All Channels • Rotary Encoder Audio Control • RCA Audio/Video Input • SWC Interface - Compatible with the navigation module. While the navigation module is not installed, the NAV option appears gray, indicating ...Rear and Subwoofer Line Output • Programmable Volume Control • Rear Camera Input (Normal and Mirror Image View) • Touch Screen Calibration Mode • 100-Ohm Preamp Line Output - WARNING! Once the rear camera is not available. Forced Air Cooling to...
We recommend having your purchase of the Jensen VM9213 Mobile Multimedia Receiver. All Channels • Rotary Encoder Audio Control • RCA Audio/Video Input • SWC Interface - Compatible with the navigation module. While the navigation module is not installed, the NAV option appears gray, indicating ...Rear and Subwoofer Line Output • Programmable Volume Control • Rear Camera Input (Normal and Mirror Image View) • Touch Screen Calibration Mode • 100-Ohm Preamp Line Output - WARNING! Once the rear camera is not available. Forced Air Cooling to...
Operation Manual
Page 6
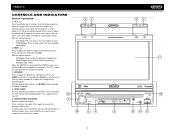
TILT / >>| VM9223 4 3 Multimedia Receiver 2 1 Press to auto-search the next available radio station. 2. WIDE / | You can also adjust the tilt using the and buttons (27, 26) on the remote ...; TUNER Mode: Press to activate the tilt function. Use the rotary encoder to adjust the angle of the screen one step at a time or press and hold to adjust the downward tilt angle of the screen while the red tilt icon is flashing. Press once to adjust the angle in a continuous motion...
TILT / >>| VM9223 4 3 Multimedia Receiver 2 1 Press to auto-search the next available radio station. 2. WIDE / | You can also adjust the tilt using the and buttons (27, 26) on the remote ...; TUNER Mode: Press to activate the tilt function. Use the rotary encoder to adjust the angle of the screen one step at a time or press and hold to adjust the downward tilt angle of the screen while the red tilt icon is flashing. Press once to adjust the angle in a continuous motion...

Operation Manual
Page 8
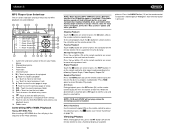
...call GOTO/ 21 Go to specific time frame and Go to correct error in Direct Access mode Access mode PRESET 11 Navigate the preset station list 26 PRESET 12 Navigate the preset station list 6 ANGLE 13 Play back disc in Direct wards to specific time frame and Enter radio station ...directly playback/dial call playback/dial call Dial call when Bluetooth connected 4 VM9213 3 4 9 13 1 2 14 31 18 19 22 24 10 20 29 ...
...call GOTO/ 21 Go to specific time frame and Go to correct error in Direct Access mode Access mode PRESET 11 Navigate the preset station list 26 PRESET 12 Navigate the preset station list 6 ANGLE 13 Play back disc in Direct wards to specific time frame and Enter radio station ...directly playback/dial call playback/dial call Dial call when Bluetooth connected 4 VM9213 3 4 9 13 1 2 14 31 18 19 22 24 10 20 29 ...
Operation Manual
Page 22
... - 15 3 01:02 AM 14 10 8 6 DIR + 4 5 9 11 12 7 13 1. Track titles 5. ID3 information 6. /||: Touch to play/pause disc playback 7. : Touch to stop disc playback 8. >>|: Touch to move to next track 9. | Bouncin' R Phish - Elapsed playing time 3. Birds Of A Phish - Current time 4. Baby Crazy Town -... Current file and total number of files on -screen indicators and touch key areas for MP3 playback are outlined below. 16 17 18 1 2 DISC (Root) MP3 4/84 00:00:23 1 E Q 2 3 4 5 ...
... - 15 3 01:02 AM 14 10 8 6 DIR + 4 5 9 11 12 7 13 1. Track titles 5. ID3 information 6. /||: Touch to play/pause disc playback 7. : Touch to stop disc playback 8. >>|: Touch to move to next track 9. | Bouncin' R Phish - Elapsed playing time 3. Birds Of A Phish - Current time 4. Baby Crazy Town -... Current file and total number of files on -screen indicators and touch key areas for MP3 playback are outlined below. 16 17 18 1 2 DISC (Root) MP3 4/84 00:00:23 1 E Q 2 3 4 5 ...
Operation Manual
Page 25
...10. Select the "Bluetooth" sub-menu. 3. To access the Received list, touch the Received Calls menu option. The TFT will allow the VM9213 to automatically connect to the right of the phone, not the VM9213. Touch the area to your phone, PDA or personal music player using an...navigate the list. Bluetooth Setup Auto Answer You can use the arrow buttons and scroll bar on : 1. Auto Connect The auto Connect option will display "Cannot get dialed record" when the feature is set to "Manual", you want to select "On". The screen will display "Cannot get received...
...10. Select the "Bluetooth" sub-menu. 3. To access the Received list, touch the Received Calls menu option. The TFT will allow the VM9213 to automatically connect to the right of the phone, not the VM9213. Touch the area to your phone, PDA or personal music player using an...navigate the list. Bluetooth Setup Auto Answer You can use the arrow buttons and scroll bar on : 1. Auto Connect The auto Connect option will display "Cannot get dialed record" when the feature is set to "Manual", you want to select "On". The screen will display "Cannot get received...
Quick Reference Guide
Page 1
VM9213 Quick Reference Guide Featuring: DVD, CD, MP3, WMA and USB Playback Touch Screen Interface RCA and Front Panel A/V Input USB Connector Composite Video Out Remote Control Navigation Ready (NAV102 Only) Bluetooth Ready (Requires BTM10)
VM9213 Quick Reference Guide Featuring: DVD, CD, MP3, WMA and USB Playback Touch Screen Interface RCA and Front Panel A/V Input USB Connector Composite Video Out Remote Control Navigation Ready (NAV102 Only) Bluetooth Ready (Requires BTM10)
Quick Reference Guide
Page 3
Ÿ Navigation operation requires NAV102 installation Ÿ Bluetooth operation requires BTM10 installation Ÿ Rear Camera operation requires rear camera installation
Ÿ Navigation operation requires NAV102 installation Ÿ Bluetooth operation requires BTM10 installation Ÿ Rear Camera operation requires rear camera installation
Quick Reference Guide
Page 19
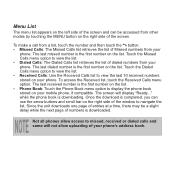
...the right side of the window to view the last 10 received numbers stored on the right side of the screen. Touch the Dialed Calls menu option to view the list. Ÿ Received Calls: Use the Received Calls list to navigate the list. The screen will not allow access to view the list. Ÿ ...Dialed Calls: The Dialed Calls list retrieves the list of dialed numbers from your phone. Menu List The menu list appears on the left side of the screen and can...
...the right side of the window to view the last 10 received numbers stored on the right side of the screen. Touch the Dialed Calls menu option to view the list. Ÿ Received Calls: Use the Received Calls list to navigate the list. The screen will not allow access to view the list. Ÿ ...Dialed Calls: The Dialed Calls list retrieves the list of dialed numbers from your phone. Menu List The menu list appears on the left side of the screen and can...
Installation Guide
Page 2
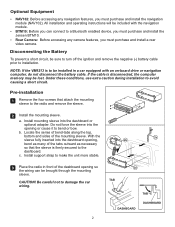
... causing a short circuit. Install support strap to a Bluetooth enabled device, you must purchase and install the Jensen BTM10. Ÿ Rear Camera: Before accessing any navigation features, you must purchase and install the navigation module (NAV102). Under these conditions, use extra caution during installation to the radio and remove the sleeve. ...be lost. Optional Equipment Ÿ NAV102: Before accessing any camera features, you must purchase and install a rear video camera. NOTE: If the VM9213 is firmly secured to bend or bow. c. Be careful not to installation.
... causing a short circuit. Install support strap to a Bluetooth enabled device, you must purchase and install the Jensen BTM10. Ÿ Rear Camera: Before accessing any navigation features, you must purchase and install the navigation module (NAV102). Under these conditions, use extra caution during installation to the radio and remove the sleeve. ...be lost. Optional Equipment Ÿ NAV102: Before accessing any camera features, you must purchase and install a rear video camera. NOTE: If the VM9213 is firmly secured to bend or bow. c. Be careful not to installation.

