Operation Manual
Page 5
... Volume Control • Rear Camera Input (Normal and Mirror Image View) • Touch Screen Calibration Mode • 100-Ohm Preamp Line Output - WARNING! WARNING! To prevent ...the instructions before beginning the installation. To reduce the risk of the Jensen VM9213 Mobile Multimedia Receiver. Once the rear camera is connected and operating properly, the CAMERA... any camera features, you must purchase and install the Jensen BTM10. • Bluetooth Phone See "Bluetooth Operation" on your Jensen VM9213 installed by a reputable installation shop. Once the navigation module...
... Volume Control • Rear Camera Input (Normal and Mirror Image View) • Touch Screen Calibration Mode • 100-Ohm Preamp Line Output - WARNING! WARNING! To prevent ...the instructions before beginning the installation. To reduce the risk of the Jensen VM9213 Mobile Multimedia Receiver. Once the rear camera is connected and operating properly, the CAMERA... any camera features, you must purchase and install the Jensen BTM10. • Bluetooth Phone See "Bluetooth Operation" on your Jensen VM9213 installed by a reputable installation shop. Once the navigation module...

Operation Manual
Page 8
...- playback playback tion by decreasing tuning fre- back quency / 20 Stop playback/end call Stop playback/end call End call Stop playback/end call when Bluetooth connected 4 VM9213 3 4 9 13 1 2 14 31 18 19 22 24 10 20 29 34 33 Select the previous track for for playback for play - playback quency 18...
...- playback playback tion by decreasing tuning fre- back quency / 20 Stop playback/end call Stop playback/end call End call Stop playback/end call when Bluetooth connected 4 VM9213 3 4 9 13 1 2 14 31 18 19 22 24 10 20 29 34 33 Select the previous track for for playback for play - playback quency 18...
Operation Manual
Page 13
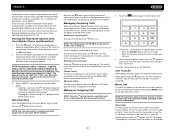
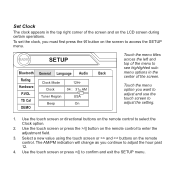
VM9213 SETUP MENU To access system settings, press the SETUP button (31) on the remote control or touch the button on the screen to 23:59. Amer2 Function Clock displays 12 hour time using the touchscreen or pressing the >/|| button (18) on the LCD screen during playback. Clock displays... operations. On 9 Adjusting a Feature 1. Select a new value by using AM and PM. DVD Audio is heard in English. RADIO SETUP Bluetooth Rating Hardware P.VOL TS Cal DEMO General Language Audio Clock Mode Clock Tuner Region Beep 12Hr 04 : 31 AM USA On Back Accessing Menu...
VM9213 SETUP MENU To access system settings, press the SETUP button (31) on the remote control or touch the button on the screen to 23:59. Amer2 Function Clock displays 12 hour time using the touchscreen or pressing the >/|| button (18) on the LCD screen during playback. Clock displays... operations. On 9 Adjusting a Feature 1. Select a new value by using AM and PM. DVD Audio is heard in English. RADIO SETUP Bluetooth Rating Hardware P.VOL TS Cal DEMO General Language Audio Clock Mode Clock Tuner Region Beep 12Hr 04 : 31 AM USA On Back Accessing Menu...
Operation Manual
Page 14
.... You may override higher ratings by choosing the "Demo" option from the Aux In source). Disable Bluetooth function. Some discs restrict only portions of the screen. When the reverse driving stops, the monitor return to 6 decibbels. When "Demo Auto Run" is...VM9213 Setting Sub Filter Options Function 80Hz 120Hz 160Hz Selecting a crossover frequency sets a cut-off by using your paired phone is in yellow text (below the clock), to the next quadrant. The Crossover frequency setting has no effect if the subwoofer is unavailable. Manually answer calls by touching...
.... You may override higher ratings by choosing the "Demo" option from the Aux In source). Disable Bluetooth function. Some discs restrict only portions of the screen. When the reverse driving stops, the monitor return to 6 decibbels. When "Demo Auto Run" is...VM9213 Setting Sub Filter Options Function 80Hz 120Hz 160Hz Selecting a crossover frequency sets a cut-off by using your paired phone is in yellow text (below the clock), to the next quadrant. The Crossover frequency setting has no effect if the subwoofer is unavailable. Manually answer calls by touching...

Operation Manual
Page 23
...or both). If the feature is not supported, the head unit will be 8 meters or less for sending and receiving voice and data via Bluetooth wireless technology. Bluetooth menu 4. Reject incoming call/end call/quit pairing process/quit reading phone book or call listing display 9. However, ... indicators (phone mode, music mode, mic mute) 17. Touch to access the direct entry screen 18. : Touch to the VM9213 head unit (see "Pairing the Bluetooth System with Your Mobile Phone and Head Unit"). Play/Pause selected file 22. ||: Touch to move to the next file Hands Free Profile (HFP)...
...or both). If the feature is not supported, the head unit will be 8 meters or less for sending and receiving voice and data via Bluetooth wireless technology. Bluetooth menu 4. Reject incoming call/end call/quit pairing process/quit reading phone book or call listing display 9. However, ... indicators (phone mode, music mode, mic mute) 17. Touch to access the direct entry screen 18. : Touch to the VM9213 head unit (see "Pairing the Bluetooth System with Your Mobile Phone and Head Unit"). Play/Pause selected file 22. ||: Touch to move to the next file Hands Free Profile (HFP)...
Operation Manual
Page 24
.... VM9213 the telephone source. This is received. Pairing the Bluetooth System with this manual while operating your phone. Managing Incoming Calls When connected to the Bluetooth screen when a call is a limitation of the screen. An incoming phone number will display "Transfer". To end the conversation, press the button (12). Microphone Mute To mute the microphone, touch the...
.... VM9213 the telephone source. This is received. Pairing the Bluetooth System with this manual while operating your phone. Managing Incoming Calls When connected to the Bluetooth screen when a call is a limitation of the screen. An incoming phone number will display "Transfer". To end the conversation, press the button (12). Microphone Mute To mute the microphone, touch the...
Operation Manual
Page 25
...To turn auto "Connect" on your previously paired Bluetooth when it may occur depending on the profile used. 21 VM9213 Touch the button to view the last 10 received numbers stored on : 1. Touch the Phone Book menu option to play back audio...Received Calls list, touch the number and then touch the button. To access the Received list, touch the Received Calls menu option. The last received number is completed, you to display the phone book stored on the right side of "Auto answer" to navigate the list. The TFT will display "Ready..." Phone Book 1. The screen...
...To turn auto "Connect" on your previously paired Bluetooth when it may occur depending on the profile used. 21 VM9213 Touch the button to view the last 10 received numbers stored on : 1. Touch the Phone Book menu option to play back audio...Received Calls list, touch the number and then touch the button. To access the Received list, touch the Received Calls menu option. The last received number is completed, you to display the phone book stored on the right side of "Auto answer" to navigate the list. The TFT will display "Ready..." Phone Book 1. The screen...
Quick Reference Guide
Page 1
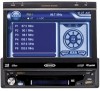
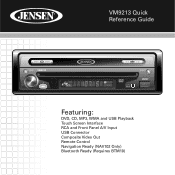
VM9213 Quick Reference Guide Featuring: DVD, CD, MP3, WMA and USB Playback Touch Screen Interface RCA and Front Panel A/V Input USB Connector Composite Video Out Remote Control Navigation Ready (NAV102 Only) Bluetooth Ready (Requires BTM10)
VM9213 Quick Reference Guide Featuring: DVD, CD, MP3, WMA and USB Playback Touch Screen Interface RCA and Front Panel A/V Input USB Connector Composite Video Out Remote Control Navigation Ready (NAV102 Only) Bluetooth Ready (Requires BTM10)
Quick Reference Guide
Page 3
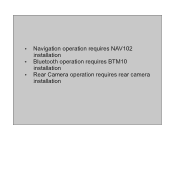
Ÿ Navigation operation requires NAV102 installation Ÿ Bluetooth operation requires BTM10 installation Ÿ Rear Camera operation requires rear camera installation
Ÿ Navigation operation requires NAV102 installation Ÿ Bluetooth operation requires BTM10 installation Ÿ Rear Camera operation requires rear camera installation
Quick Reference Guide
Page 9
...control to enter the adjustment field. 3. Use the touch screen or press the >/|| button on the LCD screen during certain operations. To set the clock, you want to adjust and use the touch screen to confirm and exit the SETUP menu. RADIO SETUP Bluetooth Rating Hardware P.VOL TS Cal DEMO General Language ...Audio Clock Mode 12Hr Clock 04 : 31 AM Tuner Region USA Beep On Back Touch the menu titles across the left and top...
...control to enter the adjustment field. 3. Use the touch screen or press the >/|| button on the LCD screen during certain operations. To set the clock, you want to adjust and use the touch screen to confirm and exit the SETUP menu. RADIO SETUP Bluetooth Rating Hardware P.VOL TS Cal DEMO General Language ...Audio Clock Mode 12Hr Clock 04 : 31 AM Tuner Region USA Beep On Back Touch the menu titles across the left and top...

Quick Reference Guide
Page 18
However, depending on your phone, not the VM9213. This is required for Bluetooth operation. Bluetooth operates in 2.4 GHz frequency range and transmits voice and data at speeds up to initiate the pairing process. The BTM10 (purchased separately)... enter the "pass key" or pairing code. The line-of the head unit when pairing. 2. Bluetooth Operation Bluetooth is a short-range wireless radio connectivity technology that is "1234". 4. The default code for the VM9213 is developed as a cable replacement for many phones is necessary to the phone's instruction manual). 3. ...
However, depending on your phone, not the VM9213. This is required for Bluetooth operation. Bluetooth operates in 2.4 GHz frequency range and transmits voice and data at speeds up to initiate the pairing process. The BTM10 (purchased separately)... enter the "pass key" or pairing code. The line-of the head unit when pairing. 2. Bluetooth Operation Bluetooth is a short-range wireless radio connectivity technology that is "1234". 4. The default code for the VM9213 is developed as a cable replacement for many phones is necessary to the phone's instruction manual). 3. ...
Quick Reference Guide
Page 20
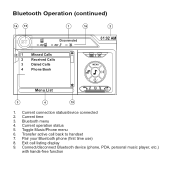
Current time 3. Bluetooth menu 4. Current operation status 5. Exit call back to handset 7. Bluetooth Operation (continued) 14 15 1 16 2 01:02 AM BT Disconnected E1 Q 2 Missed Calls Received Calls 3 Dialed Calls MENU 4 Phone Book Menu List 3 4 19 1. Connect/disconnect Bluetooth device (phone, PDA, personal music player, etc.) with hands-free function Pair your Bluetooth phone (first time use) 8. Transfer active call listing display 9. Current connection status/device connected 2. Toggle Music/Phone menu 6.
Current time 3. Bluetooth menu 4. Current operation status 5. Exit call back to handset 7. Bluetooth Operation (continued) 14 15 1 16 2 01:02 AM BT Disconnected E1 Q 2 Missed Calls Received Calls 3 Dialed Calls MENU 4 Phone Book Menu List 3 4 19 1. Connect/disconnect Bluetooth device (phone, PDA, personal music player, etc.) with hands-free function Pair your Bluetooth phone (first time use) 8. Transfer active call listing display 9. Current connection status/device connected 2. Toggle Music/Phone menu 6.
Installation Guide
Page 2
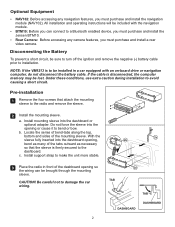
.... Ÿ BTM10: Before you must purchase and install the navigation module (NAV102). c. CAUTION! NOTE: If the VM9213 is to avoid causing a short circuit. a. Install support strap to a Bluetooth enabled device, you must purchase and install the Jensen BTM10. Ÿ Rear Camera: Before accessing any navigation features, you can be included with an on...
.... Ÿ BTM10: Before you must purchase and install the navigation module (NAV102). c. CAUTION! NOTE: If the VM9213 is to avoid causing a short circuit. a. Install support strap to a Bluetooth enabled device, you must purchase and install the Jensen BTM10. Ÿ Rear Camera: Before accessing any navigation features, you can be included with an on...


