Operation Manual
Page 5
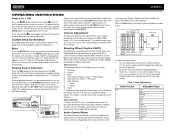
... and Previous Track Tuner • USA, A. WARNING! Using an improper fuse may cause damage to the TFT monitor. WARNING! WARNING! It's a good idea to a Bluetooth enabled device, you can connect to read all of the Jensen VM9213 Mobile Multimedia Receiver. Compatible with Eight Preset EQ Curves • Front, Rear and Subwoofer Line Output • Programmable Volume Control • Rear Camera Input (Normal and Mirror Image View) • Touch Screen Calibration Mode • 100...
... and Previous Track Tuner • USA, A. WARNING! Using an improper fuse may cause damage to the TFT monitor. WARNING! WARNING! It's a good idea to a Bluetooth enabled device, you can connect to read all of the Jensen VM9213 Mobile Multimedia Receiver. Compatible with Eight Preset EQ Curves • Front, Rear and Subwoofer Line Output • Programmable Volume Control • Rear Camera Input (Normal and Mirror Image View) • Touch Screen Calibration Mode • 100...
Operation Manual
Page 6
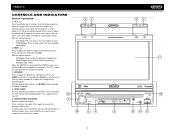
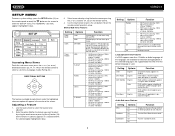
... the red tilt icon is flashing. Press once to adjust the angle in a continuous motion. With the monitor closed: • DVD Mode: Press to access the next chapter or track. 7 • TUNER Mode: Press to activate the tilt function. TILT / >>| VM9223 4 3 Multimedia Receiver 2 1 Press to auto-search the next available radio station. 2. You can also adjust the tilt using the and buttons (27, 26) on the remote control.
... the red tilt icon is flashing. Press once to adjust the angle in a continuous motion. With the monitor closed: • DVD Mode: Press to access the next chapter or track. 7 • TUNER Mode: Press to activate the tilt function. TILT / >>| VM9223 4 3 Multimedia Receiver 2 1 Press to auto-search the next available radio station. 2. You can also adjust the tilt using the and buttons (27, 26) on the remote control.

Operation Manual
Page 8
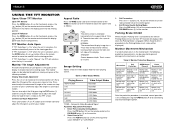
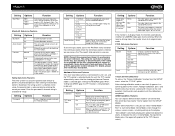
... correct error in Direct Access mode Access mode PRESET 11 Navigate the preset station list 26 PRESET 12 Navigate the preset station list 6 ANGLE 13 Play back disc in different Play back Picture CD with dif- REMOTE CONTROL Table 1: Remote Control Functions Button Function 8 Name MENU Ref# DVD 1 Enter the main menu of the disc VCD Turn on/off PBC when playing VCD TUNER 35 CD/MP3/USB 5 16 TITLE 2 Enter the title menu of the 23 disc 15 MUTE 3 Toggle...
... correct error in Direct Access mode Access mode PRESET 11 Navigate the preset station list 26 PRESET 12 Navigate the preset station list 6 ANGLE 13 Play back disc in different Play back Picture CD with dif- REMOTE CONTROL Table 1: Remote Control Functions Button Function 8 Name MENU Ref# DVD 1 Enter the main menu of the disc VCD Turn on/off PBC when playing VCD TUNER 35 CD/MP3/USB 5 16 TITLE 2 Enter the title menu of the 23 disc 15 MUTE 3 Toggle...
Operation Manual
Page 10
... the viewing angle. Aspect Ratio Press the WIDE button (28) on the remote control to "Manual", the TFT will not close when the key is the quality of the following methods: Step by Step Angle Adjustment Press the ( ) or ( ) button on the TFT screen. If "TFT Auto Open" is set to activate the mechanism that moves the display panel into the compartment. VM9213 USING THE...
... the viewing angle. Aspect Ratio Press the WIDE button (28) on the remote control to "Manual", the TFT will not close when the key is the quality of the following methods: Step by Step Angle Adjustment Press the ( ) or ( ) button on the TFT screen. If "TFT Auto Open" is set to activate the mechanism that moves the display panel into the compartment. VM9213 USING THE...
Operation Manual
Page 11
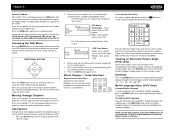
... screen. Playing Source Selection Press the SRC button (6) on the front panel or the SRC button (8) on the TFT and LCD screens. The playing mode is pressed momentarily, Preset Up will be connected to this unit via the rear RCA inputs or the A/V INPUT connector (10) on the remote control to mute the volume from "0" to "40". Select "AUX-IN1" to access an auxiliary device connected to the A/V INPUT on the touch screen to display the audio menu. +14 - 0- You cannot directly control external devices connected...
... screen. Playing Source Selection Press the SRC button (6) on the front panel or the SRC button (8) on the TFT and LCD screens. The playing mode is pressed momentarily, Preset Up will be connected to this unit via the rear RCA inputs or the A/V INPUT connector (10) on the remote control to mute the volume from "0" to "40". Select "AUX-IN1" to access an auxiliary device connected to the A/V INPUT on the touch screen to display the audio menu. +14 - 0- You cannot directly control external devices connected...
Operation Manual
Page 13
... each function selection. DIRECTIONAL BUTTONS The features available for selection during certain operations. Amer2 Function Clock displays 12 hour time using the touchscreen or pressing the >> or /|| button (18) on the disc. Language Sub-menu Features If a DVD supports more than 1 Subtitle or Audio language, all the languages are available for adjustment under the highlighted sub-menu option will change as you want to the default subtitle language specified on the remote control to...
... each function selection. DIRECTIONAL BUTTONS The features available for selection during certain operations. Amer2 Function Clock displays 12 hour time using the touchscreen or pressing the >> or /|| button (18) on the disc. Language Sub-menu Features If a DVD supports more than 1 Subtitle or Audio language, all the languages are available for adjustment under the highlighted sub-menu option will change as you want to the default subtitle language specified on the remote control to...
Operation Manual
Page 14
... persons from the SETUP menu, select the "TS CAL" option. Bluetooth Sub-menu Features Setting Options Function Bluetooth On Off Auto Answer On Off Connect Manual Auto Pairing Code Enable Bluetooth function. Not all phones/devices require a pairing code. PG 4. PG-R 6. You may override higher ratings by choosing the "Demo" option from the Aux In source). Once the correct password is in display mode, the monitor automatically switches to "OFF". Some discs restrict only portions of the subwoofer's LPF (low...
... persons from the SETUP menu, select the "TS CAL" option. Bluetooth Sub-menu Features Setting Options Function Bluetooth On Off Auto Answer On Off Connect Manual Auto Pairing Code Enable Bluetooth function. Not all phones/devices require a pairing code. PG 4. PG-R 6. You may override higher ratings by choosing the "Demo" option from the Aux In source). Once the correct password is in display mode, the monitor automatically switches to "OFF". Some discs restrict only portions of the subwoofer's LPF (low...
Operation Manual
Page 16
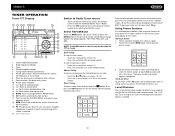
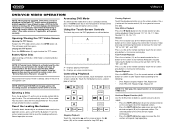
... the unit (3) or remote control (30) to access the direct entry screen 10. Radio frequency indicator 3. Preset radio stations: Touch to Equalizer level settings 9. Touch for 5 seconds at each and continuing until a station is closed. MEM: View screen used to view the SOURCE MENU and select a new playback source 18. To seek the previous station: • Touch the | or Current radio band indicator 2. Stereo reception indicator 5. No information in Tuner mode 8. Touch to enter current channel into preset memory 19. PS (Preview Scan): Touch to...
... the unit (3) or remote control (30) to access the direct entry screen 10. Radio frequency indicator 3. Preset radio stations: Touch to Equalizer level settings 9. Touch for 5 seconds at each and continuing until a station is closed. MEM: View screen used to view the SOURCE MENU and select a new playback source 18. To seek the previous station: • Touch the | or Current radio band indicator 2. Stereo reception indicator 5. No information in Tuner mode 8. Touch to enter current channel into preset memory 19. PS (Preview Scan): Touch to...
Operation Manual
Page 17
... TFT video screen, press the OPEN button (4). VM9213 DVD/VCD VIDEO OPERATION NOTE: When properly installed, DVD video cannot be displayed on page 9.) You cannot insert a disc if there is already a disc in the unit or if the power is off. Set parking brake to "4X", "8X", and "20X". When parental code is entered using the remote, the play . Repeat Playback Press the REPT button (7) on the remote control or the button on screen to...
... TFT video screen, press the OPEN button (4). VM9213 DVD/VCD VIDEO OPERATION NOTE: When properly installed, DVD video cannot be displayed on page 9.) You cannot insert a disc if there is already a disc in the unit or if the power is off. Set parking brake to "4X", "8X", and "20X". When parental code is entered using the remote, the play . Repeat Playback Press the REPT button (7) on the remote control or the button on screen to...
Operation Manual
Page 18
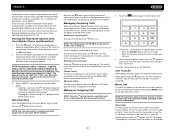
... remote control or on screen. Use the directional buttons on the remote control to select a title from different angles. Press the | or /|| button (18) on the remote control to go to the specified location on screen control to display the direct entry menu. Touch Screen Direct Entry To select a chapter/track directly, touch the button on the disc. 5. To exit the screen without changing the station, touch Exit. You can use the numeric keypad on -screen image. Press the enter button (arrow) to tune...
... remote control or on screen. Use the directional buttons on the remote control to select a title from different angles. Press the | or /|| button (18) on the remote control to go to the specified location on screen control to display the direct entry menu. Touch Screen Direct Entry To select a chapter/track directly, touch the button on the disc. 5. To exit the screen without changing the station, touch Exit. You can use the numeric keypad on -screen image. Press the enter button (arrow) to tune...

Operation Manual
Page 21
... unit will display folders 3, 4, 6, and 8, but not 2 and 7 since it is packaged with this number of the radio. VM9213 MP3/WMA OPERATION Instructions for TFT control and Insert/Eject are the same for information about these topics. As a result, the order in which MP3/WMA files are expected to another mode and then remove the USB device from the USB connector. For CD-RW discs, please make...
... unit will display folders 3, 4, 6, and 8, but not 2 and 7 since it is packaged with this number of the radio. VM9213 MP3/WMA OPERATION Instructions for TFT control and Insert/Eject are the same for information about these topics. As a result, the order in which MP3/WMA files are expected to another mode and then remove the USB device from the USB connector. For CD-RW discs, please make...

Operation Manual
Page 23
... their respective owners. To ensure the best reception for successful operation. • Before using Bluetooth wireless technology. Never place a metal object or any use the power saving mode with the phone, the unit's model number, "VM9213", will display "Phone book not provided by the Bluetooth SIG, Inc. Current connection status/device connected 2. Current time 3. Bluetooth menu 4. Toggle Music/Phone menu 6. Transfer active call 11. Mute/un-mute microphone during active call back to view the SETUP menu 14. Touch to handset 7. Touch to the...
... their respective owners. To ensure the best reception for successful operation. • Before using Bluetooth wireless technology. Never place a metal object or any use the power saving mode with the phone, the unit's model number, "VM9213", will display "Phone book not provided by the Bluetooth SIG, Inc. Current connection status/device connected 2. Current time 3. Bluetooth menu 4. Toggle Music/Phone menu 6. Transfer active call 11. Mute/un-mute microphone during active call back to view the SETUP menu 14. Touch to handset 7. Touch to the...
Operation Manual
Page 24
... TFT will mute audio output, pause CD play, and change to enter Bluetooth setup, turn the rotary encoder (5) on the front panel or press the VOL+/ VOLbuttons on the list. Select "VM9213" from other modes by touching the MENU button on the market, operations with the head unit). Managing Incoming Calls When connected to a Bluetooth phone, the unit will display the paired mobile phone model number or name (as specified in the Pairing Code field under the Bluetooth SETUP menu. NOTE: The...
... TFT will mute audio output, pause CD play, and change to enter Bluetooth setup, turn the rotary encoder (5) on the front panel or press the VOL+/ VOLbuttons on the list. Select "VM9213" from other modes by touching the MENU button on the market, operations with the head unit). Managing Incoming Calls When connected to a Bluetooth phone, the unit will display the paired mobile phone model number or name (as specified in the Pairing Code field under the Bluetooth SETUP menu. NOTE: The...
Operation Manual
Page 25
... previously paired Bluetooth when it may be necessary to your phone. Phone Book 1. The screen will allow the VM9213 to automatically connect to enter a PIN code into the unit. Once the download is downloaded. 3. NOTE: Some mobile phones do not support Phone Book upload through Bluetooth. To turn auto "Connect" on the profile used. 21 VM9213 Select the "Bluetooth" sub-menu. 3. Touch the button to view the list. Select the "Bluetooth" sub-menu. 3. Touch the area to the right of "Auto answer" to view the SETUP menu. 2. Enter the PIN code...
... previously paired Bluetooth when it may be necessary to your phone. Phone Book 1. The screen will allow the VM9213 to automatically connect to enter a PIN code into the unit. Once the download is downloaded. 3. NOTE: Some mobile phones do not support Phone Book upload through Bluetooth. To turn auto "Connect" on the profile used. 21 VM9213 Select the "Bluetooth" sub-menu. 3. Touch the button to view the list. Select the "Bluetooth" sub-menu. 3. Touch the area to the right of "Auto answer" to view the SETUP menu. 2. Enter the PIN code...
Operation Manual
Page 26
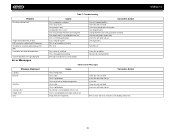
...Unit will not power on Radio Fuse blown Car battery fuse blown Illegal operation Remote control does not function Battery depleted Battery installed incorrectly No/low audio output Improper audio output connection Volume set too low Improper "MUTE" connection Speakers damaged Heavily biased volume balance Speaker wiring is in safe place and apply parking brake Change setup to accommodate disc Check wiring and correct Use correct aspect ratio setting Press OPEN button to restart monitor movement Connect the auto antenna control cable properly Connect the auto antenna control cable...
...Unit will not power on Radio Fuse blown Car battery fuse blown Illegal operation Remote control does not function Battery depleted Battery installed incorrectly No/low audio output Improper audio output connection Volume set too low Improper "MUTE" connection Speakers damaged Heavily biased volume balance Speaker wiring is in safe place and apply parking brake Change setup to accommodate disc Check wiring and correct Use correct aspect ratio setting Press OPEN button to restart monitor movement Connect the auto antenna control cable properly Connect the auto antenna control cable...
Operation Manual
Page 27
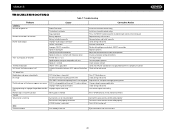
... repeat or searching while playing VCD MP3 Interruption occurred during playback Incorrect playback message displayed Error Messages Loading No Disc Message Displayed Bad Disc Unknown disc Region Error Error Table 7: Troubleshooting Cause Disc is warped or scratched Disc is dirty or wet Laser pickup is dirty Incompatible disc is used Disc rating exceeds Parental Lock rating limit Disc region code is not compatible with unit Disc is inserted upside down...
... repeat or searching while playing VCD MP3 Interruption occurred during playback Incorrect playback message displayed Error Messages Loading No Disc Message Displayed Bad Disc Unknown disc Region Error Error Table 7: Troubleshooting Cause Disc is warped or scratched Disc is dirty or wet Laser pickup is dirty Incompatible disc is used Disc rating exceeds Parental Lock rating limit Disc region code is not compatible with unit Disc is inserted upside down...
Quick Reference Guide
Page 9
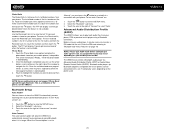
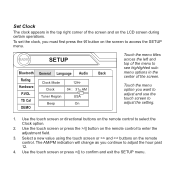
... press the button on the remote control to enter the adjustment field. 3. RADIO SETUP Bluetooth Rating Hardware P.VOL TS Cal DEMO General Language Audio Clock Mode 12Hr Clock 04 : 31 AM Tuner Region USA Beep On Back Touch the menu titles across the left and top of the menu to confirm and exit the SETUP menu. Use the touch screen or directional buttons on the LCD screen during certain operations. Select a new value using the touch screen or >> and...
... press the button on the remote control to enter the adjustment field. 3. RADIO SETUP Bluetooth Rating Hardware P.VOL TS Cal DEMO General Language Audio Clock Mode 12Hr Clock 04 : 31 AM Tuner Region USA Beep On Back Touch the menu titles across the left and top of the menu to confirm and exit the SETUP menu. Use the touch screen or directional buttons on the LCD screen during certain operations. Select a new value using the touch screen or >> and...

Quick Reference Guide
Page 18
... mobile phone within 2 meters of functions available on the environment. Connection is normally established using HFP (Hands Free Profile), which gives you full control of the head unit when pairing. 2. Press the button to 1 megabit per second. The default code for many phones is "0000". However, depending on your cellular phone must be 8 meters or less, depending on the telephone source. Bluetooth operates in 2.4 GHz frequency range...
... mobile phone within 2 meters of functions available on the environment. Connection is normally established using HFP (Hands Free Profile), which gives you full control of the head unit when pairing. 2. Press the button to 1 megabit per second. The default code for many phones is "0000". However, depending on your cellular phone must be 8 meters or less, depending on the telephone source. Bluetooth operates in 2.4 GHz frequency range...
Installation Guide
Page 1
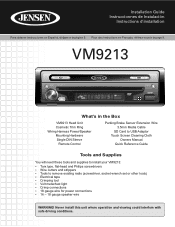
... VM9213 Head Unit Cosmetic Trim Ring Wiring Harness Power/Speaker Mounting Hardware Single DIN Sleeve Remote Control Parking Brake Sensor Extension Wire 3.5mm Media Cable SD Card to USB Adaptor Touch Screen Cleaning Cloth Owners Manual Quick Reference Guide Tools and Supplies You will need these tools and supplies to install your VM9213: Ÿ Torx type, flat-head and Philips screwdrivers Ÿ Wire cutters and strippers Ÿ Tools to remove existing radio (screwdriver, socket wrench set...
... VM9213 Head Unit Cosmetic Trim Ring Wiring Harness Power/Speaker Mounting Hardware Single DIN Sleeve Remote Control Parking Brake Sensor Extension Wire 3.5mm Media Cable SD Card to USB Adaptor Touch Screen Cleaning Cloth Owners Manual Quick Reference Guide Tools and Supplies You will need these tools and supplies to install your VM9213: Ÿ Torx type, flat-head and Philips screwdrivers Ÿ Wire cutters and strippers Ÿ Tools to remove existing radio (screwdriver, socket wrench set...
Installation Guide
Page 3
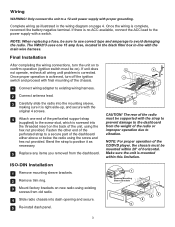
... problem is corrected. 5 4 Once proper operation is screwed into the threaded insert on to existing wiring harness. 2 Connect antenna lead. 3 Carefully slide the radio into dash opening and secure. 5 Re-install dash panel. 1 Remove Mounting Sleeve Brackets 3 4 2 5 3 Bend the strap to avoid damaging the radio. Wiring WARNING! Final Installation After completing the wiring connections, turn off the ignition 1 switch and proceed with proper grounding. Make sure the unit is complete, reconnect the battery...
... problem is corrected. 5 4 Once proper operation is screwed into the threaded insert on to existing wiring harness. 2 Connect antenna lead. 3 Carefully slide the radio into dash opening and secure. 5 Re-install dash panel. 1 Remove Mounting Sleeve Brackets 3 4 2 5 3 Bend the strap to avoid damaging the radio. Wiring WARNING! Final Installation After completing the wiring connections, turn off the ignition 1 switch and proceed with proper grounding. Make sure the unit is complete, reconnect the battery...


