
Instructions
Page 1
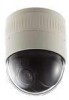
Model No. VN-C655 Serial No. LWT0202-001A-H which is located on the body. Retain this information for future reference. DOME TYPE NETWORK CAMERA VN-C655 READ ME FIRST For Customer Use: Enter below the Serial No.
Model No. VN-C655 Serial No. LWT0202-001A-H which is located on the body. Retain this information for future reference. DOME TYPE NETWORK CAMERA VN-C655 READ ME FIRST For Customer Use: Enter below the Serial No.
Instructions
Page 4
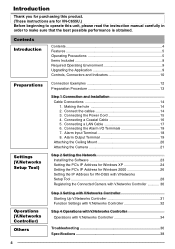
... Output Terminal 19 Attaching the Ceiling Mount 20 Attaching the Camera 21 Step 2 Setting the Network Installing the Software 23 Setting the PC's IP Address for Windows XP 24 Setting the PC's IP Address for Windows 2000 26 Setting the IP Address for VN-C655U.) Before beginning to operate this unit, please read the...
... Output Terminal 19 Attaching the Ceiling Mount 20 Attaching the Camera 21 Step 2 Setting the Network Installing the Software 23 Setting the PC's IP Address for Windows XP 24 Setting the PC's IP Address for Windows 2000 26 Setting the IP Address for VN-C655U.) Before beginning to operate this unit, please read the...

Instructions
Page 5
... function by in surveillance situations in which the object is very alarm input. toring cameras, allowing peripheral equipment for Ⅵ Day/Night surveillance such cameras to be used for VN-C655. and a vertical tilting speed of strong radio waves or mag- Operating Precautions...; Do not install or use . set accordingly in an upside down position on the network Ⅵ Optical + Electronic zooming without decreasing the frame rate. small. Ⅵ Conventional surveillance camera peripheral Ⅵ DSP with IR illumination that have a large difference in bright- ness ...
... function by in surveillance situations in which the object is very alarm input. toring cameras, allowing peripheral equipment for Ⅵ Day/Night surveillance such cameras to be used for VN-C655. and a vertical tilting speed of strong radio waves or mag- Operating Precautions...; Do not install or use . set accordingly in an upside down position on the network Ⅵ Optical + Electronic zooming without decreasing the frame rate. small. Ⅵ Conventional surveillance camera peripheral Ⅵ DSP with IR illumination that have a large difference in bright- ness ...
Instructions
Page 6
... to the ceiling-mounting bracket. To prevent this is tilted and age and color may increase. by the V.Networks Control- When the camera is not a malfunction. Ⅵ Do not connect cameras other than VN-C655 to VN-C655 deterioration of a hemispherical shape, or magnetic waves are generated, near a light source or automatic gain boost by...
... to the ceiling-mounting bracket. To prevent this is tilted and age and color may increase. by the V.Networks Control- When the camera is not a malfunction. Ⅵ Do not connect cameras other than VN-C655 to VN-C655 deterioration of a hemispherical shape, or magnetic waves are generated, near a light source or automatic gain boost by...

Instructions
Page 10
... for Alarm input and Alarm output. (1 Vp-p) with a LAN cable falling down, attach the safety wire between (☞ Page 17) this screw to fasten the camera clamping bracket. 3 [POWER INPUT DC18V] Terminal Connect to a supplied AC adaptor. 1 ALARM ALM OUT 1 2 OUT ALM OUT 2 3 ALARM ALM IN 1 4... IN ALM IN 2 5 GND 4 Safety Wire Hole To prevent the possibility of the entire camera 6 [10BASE-T/100BASE-TX] Connector For network connection with an output impedance of 75 Ø, to (☞Page 18) be connected to video monitor, etc. (☞Page 16) ...
... for Alarm input and Alarm output. (1 Vp-p) with a LAN cable falling down, attach the safety wire between (☞ Page 17) this screw to fasten the camera clamping bracket. 3 [POWER INPUT DC18V] Terminal Connect to a supplied AC adaptor. 1 ALARM ALM OUT 1 2 OUT ALM OUT 2 3 ALARM ALM IN 1 4... IN ALM IN 2 5 GND 4 Safety Wire Hole To prevent the possibility of the entire camera 6 [10BASE-T/100BASE-TX] Connector For network connection with an output impedance of 75 Ø, to (☞Page 18) be connected to video monitor, etc. (☞Page 16) ...
Instructions
Page 13
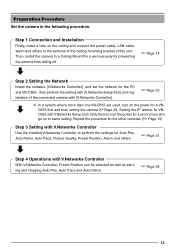
...first and then setting the camera (☞Page 28, Setting the IP Adress for a second one VN-C655 are used, turn on the ceiling and connect the power cable, LAN cable, alarm and others . ☞ Page 31 Step 4 Operations with V.Networks Setup tool). Repeat the ...procedure for the PC and VN-C655. Then, install the camera to perform the settings for a VN- Preparation Procedure Set the camera in the following procedure. Step 1 Connection and Installation Firstly, make a hole...
...first and then setting the camera (☞Page 28, Setting the IP Adress for a second one VN-C655 are used, turn on the ceiling and connect the power cable, LAN cable, alarm and others . ☞ Page 31 Step 4 Operations with V.Networks Setup tool). Repeat the ...procedure for the PC and VN-C655. Then, install the camera to perform the settings for a VN- Preparation Procedure Set the camera in the following procedure. Step 1 Connection and Installation Firstly, make a hole...
Instructions
Page 15
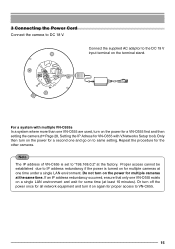
For a system with V.Networks Setup tool). Only then turn on the power for a second one and go on the power for a VN-C655 first and then setting the camera (☞Page 28, Setting the IP Adress for VN-C655 with multiple VN-C655s In a system where more than one VN-C655 are used, turn on to...for proper access to "198.168.0.2" at the same time. Repeat the procedure for multiple cameras at the factory. Or turn off the power once for all network equipment and turn on for multiple cameras at one VN-C655 exists on again for some time (at least 10 minutes). If an IP address ...
For a system with V.Networks Setup tool). Only then turn on the power for a second one and go on the power for a VN-C655 first and then setting the camera (☞Page 28, Setting the IP Adress for VN-C655 with multiple VN-C655s In a system where more than one VN-C655 are used, turn on to...for proper access to "198.168.0.2" at the same time. Repeat the procedure for multiple cameras at the factory. Or turn off the power once for all network equipment and turn on for multiple cameras at one VN-C655 exists on again for some time (at least 10 minutes). If an IP address ...
Instructions
Page 23
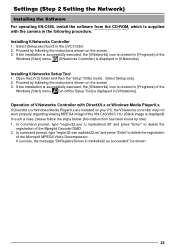
... the Windows [Start] menu. [vn-c655u Setup Tool] is displayed in mp4sds32.ax succeeded." If the installation is successfully executed, the [V.Networks] icon is created in [Programs]...JVC] folder. 2. Open the [JVC] folder and then the "setup" folder inside. Settings (Step 2 Setting the Network) Installing the Software For operating VN-C655, install the software ~fr~o~m~~t~h~e~~C~D~-~R~O~~M~, which is supplied with DirectX9.x or Windows Media Player9.x. If the installation is successfully executed, the [V.Networks] icon is created in [Programs] of V.Networks Controller with the camera...
... the Windows [Start] menu. [vn-c655u Setup Tool] is displayed in mp4sds32.ax succeeded." If the installation is successfully executed, the [V.Networks] icon is created in [Programs]...JVC] folder. 2. Open the [JVC] folder and then the "setup" folder inside. Settings (Step 2 Setting the Network) Installing the Software For operating VN-C655, install the software ~fr~o~m~~t~h~e~~C~D~-~R~O~~M~, which is supplied with DirectX9.x or Windows Media Player9.x. If the installation is successfully executed, the [V.Networks] icon is created in [Programs] of V.Networks Controller with the camera...
Instructions
Page 24
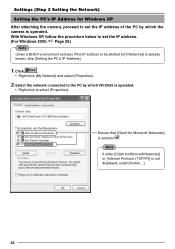
... environment and also if the IP address to be allotted to [V.Networks] is operated. • Right-click to select [Properties]. Note If either [Client for Windows XP After attaching the camera, proceed to the PC by which VN-C655 is already known, skip [Setting the PC's IP Address].... 1. Settings (Step 2 Setting the Network) Setting the PC's IP Address for Microsoft Networks] or [Internet Protocol (TCP/IP)] is not displayed,...
... environment and also if the IP address to be allotted to [V.Networks] is operated. • Right-click to select [Properties]. Note If either [Client for Windows XP After attaching the camera, proceed to the PC by which VN-C655 is already known, skip [Setting the PC's IP Address].... 1. Settings (Step 2 Setting the Network) Setting the PC's IP Address for Microsoft Networks] or [Internet Protocol (TCP/IP)] is not displayed,...

Instructions
Page 26
Select [Settings] and click [Control Panel]. 2. Double-click [Local Area Connection]. Click . Select [Internet Protocol (TCP/IP)]. Double-click [Network and Dial-up Co...]. 3. Settings (Step 2 Setting the Network) Setting the PC's IP Address for Windows 2000 After attaching the camera, proceed to set the IP address of the PC by which the camera is operated. With Windows 2000, follow the procedure below to set the IP address. 1. Click . 26
Select [Settings] and click [Control Panel]. 2. Double-click [Local Area Connection]. Click . Select [Internet Protocol (TCP/IP)]. Double-click [Network and Dial-up Co...]. 3. Settings (Step 2 Setting the Network) Setting the PC's IP Address for Windows 2000 After attaching the camera, proceed to set the IP address of the PC by which the camera is operated. With Windows 2000, follow the procedure below to set the IP address. 1. Click . 26
Instructions
Page 28
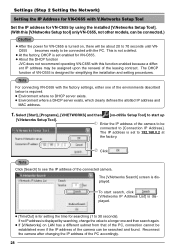
...connection cannot be established even if the IP address of the leasing contract. Select [Start], [Programs], [V.NETWORKS] and then [vn-c655u Setup Tool] to be assigned upon the renewal of the camera can be connected.) Caution ● After the power for simplifying the installation and setting procedures. The... 1. played. ● [TimeOut] is for setting the time for VN-C655. ● About the DHCP function JVC does not recommend operating VN-C655 with the factory settings, either one and then search again. ● If [V.Networks] on , there will be about 20 to 70 seconds until VNC655 ...
...connection cannot be established even if the IP address of the leasing contract. Select [Start], [Programs], [V.NETWORKS] and then [vn-c655u Setup Tool] to be assigned upon the renewal of the camera can be connected.) Caution ● After the power for simplifying the installation and setting procedures. The... 1. played. ● [TimeOut] is for setting the time for VN-C655. ● About the DHCP function JVC does not recommend operating VN-C655 with the factory settings, either one and then search again. ● If [V.Networks] on , there will be about 20 to 70 seconds until VNC655 ...
Instructions
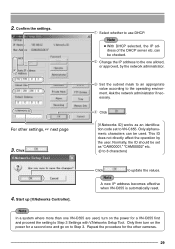
Page 29
... for a second one and go on the power for the other settings, ☞ next page 3. Click . [V.Networks ID] works as "CAM00001," "CAM00002" etc. (0 to the one VN-C655 are used . Change the IP address to 8 characters) 4. Click to the operating environment. Only then turn ...on to Step 3 Settings with V.Networks Setup Tool. Repeat the procedure for a VN-C655 first and proceed the setting to Step 3. Select whether to VN-C655. For other cameras. 29 Normally, the ID should be checked. Only alphanumeric characters can be...
... for a second one and go on the power for the other settings, ☞ next page 3. Click . [V.Networks ID] works as "CAM00001," "CAM00002" etc. (0 to the one VN-C655 are used . Change the IP address to 8 characters) 4. Click to the operating environment. Only then turn ...on to Step 3 Settings with V.Networks Setup Tool. Repeat the procedure for a VN-C655 first and proceed the setting to Step 3. Select whether to VN-C655. For other cameras. 29 Normally, the ID should be checked. Only alphanumeric characters can be...

Instructions
Page 30
... where no DHCP server exists. • Environment where a DHCP server, which clearly defines the IP address and MAC address allotted to VN-C655, exists. 30 2 Enter [V.Network Name], a name under which the camera is easy to remember, such as the installation location or number. (1 to 40 characters) 3 Select the distribution method of the...
... where no DHCP server exists. • Environment where a DHCP server, which clearly defines the IP address and MAC address allotted to VN-C655, exists. 30 2 Enter [V.Network Name], a name under which the camera is easy to remember, such as the installation location or number. (1 to 40 characters) 3 Select the distribution method of the...
Instructions
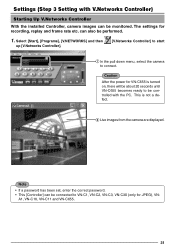
Page 31
... [Controller] can also be monitored. A1, VN-C10, VN-C11 and VN-C655. 31 Select [Start], [Programs], [V.NETWORKS] and then up [V.Networks Controller]. [V.Networks Controller] to start 1 In the pull down menu, select the camera to VN-C1, VN-C2, VN-C3, VN-C30 (only for VN-C655 is not a defect. 2 Live images from the camera are displayed. This is turned on, there...
... [Controller] can also be monitored. A1, VN-C10, VN-C11 and VN-C655. 31 Select [Start], [Programs], [V.NETWORKS] and then up [V.Networks Controller]. [V.Networks Controller] to start 1 In the pull down menu, select the camera to VN-C1, VN-C2, VN-C3, VN-C30 (only for VN-C655 is not a defect. 2 Live images from the camera are displayed. This is turned on, there...

Instructions
Page 32
... : Click to start Auto Trace operation. Upside Down : Displays the image inversely. This function is used in the case that the camera is connected for image size, alarm etc. Note ● The followings are disabled during Auto Pan: • Auto Pan Setting &#...operation. JPEG : 640x480 320x240 Auto Patrol Stop : Click to stop Auto Trace operation. Settings (Step 3 Setting with V.Networks Controller) Function Settings with V.Networks Controller With [V.Networks Controller], settings for the first time. Auto Trace Stop : Click to stop Auto Pan operation. : Sets the image ...
... : Click to start Auto Trace operation. Upside Down : Displays the image inversely. This function is used in the case that the camera is connected for image size, alarm etc. Note ● The followings are disabled during Auto Pan: • Auto Pan Setting &#...operation. JPEG : 640x480 320x240 Auto Patrol Stop : Click to stop Auto Trace operation. Settings (Step 3 Setting with V.Networks Controller) Function Settings with V.Networks Controller With [V.Networks Controller], settings for the first time. Auto Trace Stop : Click to stop Auto Pan operation. : Sets the image ...

Instructions
Page 33
... Auto Trace operation. Time Stamp : Sets display of the date and time of [V.Networks Controller]. 33 Position Memory : Set Preset Position. can be set individually. Property : Changes information on cameras not currently connected. : For checking the version of camera image. Pan/Tilt Setting : Set the operation speed and Auto Flip of frames transmitted...
... Auto Trace operation. Time Stamp : Sets display of the date and time of [V.Networks Controller]. 33 Position Memory : Set Preset Position. can be set individually. Property : Changes information on cameras not currently connected. : For checking the version of camera image. Pan/Tilt Setting : Set the operation speed and Auto Flip of frames transmitted...

Instructions
Page 34
... PLAY Select the file saved in 1. Select position. Select this is selected, recording starts. Operations (Step 4 Operations with V.Networks Controller) Operations with an alarm activated. 34 Assign the buttons using the pull down menu. 6 REC When this button too ...Networks Controller [V.Networks Controller] can be used to select the camera using 7 SNAPSHOT position tabs in 1. Stops recording. It is Saves only one frame of the connected camera. The Position Title is also possible to select the camera, record and playback the camera images etc. 1 2 3 4 56 7 1 Camera...
... PLAY Select the file saved in 1. Select position. Select this is selected, recording starts. Operations (Step 4 Operations with V.Networks Controller) Operations with an alarm activated. 34 Assign the buttons using the pull down menu. 6 REC When this button too ...Networks Controller [V.Networks Controller] can be used to select the camera using 7 SNAPSHOT position tabs in 1. Stops recording. It is Saves only one frame of the connected camera. The Position Title is also possible to select the camera, record and playback the camera images etc. 1 2 3 4 56 7 1 Camera...
Instructions
Page 36
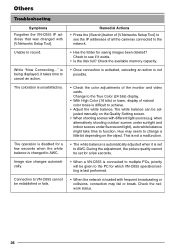
... is disabled for a few seconds. • When a VN-C655 is difficult to achieve. • Adjust the white balance. Check to see the IP addresses of all the cameras connected to the network. • Has the folder for which VN-C655 operation/setting is last performed. • When the... network is set for a few seconds when the white balance is changed with [V.Networks Setup Tool]. Others Troubleshooting Symptoms Forgotten the VN-C655 IP address ...
... is disabled for a few seconds. • When a VN-C655 is difficult to achieve. • Adjust the white balance. Check to see the IP addresses of all the cameras connected to the network. • Has the folder for which VN-C655 operation/setting is last performed. • When the... network is set for a few seconds when the white balance is changed with [V.Networks Setup Tool]. Others Troubleshooting Symptoms Forgotten the VN-C655 IP address ...
Instructions
Page 37
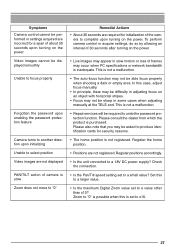
...not a malfunction. • The auto-focus function may occur when PC specifications or network bandwidth is inadequate. Register the home position. • Positions are required for initialization of the camera to complete upon initializing Unable to select position Video images are not displayed PAN/TILT ...stripes. • Focus may be asked to produce identification cards for security reasons. • The home position is purchased. Symptoms Camera control cannot be performed or settings acquired are incorrect for a span of about 30 seconds upon turning on the power Video images cannot...
...not a malfunction. • The auto-focus function may occur when PC specifications or network bandwidth is inadequate. Register the home position. • Positions are required for initialization of the camera to complete upon initializing Unable to select position Video images are not displayed PAN/TILT ...stripes. • Focus may be asked to produce identification cards for security reasons. • The home position is purchased. Symptoms Camera control cannot be performed or settings acquired are incorrect for a span of about 30 seconds upon turning on the power Video images cannot...

Instructions
Page 40
and many other countries. © 2004 Victor Company of Japan, Limited. Printed in Japan, the U.S.A., the U.K. R is a registered trademark owned by Victor Company of Japan, Limited. R is a registered trademark in Thailand LWT0202-001A-H VN-C655 DOME TYPE NETWORK CAMERA
and many other countries. © 2004 Victor Company of Japan, Limited. Printed in Japan, the U.S.A., the U.K. R is a registered trademark owned by Victor Company of Japan, Limited. R is a registered trademark in Thailand LWT0202-001A-H VN-C655 DOME TYPE NETWORK CAMERA

