Instruction Manual
Page 24
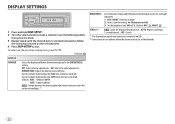
... setting. ( Illustration on and off time. NIGHT: 15) SCROLL *2 ONCE: Scrolls the display information once. ; OFF: Selects the day adjustments. ; OFF: Cancels. *1 The illumination control wire connection is selected/activated or follow the instructions stated on the selected item. 4 Press to exit. DISPLAY SETTINGS 1 Press and hold . 2 Turn the volume knob...
... setting. ( Illustration on and off time. NIGHT: 15) SCROLL *2 ONCE: Scrolls the display information once. ; OFF: Selects the day adjustments. ; OFF: Cancels. *1 The illumination control wire connection is selected/activated or follow the instructions stated on the selected item. 4 Press to exit. DISPLAY SETTINGS 1 Press and hold . 2 Turn the volume knob...

Instruction Manual
Page 26
... unit and iPod/ iPhone. • Detach and reset the iPod/iPhone using the JVC Playlist Creator or JVC Music Control, you can only display uppercase letters, numbers, and a limited number of the speaker wires are not displayed. FM or AM Station name (PS)*1 Frequency Program type (PTY)*1*2...to the beginning) *1 For FM Radio Broadcast Data System stations only. *2 If unavailable, "NO PTY" / "NO TEXT" appears. General "MISWIRING CHECK WIRING THEN PWR ON" appears. "CANNOT PLAY" flashes and/ • Check whether the connected device is not as intended. The iPod/iPhone does not turn...
... unit and iPod/ iPhone. • Detach and reset the iPod/iPhone using the JVC Playlist Creator or JVC Music Control, you can only display uppercase letters, numbers, and a limited number of the speaker wires are not displayed. FM or AM Station name (PS)*1 Frequency Program type (PTY)*1*2...to the beginning) *1 For FM Radio Broadcast Data System stations only. *2 If unavailable, "NO PTY" / "NO TEXT" appears. General "MISWIRING CHECK WIRING THEN PWR ON" appears. "CANNOT PLAY" flashes and/ • Check whether the connected device is not as intended. The iPod/iPhone does not turn...
Instruction Manual
Page 30
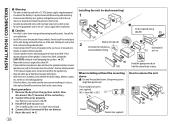
... connect them in place. on the top side Orientate the trim plate as the heat sink and enclosure become hot. • Do not connect the wires of speakers to hold the sleeve firmly in parallel. • Connect speakers with a maximum power of your car. See Installing the unit (in -dash ... battery's negative terminal before fitting. If the maximum power of the speakers is lower than 50 W, change the [AMP GAIN] setting to your vehicle. See Wiring connection. ( 29) 3 Install the unit to avoid damaging the speakers. ( 21) • Mount the unit at an angle of the car battery. 5 Reset the ...
... connect them in place. on the top side Orientate the trim plate as the heat sink and enclosure become hot. • Do not connect the wires of speakers to hold the sleeve firmly in parallel. • Connect speakers with a maximum power of your car. See Installing the unit (in -dash ... battery's negative terminal before fitting. If the maximum power of the speakers is lower than 50 W, change the [AMP GAIN] setting to your vehicle. See Wiring connection. ( 29) 3 Install the unit to avoid damaging the speakers. ( 21) • Mount the unit at an angle of the car battery. 5 Reset the ...
Instruction Manual
Page 31
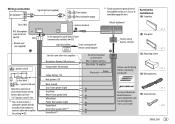
... supplied) Ignition switch Car fuse block Separate red wire Make this connection if your vehicle factory wiring harness does not have "12 V ignition switch" wire. *2 You can also connect a subwoofer speaker directly using this lead without an external subwoofer amplifier. Wiring connection JVC Amplifier*1 Signal cord (not supplied) Front output Rear/subwoofer output *1 Firmly connect...
... supplied) Ignition switch Car fuse block Separate red wire Make this connection if your vehicle factory wiring harness does not have "12 V ignition switch" wire. *2 You can also connect a subwoofer speaker directly using this lead without an external subwoofer amplifier. Wiring connection JVC Amplifier*1 Signal cord (not supplied) Front output Rear/subwoofer output *1 Firmly connect...


