
Instruction Manual America
Page 6
...menu. (Page 5) • [XX] indicates the selected items. • (Page XX) indicates references are available on the faceplate of KD-X360BTS. • English indications are explained mainly using the external device if it away from children. General: • Avoid using buttons ...® Radio 12 BLUETOOTH® 15 AUX 24 AUDIO SETTINGS 24 DISPLAY SETTINGS 30 REFERENCES 31 Maintenance More information TROUBLESHOOTING 35 INSTALLATION/ CONNECTION 38 SPECIFICATIONS 42 2 ENGLISH BEFORE USE IMPORTANT • To ensure proper use, please read through this manual before ...
...menu. (Page 5) • [XX] indicates the selected items. • (Page XX) indicates references are available on the faceplate of KD-X360BTS. • English indications are explained mainly using the external device if it away from children. General: • Avoid using buttons ...® Radio 12 BLUETOOTH® 15 AUX 24 AUDIO SETTINGS 24 DISPLAY SETTINGS 30 REFERENCES 31 Maintenance More information TROUBLESHOOTING 35 INSTALLATION/ CONNECTION 38 SPECIFICATIONS 42 2 ENGLISH BEFORE USE IMPORTANT • To ensure proper use, please read through this manual before ...
Instruction Manual America
Page 11
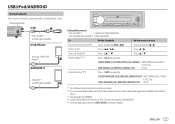
... cable inside the car when not using. *2 You can control Android device using the Android device itself via other media player application installed in the Android device. *3 Not applicable for ANDROID. *4 Only for iPod/ANDROID. *5 For iPod: Applicable only when [HEAD ... (commercially available) iPod/iPhone Accessory of the iPod/ iPhone*1 ANDROID*2 USB cable*1 (commercially available) Selectable source: • KD-X360BTS: USB/iPod USB/ANDROID • KD-X260BT/KD-SX25BT: USB/ANDROID To On the faceplate On the remote control Reverse/Fast-forward*3 Press and hold H / I . Select ...
... cable inside the car when not using. *2 You can control Android device using the Android device itself via other media player application installed in the Android device. *3 Not applicable for ANDROID. *4 Only for iPod/ANDROID. *5 For iPod: Applicable only when [HEAD ... (commercially available) iPod/iPhone Accessory of the iPod/ iPhone*1 ANDROID*2 USB cable*1 (commercially available) Selectable source: • KD-X360BTS: USB/iPod USB/ANDROID • KD-X260BT/KD-SX25BT: USB/ANDROID To On the faceplate On the remote control Reverse/Fast-forward*3 Press and hold H / I . Select ...
Instruction Manual America
Page 12
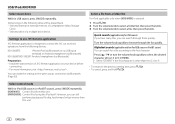
...via Bluetooth) Preparation: • Install the latest version of a multiple drive device. Stored songs in USB source, press 5MODE repeatedly. KD-X360BTS: iPhone/iPod (via Bluetooth or via USB input terminal) or Android smartphone (via Bluetooth) KD-X260BT/KD-SX25BT: Android smartphone (via Bluetooth.... (Page 22) Select a file from the following drive will be played back. • Selected internal or external memory of a smartphone (Mass Storage Class). • Selected drive of JVC Remote application on ...
...via Bluetooth) Preparation: • Install the latest version of a multiple drive device. Stored songs in USB source, press 5MODE repeatedly. KD-X360BTS: iPhone/iPod (via Bluetooth or via USB input terminal) or Android smartphone (via Bluetooth) KD-X260BT/KD-SX25BT: Android smartphone (via Bluetooth.... (Page 22) Select a file from the following drive will be played back. • Selected internal or external memory of a smartphone (Mass Storage Class). • Selected drive of JVC Remote application on ...
Instruction Manual America
Page 13
...devices via USB input terminal (see the following) or via Bluetooth) Preparation: Install the latest version of the number buttons (3, 4, 5 or 6). To On the faceplate Play back/pause Press the volume knob. KD-X360BTS: USB input terminal Accessory of the number buttons (3, 4, 5 or 6)... . 3 Press B SRC repeatedly to your device. • The bookmark is skipped. KD-X360BTS: iPhone/iPod (via Bluetooth or via USB input terminal) or Android smartphone (via Bluetooth) KD-X260BT/KD-SX25BT: Android smartphone (via Bluetooth (page 23). To cancel, press and hold the volume...
...devices via USB input terminal (see the following) or via Bluetooth) Preparation: Install the latest version of the number buttons (3, 4, 5 or 6). To On the faceplate Play back/pause Press the volume knob. KD-X360BTS: USB input terminal Accessory of the number buttons (3, 4, 5 or 6)... . 3 Press B SRC repeatedly to your device. • The bookmark is skipped. KD-X360BTS: iPhone/iPod (via Bluetooth or via USB input terminal) or Android smartphone (via Bluetooth) KD-X260BT/KD-SX25BT: Android smartphone (via Bluetooth (page 23). To cancel, press and hold the volume...
Instruction Manual America
Page 14
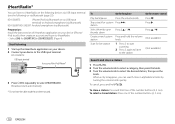
...to select IHEARTRADIO. Press I. To select a stored station: Press one of the iPod/iPhone* 3 Press B SRC repeatedly to the station. KD-X360BTS: USB input terminal Accessory of the number buttons (4, 5 or 6). thumbs down Create a new/custom Press and hold . Press J ...Install the latest version of the number buttons (4, 5 or 6). 10 ENGLISH iHeartRadio® You can search cities in [SOURCE SELECT]. (Page 4) Start listening 1 Start up or Press 2J / 1K. KD-X360BTS: iPhone/iPod (via Bluetooth or via USB input terminal) or Android smartphone (via Bluetooth) KD-X260BT/KD...
...to select IHEARTRADIO. Press I. To select a stored station: Press one of the iPod/iPhone* 3 Press B SRC repeatedly to the station. KD-X360BTS: USB input terminal Accessory of the number buttons (4, 5 or 6). thumbs down Create a new/custom Press and hold . Press J ...Install the latest version of the number buttons (4, 5 or 6). 10 ENGLISH iHeartRadio® You can search cities in [SOURCE SELECT]. (Page 4) Start listening 1 Start up or Press 2J / 1K. KD-X360BTS: iPhone/iPod (via Bluetooth or via USB input terminal) or Android smartphone (via Bluetooth) KD-X260BT/KD...
Instruction Manual America
Page 15
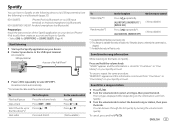
... While listening to select the desired song or station, then press the knob. To unsave, repeat the same procedure. KD-X360BTS: USB input terminal Accessory of the Spotify application on your device (iPhone/ iPod touch), then create an account and...Install the latest version of the iPod/iPhone* 3 Press B SRC repeatedly to select a list type, then press the knob. Spotify You can browse through the list quickly by turning the volume knob quickly. ENGLISH 11 KD-X360BTS: iPhone/iPod (via Bluetooth or via USB input terminal) or Android smartphone (via Bluetooth) KD-X260BT/KD...
... While listening to select the desired song or station, then press the knob. To unsave, repeat the same procedure. KD-X360BTS: USB input terminal Accessory of the Spotify application on your device (iPhone/ iPod touch), then create an account and...Install the latest version of the iPod/iPhone* 3 Press B SRC repeatedly to select a list type, then press the knob. Spotify You can browse through the list quickly by turning the volume knob quickly. ENGLISH 11 KD-X360BTS: iPhone/iPod (via Bluetooth or via USB input terminal) or Android smartphone (via Bluetooth) KD-X260BT/KD...
Instruction Manual America
Page 26
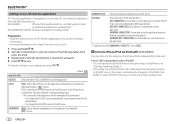
... to iPod USB. To return to use JVC Remote application JVC Remote application is still connected via Bluetooth) Preparation: • Install the latest version of JVC Remote application on this unit. Listen to iPhone/iPod via Bluetooth (for KD-X360BTS) You can operate the iPod/iPhone...device (IOS or ANDROID) to use the application. [IOS] [YES]: Selects iPhone/iPod to the previous setting item, press . KD-X360BTS: iPhone/iPod (via Bluetooth or via USB input terminal) or Android smartphone (via Bluetooth) KD-X260BT/KD-SX25BT: Android smartphone (via Bluetooth. 22 ENGLISH
... to iPod USB. To return to use JVC Remote application JVC Remote application is still connected via Bluetooth) Preparation: • Install the latest version of JVC Remote application on this unit. Listen to iPhone/iPod via Bluetooth (for KD-X360BTS) You can operate the iPod/iPhone...device (IOS or ANDROID) to use the application. [IOS] [YES]: Selects iPhone/iPod to the previous setting item, press . KD-X360BTS: iPhone/iPod (via Bluetooth or via USB input terminal) or Android smartphone (via Bluetooth) KD-X260BT/KD-SX25BT: Android smartphone (via Bluetooth. 22 ENGLISH

Instruction Manual America
Page 40
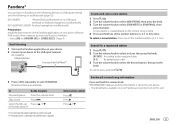
...; Connected via Bluetooth or through auxiliary input jack. For more information about the SiriusXM channel lineup, visit . 36 ENGLISH "UPGRADE APP" Make sure you have installed the latest version of the Pandora application on the Android device and start playback. • Relaunch the current media player application or use another media...
...; Connected via Bluetooth or through auxiliary input jack. For more information about the SiriusXM channel lineup, visit . 36 ENGLISH "UPGRADE APP" Make sure you have installed the latest version of the Pandora application on the Android device and start playback. • Relaunch the current media player application or use another media...
Instruction Manual America
Page 42
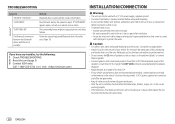
... Ignition wire (red) to prevent a short circuit. • To prevent short circuit: - Consult the car audio dealer. • Install this unit during and shortly after installation. - If "H/W ERROR" appears again, consult your vehicle. Do not touch the metal parts of this unit in contact with a 12... Keep all cables away from the unit. (Page 19) If you have any troubles, try the operation again. TROUBLESHOOTING INSTALLATION/CONNECTION Bluetooth® Symptom "NO INFO"/"NO DATA" "H/W ERROR" "SWITCHING NG" The Bluetooth connection between the Bluetooth device and the unit is...
... Ignition wire (red) to prevent a short circuit. • To prevent short circuit: - Consult the car audio dealer. • Install this unit during and shortly after installation. - If "H/W ERROR" appears again, consult your vehicle. Do not touch the metal parts of this unit in contact with a 12... Keep all cables away from the unit. (Page 19) If you have any troubles, try the operation again. TROUBLESHOOTING INSTALLATION/CONNECTION Bluetooth® Symptom "NO INFO"/"NO DATA" "H/W ERROR" "SWITCHING NG" The Bluetooth connection between the Bluetooth device and the unit is...

Instruction Manual America
Page 43
...wires properly. Removing the unit Use only the specified screws. Using wrong screws might damage the unit. See "Wiring connection" on page 40. 3 Install the unit to your car Bend the appropriate tabs to turn on the power. 6 Detach the faceplate and reset the unit within 5 seconds. (...Page 3) Hook on both sides) with the vehicle mounting bracket and secure the unit with screws (commercially available). See "Installing the unit (in-dash mounting)". 4 Connect the terminal of your car. Dashboard of the car battery. 5 Press BSRC to hold the sleeve firmly...
...wires properly. Removing the unit Use only the specified screws. Using wrong screws might damage the unit. See "Wiring connection" on page 40. 3 Install the unit to your car Bend the appropriate tabs to turn on the power. 6 Detach the faceplate and reset the unit within 5 seconds. (...Page 3) Hook on both sides) with the vehicle mounting bracket and secure the unit with screws (commercially available). See "Installing the unit (in-dash mounting)". 4 Connect the terminal of your car. Dashboard of the car battery. 5 Press BSRC to hold the sleeve firmly...
Instruction Manual America
Page 44
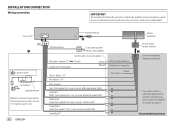
... switch" wire. 40 ENGLISH Antenna terminal Light blue/yellow To the steering wheel remote control adapter Join the same color wires together. INSTALLATION/CONNECTION Wiring connection IMPORTANT We recommend installing the unit with a commercially available custom wiring harness specific for your car and leave this job to professionals for your car audio...
... switch" wire. 40 ENGLISH Antenna terminal Light blue/yellow To the steering wheel remote control adapter Join the same color wires together. INSTALLATION/CONNECTION Wiring connection IMPORTANT We recommend installing the unit with a commercially available custom wiring harness specific for your car and leave this job to professionals for your car audio...
Instruction Manual America
Page 45
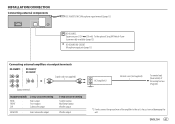
INSTALLATION/CONNECTION Connecting external components KD-X360BTS: MIC (Microphone input terminal) (page 15) KD-X360BTS: Expansion port (12 V 500 mA): To the optional SiriusXM Vehicle Tuner (commercially available) (page 12) KD-X260BT/KD-SX25BT: Microphone input jack (page 15) Connecting external amplifiers via output terminals KD-X360BTS KD-X260BT/ KD-SX25BT Signal cord (not supplied) Output terminals Output terminals REAR : FRONT...
INSTALLATION/CONNECTION Connecting external components KD-X360BTS: MIC (Microphone input terminal) (page 15) KD-X360BTS: Expansion port (12 V 500 mA): To the optional SiriusXM Vehicle Tuner (commercially available) (page 12) KD-X260BT/KD-SX25BT: Microphone input jack (page 15) Connecting external amplifiers via output terminals KD-X360BTS KD-X260BT/ KD-SX25BT Signal cord (not supplied) Output terminals Output terminals REAR : FRONT...

Instruction Manual America
Page 47
SPECIFICATIONS General Operating Voltage Installation Size (W × H × D) Net Weight (includes Trimplate, Mounting Sleeve) 12 V DC car battery 182 mm × 53 mm × 100 mm (7-3/16" × 2-1/8" × 3-15/16") KD-X360BTS: 0.7 kg (1.5 lbs) KD-X260BT/KD-SX25BT: 0.6 kg (1.3 lbs) Subject to change without notice. ENGLISH 43
SPECIFICATIONS General Operating Voltage Installation Size (W × H × D) Net Weight (includes Trimplate, Mounting Sleeve) 12 V DC car battery 182 mm × 53 mm × 100 mm (7-3/16" × 2-1/8" × 3-15/16") KD-X360BTS: 0.7 kg (1.5 lbs) KD-X260BT/KD-SX25BT: 0.6 kg (1.3 lbs) Subject to change without notice. ENGLISH 43

Quick Start Guide America
Page 6
... comes into contact with metal parts to avoid damaging the speakers. • Mount the unit at an angle of less than 50 W. See "Installing the unit (in -dash mounting) Caution • For safety's sake, leave wiring and mounting to turn on the power. 6 Detach the ...your vehicle wiring harness does not have the ignition terminal, connect Ignition wire (red) to prevent a short circuit. • To prevent short circuit: - INSTALLATION/CONNECTION Warning • The unit can only be used with a 12 V DC power supply, negative ground. • Disconnect the battery's negative terminal ...
... comes into contact with metal parts to avoid damaging the speakers. • Mount the unit at an angle of less than 50 W. See "Installing the unit (in -dash mounting) Caution • For safety's sake, leave wiring and mounting to turn on the power. 6 Detach the ...your vehicle wiring harness does not have the ignition terminal, connect Ignition wire (red) to prevent a short circuit. • To prevent short circuit: - INSTALLATION/CONNECTION Warning • The unit can only be used with a 12 V DC power supply, negative ground. • Disconnect the battery's negative terminal ...

Quick Start Guide America
Page 7
... speaker (left) l Purple ª, Purple/black ·: Rear speaker (right) m Green ª, Green/black ·: Rear speaker (left) 3 Using wrong screws might damage the unit. Installing the unit (without mounting sleeve) 1 Remove the mounting sleeve and trim plate from the unit. 2 Align the holes in the unit (on both sides) with...
... speaker (left) l Purple ª, Purple/black ·: Rear speaker (right) m Green ª, Green/black ·: Rear speaker (left) 3 Using wrong screws might damage the unit. Installing the unit (without mounting sleeve) 1 Remove the mounting sleeve and trim plate from the unit. 2 Align the holes in the unit (on both sides) with...


