
Instruction Manual America
Page 6
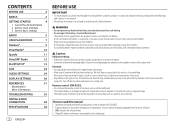
... antenna will automatically extend when you turn on the faceplate of the body, seek immediate medical attention. CONTENTS BEFORE USE 2 BASICS 3 GETTING STARTED 4 1 Cancel the demonstration 2 Set the clock and date 3 Set the basic settings RADIO 5 USB/iPod/ANDROID 7 Pandora® 9 iHeartRadio® 10 Spotify 11 SiriusXM® Radio 12 BLUETOOTH® 15 AUX 24 AUDIO SETTINGS 24 DISPLAY SETTINGS 30 REFERENCES 31 Maintenance More information TROUBLESHOOTING 35 INSTALLATION/ CONNECTION 38 SPECIFICATIONS...
... antenna will automatically extend when you turn on the faceplate of the body, seek immediate medical attention. CONTENTS BEFORE USE 2 BASICS 3 GETTING STARTED 4 1 Cancel the demonstration 2 Set the clock and date 3 Set the basic settings RADIO 5 USB/iPod/ANDROID 7 Pandora® 9 iHeartRadio® 10 Spotify 11 SiriusXM® Radio 12 BLUETOOTH® 15 AUX 24 AUDIO SETTINGS 24 DISPLAY SETTINGS 30 REFERENCES 31 Maintenance More information TROUBLESHOOTING 35 INSTALLATION/ CONNECTION 38 SPECIFICATIONS...
Instruction Manual America
Page 7
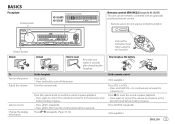
.... BASICS Faceplate Volume knob Display window KD-X260BT/ KD-SX25BT Remote control (RM-RK52) (except for the first time. How to replace the battery On the faceplate Press BSRC. • Press and hold VOL + to continuously increase the volume to bright sunlight.) Detach button Attach To Turn on the power Adjust the volume Select a source Change the display information Pull out the insulation sheet when using for KD-SX25BT) This unit can be remotely controlled with an...
.... BASICS Faceplate Volume knob Display window KD-X260BT/ KD-SX25BT Remote control (RM-RK52) (except for the first time. How to replace the battery On the faceplate Press BSRC. • Press and hold VOL + to continuously increase the volume to bright sunlight.) Detach button Attach To Turn on the power Adjust the volume Select a source Change the display information Pull out the insulation sheet when using for KD-SX25BT) This unit can be remotely controlled with an...

Instruction Manual America
Page 8
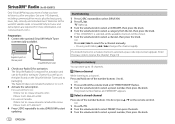
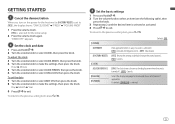
... to select [CLOCK ADJUST], then press the knob. 4 Turn the volume knob to make the settings, then press the knob. GETTING STARTED 1 Cancel the demonstration When you turn on the power for the first time (or [FACTORY RESET] is set the date 7 Turn the volume knob to select [DATE SET], then press the knob. 8 Turn the volume knob to make the settings, then press the knob. Default: [XX] [SYSTEM] [KEY BEEP] [SOURCE SELECT...
... to select [CLOCK ADJUST], then press the knob. 4 Turn the volume knob to make the settings, then press the knob. GETTING STARTED 1 Cancel the demonstration When you turn on the power for the first time (or [FACTORY RESET] is set the date 7 Turn the volume knob to select [DATE SET], then press the knob. 8 Turn the volume knob to make the settings, then press the knob. Default: [XX] [SYSTEM] [KEY BEEP] [SOURCE SELECT...
Instruction Manual America
Page 16
... the rear panel SiriusXM Vehicle Tuner 2 Check your Radio ID for activation and can store up . 3 Turn the volume knob to select a CATEGORY, then press the knob. 4 Turn the volume knob to select SIRIUS XM. 2 Press . Get over 140 channels, including commercial-free music plus the best sports, news, talk, comedy and entertainment. Preparation: 1 Connect the optional SiriusXM Vehicle Tuner (commercially available). If "ALL CHANNELS" is selected, a pass code input screen appears...
... the rear panel SiriusXM Vehicle Tuner 2 Check your Radio ID for activation and can store up . 3 Turn the volume knob to select a CATEGORY, then press the knob. 4 Turn the volume knob to select SIRIUS XM. 2 Press . Get over 140 channels, including commercial-free music plus the best sports, news, talk, comedy and entertainment. Preparation: 1 Connect the optional SiriusXM Vehicle Tuner (commercially available). If "ALL CHANNELS" is selected, a pass code input screen appears...
Instruction Manual America
Page 18
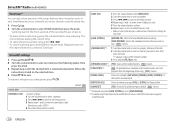
... the previous setting item, press . [SIRIUS XM] [CHANNEL LOCK] To unlock settings: 1 Turn the volume knob to select a number. 2 Press S / T to move to the entry position. 4 Repeat steps 2 and 3 to enter a new 4-digit pass code. 5 Press the volume knob to confirm. 6 Repeat steps 2 to 5 to reconfirm the pass code. • Make a note of your SmartFavorites music channels or a music channel currently tuned into. 1 Press . 2 Turn the volume knob to...
... the previous setting item, press . [SIRIUS XM] [CHANNEL LOCK] To unlock settings: 1 Turn the volume knob to select a number. 2 Press S / T to move to the entry position. 4 Repeat steps 2 and 3 to enter a new 4-digit pass code. 5 Press the volume knob to confirm. 6 Repeat steps 2 to 5 to reconfirm the pass code. • Make a note of your SmartFavorites music channels or a music channel currently tuned into. 1 Press . 2 Turn the volume knob to...

Instruction Manual America
Page 19
... the location of your mobile phone, Bluetooth features may not work with this unit. Connection Supported Bluetooth profiles - For some Bluetooth devices, you reset the unit. Operate the Bluetooth device to confirm pairing. NO" Press the volume knob to five devices can change to a desired PIN code before pairing. (Page 19) • If only "PAIRING" appears, operate the Bluetooth device to confirm the passkey. (B) "Device Name" "VOL - YES" "BACK - For KD-X360BTS, the battery and signal strength of your receiver ("KD...
... the location of your mobile phone, Bluetooth features may not work with this unit. Connection Supported Bluetooth profiles - For some Bluetooth devices, you reset the unit. Operate the Bluetooth device to confirm pairing. NO" Press the volume knob to five devices can change to a desired PIN code before pairing. (Page 19) • If only "PAIRING" appears, operate the Bluetooth device to confirm the passkey. (B) "Device Name" "VOL - YES" "BACK - For KD-X360BTS, the battery and signal strength of your receiver ("KD...
Instruction Manual America
Page 20
... the faceplate, Bluetooth is set to [ON]. (Page 19) BLUETOOTH - Bluetooth function of two Bluetooth phones and one Bluetooth audio device can connect to five Bluetooth audio devices and switch between these five devices. (Page 21) • Some Bluetooth devices may not automatically connect to the unit after pairing. Press the volume knob to pair once you connect iPhone/iPod touch to the instruction manual of the Bluetooth device for KD-X360BTS) When you have selected in [RING COLOR]. (Page 18) KD-X260BT/KD-SX25BT: The buttons will...
... the faceplate, Bluetooth is set to [ON]. (Page 19) BLUETOOTH - Bluetooth function of two Bluetooth phones and one Bluetooth audio device can connect to five Bluetooth audio devices and switch between these five devices. (Page 21) • Some Bluetooth devices may not automatically connect to the unit after pairing. Press the volume knob to pair once you connect iPhone/iPod touch to the instruction manual of the Bluetooth device for KD-X360BTS) When you have selected in [RING COLOR]. (Page 18) KD-X260BT/KD-SX25BT: The buttons will...
Instruction Manual America
Page 24
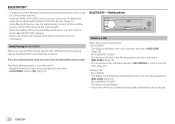
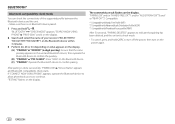
... on the unit and Bluetooth device, then operate the Bluetooth device to confirm the passkey. (B) "PAIRING" "PIN IS 0000": Enter "0000" on the Bluetooth device. (C) "PAIRING": Operate the Bluetooth device to continue. The connectivity result flashes on the display. If "CONNECT NOW USING PHONE" appears, operate the Bluetooth device to allow phonebook access to confirm pairing. BLUETOOTH® Bluetooth compatibility check mode You can check the connectivity of your receiver ("KD-X3 BTS"/ "KD-X2 BT"/"KD-SX2 BT") on the Bluetooth device within 3 minutes...
... on the unit and Bluetooth device, then operate the Bluetooth device to confirm the passkey. (B) "PAIRING" "PIN IS 0000": Enter "0000" on the Bluetooth device. (C) "PAIRING": Operate the Bluetooth device to continue. The connectivity result flashes on the display. If "CONNECT NOW USING PHONE" appears, operate the Bluetooth device to allow phonebook access to confirm pairing. BLUETOOTH® Bluetooth compatibility check mode You can check the connectivity of your receiver ("KD-X3 BTS"/ "KD-X2 BT"/"KD-SX2 BT") on the Bluetooth device within 3 minutes...
Instruction Manual America
Page 28
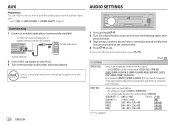
... settings made in [EASY EQ] or [PRO EQ]. [FLAT]/[DRVN 3]/[DRVN 2]/[DRVN 1]/[HARD ROCK]/[HIP HOP]/[JAZZ]/ [POP]/[R&B]/[USER]/[CLASSICAL] Drive equalizer ([DRVN 3]/[DRVN 2]/[DRVN 1]) boosts specific frequencies in [SOURCE SELECT]. (Page 4) Start listening 1 Connect a portable audio player (commercially available). 3.5 mm (1/8") stereo mini plug with "L" shaped connector (commercially available) Portable audio player Auxiliary input jack 2 Press B SRC repeatedly to select AUX. 3 Turn on the selected item. 4 Press to exit. Use a 3-core plug head stereo mini plug for...
... settings made in [EASY EQ] or [PRO EQ]. [FLAT]/[DRVN 3]/[DRVN 2]/[DRVN 1]/[HARD ROCK]/[HIP HOP]/[JAZZ]/ [POP]/[R&B]/[USER]/[CLASSICAL] Drive equalizer ([DRVN 3]/[DRVN 2]/[DRVN 1]) boosts specific frequencies in [SOURCE SELECT]. (Page 4) Start listening 1 Connect a portable audio player (commercially available). 3.5 mm (1/8") stereo mini plug with "L" shaped connector (commercially available) Portable audio player Auxiliary input jack 2 Press B SRC repeatedly to select AUX. 3 Turn on the selected item. 4 Press to exit. Use a 3-core plug head stereo mini plug for...
Instruction Manual America
Page 29
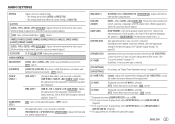
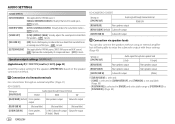
.... [AUDIO CONTROL] [BASS BOOST] [LEVEL +01] to [LEVEL +05]: Selects your preferred bass boost level. ; [OFF]: Cancels. [LOUDNESS] [LEVEL 01]/[LEVEL 02]: Boosts low or high frequencies to produce a wellbalanced sound at low volume. ; [OFF]: Cancels. [SUB.W LEVEL]*1 [SPK-OUT]*2 (Not applicable when 3-way crossover is selected.) [SUB.W 00] to [SUB.W +06] ([SUB.W +03]): Adjusts the output level of the subwoofer connected via speaker lead. (Page 40) [PRE-OUT]*3 [SUB.W -50] to [SUB.W +10] ([SUB.W 00]): Adjusts the output level of...
.... [AUDIO CONTROL] [BASS BOOST] [LEVEL +01] to [LEVEL +05]: Selects your preferred bass boost level. ; [OFF]: Cancels. [LOUDNESS] [LEVEL 01]/[LEVEL 02]: Boosts low or high frequencies to produce a wellbalanced sound at low volume. ; [OFF]: Cancels. [SUB.W LEVEL]*1 [SPK-OUT]*2 (Not applicable when 3-way crossover is selected.) [SUB.W 00] to [SUB.W +06] ([SUB.W +03]): Adjusts the output level of the subwoofer connected via speaker lead. (Page 40) [PRE-OUT]*3 [SUB.W -50] to [SUB.W +10] ([SUB.W 00]): Adjusts the output level of...
Instruction Manual America
Page 30
... (page 25) Select the output setting for FM/AM source, SIRIUS XM source and AUX source.) [ON]: Improves the sound quality of the tyres. ; [OFF]: Cancels. [K2 TECHNOLOGY] (Not applicable for the speakers [SPK/PRE OUT], based on [SPK/PRE OUT] [REAR/REAR] Audio signal through rear speaker lead L (left ): Subwoofer output Subwoofer output R (right): (Mute) KD-X260BT/KD-SX25BT: Setting on [SPK/PRE OUT] Audio signal through lineout terminal REAR/SW [REAR/REAR] Rear speakers output [REAR/SUB.W] (default) Subwoofer output [SUB.W/SUB.W] Subwoofer output Connection via lineout terminals...
... (page 25) Select the output setting for FM/AM source, SIRIUS XM source and AUX source.) [ON]: Improves the sound quality of the tyres. ; [OFF]: Cancels. [K2 TECHNOLOGY] (Not applicable for the speakers [SPK/PRE OUT], based on [SPK/PRE OUT] [REAR/REAR] Audio signal through rear speaker lead L (left ): Subwoofer output Subwoofer output R (right): (Mute) KD-X260BT/KD-SX25BT: Setting on [SPK/PRE OUT] Audio signal through lineout terminal REAR/SW [REAR/REAR] Rear speakers output [REAR/SUB.W] (default) Subwoofer output [SUB.W/SUB.W] Subwoofer output Connection via lineout terminals...
Instruction Manual America
Page 34
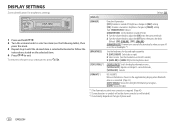
... supplementary display when Bluetooth device is connected. (Page 33) [BATT/SIGNAL]: Shows the strength of phone used. 30 ENGLISH Default: [XX] [DISPLAY] [DIMMER] Dims the illumination. [OFF]: Dimmer is selected/activated or follow the instructions stated on . Brightness changes to [NIGHT] setting. (See "[BRIGHTNESS]" below.) [DIMMER TIME]: Set the dimmer on and off time. 1 Turn the volume knob to adjust the [ON] time, then press the knob. 2 Turn the volume knob to adjust the [OFF] time, then...
... supplementary display when Bluetooth device is connected. (Page 33) [BATT/SIGNAL]: Shows the strength of phone used. 30 ENGLISH Default: [XX] [DISPLAY] [DIMMER] Dims the illumination. [OFF]: Dimmer is selected/activated or follow the instructions stated on . Brightness changes to [NIGHT] setting. (See "[BRIGHTNESS]" below.) [DIMMER TIME]: Set the dimmer on and off time. 1 Turn the volume knob to adjust the [ON] time, then press the knob. 2 Turn the volume knob to adjust the [OFF] time, then...
Instruction Manual America
Page 35
... when audio files comply with a cotton swab. JVC original application - Repeat steps 1 and 2 for all the primary colors. • Your setting is stored to [USER] in [PRESET]. • [NIGHT COLOR] or [DAY COLOR] is changed by turning on or off dirt on the reverse More information side of the faceplate) For: - Latest firmware updates and latest compatible item list - About USB devices • You cannot connect a USB device via a USB...
... when audio files comply with a cotton swab. JVC original application - Repeat steps 1 and 2 for all the primary colors. • Your setting is stored to [USER] in [PRESET]. • [NIGHT COLOR] or [DAY COLOR] is changed by turning on or off dirt on the reverse More information side of the faceplate) For: - Latest firmware updates and latest compatible item list - About USB devices • You cannot connect a USB device via a USB...

Instruction Manual America
Page 39
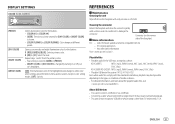
.... • Adjust the volume to the optimum level. • Check the cords and connections. Radio • Radio reception is not correct. USB/iPod Elapsed playing time is poor. • Static noise while listening to USB/iPod/iPhone again. "NOT SUPPORT" appears and Check whether the track is not malfunction and reattach the USB device. Make sure the USB device is a playable format. This unit is compatible with another source. • "USB ERROR" appears The USB port...
.... • Adjust the volume to the optimum level. • Check the cords and connections. Radio • Radio reception is not correct. USB/iPod Elapsed playing time is poor. • Static noise while listening to USB/iPod/iPhone again. "NOT SUPPORT" appears and Check whether the track is not malfunction and reattach the USB device. Make sure the USB device is a playable format. This unit is compatible with another source. • "USB ERROR" appears The USB port...
Instruction Manual America
Page 41
...; Other Bluetooth devices might be controlled. • Check whether the connected Bluetooth audio player supports Audio/Video Remote Control Profile (AVRCP). (Refer to the unit. No Bluetooth device is • Search from both the unit and Bluetooth device. • Delete pairing information from the Bluetooth device again. Press the volume knob to a place where you can get a better signal reception. "ERROR" Try the operation again. detected. • Reset the unit. (Page 3) Pairing cannot be made. • Make sure...
...; Other Bluetooth devices might be controlled. • Check whether the connected Bluetooth audio player supports Audio/Video Remote Control Profile (AVRCP). (Refer to the unit. No Bluetooth device is • Search from both the unit and Bluetooth device. • Delete pairing information from the Bluetooth device again. Press the volume knob to a place where you can get a better signal reception. "ERROR" Try the operation again. detected. • Reset the unit. (Page 3) Pairing cannot be made. • Make sure...
Instruction Manual America
Page 44
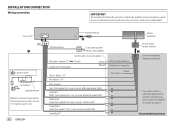
... Green: Rear speaker*1/For 3-way crossover: Tweeter (left) Green/black *1 Blue: To power antenna Blue/white: To amplifier Brown (Not used) Vehicle dashboard Factory wiring harness (vehicle) Custom wiring harness (separately purchased) *1 You can also connect a subwoofer speaker directly using this connection if your vehicle factory wiring harness does not have "12 V ignition switch" wire. 40 ENGLISH Antenna terminal Light blue/yellow To the steering wheel remote control adapter Join the same color wires together. Fuse (10 A) Ignition switch Car fuse block Separate red wire Make this...
... Green: Rear speaker*1/For 3-way crossover: Tweeter (left) Green/black *1 Blue: To power antenna Blue/white: To amplifier Brown (Not used) Vehicle dashboard Factory wiring harness (vehicle) Custom wiring harness (separately purchased) *1 You can also connect a subwoofer speaker directly using this connection if your vehicle factory wiring harness does not have "12 V ignition switch" wire. 40 ENGLISH Antenna terminal Light blue/yellow To the steering wheel remote control adapter Join the same color wires together. Fuse (10 A) Ignition switch Car fuse block Separate red wire Make this...
Instruction Manual America
Page 45
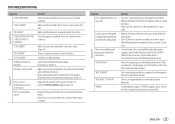
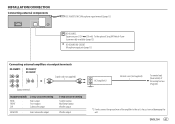
... input jack (page 15) Connecting external amplifiers via output terminals KD-X360BTS KD-X260BT/ KD-SX25BT Signal cord (not supplied) Output terminals Output terminals REAR : FRONT : SW : 2-way crossover setting Rear output Front output Subwoofer output REAR/SW : Rear/subwoofer output 3-way crossover setting Tweeter output Mid Range output Woofer output Woofer output JVC Amplifier*2 Remote wire (not supplied) To remote lead (blue/white) of the wiring harness. (Page 40) *2 Firmly connect the ground wire of the amplifier to the car's chassis to avoid damaging the unit...
... input jack (page 15) Connecting external amplifiers via output terminals KD-X360BTS KD-X260BT/ KD-SX25BT Signal cord (not supplied) Output terminals Output terminals REAR : FRONT : SW : 2-way crossover setting Rear output Front output Subwoofer output REAR/SW : Rear/subwoofer output 3-way crossover setting Tweeter output Mid Range output Woofer output Woofer output JVC Amplifier*2 Remote wire (not supplied) To remote lead (blue/white) of the wiring harness. (Page 40) *2 Firmly connect the ground wire of the amplifier to the car's chassis to avoid damaging the unit...

Quick Start Guide America
Page 7
... same color wires together. Factory wiring harness (vehicle) Custom wiring harness (separately purchased) Part list (supplied) (A) Faceplate (×1) (B) Trimplate (×1) (C) Mounting sleeve (×1) (D) Wiring harness (×1) (E) Extraction key (×2) Recommended connection a Light blue/yellow: To the steering wheel remote control adapter b Brown (not used) c Blue: To power antenna d Blue/white: To amplifier e Blue/white: Remote (12 V 350 mA) f Orange/white: Illumination g Yellow: Battery 12 V h Red: Ignition 12 V i Black: Ground j Gray ª, Gray/black ·: Front speaker...
... same color wires together. Factory wiring harness (vehicle) Custom wiring harness (separately purchased) Part list (supplied) (A) Faceplate (×1) (B) Trimplate (×1) (C) Mounting sleeve (×1) (D) Wiring harness (×1) (E) Extraction key (×2) Recommended connection a Light blue/yellow: To the steering wheel remote control adapter b Brown (not used) c Blue: To power antenna d Blue/white: To amplifier e Blue/white: Remote (12 V 350 mA) f Orange/white: Illumination g Yellow: Battery 12 V h Red: Ignition 12 V i Black: Ground j Gray ª, Gray/black ·: Front speaker...
Quick Start Guide America
Page 9
..., [ENGLISH] is turned off. ; [OFF]: Cancels. GETTING STARTED 1 Cancel the demonstration When you turn on the display even when the unit is selected. 5 To return to the previous setting item, press . 3 Set the basic settings 1 Press and hold . 2 Turn the volume knob to default (except the stored station). ; [NO]: Cancels. [ON]: The clock time is shown on the power for menu and music information if applicable.
..., [ENGLISH] is turned off. ; [OFF]: Cancels. GETTING STARTED 1 Cancel the demonstration When you turn on the display even when the unit is selected. 5 To return to the previous setting item, press . 3 Set the basic settings 1 Press and hold . 2 Turn the volume knob to default (except the stored station). ; [NO]: Cancels. [ON]: The clock time is shown on the power for menu and music information if applicable.
Quick Start Guide America
Page 11
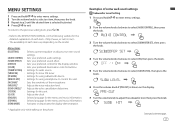
... the phone. Adjusts the noise reduction level. Adjusts the clock. Selects language for buttons. Activates or deactivates the display demonstration. * Applicable only while talking on the display. 7 Turn the volume knob to select [SUB.W LEVEL], then press the knob. 6 Press the volume knob if [PRE-OUT] is selected/activated. 4 Press to the INSTRUCTION MANUAL on the following website for using a Bluetooth device. Settings for the display window. Sets your preferred sound effect. Adjusts the echo cancellation delay time. Sets the...
... the phone. Adjusts the noise reduction level. Adjusts the clock. Selects language for buttons. Activates or deactivates the display demonstration. * Applicable only while talking on the display. 7 Turn the volume knob to select [SUB.W LEVEL], then press the knob. 6 Press the volume knob if [PRE-OUT] is selected/activated. 4 Press to the INSTRUCTION MANUAL on the following website for using a Bluetooth device. Settings for the display window. Sets your preferred sound effect. Adjusts the echo cancellation delay time. Sets the...


