Instruction Manual
Page 1
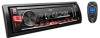
... detenidamente este manual para comprender a fondo todas las instrucciones y obtener un máximo disfrute de esta unidad. which are located on the top or bottom of the cabinet. Serial No. For customer Use: Enter below the Model No. and Serial No. Retain this information for future reference. Model No. B5A-0115-00 [J] KD-X220 DIGITAL MEDIA RECEIVER INSTRUCTION MANUAL RÉCEPTEUR...
... detenidamente este manual para comprender a fondo todas las instrucciones y obtener un máximo disfrute de esta unidad. which are located on the top or bottom of the cabinet. Serial No. For customer Use: Enter below the Model No. and Serial No. Retain this information for future reference. Model No. B5A-0115-00 [J] KD-X220 DIGITAL MEDIA RECEIVER INSTRUCTION MANUAL RÉCEPTEUR...
Instruction Manual
Page 2
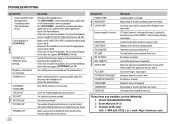
... • The Lithium battery is in used batteries promptly. CONTENTS BEFORE USE BASICS GETTING STARTED USB / iPod / ANDROID RADIO AUX Pandora® iHeartRadio® AUDIO SETTINGS DISPLAY SETTINGS MORE INFORMATION TROUBLESHOOTING SPECIFICATIONS INSTALLATION / CONNECTION BEFORE USE 2 Warning 3 Do not operate any metallic objects (such as coins or metal tools) inside the unit, to prevent a short 11 circuit. 13 Remote control (RM-RK52): • Do not leave the remote control in hot places such...
... • The Lithium battery is in used batteries promptly. CONTENTS BEFORE USE BASICS GETTING STARTED USB / iPod / ANDROID RADIO AUX Pandora® iHeartRadio® AUDIO SETTINGS DISPLAY SETTINGS MORE INFORMATION TROUBLESHOOTING SPECIFICATIONS INSTALLATION / CONNECTION BEFORE USE 2 Warning 3 Do not operate any metallic objects (such as coins or metal tools) inside the unit, to prevent a short 11 circuit. 13 Remote control (RM-RK52): • Do not leave the remote control in hot places such...
Instruction Manual
Page 3
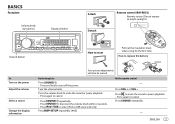
... again to replace the battery To Turn on the power Adjust the volume Select a source Change the display information Your preset adjustments will also be erased. Turn the volume knob. ENGLISH 3 BASICS Faceplate Volume knob (turn/press) Display window Attach Detach Remote control (RM-RK52) Remote sensor (Do not expose to bright sunlight.) Detach button How to turn the volume knob within 2 seconds. On the faceplate Press . • Press and hold to reset Pull out the...
... again to replace the battery To Turn on the power Adjust the volume Select a source Change the display information Your preset adjustments will also be erased. Turn the volume knob. ENGLISH 3 BASICS Faceplate Volume knob (turn/press) Display window Attach Detach Remote control (RM-RK52) Remote sensor (Do not expose to bright sunlight.) Detach button How to turn the volume knob within 2 seconds. On the faceplate Press . • Press and hold to reset Pull out the...
Instruction Manual
Page 4
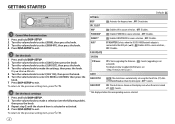
... PANDORA in source selection. ; NO: Cancels (upgrading is selected. 4 CLOCK CLOCK SYNC AUTO: The clock time is connected to the AUX jack. ( 8) ; OFF: Disables. OFF: Disables. AUX * BT ADAPTER: Selects when the KS-BTA100 Bluetooth adapter is automatically set using the Clock Time (CT) data in FM Radio Broadcast Data System signal. ; GETTING STARTED 1 Cancel the demonstration 1 Press and hold . 2 Turn the volume knob to select [DEMO], then press the knob. 3 Turn the volume knob to select [DEMO OFF...
... PANDORA in source selection. ; NO: Cancels (upgrading is selected. 4 CLOCK CLOCK SYNC AUTO: The clock time is connected to the AUX jack. ( 8) ; OFF: Disables. OFF: Disables. AUX * BT ADAPTER: Selects when the KS-BTA100 Bluetooth adapter is automatically set using the Clock Time (CT) data in FM Radio Broadcast Data System signal. ; GETTING STARTED 1 Cancel the demonstration 1 Press and hold . 2 Turn the volume knob to select [DEMO], then press the knob. 3 Turn the volume knob to select [DEMO OFF...

Instruction Manual
Page 5
USB / iPod / ANDROID Start playback The source changes automatically and playback starts. Press . Follow the instructions to install JVC MUSIC PLAY APP" is selected. ( 6) ENGLISH 5 USB input terminal USB USB 2.0 cable*1 (commercially available) iPod/iPhone (Accessory of JVC MUSIC PLAY application on your Android device before connecting. ( 14) *3 For ANDROID: Applicable only when [AUTO MODE] is selected. ( 6) *4 Only for iPod/ ANDROID. *5 For iPod/ ANDROID: Applicable only when [HEAD MODE]/ [AUTO MODE] is shown. Press . Press repeatedly. This does not work for ...
USB / iPod / ANDROID Start playback The source changes automatically and playback starts. Press . Follow the instructions to install JVC MUSIC PLAY APP" is selected. ( 6) ENGLISH 5 USB input terminal USB USB 2.0 cable*1 (commercially available) iPod/iPhone (Accessory of JVC MUSIC PLAY application on your Android device before connecting. ( 14) *3 For ANDROID: Applicable only when [AUTO MODE] is selected. ( 6) *4 Only for iPod/ ANDROID. *5 For iPod/ ANDROID: Applicable only when [HEAD MODE]/ [AUTO MODE] is shown. Press . Press repeatedly. This does not work for ...

Instruction Manual
Page 6
... memory of a smartphone (Mass Storage Class). • Selected drive of the Audiobooks sound file in your iPod/iPhone. (Default: Depends on your iPod/iPhone setting.) 5 Press to make a selection, then press the knob. 0.5× SPEED / 1× SPEED / 2× SPEED: Select the desired playback speed of a multiple drives device. IPHONE MODE: Control from the unit. While in iPod source, press repeatedly. For MP3/WMA/WAV/FLAC or JPC / JMC file: Turn the volume...
... memory of a smartphone (Mass Storage Class). • Selected drive of the Audiobooks sound file in your iPod/iPhone. (Default: Depends on your iPod/iPhone setting.) 5 Press to make a selection, then press the knob. 0.5× SPEED / 1× SPEED / 2× SPEED: Select the desired playback speed of a multiple drives device. IPHONE MODE: Control from the unit. While in iPod source, press repeatedly. For MP3/WMA/WAV/FLAC or JPC / JMC file: Turn the volume...
Instruction Manual
Page 7
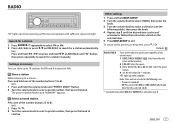
... "PRESET MODE" flashes. 2 Turn the volume knob to search for AM. Settings in step 1. "M" lights up to exit. Store a station While listening to the previous setting item, press . The preset number flashes and "MEMORY" appears. Other settings 1 Press and hold on the selected item. 5 Press to 18 stations for FM and 6 stations for a station manually. To return to a station.... ENGLISH 7 Radio Timer will be turned on the radio at a specific time regardless of the number buttons (1 to...
... "PRESET MODE" flashes. 2 Turn the volume knob to search for AM. Settings in step 1. "M" lights up to exit. Store a station While listening to the previous setting item, press . The preset number flashes and "MEMORY" appears. Other settings 1 Press and hold on the selected item. 5 Press to 18 stations for FM and 6 stations for a station manually. To return to a station.... ENGLISH 7 Radio Timer will be turned on the radio at a specific time regardless of the number buttons (1 to...

Instruction Manual
Page 8
... is a station broadcasting a program of the same PTY code as you have selected, that station is tuned in [SRC SELECT]. ( 4) 3 Press repeatedly to select AUX. 4 Turn on the portable audio player and start playback. Use a 3-core plug head stereo mini plug for FM source. IF BAND AUTO: Increases the tuner selectivity to the instruction manual of the unit ( 19) Blue/white: Remote Black: Ground Brown: Tel muting Auxiliary input jack 2 Register (pair) the Bluetooth device with "L" shaped connector (commercially available) Auxiliary input jack Portable audio player 2 Select [ON...
... is a station broadcasting a program of the same PTY code as you have selected, that station is tuned in [SRC SELECT]. ( 4) 3 Press repeatedly to select AUX. 4 Turn on the portable audio player and start playback. Use a 3-core plug head stereo mini plug for FM source. IF BAND AUTO: Increases the tuner selectivity to the instruction manual of the unit ( 19) Blue/white: Remote Black: Ground Brown: Tel muting Auxiliary input jack 2 Register (pair) the Bluetooth device with "L" shaped connector (commercially available) Auxiliary input jack Portable audio player 2 Select [ON...

Instruction Manual
Page 9
... the faceplate Playback / pause Press the volume knob. Pandora® Preparation: Install the latest version of the iPod/iPhone)*1 The source changes to select [FROM TRACK] or [FROM ARTIST], then press the knob. USB input terminal (Accessory of the Pandora application on your device (iPhone/ iPod touch), then create an account and log in [SRC SELECT]. ( 4) Start listening 1 Open the Pandora application on your device. 2 Connect...
... the faceplate Playback / pause Press the volume knob. Pandora® Preparation: Install the latest version of the iPod/iPhone)*1 The source changes to select [FROM TRACK] or [FROM ARTIST], then press the knob. USB input terminal (Accessory of the Pandora application on your device (iPhone/ iPod touch), then create an account and log in [SRC SELECT]. ( 4) Start listening 1 Open the Pandora application on your device. 2 Connect...

Instruction Manual
Page 10
... On the faceplate Press the volume knob. Press 1. To cancel, press and hold . Skip a track for custom station Thumbs up or thumbs down is selected, the current track is skipped. USB input terminal (Accessory of iHeart Link for JVC application on your device. 2 Connect your device to the USB input terminal. Press . iHeartRadio® Preparation: Install the latest version of the iPod/iPhone)*1 3 Press repeatedly...
... On the faceplate Press the volume knob. Press 1. To cancel, press and hold . Skip a track for custom station Thumbs up or thumbs down is selected, the current track is skipped. USB input terminal (Accessory of iHeart Link for JVC application on your device. 2 Connect your device to the USB input terminal. Press . iHeartRadio® Preparation: Install the latest version of the iPod/iPhone)*1 3 Press repeatedly...

Instruction Manual
Page 11
... knob. 4 Turn the volume knob to make a selection (see the following table), then press the knob. 3 Repeat step 2 until the desired item is set to step 2 of the selected sound tone. To return to exit. Default: XX EQ SETTING EQ PRESET FLAT / HARD ROCK / JAZZ / POP / R&B / TALK / USER1 / USER2 / VOCAL BOOST / BASS BOOST / CLASSICAL / DANCE: Selects a preset equalizer. AUDIO SETTINGS To Select a preset equalizer Store your own sound settings. EASY...
... knob. 4 Turn the volume knob to make a selection (see the following table), then press the knob. 3 Repeat step 2 until the desired item is set to step 2 of the selected sound tone. To return to exit. Default: XX EQ SETTING EQ PRESET FLAT / HARD ROCK / JAZZ / POP / R&B / TALK / USER1 / USER2 / VOCAL BOOST / BASS BOOST / CLASSICAL / DANCE: Selects a preset equalizer. AUDIO SETTINGS To Select a preset equalizer Store your own sound settings. EASY...

Instruction Manual
Page 12
... output balance. R06 (00): Adjusts the left ) R (right) REAR/REAR Rear speakers output Rear speakers output Rear speakers output REAR/SUB.W Subwoofer output Rear speakers output Rear speakers output SUB.W/SUB.W Subwoofer output Subwoofer output (Mute) If [SUB.W/SUB.W] is selected: - [HIGH 120HZ] is selected in [SUB.W LPF] and [THROUGH] is not available. - [R01] is selected in [FADER] and selectable range is selected for [SUB.W LPF].) R06 - TEL MUTING*8 ON: Mutes the sounds while using the cellular phone (not connected through an external amplifier. ( 19) ON / OFF: Turns...
... output balance. R06 (00): Adjusts the left ) R (right) REAR/REAR Rear speakers output Rear speakers output Rear speakers output REAR/SUB.W Subwoofer output Rear speakers output Rear speakers output SUB.W/SUB.W Subwoofer output Subwoofer output (Mute) If [SUB.W/SUB.W] is selected: - [HIGH 120HZ] is selected in [SUB.W LPF] and [THROUGH] is not available. - [R01] is selected in [FADER] and selectable range is selected for [SUB.W LPF].) R06 - TEL MUTING*8 ON: Mutes the sounds while using the cellular phone (not connected through an external amplifier. ( 19) ON / OFF: Turns...

Instruction Manual
Page 13
... night adjustments when you turn off your car's headlight. *1 The illumination control wire connection is required. ( 19) *2 Some characters or symbols will not be shown correctly (or will be blanked). OFF: Cancels. [NIGHT COLOR] or [DAY COLOR] is selected/activated or follow the instructions stated on the selected item. 4 Press to exit. Default: XX DISPLAY DIMMER Selects the display and button illumination adjusted in the [BRIGHTNESS] setting. DIMMER TIME: Adjusts the dimmer on...
... night adjustments when you turn off your car's headlight. *1 The illumination control wire connection is required. ( 19) *2 Some characters or symbols will not be shown correctly (or will be blanked). OFF: Cancels. [NIGHT COLOR] or [DAY COLOR] is selected/activated or follow the instructions stated on the selected item. 4 Press to exit. Default: XX DISPLAY DIMMER Selects the display and button illumination adjusted in the [BRIGHTNESS] setting. DIMMER TIME: Adjusts the dimmer on...
Instruction Manual
Page 14
... playback via a USB hub. • Connecting a cable whose rating is other than 5 m may result in abnormal playback. • The maximum number of the iPod/ iPhone. • If some or all of the services may become unavailable. • Some iHeartRadio® functionality cannot be operated from this unit. • For issues using the JVC Playlist Creator or JVC Music Control, you can search for audio file by...
... playback via a USB hub. • Connecting a cable whose rating is other than 5 m may result in abnormal playback. • The maximum number of the iPod/ iPhone. • If some or all of the services may become unavailable. • Some iHeartRadio® functionality cannot be operated from this unit. • For issues using the JVC Playlist Creator or JVC Music Control, you can search for audio file by...
Instruction Manual
Page 15
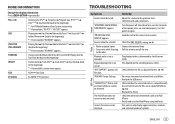
... cords and connections. AUX AUX Day/Clock BT AUDIO BT AUDIO Day/Clock TROUBLESHOOTING Symptom Remedy Sound cannot be sure the terminals of symbols. Send the unit to be heard. • Adjust the volume to the beginning) *4 If not recorded, "NO NAME" appears. Playback order is determined by the file name (USB). Elapsed playing time is compatible with or connected device cannot this unit and iPod/ iPhone. • Detach and reset the iPod/iPhone using hard reset. USB / iPod...
... cords and connections. AUX AUX Day/Clock BT AUDIO BT AUDIO Day/Clock TROUBLESHOOTING Symptom Remedy Sound cannot be sure the terminals of symbols. Send the unit to be heard. • Adjust the volume to the beginning) *4 If not recorded, "NO NAME" appears. Playback order is determined by the file name (USB). Elapsed playing time is compatible with or connected device cannot this unit and iPod/ iPhone. • Detach and reset the iPod/iPhone using hard reset. USB / iPod...
Instruction Manual
Page 16
... the audio signal to unit. ( 14) ANDROID Cannot playback at [AUTO MODE]. • Make sure JVC MUSIC PLAY APP is installed on the Android device. ( 5) • Reconnect the Android device and select the appropriate control mode. ( 6) • If this does not solve the problem, the connected Android device does not support [AUTO MODE]. ( 14) "NO DEVICE" or "READING" keeps flashing. • Switch off the power saving mode on the Android device. "UPGRADE APP" Make sure you have installed the...
... the audio signal to unit. ( 14) ANDROID Cannot playback at [AUTO MODE]. • Make sure JVC MUSIC PLAY APP is installed on the Android device. ( 5) • Reconnect the Android device and select the appropriate control mode. ( 6) • If this does not solve the problem, the connected Android device does not support [AUTO MODE]. ( 14) "NO DEVICE" or "READING" keeps flashing. • Switch off the power saving mode on the Android device. "UPGRADE APP" Make sure you have installed the...
Instruction Manual
Page 17
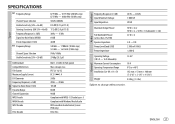
...) FLAC files Auxiliary Frequency Response (±3 dB) Input Maximum Voltage Input Impedance 20 Hz - 20 kHz 1 000 mV 30 kΩ Audio Maximum Output Power Full Bandwidth Power (at less than 1 % THD) Speaker Impedance Preout Level/Load (USB) Preout Impedance 50 W × 4 or 50 W × 2 + 50 W × 1 (Subwoofer = 4 Ω) 22 W × 4 4 Ω - 8 Ω 2 500 mV/10 kΩ ≤ 600 Ω General Operating Voltage (10...
...) FLAC files Auxiliary Frequency Response (±3 dB) Input Maximum Voltage Input Impedance 20 Hz - 20 kHz 1 000 mV 30 kΩ Audio Maximum Output Power Full Bandwidth Power (at less than 1 % THD) Speaker Impedance Preout Level/Load (USB) Preout Impedance 50 W × 4 or 50 W × 2 + 50 W × 1 (Subwoofer = 4 Ω) 22 W × 4 4 Ω - 8 Ω 2 500 mV/10 kΩ ≤ 600 Ω General Operating Voltage (10...
Instruction Manual
Page 18
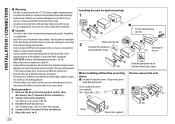
... lamps, blinkers, wipers, etc. Basic procedure 1 Remove the key from heat dissipate metal parts. • After the unit is turned on the car are working properly. • If the fuse blows, first make sure the wires are not touching car's chassis, then replace the old fuse with a maximum power of the car battery. 2 Connect the wires properly. Caution • For safety's sake, leave wiring and mounting to remove the unit 18
... lamps, blinkers, wipers, etc. Basic procedure 1 Remove the key from heat dissipate metal parts. • After the unit is turned on the car are working properly. • If the fuse blows, first make sure the wires are not touching car's chassis, then replace the old fuse with a maximum power of the car battery. 2 Connect the wires properly. Caution • For safety's sake, leave wiring and mounting to remove the unit 18

Instruction Manual
Page 19
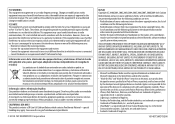
... color wires together. Part list for installation (A) Faceplate Fuse (10 A) Rear/subwoofer output Antenna terminal Vehicle dashboard Remote wire (not supplied) Ignition switch Car fuse block Separate red wire Make this connection if your vehicle factory wiring harness does not have "12 V ignition switch" wire. *2 You can also connect a subwoofer speaker directly using this lead without an external subwoofer amplifier. Blue/white: Remote (200 mA max.) Orange/white: Illumination Recommended connection Blue: To power antenna Blue/white: To amplifier Brown: Tel muting Yellow: Battery...
... color wires together. Part list for installation (A) Faceplate Fuse (10 A) Rear/subwoofer output Antenna terminal Vehicle dashboard Remote wire (not supplied) Ignition switch Car fuse block Separate red wire Make this connection if your vehicle factory wiring harness does not have "12 V ignition switch" wire. *2 You can also connect a subwoofer speaker directly using this lead without an external subwoofer amplifier. Blue/white: Remote (200 mA max.) Orange/white: Illumination Recommended connection Blue: To power antenna Blue/white: To amplifier Brown: Tel muting Yellow: Battery...
Instruction Manual
Page 56
... has been designed to connect specifically to provide reasonable protection against harmful interference in the U.S. If this equipment may generate or use radio frequency energy. Please note that the following measures: • Reorient or relocate the receiving antenna. • Increase the separation between the equipment and receiver. • Connect the equipment into an outlet on , the user is a registered mark of...
... has been designed to connect specifically to provide reasonable protection against harmful interference in the U.S. If this equipment may generate or use radio frequency energy. Please note that the following measures: • Reorient or relocate the receiving antenna. • Increase the separation between the equipment and receiver. • Connect the equipment into an outlet on , the user is a registered mark of...


