Instruction Manual
Page 4
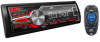
...to avoid damaging the speakers by the sudden increase of the output level. 7 General: 8 • Avoid using buttons on the faceplate of KD-X110. • [XX] indicates the selected items. • ( XX) indicates references are explained mainly using the USB device or iPod/...backed up. Dispose of used . CONTENTS BEFORE USE BASICS GETTING STARTED USB / iPod RADIO AUX AUDIO SETTINGS DISPLAY SETTINGS MORE INFORMATION TROUBLESHOOTING SPECIFICATIONS INSTALLATION / CONNECTION BEFORE USE 2 Warning Do not operate any metallic objects (such as coins or metal tools) inside the unit, to prevent ...
...to avoid damaging the speakers by the sudden increase of the output level. 7 General: 8 • Avoid using buttons on the faceplate of KD-X110. • [XX] indicates the selected items. • ( XX) indicates references are explained mainly using the USB device or iPod/...backed up. Dispose of used . CONTENTS BEFORE USE BASICS GETTING STARTED USB / iPod RADIO AUX AUDIO SETTINGS DISPLAY SETTINGS MORE INFORMATION TROUBLESHOOTING SPECIFICATIONS INSTALLATION / CONNECTION BEFORE USE 2 Warning Do not operate any metallic objects (such as coins or metal tools) inside the unit, to prevent ...
Instruction Manual
Page 15
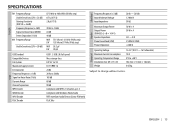
... (USB) Preout Impedance 50 W × 4 30 W × 4 4 Ω - 8 Ω 2 500 mV/10 kΩ ≤ 600 Ω General Operating Voltage Maximum Current Consumption Operating Temperature Range Installation Size (W × H × D) Weight 14.4 V (10.5 V - 16 V allowable) 10 A 0°C to +40°C 182 mm × 53 mm × 106 mm 0.62 kg Subject to...
... (USB) Preout Impedance 50 W × 4 30 W × 4 4 Ω - 8 Ω 2 500 mV/10 kΩ ≤ 600 Ω General Operating Voltage Maximum Current Consumption Operating Temperature Range Installation Size (W × H × D) Weight 14.4 V (10.5 V - 16 V allowable) 10 A 0°C to +40°C 182 mm × 53 mm × 106 mm 0.62 kg Subject to...
Instruction Manual
Page 16
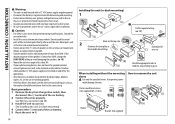
.... on the top side Orientate the trim plate as the heat sink and enclosure become hot. • Do not connect the [ wires of the unit. INSTALLATION / CONNECTION Warning • The unit can only be used with a 12 V DC power supply, negative ground. • Disconnect the battery's negative terminal ... vehicle's fuse box which provides 12 V DC power supply and is turned on and off by the ignition key. • After the unit is installed, check whether the brake lamps, blinkers, wipers, etc. Caution • For safety's sake, leave wiring and mounting to remove the unit Flat or...
.... on the top side Orientate the trim plate as the heat sink and enclosure become hot. • Do not connect the [ wires of the unit. INSTALLATION / CONNECTION Warning • The unit can only be used with a 12 V DC power supply, negative ground. • Disconnect the battery's negative terminal ... vehicle's fuse box which provides 12 V DC power supply and is turned on and off by the ignition key. • After the unit is installed, check whether the brake lamps, blinkers, wipers, etc. Caution • For safety's sake, leave wiring and mounting to remove the unit Flat or...
Instruction Manual
Page 17
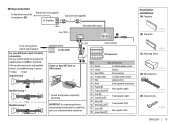
... STEERING WHEEL (For KD-X210) REMOTE If your car does NOT have an ISO terminal Modified wiring 1 ( or ) Modified wiring 2 * Custom wiring harness (separately purchased) IMPORTANT: A custom wiring harness (separately purchased) which is suitable for your car is recommended for installation (A) Faceplate (B) Trim... plate To the steering wheel remote control adapter For some VW/Audi or Opel (Vauxhall) automobiles You may need to modify the wiring of the wiring harness (D) Remote wire (not supplied) JVC Amplifier Signal cord (not...
... STEERING WHEEL (For KD-X210) REMOTE If your car does NOT have an ISO terminal Modified wiring 1 ( or ) Modified wiring 2 * Custom wiring harness (separately purchased) IMPORTANT: A custom wiring harness (separately purchased) which is suitable for your car is recommended for installation (A) Faceplate (B) Trim... plate To the steering wheel remote control adapter For some VW/Audi or Opel (Vauxhall) automobiles You may need to modify the wiring of the wiring harness (D) Remote wire (not supplied) JVC Amplifier Signal cord (not...


