Instruction Manual
Page 4
...or equivalent type. 13 • The battery pack or batteries shall not be exposed to avoid damaging the speakers by the sudden increase of KD-X110. • [XX] indicates the selected items. • ( XX) indicates references are available on the stated page. 2 Maintenance ... How to damage the connector. CONTENTS BEFORE USE BASICS GETTING STARTED USB / iPod RADIO AUX AUDIO SETTINGS DISPLAY SETTINGS MORE INFORMATION TROUBLESHOOTING SPECIFICATIONS INSTALLATION / CONNECTION BEFORE USE 2 Warning Do not operate any metallic objects (such as coins or metal tools) inside the unit, to prevent...
...or equivalent type. 13 • The battery pack or batteries shall not be exposed to avoid damaging the speakers by the sudden increase of KD-X110. • [XX] indicates the selected items. • ( XX) indicates references are available on the stated page. 2 Maintenance ... How to damage the connector. CONTENTS BEFORE USE BASICS GETTING STARTED USB / iPod RADIO AUX AUDIO SETTINGS DISPLAY SETTINGS MORE INFORMATION TROUBLESHOOTING SPECIFICATIONS INSTALLATION / CONNECTION BEFORE USE 2 Warning Do not operate any metallic objects (such as coins or metal tools) inside the unit, to prevent...
Instruction Manual
Page 15
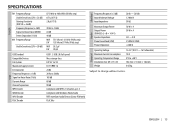
... (USB) Preout Impedance 50 W × 4 30 W × 4 4 Ω - 8 Ω 2 500 mV/10 kΩ ≤ 600 Ω General Operating Voltage Maximum Current Consumption Operating Temperature Range Installation Size (W × H × D) Weight 14.4 V (10.5 V - 16 V allowable) 10 A 0°C to +40°C 182 mm × 53 mm × 106 mm 0.62 kg Subject to...
... (USB) Preout Impedance 50 W × 4 30 W × 4 4 Ω - 8 Ω 2 500 mV/10 kΩ ≤ 600 Ω General Operating Voltage Maximum Current Consumption Operating Temperature Range Installation Size (W × H × D) Weight 14.4 V (10.5 V - 16 V allowable) 10 A 0°C to +40°C 182 mm × 53 mm × 106 mm 0.62 kg Subject to...
Instruction Manual
Page 16
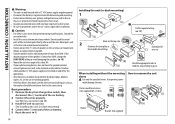
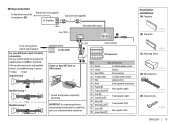
...a short circuit. • Insulate unconnected wires with one that has the same rating. Using wrong screws might damage the unit. When installing without the mounting sleeve Use only the specified screws. Basic procedure 1 Remove the key from the ignition switch, then disconnect the [.... Do the required wiring. ( 15) Dashboard of your car Bend the appropriate tabs to ground this unit during and shortly after installation. How to professionals. INSTALLATION / CONNECTION Warning • The unit can only be used with a 12 V DC power supply, negative ground. • Disconnect...
...a short circuit. • Insulate unconnected wires with one that has the same rating. Using wrong screws might damage the unit. When installing without the mounting sleeve Use only the specified screws. Basic procedure 1 Remove the key from the ignition switch, then disconnect the [.... Do the required wiring. ( 15) Dashboard of your car Bend the appropriate tabs to ground this unit during and shortly after installation. How to professionals. INSTALLATION / CONNECTION Warning • The unit can only be used with a 12 V DC power supply, negative ground. • Disconnect...
Instruction Manual
Page 17
Wiring connection To Blue/white wire of the wiring harness (D) Remote wire (not supplied) JVC Amplifier Signal cord (not supplied) Rear/subwoofer output Fuse (10 A) Part list for connection. Aerial terminal ISO connector Pin Color and ...Light blue/yellow STEERING WHEEL (For KD-X210) REMOTE If your car does NOT have an ISO terminal Modified wiring 1 ( or ) Modified wiring 2 * Custom wiring harness (separately purchased) IMPORTANT: A custom wiring harness (separately purchased) which is suitable for your car is recommended for installation (A) Faceplate (B) Trim plate To the...
Wiring connection To Blue/white wire of the wiring harness (D) Remote wire (not supplied) JVC Amplifier Signal cord (not supplied) Rear/subwoofer output Fuse (10 A) Part list for connection. Aerial terminal ISO connector Pin Color and ...Light blue/yellow STEERING WHEEL (For KD-X210) REMOTE If your car does NOT have an ISO terminal Modified wiring 1 ( or ) Modified wiring 2 * Custom wiring harness (separately purchased) IMPORTANT: A custom wiring harness (separately purchased) which is suitable for your car is recommended for installation (A) Faceplate (B) Trim plate To the...


