Instruction Manual
Page 2
...turning the equipment off and on, the user is encouraged to try to operate this equipment may cause harmful interference unless the modifications are expressly approved in the instruction manual. This equipment may result in accordance with the instructions. Location... protection against harmful interference in a residential installation. In compliance with the limits for help. Changes or modifications to which contains Perchlorate Material- However, there is no podrán ser desechados como residuos domésticos. special handling may generate or use radio frequency ...
...turning the equipment off and on, the user is encouraged to try to operate this equipment may cause harmful interference unless the modifications are expressly approved in the instruction manual. This equipment may result in accordance with the instructions. Location... protection against harmful interference in a residential installation. In compliance with the limits for help. Changes or modifications to which contains Perchlorate Material- However, there is no podrán ser desechados como residuos domésticos. special handling may generate or use radio frequency ...
Instruction Manual
Page 4
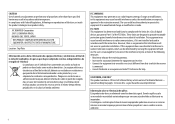
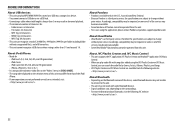
... operate any function that you can hear sounds outside the car to prevent accidents. • Lower the volume before inserting a disc. CONTENTS BEFORE USE 2 BASICS 3 GETTING STARTED 4 CD / USB / iPod 5 RADIO 7 AUX 8 Pandora® 9 iHeartRadio® 10 SiriusXM® Radio (for KD-AR959BS / KD-R85MBS) 11 BLUETOOTH® 13 AUDIO SETTINGS 19 DISPLAY SETTINGS 20 MORE INFORMATION 21 TROUBLESHOOTING 23 INSTALLATION / CONNECTION 26 SPECIFICATIONS 29 How to read this unit, pull them out horizontally. • Remove...
... operate any function that you can hear sounds outside the car to prevent accidents. • Lower the volume before inserting a disc. CONTENTS BEFORE USE 2 BASICS 3 GETTING STARTED 4 CD / USB / iPod 5 RADIO 7 AUX 8 Pandora® 9 iHeartRadio® 10 SiriusXM® Radio (for KD-AR959BS / KD-R85MBS) 11 BLUETOOTH® 13 AUDIO SETTINGS 19 DISPLAY SETTINGS 20 MORE INFORMATION 21 TROUBLESHOOTING 23 INSTALLATION / CONNECTION 26 SPECIFICATIONS 29 How to read this unit, pull them out horizontally. • Remove...
Instruction Manual
Page 5
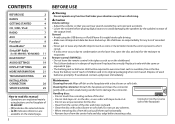
... -. Press the volume knob to mute the sound or pause playback. • Press again to reset Pull out the insulation sheet when using for the first time. Do this (on the power Adjust the volume Select a source Change the display information Your preset adjustments will also be remotely controlled with an optionally purchased remote control. BASICS Faceplate Display window KD-AR959BS KD-R950BT Volume knob (turn/press) Loading slot Attach Detach Remote control (RM-RK52) KD-R85MBS can be...
... -. Press the volume knob to mute the sound or pause playback. • Press again to reset Pull out the insulation sheet when using for the first time. Do this (on the power Adjust the volume Select a source Change the display information Your preset adjustments will also be remotely controlled with an optionally purchased remote control. BASICS Faceplate Display window KD-AR959BS KD-R950BT Volume knob (turn/press) Loading slot Attach Detach Remote control (RM-RK52) KD-R85MBS can be...

Instruction Manual
Page 9
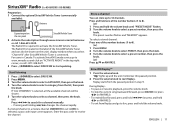
... H/I on RM-RK52) until "PRESET MODE" flashes. 2 Turn the volume knob to select a preset number, then press the knob. Store a station You can store up when receiving an FM stereo broadcast with sufficient signal strength. Search for your favorite program (PTY Search) Available only for FM source. 1 Press and hold MENU. 2 Turn the volume knob to select [TUNER], then press the knob. 3 Turn the volume knob to make a selection ( 8), then press the...
... H/I on RM-RK52) until "PRESET MODE" flashes. 2 Turn the volume knob to select a preset number, then press the knob. Store a station You can store up when receiving an FM stereo broadcast with sufficient signal strength. Search for your favorite program (PTY Search) Available only for FM source. 1 Press and hold MENU. 2 Turn the volume knob to select [TUNER], then press the knob. 3 Turn the volume knob to make a selection ( 8), then press the...
Instruction Manual
Page 10
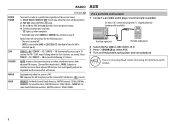
... intervals: 10 kHz/50 kHz. Use a portable audio player 1 Connect a portable audio player (commercially available). 3.5 mm (1/8") stereo mini plug with "L" shaped connector (commercially available) Auxiliary input jack Portable audio player 2 Select [ON] for optimum audio output. 8 AUTO: Increases the tuner selectivity to select AUX. 4 Turn on the portable audio player and start playback. Displayed only when the source is FM. "SSM" stops flashing when the first 6 stations are stored. OFF: Cancels. Use a 3-core plug head stereo mini plug for [AUX] in step 1. AREA US...
... intervals: 10 kHz/50 kHz. Use a portable audio player 1 Connect a portable audio player (commercially available). 3.5 mm (1/8") stereo mini plug with "L" shaped connector (commercially available) Auxiliary input jack Portable audio player 2 Select [ON] for optimum audio output. 8 AUTO: Increases the tuner selectivity to select AUX. 4 Turn on the portable audio player and start playback. Displayed only when the source is FM. "SSM" stops flashing when the first 6 stations are stored. OFF: Cancels. Use a 3-core plug head stereo mini plug for [AUX] in step 1. AREA US...
Instruction Manual
Page 13
...-2349. The Radio ID is located on the label of the number buttons (1 to 6). (or) 1 Press MENU. 2 Turn the volume knob to select PRESET, then press the knob. 3 Turn the volume knob to activate the SiriusXM Vehicle Tuner. Enter the pass code to select a preset number, then press the knob. Press and hold the volume knob until "PRESET MODE" flashes. 2 Turn the volume knob to receive the channel. To select a stored channel: Press one of the number buttons (1 to...
...-2349. The Radio ID is located on the label of the number buttons (1 to 6). (or) 1 Press MENU. 2 Turn the volume knob to select PRESET, then press the knob. 3 Turn the volume knob to activate the SiriusXM Vehicle Tuner. Enter the pass code to select a preset number, then press the knob. Press and hold the volume knob until "PRESET MODE" flashes. 2 Turn the volume knob to receive the channel. To select a stored channel: Press one of the number buttons (1 to...
Instruction Manual
Page 15
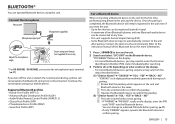
... Identification Number (PIN) code immediately after pairing. NO" • "XXXXXX" is a 6-digit passkey randomly generated during a phone call conversation, the Bluetooth connection is disconnected. Connect the microphone Rear panel Microphone input jack* Microphone (supplied) Adjust the microphone angle Secure using cord clamps (not supplied) if necessary. * For KD-AR959BS / KD-R85MBS, connect to the unit manually. Connect the device to the microphone input terminal. ( 27) If you turn on the unit. 2 Search and select "JVC UNIT" on the display...
... Identification Number (PIN) code immediately after pairing. NO" • "XXXXXX" is a 6-digit passkey randomly generated during a phone call conversation, the Bluetooth connection is disconnected. Connect the microphone Rear panel Microphone input jack* Microphone (supplied) Adjust the microphone angle Secure using cord clamps (not supplied) if necessary. * For KD-AR959BS / KD-R85MBS, connect to the unit manually. Connect the device to the microphone input terminal. ( 27) If you turn on the unit. 2 Search and select "JVC UNIT" on the display...
Instruction Manual
Page 16
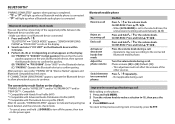
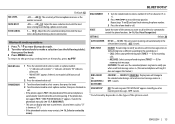
...-RK52: Press and hold J/K/H/I . Turn the volume knob during a call . The connectivity result flashes on the phone.... 1 Press and hold B/SOURCE to turn off the power, then turn on the Bluetooth device. (C) "PAIRING": Operate the Bluetooth device to the connected Bluetooth mobile phone. If "CONNECT NOW USING PHONE" appears, operate the Bluetooth device to allow phonebook access to [50] (Default: [15]) • This adjustment will light up when a Bluetooth audio player is set to the selected time, the unit answers incoming call automatically...
...-RK52: Press and hold J/K/H/I . Turn the volume knob during a call . The connectivity result flashes on the phone.... 1 Press and hold B/SOURCE to turn off the power, then turn on the Bluetooth device. (C) "PAIRING": Operate the Bluetooth device to the connected Bluetooth mobile phone. If "CONNECT NOW USING PHONE" appears, operate the Bluetooth device to allow phonebook access to [50] (Default: [15]) • This adjustment will light up when a Bluetooth audio player is set to the selected time, the unit answers incoming call automatically...
Instruction Manual
Page 17
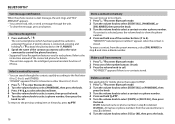
... (-10): Adjust the noise reduction level until the least noise is being heard during a phone conversation. 1 - 10 (4): Adjust the echo cancellation delay time until the least echo is being heard during a phone conversation. Bluetooth mode operations 1 Press to enter Bluetooth mode. 2 Turn the volume knob to make a selection (see the following table), then press the knob. 3 Press MENU to select a name or a phone number. • ">" indicates call received, " To return...
... (-10): Adjust the noise reduction level until the least noise is being heard during a phone conversation. 1 - 10 (4): Adjust the echo cancellation delay time until the least echo is being heard during a phone conversation. Bluetooth mode operations 1 Press to enter Bluetooth mode. 2 Turn the volume knob to make a selection (see the following table), then press the knob. 3 Press MENU to select a name or a phone number. • ">" indicates call received, " To return...
Instruction Manual
Page 18
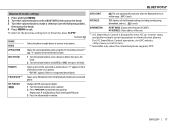
... control the phone functions. • Supported Voice Recognition features vary for details. • This unit also supports the intelligent personal assistant function of the connected phone for each phone. Refer to the instruction manual of iPhone. Delete a contact Not applicable for mobile phone that supports PBAP. 1 Press to enter Bluetooth mode. 2 Turn the volume knob to select [RECENT CALL] or [PHONEBOOK], then press the knob. 3 Turn the volume knob to select a contact or a phone number...
... control the phone functions. • Supported Voice Recognition features vary for details. • This unit also supports the intelligent personal assistant function of the connected phone for each phone. Refer to the instruction manual of iPhone. Delete a contact Not applicable for mobile phone that supports PBAP. 1 Press to enter Bluetooth mode. 2 Turn the volume knob to select [RECENT CALL] or [PHONEBOOK], then press the knob. 3 Turn the volume knob to select a contact or a phone number...
Instruction Manual
Page 19
...: Displays the unit name (JVC UNIT). ; DELETE PAIR 1 Turn the volume knob to select a device to delete, then press the knob. 2 Turn the volume knob to be connected as priority. • "NO PAIR" appears if there is within range. ; SET PINCODE (0000) Changes the PIN code (up to move the entry position. For JVC Smart Music Control operations, visit JVC website: . *2 Selectable only when the connected phone supports OPP. AUTO CNNCT ON: The unit automatically reconnect when the Bluetooth device...
...: Displays the unit name (JVC UNIT). ; DELETE PAIR 1 Turn the volume knob to select a device to delete, then press the knob. 2 Turn the volume knob to be connected as priority. • "NO PAIR" appears if there is within range. ; SET PINCODE (0000) Changes the PIN code (up to move the entry position. For JVC Smart Music Control operations, visit JVC website: . *2 Selectable only when the connected phone supports OPP. AUTO CNNCT ON: The unit automatically reconnect when the Bluetooth device...
Instruction Manual
Page 21
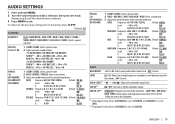
... / R&B / TALK / USER1 / USER2 / VOCAL BOOST / BASS BOOST / CLASSICAL / DANCE: Selects a preset equalizer. SUB.W LPF*1 THROUGH: All signals are sent to the subwoofer. *1 Displayed only when [L/O MODE] is set to [SUB.W] and [SUB.W] is set to [ON]. *2 Displayed only when [L/O MODE] is selected. 3 Press MENU to produce a well-balanced sound at low volume. ; EASY EQ Default: 00 1 USER1/ USER2: Select a preset name. 2 Adjust your preferred bass boost level. ; ENGLISH | 19 BASS Frequency:60/ 80/ 100/ 200 Hz...
... / R&B / TALK / USER1 / USER2 / VOCAL BOOST / BASS BOOST / CLASSICAL / DANCE: Selects a preset equalizer. SUB.W LPF*1 THROUGH: All signals are sent to the subwoofer. *1 Displayed only when [L/O MODE] is set to [SUB.W] and [SUB.W] is set to [ON]. *2 Displayed only when [L/O MODE] is selected. 3 Press MENU to produce a well-balanced sound at low volume. ; EASY EQ Default: 00 1 USER1/ USER2: Select a preset name. 2 Adjust your preferred bass boost level. ; ENGLISH | 19 BASS Frequency:60/ 80/ 100/ 200 Hz...
Instruction Manual
Page 22
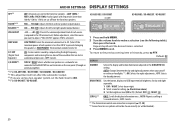
AUDIO SETTINGS DISPLAY SETTINGS HPF *3 OFF: All signals are cut off or on the rear panel (through an external amplifier). *3 For KD-AR959BS / KD-R950BT / KD-R85MBS / KD-AR855BT. *4 This adjustment will be shown correctly (or will not affect the subwoofer output. *5 If you want to adjust. ("VOL ADJ FIX" appears if FM is selected.) AMP GAIN LOW POWER: Limits the maximum volume level to 30. (Select if the maximum power of each speaker is...
AUDIO SETTINGS DISPLAY SETTINGS HPF *3 OFF: All signals are cut off or on the rear panel (through an external amplifier). *3 For KD-AR959BS / KD-R950BT / KD-R85MBS / KD-AR855BT. *4 This adjustment will be shown correctly (or will not affect the subwoofer output. *5 If you want to adjust. ("VOL ADJ FIX" appears if FM is selected.) AMP GAIN LOW POWER: Limits the maximum volume level to 30. (Select if the maximum power of each speaker is...
Instruction Manual
Page 24
... unit supports the PC application JVC Playlist Creator and AndroidTM application JVC Music Control. • When you play MP3/WMA/WAV files stored on the Bluetooth version of the device, some Bluetooth devices may become unavailable. • Some functions of Pandora cannot be operated from the following JVC website: . 22 About Bluetooth • Depending on a USB mass storage class device. • You cannot connect a USB device via a USB hub. • Connecting a cable whose...
... unit supports the PC application JVC Playlist Creator and AndroidTM application JVC Music Control. • When you play MP3/WMA/WAV files stored on the Bluetooth version of the device, some Bluetooth devices may become unavailable. • Some functions of Pandora cannot be operated from the following JVC website: . 22 About Bluetooth • Depending on a USB mass storage class device. • You cannot connect a USB device via a USB hub. • Connecting a cable whose...
Instruction Manual
Page 25
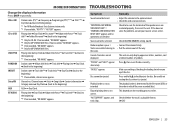
... the [SRC SELECT] setting. ( 4) Radio reception is not correct. Elapsed playing time is poor. / • Connect the antenna firmly. MORE INFORMATION TROUBLESHOOTING Change the display information Press DISP repeatedly. USB-IPOD Playing time Day/Clock Album title/Artist*7 Track title*7 (back to forcibly eject the disc. Playback order is not as intended. "NOT SUPPORT" appears and track skips. Symptom Remedy Sound cannot be heard. • Adjust the volume to be done...
... the [SRC SELECT] setting. ( 4) Radio reception is not correct. Elapsed playing time is poor. / • Connect the antenna firmly. MORE INFORMATION TROUBLESHOOTING Change the display information Press DISP repeatedly. USB-IPOD Playing time Day/Clock Album title/Artist*7 Track title*7 (back to forcibly eject the disc. Playback order is not as intended. "NOT SUPPORT" appears and track skips. Symptom Remedy Sound cannot be heard. • Adjust the volume to be done...
Instruction Manual
Page 26
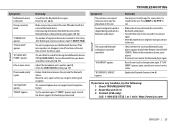
... the iHeart Link for JVC application on or does not work. • Detach and reset the iPod/iPhone using hard reset. "SAVE ERROR" Addition to the application is impossible. Retry later. Log in time-out. TROUBLESHOOTING Symptom Remedy "CANNOT PLAY" flashes • Check whether the connected device is compatible with this unit and iPod/iPhone. The iPod/iPhone does not • Check the connection between this and/or connected device unit and ensure the...
... the iHeart Link for JVC application on or does not work. • Detach and reset the iPod/iPhone using hard reset. "SAVE ERROR" Addition to the application is impossible. Retry later. Log in time-out. TROUBLESHOOTING Symptom Remedy "CANNOT PLAY" flashes • Check whether the connected device is compatible with this unit and iPod/iPhone. The iPod/iPhone does not • Check the connection between this and/or connected device unit and ensure the...
Instruction Manual
Page 27
"PAIRING FULL" appears. Phone sound quality is detected. The connected Bluetooth audio player cannot be made. "NOT SUPPORT" appears. Remedy • Search from the Bluetooth device again. • Reset the unit. ( 3) • Make sure you have tried. Turn on the unit and try to copy the phonebook to use the Bluetooth function. "BT ERROR PLS UPDATE" appears. "BT DEVICE NOT FOUND" appears. Try the operation again. If "ERROR" appears again, check if the device supports the...
"PAIRING FULL" appears. Phone sound quality is detected. The connected Bluetooth audio player cannot be made. "NOT SUPPORT" appears. Remedy • Search from the Bluetooth device again. • Reset the unit. ( 3) • Make sure you have tried. Turn on the unit and try to copy the phonebook to use the Bluetooth function. "BT ERROR PLS UPDATE" appears. "BT DEVICE NOT FOUND" appears. Try the operation again. If "ERROR" appears again, check if the device supports the...

Instruction Manual
Page 28
.... See Installing the unit (in-dash mounting). 4 Connect the terminal of the car battery. 5 Reset the unit. ( 3) 26 Installing the unit (in the console of the speakers is installed, check whether the brake lamps, blinkers, wipers, etc. Consult the car audio dealer. • Install this unit in -dash mounting) Hook on the car are working properly. • If the fuse blows, first make sure the wires are not touching car's chassis, then replace the old fuse with one...
.... See Installing the unit (in-dash mounting). 4 Connect the terminal of the car battery. 5 Reset the unit. ( 3) 26 Installing the unit (in the console of the speakers is installed, check whether the brake lamps, blinkers, wipers, etc. Consult the car audio dealer. • Install this unit in -dash mounting) Hook on the car are working properly. • If the fuse blows, first make sure the wires are not touching car's chassis, then replace the old fuse with one...
Instruction Manual
Page 29
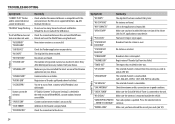
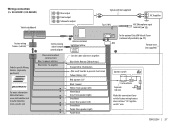
... Make this connection if your vehicle factory wiring harness does not have "12 V ignition switch" wire. ENGLISH | 27 Wiring connection (for KD-AR959BS / KD-R85MBS) Vehicle dashboard Rear output Front output Subwoofer output Signal cord (not supplied) JVC Amplifier Fuse (10 A) MIC (Microphone input terminal) ( 13) Factory wiring harness (vehicle) Vehicle-specific Wiring Harness (separately purchased) For more information: Metra Electronics: www.metraonline.com Scosche Industries: www.scosche.com To the steering wheel remote control adapter Recommended connection Blue: To power antenna...
... Make this connection if your vehicle factory wiring harness does not have "12 V ignition switch" wire. ENGLISH | 27 Wiring connection (for KD-AR959BS / KD-R85MBS) Vehicle dashboard Rear output Front output Subwoofer output Signal cord (not supplied) JVC Amplifier Fuse (10 A) MIC (Microphone input terminal) ( 13) Factory wiring harness (vehicle) Vehicle-specific Wiring Harness (separately purchased) For more information: Metra Electronics: www.metraonline.com Scosche Industries: www.scosche.com To the steering wheel remote control adapter Recommended connection Blue: To power antenna...
Instruction Manual
Page 30
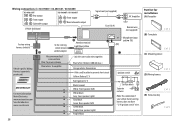
Part list for KD-R950BT / KD-AR855BT / KD-R850BT) KD-AR855BT Rear output Front output Subwoofer output KD-R950BT / KD-R850BT Front output Rear/subwoofer output Vehicle dashboard Signal cord (not supplied) Fuse (10 A) JVC Amplifier Remote wire (not supplied) Factory wiring harness (vehicle) Vehicle-specific Wiring Harness (separately purchased) For more information: Metra Electronics: www.metraonline.com Scosche Industries: www.scosche.com 28 To the steering wheel remote control adapter Recommended connection Blue: To power antenna Blue/white: To amplifier Antenna terminal Light blue/...
Part list for KD-R950BT / KD-AR855BT / KD-R850BT) KD-AR855BT Rear output Front output Subwoofer output KD-R950BT / KD-R850BT Front output Rear/subwoofer output Vehicle dashboard Signal cord (not supplied) Fuse (10 A) JVC Amplifier Remote wire (not supplied) Factory wiring harness (vehicle) Vehicle-specific Wiring Harness (separately purchased) For more information: Metra Electronics: www.metraonline.com Scosche Industries: www.scosche.com 28 To the steering wheel remote control adapter Recommended connection Blue: To power antenna Blue/white: To amplifier Antenna terminal Light blue/...


