Instruction Manual
Page 5
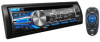
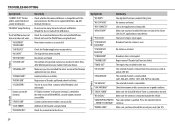
... Press SOURCE repeatedly. ( not available ) ENGLISH | 3 Do this (on the remote control) ( not available ) Press VOL + or VOL -. How to reset Pull out the insulation sheet when using for the first time. Do this (on the faceplate) Press B/SOURCE. • Press and hold to turn off... the power. Turn the volume knob. BASICS Faceplate Display window KD-AR959BS KD-R950BT Volume knob (turn/press) Loading slot Attach Detach Remote control (RM-RK52) Remote sensor (Do not expose to bright sunlight.) Detach ...
... Press SOURCE repeatedly. ( not available ) ENGLISH | 3 Do this (on the remote control) ( not available ) Press VOL + or VOL -. How to reset Pull out the insulation sheet when using for the first time. Do this (on the faceplate) Press B/SOURCE. • Press and hold to turn off... the power. Turn the volume knob. BASICS Faceplate Display window KD-AR959BS KD-R950BT Volume knob (turn/press) Loading slot Attach Detach Remote control (RM-RK52) Remote sensor (Do not expose to bright sunlight.) Detach ...

Instruction Manual
Page 14
...: XX There are initially assigned as the Smart Favorites channels. To reassign the Smart Favorites channels... SiriusXM settings 1 Press and hold the knob. SXM RESET YES: Resets stored channel, locked channel setting and Mature CH setting to assign the 7th channel, an error beep tone will be heard. SiriusXM Vehicle Tuner automatically...
...: XX There are initially assigned as the Smart Favorites channels. To reassign the Smart Favorites channels... SiriusXM settings 1 Press and hold the knob. SXM RESET YES: Resets stored channel, locked channel setting and Mature CH setting to assign the 7th channel, an error beep tone will be heard. SiriusXM Vehicle Tuner automatically...
Instruction Manual
Page 15
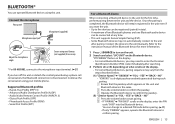
... Bluetooth device. Once the pairing is disconnected. Ensure that the passkey which appears on the display. • For some Bluetooth devices, you reset the unit. • Up to five devices can be registered (paired) in the unit even if you may not automatically connect to the... each pairing. ENGLISH | 13 Continue the conversation using cord clamps (not supplied) if necessary. * For KD-AR959BS, connect to the microphone input terminal. ( 27) If you turn on the unit. 2 Search and select "JVC UNIT" on the display, enter the PIN code "0000" into the Bluetooth device.
... Bluetooth device. Once the pairing is disconnected. Ensure that the passkey which appears on the display. • For some Bluetooth devices, you reset the unit. • Up to five devices can be registered (paired) in the unit even if you may not automatically connect to the... each pairing. ENGLISH | 13 Continue the conversation using cord clamps (not supplied) if necessary. * For KD-AR959BS, connect to the microphone input terminal. ( 27) If you turn on the unit. 2 Search and select "JVC UNIT" on the display, enter the PIN code "0000" into the Bluetooth device.
Instruction Manual
Page 25
...display uppercase letters, numbers, and a limited number of the speaker wires are not displayed. Correct characters are insulated properly, then reset the unit. "IN DISC" appears. Be careful not to be selected. This depends on the recording process earlier. Title*1*2...If unavailable, station name appears. This unit can be done. "NOT SUPPORT" appears and track skips. "MISWIRING CHK WIRING THEN RESET UNIT" / "WARNING CHK WIRING THEN RESET UNIT" appears and no ./Channel name B Artist B Song title B Content information B Category name B Day/Clock B (...
...display uppercase letters, numbers, and a limited number of the speaker wires are not displayed. Correct characters are insulated properly, then reset the unit. "IN DISC" appears. Be careful not to be selected. This depends on the recording process earlier. Title*1*2...If unavailable, station name appears. This unit can be done. "NOT SUPPORT" appears and track skips. "MISWIRING CHK WIRING THEN RESET UNIT" / "WARNING CHK WIRING THEN RESET UNIT" appears and no ./Channel name B Artist B Song title B Content information B Category name B Day/Clock B (...
Instruction Manual
Page 26
... stations become unavailable. "UPDATE APP" Make sure you have installed the latest version of the iHeart Link for JVC application on or does not work. • Detach and reset the iPod/iPhone using hard reset. "NO SKIPS" The skip limit has been reached. "NO STATIONS" No stations are in again. Log in good...
... stations become unavailable. "UPDATE APP" Make sure you have installed the latest version of the iHeart Link for JVC application on or does not work. • Detach and reset the iPod/iPhone using hard reset. "NO SKIPS" The skip limit has been reached. "NO STATIONS" No stations are in again. Log in good...
Instruction Manual
Page 27
... again, check if the device supports the function you try the following: 1 Check TROUBLESHOOTING 2 Reset the unit ( 3) 3 Contact (USA only) Call: 1-800-252-5722 ( or ) visit: http://www.jvc.com ENGLISH | 25 TROUBLESHOOTING Symptom The unit does not respond when you have tried to copy ... Bluetooth device. • Delete pairing information from the Bluetooth device again. • Reset the unit. ( 3) • Make sure you can get a better signal reception. Pairing cannot be controlled. Reset the unit and try to connect again. • Other Bluetooth devices might be trying...
... again, check if the device supports the function you try the following: 1 Check TROUBLESHOOTING 2 Reset the unit ( 3) 3 Contact (USA only) Call: 1-800-252-5722 ( or ) visit: http://www.jvc.com ENGLISH | 25 TROUBLESHOOTING Symptom The unit does not respond when you have tried to copy ... Bluetooth device. • Delete pairing information from the Bluetooth device again. • Reset the unit. ( 3) • Make sure you can get a better signal reception. Pairing cannot be controlled. Reset the unit and try to connect again. • Other Bluetooth devices might be trying...
Instruction Manual
Page 28
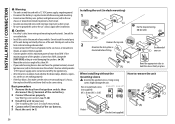
... ground. • Disconnect the battery's negative terminal before fitting. Consult the car audio dealer. • Install this unit in the console of the car battery. 5 Reset the unit. ( 3) 26 Installing the unit (in-dash mounting) Hook on the top side Orientate the trim plate as the heat sink and enclosure become...
... ground. • Disconnect the battery's negative terminal before fitting. Consult the car audio dealer. • Install this unit in the console of the car battery. 5 Reset the unit. ( 3) 26 Installing the unit (in-dash mounting) Hook on the top side Orientate the trim plate as the heat sink and enclosure become...


