
Instructions
Page 3
... the power cords from the car battery when the unit is connected to start up, or may obstruct the operation of copyright in the sound or video recording, broadcast or cable programme and in the car becomes normal before operating the unit. • At an altitude between 5°C (41°F) and 35°C (95°F). This warning appears only when the parking brake wire is turned on the monitor...
... the power cords from the car battery when the unit is connected to start up, or may obstruct the operation of copyright in the sound or video recording, broadcast or cable programme and in the car becomes normal before operating the unit. • At an altitude between 5°C (41°F) and 35°C (95°F). This warning appears only when the parking brake wire is turned on the monitor...

Instructions
Page 5
... Macrovision, and is connected. - This is inevitable and is encouraged to try to direct sunlight. Reverse engineering or disassembly is protected by the sudden increase of the following measures: - This product incorporates copyright protection technology that interference will block outside sounds, making driving dangerous. • Stop the car before playing a disc to radio communications. Caution on volume setting: Discs produce very little...
... Macrovision, and is connected. - This is inevitable and is encouraged to try to direct sunlight. Reverse engineering or disassembly is protected by the sudden increase of the following measures: - This product incorporates copyright protection technology that interference will block outside sounds, making driving dangerous. • Stop the car before playing a disc to radio communications. Caution on volume setting: Discs produce very little...
Instructions
Page 8
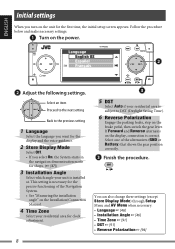
... System starts in the navigation demonstration mode for the first time, the initial setup screen appears. Select an item Proceed to the next setting Back to DST (Daylight Saving Time). 6 Reverse Polarization Engage the parking brake, step on the brake pedal, then switch the gear lever. Select one of the Navigation System. • See "Measuring the installation angle" on the Installation/Connection Manual. 4 Time Zone Select your residential area for clock adjustment. 5 DST Select Auto...
... System starts in the navigation demonstration mode for the first time, the initial setup screen appears. Select an item Proceed to the next setting Back to DST (Daylight Saving Time). 6 Reverse Polarization Engage the parking brake, step on the brake pedal, then switch the gear lever. Select one of the Navigation System. • See "Measuring the installation angle" on the Installation/Connection Manual. 4 Time Zone Select your residential area for clock adjustment. 5 DST Select Auto...
Instructions
Page 9
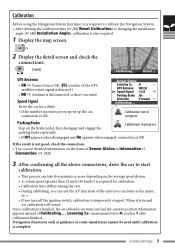
... engage the parking brake repeatedly. • If Off appears when disengaged and On appears when engaged, connection is 4) reaches 1 after calibration finished. Navigation (functions such as you speed up the car, connection is also required. 1 Display the map screen. 2 Display the detail screen and check the connections. [Hold] Calibrating... Calibration Before using the Navigation System first time, it is disconnected or short-circuited. Speed Signal Drive the car for calibration...
... engage the parking brake repeatedly. • If Off appears when disengaged and On appears when engaged, connection is 4) reaches 1 after calibration finished. Navigation (functions such as you speed up the car, connection is also required. 1 Display the map screen. 2 Display the detail screen and check the connections. [Hold] Calibrating... Calibration Before using the Navigation System first time, it is disconnected or short-circuited. Speed Signal Drive the car for calibration...

Instructions
Page 10
... turn off the AV function [Hold] The display switches to the beginning) * You cannot select these sources if they are not ready. For radio operations, ☞ [51]. For disc/HDD operations, ☞ [59]. For navigation operations, ☞ [18]. To adjust the volume To change the source TUNER = SAT* = DISC* = HDD = CD-CH/ EXT-IN/iPod/D. ENGLISH Basic operations Reset the unit. • Use only when the internal system malfunctions. To restore the sound, press the same button...
... turn off the AV function [Hold] The display switches to the beginning) * You cannot select these sources if they are not ready. For radio operations, ☞ [51]. For disc/HDD operations, ☞ [59]. For navigation operations, ☞ [18]. To adjust the volume To change the source TUNER = SAT* = DISC* = HDD = CD-CH/ EXT-IN/iPod/D. ENGLISH Basic operations Reset the unit. • Use only when the internal system malfunctions. To restore the sound, press the same button...
Instructions
Page 11
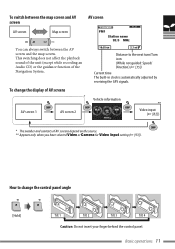
... operations 11 Vehicle information AV screen 1 AV screen 2 Video input (☞ [82]) * The number and contents of AV screens Distance to change the display of AV screens depend on the source. ** Appears only when you have selected Video or Camera for Video Input setting (☞ [93]). How to the next turn/Turn icon (While not guided: Speed/ Direction) (☞ [35]) Current time The built-in clock is automatically adjusted by receiving the GPS signals. To change the control...
... operations 11 Vehicle information AV screen 1 AV screen 2 Video input (☞ [82]) * The number and contents of AV screens Distance to change the display of AV screens depend on the source. ** Appears only when you have selected Video or Camera for Video Input setting (☞ [93]). How to the next turn/Turn icon (While not guided: Speed/ Direction) (☞ [35]) Current time The built-in clock is automatically adjusted by receiving the GPS signals. To change the control...
Instructions
Page 16
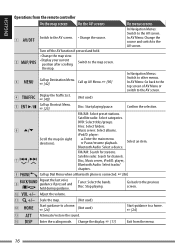
... AV screen. • Change the source. 2 MAP/POS Turn off the AV function if pressed and held during guidance. ENGLISH Operations from the menu. 16 Switch to a home. ☞ [24] e ATT Attenuate/restore the sound. FM/AM: Select preset stations. Satellite radio: Select categories. DVD: Select titles/groups. Bluetooth Audio: Select a device. Select an item. 7 / FM/AM: Search for channels. Tuner: Select the bands. p VOL +/- Adjust the volume. Scale...
... AV screen. • Change the source. 2 MAP/POS Turn off the AV function if pressed and held during guidance. ENGLISH Operations from the menu. 16 Switch to a home. ☞ [24] e ATT Attenuate/restore the sound. FM/AM: Select preset stations. Satellite radio: Select categories. DVD: Select titles/groups. Bluetooth Audio: Select a device. Select an item. 7 / FM/AM: Search for channels. Tuner: Select the bands. p VOL +/- Adjust the volume. Scale...
Instructions
Page 37
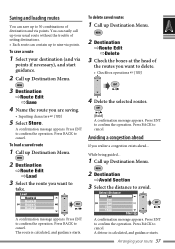
...trouble of the routes you want to delete. • Checkbox operations ☞ [105] 3 Destination ]Route Edit ]Save 4 Name the route you want to avoid. A confirmation message appears. To load a saved route 1 Call up Destination Menu. 2 Destination ]Route Edit ]Delete 3 Check the boxes at the head of setting...[Hold] A confirmation message appears. To delete saved routes 1 Call up Destination Menu. 2 Destination ]Route Edit ]Load 3 Select the route you are saving. • Inputting characters ☞ [105] 5 Select Store. Press ENT to confirm the operation. Avoiding a congestion ...
...trouble of the routes you want to delete. • Checkbox operations ☞ [105] 3 Destination ]Route Edit ]Save 4 Name the route you want to avoid. A confirmation message appears. To load a saved route 1 Call up Destination Menu. 2 Destination ]Route Edit ]Delete 3 Check the boxes at the head of setting...[Hold] A confirmation message appears. To delete saved routes 1 Call up Destination Menu. 2 Destination ]Route Edit ]Load 3 Select the route you are saving. • Inputting characters ☞ [105] 5 Select Store. Press ENT to confirm the operation. Avoiding a congestion ...
Instructions
Page 41
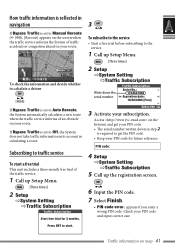
... calculating a route. Subscribing to Auto Reroute, the System automatically calculates a new route when the traffic service informs of the traffic service. 1 Call up the registration screen. 6 Input the PIN code. 7 Select Finish. • PIN code error. Reroute To check the information and decide whether to calculate a detour [Hold] If Bypass Traffic is set to the service. 1 Call up Setup Menu. [Three times] 2 Setup ]System Setting ]Traffic Subscription Write down the...
... calculating a route. Subscribing to Auto Reroute, the System automatically calculates a new route when the traffic service informs of the traffic service. 1 Call up the registration screen. 6 Input the PIN code. 7 Select Finish. • PIN code error. Reroute To check the information and decide whether to calculate a detour [Hold] If Bypass Traffic is set to the service. 1 Call up Setup Menu. [Three times] 2 Setup ]System Setting ]Traffic Subscription Write down the...
Instructions
Page 60
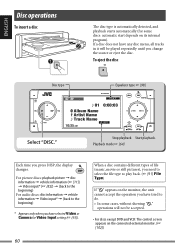
... picture = disc information = vehicle information (☞ [11]) = Video input* (☞ [82]) = (back to the beginning) For audio discs: disc information = vehicle information = Video input* = (back to do. • In some discs: automatic start depends on the connected external monitor. (☞ [102]) Playback mode ☞ [64] Each time you have selected Video or Camera for some cases, without showing " ," operations will be accepted. • For discs except DVD and VCD: The control screen appears...
... picture = disc information = vehicle information (☞ [11]) = Video input* (☞ [82]) = (back to the beginning) For audio discs: disc information = vehicle information = Video input* = (back to do. • In some discs: automatic start depends on the connected external monitor. (☞ [102]) Playback mode ☞ [64] Each time you have selected Video or Camera for some cases, without showing " ," operations will be accepted. • For discs except DVD and VCD: The control screen appears...

Instructions
Page 83
...Use AV Menu to establish a new Bluetooth connection. Menu operation for Bluetooth Audio can be connected at a time. Up to turn on the rear. • Refer also to the instructions supplied with the Bluetooth Adapter and the Bluetooth device. • Refer to the list (included in total. • Only one device for Bluetooth Phone and one for Bluetooth devices Registering a Bluetooth device AV screen: AV Menu 2/2 Mode = Bluetooth Audio Mode 1/2 Dial Message Open Search Special Device Map screen/AV screen: other sources than Bluetooth Audio [Hold] Phone Menu Mode List Mode...
...Use AV Menu to establish a new Bluetooth connection. Menu operation for Bluetooth Audio can be connected at a time. Up to turn on the rear. • Refer also to the instructions supplied with the Bluetooth Adapter and the Bluetooth device. • Refer to the list (included in total. • Only one device for Bluetooth Phone and one for Bluetooth devices Registering a Bluetooth device AV screen: AV Menu 2/2 Mode = Bluetooth Audio Mode 1/2 Dial Message Open Search Special Device Map screen/AV screen: other sources than Bluetooth Audio [Hold] Phone Menu Mode List Mode...
Instructions
Page 87
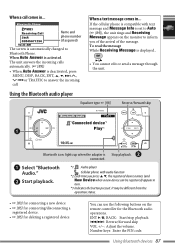
... phone is compatible with audio function *2 Each time you of the arrival of the message. Using the Bluetooth audio player Equalizer type ☞ [98] Reverse/forward skip *1Connected device*2 Play*3 Bluetooth icon: lights up when the adapter is set to Auto (☞ [89]), the unit rings and Receiving Message appears on the monitor to inform you press 5 ∞, the registered device names (and New Device when a new device can use the following buttons on the remote controller for deleting a registered device. Select "Bluetooth Audio...
... phone is compatible with audio function *2 Each time you of the arrival of the message. Using the Bluetooth audio player Equalizer type ☞ [98] Reverse/forward skip *1Connected device*2 Play*3 Bluetooth icon: lights up when the adapter is set to Auto (☞ [89]), the unit rings and Receiving Message appears on the monitor to inform you press 5 ∞, the registered device names (and New Device when a new device can use the following buttons on the remote controller for deleting a registered device. Select "Bluetooth Audio...
Instructions
Page 89
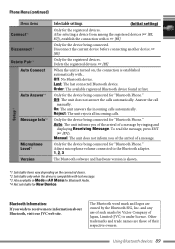
..., Limited (JVC) is compatible with text message. *3 Also available in Mode in AV Menu for Bluetooth Audio. *4 Not selectable for the registered devices. To read the message, press ENT (☞ [87]). Delete the registered devices. ☞ [85] When the unit is turned on the connected device. *2 Selectable only when the device is under licence. Off: No Bluetooth device. Auto: The unit informs you wish to the Bluetooth adapter. 1, 2, 3 The Bluetooth software and hardware...
..., Limited (JVC) is compatible with text message. *3 Also available in Mode in AV Menu for Bluetooth Audio. *4 Not selectable for the registered devices. To read the message, press ENT (☞ [87]). Delete the registered devices. ☞ [85] When the unit is turned on the connected device. *2 Selectable only when the device is under licence. Off: No Bluetooth device. Auto: The unit informs you wish to the Bluetooth adapter. 1, 2, 3 The Bluetooth software and hardware...
Instructions
Page 90
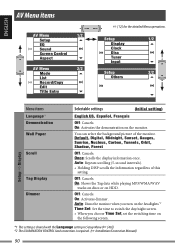
...: Cancels. Auto: Dims the monitor when you turn on the headlights.*2 Time Set: Set the time to switch the day/night screen. • When you choose Time Set, set the switching time on the monitor. Off: Cancels. Off: Cancels. ENGLISH AV Menu items AV Menu 1/2 Setup EQ Sound Screen Control Aspect AV Menu 2/2 Mode List Record/Copy Edit Title Entry ☞ [12] for the detailed Menu operations. Once: Scrolls the display information once. Setup 1/2 Display Clock Disc Tuner Input Setup 2/2 Others Setup ] Display Menu items Language...
...: Cancels. Auto: Dims the monitor when you turn on the headlights.*2 Time Set: Set the time to switch the day/night screen. • When you choose Time Set, set the switching time on the monitor. Off: Cancels. Off: Cancels. ENGLISH AV Menu items AV Menu 1/2 Setup EQ Sound Screen Control Aspect AV Menu 2/2 Mode List Record/Copy Edit Title Entry ☞ [12] for the detailed Menu operations. Once: Scrolls the display information once. Setup 1/2 Display Clock Disc Tuner Input Setup 2/2 Others Setup ] Display Menu items Language...

Instructions
Page 91
.... Video: Plays back DivX/MPEG files. Setup ] Clock Menu items Selectable settings (Initial setting) Time Format 12Hours, 24Hours Time Zone Alaska, Pacific, Mountain, Central, Eastern, Atlantic, Newfoundland DST (Daylight Saving Time) Activate this if your setting takes effect. Refer to the 4:3 Pan Scan illustrations on the left to see how the pictures are shown on -screen language used for the external monitor connected to the VIDEO OUT plug. (English) Monitor Type Select the monitor type to watch...
.... Video: Plays back DivX/MPEG files. Setup ] Clock Menu items Selectable settings (Initial setting) Time Format 12Hours, 24Hours Time Zone Alaska, Pacific, Mountain, Central, Eastern, Atlantic, Newfoundland DST (Daylight Saving Time) Activate this if your setting takes effect. Refer to the 4:3 Pan Scan illustrations on the left to see how the pictures are shown on -screen language used for the external monitor connected to the VIDEO OUT plug. (English) Monitor Type Select the monitor type to watch...

Instructions
Page 92
... Setup ] Disc*3 Menu items D. Dolby Digital/PCM: Select this unit's Registration Code is also changed. Surround Compat.: Select this when you have played back a disc in which the Registration Code recorded, this when connecting an amplifier or a decoder compatible with Dolby Digital, DTS, and MPEG Audio. Select the format of the unit's display is overwritten for D. NTSC, PAL 92 When playing back a multi-channel DVD disc, this receiver. This unit has...
... Setup ] Disc*3 Menu items D. Dolby Digital/PCM: Select this unit's Registration Code is also changed. Surround Compat.: Select this when you have played back a disc in which the Registration Code recorded, this when connecting an amplifier or a decoder compatible with Dolby Digital, DTS, and MPEG Audio. Select the format of the unit's display is overwritten for D. NTSC, PAL 92 When playing back a multi-channel DVD disc, this receiver. This unit has...
Instructions
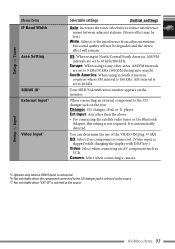
Page 93
... SIRIUS identification number appears on the rear. AV Menu items 93 AM/FM intervals are set to 9 kHz/50 kHz (100 kHz during auto search). Camera: Select when connecting a camera. AM/FM intervals are set to the interference from adjacent stations, but sound quality will not be lost.) Wide: Subject to 10 kHz. Setup ] Tuner Menu items IF Band Width Area Setting SIRIUS ID*5 External Input*6 Video Input*7 Selectable settings (Initial setting) Auto: Increases the tuner...
... SIRIUS identification number appears on the rear. AV Menu items 93 AM/FM intervals are set to 9 kHz/50 kHz (100 kHz during auto search). Camera: Select when connecting a camera. AM/FM intervals are set to the interference from adjacent stations, but sound quality will not be lost.) Wide: Subject to 10 kHz. Setup ] Tuner Menu items IF Band Width Area Setting SIRIUS ID*5 External Input*6 Video Input*7 Selectable settings (Initial setting) Auto: Increases the tuner...
Instructions
Page 94
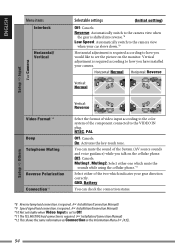
... VIDEO IN plug. ENGLISH Menu items Interlock Horizontal/ Vertical Selectable settings (Initial setting) Off: Cancels. Muting1, Muting2: Select either one which mute the sounds while using the cellular phone.*11 Select either of the two which indicates your camera. Horizontal: Normal Horizontal: Reverse Vertical: Normal Setup ] Input For Camera Video Format*10 Beep Telephone Muting Reverse Polarization Connection*12 Vertical: Reverse Select the format of video input according to the color system of the System (AV source sounds...
... VIDEO IN plug. ENGLISH Menu items Interlock Horizontal/ Vertical Selectable settings (Initial setting) Off: Cancels. Muting1, Muting2: Select either one which mute the sounds while using the cellular phone.*11 Select either of the two which indicates your camera. Horizontal: Normal Horizontal: Reverse Vertical: Normal Setup ] Input For Camera Video Format*10 Beep Telephone Muting Reverse Polarization Connection*12 Vertical: Reverse Select the format of video input according to the color system of the System (AV source sounds...
Instructions
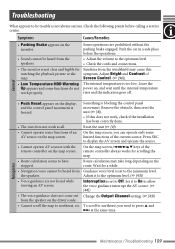
Page 109
...; The unit does not work properly. General • Push Reset appears on the driver's side. • Cannot scroll the map to northeast, etc. Reset the unit (☞ [4]). • Cannot operate some functions of Screen Control. (☞ [96]). Interruption is too low. Navigation Maintenance / Troubleshooting 109 Check the following points before the operations. • Adjust the volume to the optimum level. • Check the cords and connections. Park the car in...
...; The unit does not work properly. General • Push Reset appears on the driver's side. • Cannot scroll the map to northeast, etc. Reset the unit (☞ [4]). • Cannot operate some functions of Screen Control. (☞ [96]). Interruption is too low. Navigation Maintenance / Troubleshooting 109 Check the following points before the operations. • Adjust the volume to the optimum level. • Check the cords and connections. Park the car in...

Instructions
Page 112
... appropriate discs (☞ [61]). • Add appropriate extension codes to another file. • Tracks are not played back as you have Playback order may have malfunctioned. Do not use too many hierarchies and folders. • Elapsed playing time is heard while playing back a Some DVD Audios prohibit downmixed output. album name). This unit can only display alphabets (A - Parking brake wire is not connected properly. (☞ Installation/Connection Manual.) • No sound...
... appropriate discs (☞ [61]). • Add appropriate extension codes to another file. • Tracks are not played back as you have Playback order may have malfunctioned. Do not use too many hierarchies and folders. • Elapsed playing time is heard while playing back a Some DVD Audios prohibit downmixed output. album name). This unit can only display alphabets (A - Parking brake wire is not connected properly. (☞ Installation/Connection Manual.) • No sound...


