JVC KV-PX9S - EXAD 20GB GPS Navigation System Support and Manuals
Get Help and Manuals for this JVC item

Popular JVC KV-PX9S Manual Pages
Quick Reference Guide - Page 12
...navigation, positioning, dispatch, real time route guidance, fleet management or similar applications;
Except where you have been specifically...169; 2006 NAVTEQ - Multi-disc sets may only be uninterrupted or error-free.
JVC and its licensors (including their entirety...part of the Data provided to you agree to publish and sell ZIP+4® information. ©United States Postal Service...
Update Guide - Page 1
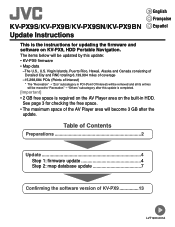
...-001A Table of Contents
Preparations 2
Update 4
Step 1: firmware update 4 Step 2: map database update 7
Confirming the software version of Interest)
* The "Recreation" → "Zoo" subcategory in POI (Point Of Interest) will be moved to "Recreation" → "Others" subcategory after the update.
KV-PX9S/KV-PX9B/KV-PX9SN/KV-PX9BN Update Instructions
English Française Espa...
Update Guide - Page 2
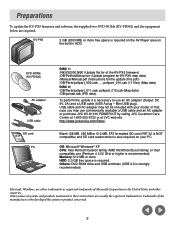
... is strongly recommended)
Microsoft, Windows, are either trademarks or registered trademarks of the KV-PX9 firmware) /DB/Px9hddSetup.exe (Update program for KV-PX9 map data) /Manual/Manual.pdf (Instructions for the update (this pdf)) /DB/Parts/px9part_000.cab, ..., px9part_010.cab (11 files) (Map data) DISC 2: /DB/Parts/px9part_011.cab, px9part_012.cab (Map data) /DB/poicab.cab (POI data). DVD...
Update Guide - Page 3
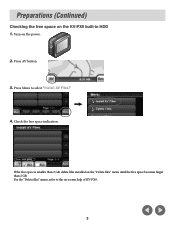
... Menu to the on the "Delete files" menu until the free space becomes larger than 2 GB. For the "Delete files" menu, refer to select "Install AV Files."
4. Check the free space indication. Press AV button. 3. Turn on the KV-PX9 built-in HDD 1. If the free space is smaller than 2 GB, delete files...
Update Guide - Page 4
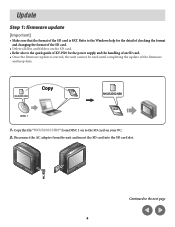
... and the handling of an SD card. • Once the firmware update is FAT. Disconnect the AC adapter from DISC 1 on to the SD card on the SD card. • Refer also to the next page 4
Continued to the quick guide of KV-PX9 for the detail of checking the format and changing the format...
Update Guide - Page 5

Continued to update the firmware. Update (continued)
3. DO NOT do any operation while updating. If an error occurs.
"complete" appears on the screen display as the update successfully finished.
• If "error" appears on the screen as follows. OFF
4. The power lamp flashes purple and red and the firmware update status is displayed on the display screen, disconnect the AC...
Update Guide - Page 6
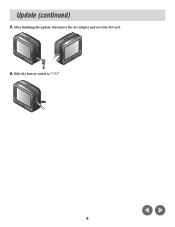
ON
6 Update (continued)
5. Slide the battery switch to "ON." After finishing the update, disconnect the AC adapter and eject the SD card.
1 2
6.
Update Guide - Page 7
...updating varies depending on your PC before starting update. • Quit all programs on the specification of your PC to avoid the accidental interruption of the
update process. • DO NOT interrupt the update after starting the update... the next page 7 Update (continued)
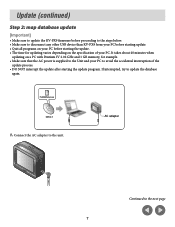
Step 2: map database update
[Important]
• Make sure to update the KV-PX9 firmware before proceeding to the steps...
Update Guide - Page 8
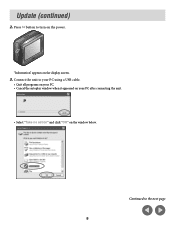
Continued to turn on the power. Press button to the next page 8
Connect the unit to your PC using a USB cable.
• Quit all programs on your PC. • Cancel the autoplay window when it appeared on your PC after connecting the unit.
• Select "Take no action" and click "OK" on the display screen.
3.
"Information" appears on the window below. Update (continued)
2.
Update Guide - Page 9

Open the "DB" folder and double-click "Px9hddSetup.exe."
Click "START." Insert the DISC 1 into your PC. 5. Continued to the next page 9 Update (continued)
4. The update program window appears (its messages appear only in English).
6.
Update Guide - Page 10
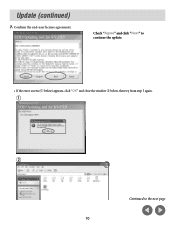
Update (continued)
7. Confirm the end-user license agreement.
Check "Agree" and click "Next" to continue the update.
• If the error screen (1 below) appears, click "OK" and close the window 2 below, then try from step 5 again.
1
2
Continued to the next page 10
Update Guide - Page 11

... disconnection while updating. Please call JVC Customer Care Center at 1-800-
252-5722 if you cannot finish the update even after retrying.
9. Update (continued)
8.
It takes about 40 minutes when updating on a
PC with Pentium IV 2.02 GHz and 1 GB memory, for updating varies depending on -screen message below. Insert DISC 2 following the on the specification of...
Update Guide - Page 12
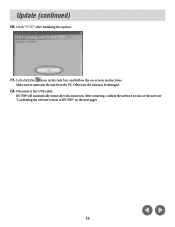
... icon in the task bar, and follow the on the next page).
12
KV-PX9 will automatically restart after finishing the update.
11. After restarting, confirm the software version of the unit (see "Confirming the software version of KV-PX9" on -screen instructions.
Make sure to unmount the unit from the PC. Otherwise the unit may...
Update Guide - Page 13

Confirming the software version of the unit appears. Press "INFO." 3. Press Menu button. 2. Press "Version." The version information of KV-PX9
1. The information appears as below after the update was finished successfully.
13
Update Guide - Page 14

...restrictions set as ...specifically ...Service, USPS, and ZIP+4. End-User License Agreement
The data ("Data") is provided for your personal, internal use this Data with any products, systems, or applications installed or otherwise connected to or in communication with vehicles, capable of vehicle navigation...JVC and not as necessary for Ontario, ©Canada Post Corporation, GeoBase®. Prices...
JVC KV-PX9S Reviews
We have not received any reviews for JVC yet.