

Instructions
Page 4
...video recording formats (1080i, 1080p, and 720p) Shooting can be performed in different HD recording modes, thus supporting a wide variety of content production. Ⅵ QuickTime(MOV)/MP4 format for the built-in or external microphone. Ⅵ Three video output terminals This camcorder comes with an HDMI ... shooting conditions according to the scenes of your preference. Ⅵ White balance adjustment feature Enables white balance to be adjusted automatically or manually. Ⅵ Built-in color bars (multi-format color bars) Ⅵ Slow shutter Makes it possible to brightly shoot video of...
...video recording formats (1080i, 1080p, and 720p) Shooting can be performed in different HD recording modes, thus supporting a wide variety of content production. Ⅵ QuickTime(MOV)/MP4 format for the built-in or external microphone. Ⅵ Three video output terminals This camcorder comes with an HDMI ... shooting conditions according to the scenes of your preference. Ⅵ White balance adjustment feature Enables white balance to be adjusted automatically or manually. Ⅵ Built-in color bars (multi-format color bars) Ⅵ Slow shutter Makes it possible to brightly shoot video of...
Instructions
Page 5
... Selecting a Shooting Mode 25 Selecting the Video/Still Picture Shooting Mode . . . . . 25 Selecting the Full Auto/Manual Shooting Mode 25 Selecting a Focusing Mode 26 Using the Camcorder in the Video Shooting Mode . . . . . 26 Setting the Video Format 26 Displaying the Remaining Space on the ...27 Capturing Still Pictures in the Video Shooting Mode 28 Recording Multiple Clips as a Continuous File . . . . . .28 Using the Camcorder in the Still Picture Shooting Mode 29 Setting the Picture Quality, Recording Size, and Sensitivity 29 Capturing Still Pictures 29 Zoom Operation 30 Adjusting...
... Selecting a Shooting Mode 25 Selecting the Video/Still Picture Shooting Mode . . . . . 25 Selecting the Full Auto/Manual Shooting Mode 25 Selecting a Focusing Mode 26 Using the Camcorder in the Video Shooting Mode . . . . . 26 Setting the Video Format 26 Displaying the Remaining Space on the ...27 Capturing Still Pictures in the Video Shooting Mode 28 Recording Multiple Clips as a Continuous File . . . . . .28 Using the Camcorder in the Still Picture Shooting Mode 29 Setting the Picture Quality, Recording Size, and Sensitivity 29 Capturing Still Pictures 29 Zoom Operation 30 Adjusting...
Instructions
Page 6
...reference items. Ⅵ Content of this product. Memo : Describes reference information, such as functions and usage restrictions of this manual ● All rights reserved by JVC. Getting Started Contents (continued) Playing Still Pictures on the SD Card 48 Viewing Still Pictures in a Slideshow 48 Returning .... (Even if you record an event such as a show, performance or exhibition for personal enjoyment, it is strongly recommended that this camcorder is intended for viewing in higher image quality. • QuickTime and Final Cut Pro are trademarks of Apple Inc. • Other ...
...reference items. Ⅵ Content of this product. Memo : Describes reference information, such as functions and usage restrictions of this manual ● All rights reserved by JVC. Getting Started Contents (continued) Playing Still Pictures on the SD Card 48 Viewing Still Pictures in a Slideshow 48 Returning .... (Even if you record an event such as a show, performance or exhibition for personal enjoyment, it is strongly recommended that this camcorder is intended for viewing in higher image quality. • QuickTime and Final Cut Pro are trademarks of Apple Inc. • Other ...
Instructions
Page 11
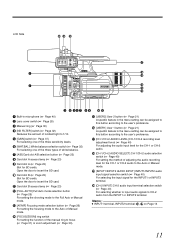
...SD cards. T [CH-2 INPUT] CH-2 audio input terminal selection switch (A Page 40) For selecting whether to input audio signals to the Full Auto or Manual mode. Memo : ● INPUT1 terminal, INPUT2 terminal: R, S on Page 13 11 M- B A Built-in the menu setting can be assigned to ...from the INPUT1 or INPUT2 terminal. P [USER1] User 1 button (A Page 21) A specific feature in microphone (A Page 40) B Lens cover switch (A Page 20) C Manual ring (A Page 30) D [ND FILTER] switch (A Page 32) Reduces the amount of incident light to the user's preference. R [CH-1/CH-2 AUDIO SELECT] CH-1/CH...
...SD cards. T [CH-2 INPUT] CH-2 audio input terminal selection switch (A Page 40) For selecting whether to input audio signals to the Full Auto or Manual mode. Memo : ● INPUT1 terminal, INPUT2 terminal: R, S on Page 13 11 M- B A Built-in the menu setting can be assigned to ...from the INPUT1 or INPUT2 terminal. P [USER1] User 1 button (A Page 21) A specific feature in microphone (A Page 40) B Lens cover switch (A Page 20) C Manual ring (A Page 30) D [ND FILTER] switch (A Page 32) Reduces the amount of incident light to the user's preference. R [CH-1/CH-2 AUDIO SELECT] CH-1/CH...

Instructions
Page 12
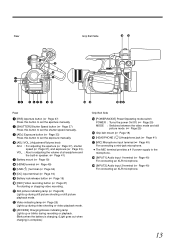
...A When the LCD cover is used for starting or stopping video recording. E [MENU] Menu button (A Page 57) Displays the menu screen. Press this camcorder to the user's preference. F Built-in the playback mode, pressing this button according to the Camera Shooting or Media Playback mode. I [DISPLAY] Display button... : 9 87 6D C CAM / MEDIA USER3 DISPLAY Q.REVIEW MENU COMPONENT OUT A / V OUT 2 34 INDEX T PR W 5 REC ; MIC MIC+48V INPUT1 INPUT2 AUTO MANUAL CH-1 AUDIO SELECT CH-2 AUTO MANUAL 0 1 23 ND FILTER ON OFF USER1 USER2 FOCUS ZOOM AF/MF FULL AUTO GAIN WHT.BAL A / B L-
...A When the LCD cover is used for starting or stopping video recording. E [MENU] Menu button (A Page 57) Displays the menu screen. Press this camcorder to the user's preference. F Built-in the playback mode, pressing this button according to the Camera Shooting or Media Playback mode. I [DISPLAY] Display button... : 9 87 6D C CAM / MEDIA USER3 DISPLAY Q.REVIEW MENU COMPONENT OUT A / V OUT 2 34 INDEX T PR W 5 REC ; MIC MIC+48V INPUT1 INPUT2 AUTO MANUAL CH-1 AUDIO SELECT CH-2 AUTO MANUAL 0 1 23 ND FILTER ON OFF USER1 USER2 FOCUS ZOOM AF/MF FULL AUTO GAIN WHT.BAL A / B L-
Instructions
Page 13
...] Microphone input terminal (A Page 40) For connecting a mini-jack microphone. ● The MIC terminal provides a 4 V power supply to set the aperture manually. C [AE±] Exposure button (A Page 33) Press this button to the microphone. L Video indicating lamp (A Page 25) Lights up during still picture... shooting or still picture playback mode. EF F GH Rear A [IRIS] Aperture button (A Page 37) Press this button to set the exposure manually. K Still picture indicating lamp (A Page 25) Lights up during recording or playback. S [INPUT2] Audio input 2 terminal (A Page 40) For...
...] Microphone input terminal (A Page 40) For connecting a mini-jack microphone. ● The MIC terminal provides a 4 V power supply to set the aperture manually. C [AE±] Exposure button (A Page 33) Press this button to the microphone. L Video indicating lamp (A Page 25) Lights up during still picture... shooting or still picture playback mode. EF F GH Rear A [IRIS] Aperture button (A Page 37) Press this button to set the exposure manually. K Still picture indicating lamp (A Page 25) Lights up during recording or playback. S [INPUT2] Audio input 2 terminal (A Page 40) For...

Instructions
Page 16
... : Snow SPOT.L : Spotlight TWIL. : Night I 3 4 ±0 5 6 F5.6 1/4000 10x 7 ND 8 3200K 9 SPORT : CH1 ; CH2 A B H G F E D 4 : 5 0 PM NOV.1.2 0 0 9 C B A Shooting Mode A : Full Auto Shooting M : Manual Shooting B Focusing Mode AF : Auto Focus MF : Manual Focus C Exposure L : Fixed D Aperture E Shutter Speed F ND Filter Displayed when the ND filter switch is indicated by the card icon as follows...
... : Snow SPOT.L : Spotlight TWIL. : Night I 3 4 ±0 5 6 F5.6 1/4000 10x 7 ND 8 3200K 9 SPORT : CH1 ; CH2 A B H G F E D 4 : 5 0 PM NOV.1.2 0 0 9 C B A Shooting Mode A : Full Auto Shooting M : Manual Shooting B Focusing Mode AF : Auto Focus MF : Manual Focus C Exposure L : Fixed D Aperture E Shutter Speed F ND Filter Displayed when the ND filter switch is indicated by the card icon as follows...
Instructions
Page 18
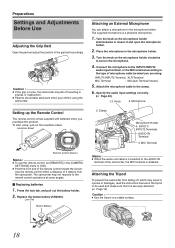
...at some angles. Ⅵ Replacing batteries 1 . Knob 2. INPUT1/ INPUT2 Terminals AUDIO IN AUDOIOPEINN Terminal 4. To start using the camcorder. Turn the knob on the microphone holder anticlockwise to secure the microphone. 4 . Connect the microphone to the INPUT1/INPUT2 audio ... in injuries or damages, read the instruction manual of the camcorder, the MIC terminal is a phantom microphone. 1 . Turn the knob on a stable surface. 18 Microphone 5. Attaching the Tripod To prevent the camcorder from the camcorder. The supplied microphone is disabled. Attach the...
...at some angles. Ⅵ Replacing batteries 1 . Knob 2. INPUT1/ INPUT2 Terminals AUDIO IN AUDOIOPEINN Terminal 4. To start using the camcorder. Turn the knob on the microphone holder anticlockwise to secure the microphone. 4 . Connect the microphone to the INPUT1/INPUT2 audio ... in injuries or damages, read the instruction manual of the camcorder, the MIC terminal is a phantom microphone. 1 . Turn the knob on a stable surface. 18 Microphone 5. Attaching the Tripod To prevent the camcorder from the camcorder. The supplied microphone is disabled. Attach the...

Instructions
Page 21
...press the center. 4 . Press the center of the Set Lever to select. LINE - PRST- Press MENU. MIC MIC+48V INPUT1 INPUT2 AUTO MANUAL CH-1 AUDIO SELECT CH-2 AUTO MANUAL 0 1 23 2 3 45 USER1 USER2 ND FILTER ON OFF USER1 USER2 FOCUS ZOOM AF/MF FULL AUTO GAIN WHT.BAL A / B L- ... left . Ⅵ To close the menu screen, press MENU. Push the Set Lever up or down to the USER Buttons This camcorder comes with three USER buttons. Display Language Japanese English French German Spanish Italian Russian Simplied Chinese Assigning Functions to select, then press the center....
...press the center. 4 . Press the center of the Set Lever to select. LINE - PRST- Press MENU. MIC MIC+48V INPUT1 INPUT2 AUTO MANUAL CH-1 AUDIO SELECT CH-2 AUTO MANUAL 0 1 23 2 3 45 USER1 USER2 ND FILTER ON OFF USER1 USER2 FOCUS ZOOM AF/MF FULL AUTO GAIN WHT.BAL A / B L- ... left . Ⅵ To close the menu screen, press MENU. Push the Set Lever up or down to the USER Buttons This camcorder comes with three USER buttons. Display Language Japanese English French German Spanish Italian Russian Simplied Chinese Assigning Functions to select, then press the center....
Instructions
Page 25
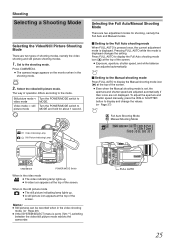
... picture mode MODE and hold for shooting, namely the Full Auto and Manual modes. Ⅵ Setting to [720-**], switching between the video/still picture mode reboots the camcorder. FULL AUTO Ⅵ Setting to the Manual shooting mode Press FULL AUTO to the mode. The way of operation... differs according to display the Manual shooting mode icon (M) at the top of shooting modes, namely the...
... picture mode MODE and hold for shooting, namely the Full Auto and Manual modes. Ⅵ Setting to [720-**], switching between the video/still picture mode reboots the camcorder. FULL AUTO Ⅵ Setting to the Manual shooting mode Press FULL AUTO to the mode. The way of operation... differs according to display the Manual shooting mode icon (M) at the top of shooting modes, namely the...
Instructions
Page 26
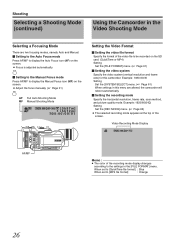
...) Ⅵ Setting the video system Specify the video system (vertical resolution and frame rate) for this menu are two focusing modes, namely Auto and Manual. Ⅵ Setting to the Auto Focus mode Press AF/MF to the settings in the [FILE FORMAT] menu. Video Recording Mode Display Memo : ...AF/MF AF Full Auto Shooting Mode MF Manual Shooting Mode A [0h57m] B [5h12m] 00:00:00:01 18dB ND ND FILTER ON OFF USER1 USER2 FOCUS ZOOM AF/MF FULL AUTO GAIN WHT.BAL A / B L- PRST- Shooting Selecting a Shooting Mode (continued) Using the Camcorder in the Video Shooting Mode Selecting a Focusing...
...) Ⅵ Setting the video system Specify the video system (vertical resolution and frame rate) for this menu are two focusing modes, namely Auto and Manual. Ⅵ Setting to the Auto Focus mode Press AF/MF to the settings in the [FILE FORMAT] menu. Video Recording Mode Display Memo : ...AF/MF AF Full Auto Shooting Mode MF Manual Shooting Mode A [0h57m] B [5h12m] 00:00:00:01 18dB ND ND FILTER ON OFF USER1 USER2 FOCUS ZOOM AF/MF FULL AUTO GAIN WHT.BAL A / B L- PRST- Shooting Selecting a Shooting Mode (continued) Using the Camcorder in the Video Shooting Mode Selecting a Focusing...
Instructions
Page 30
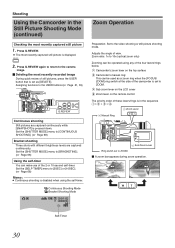
... The priority order of these levers/rings is pressed down. C Sub zoom lever on the LCD cover D Zoom lever on the top surface B Camcorder's manual ring: This can make use of the four levers/rings below. Press Q.REVIEW again to return to the camera image. Ⅵ Deleting the most...set as a zoom ring when the [FOCUS/ ZOOM] ring switch at the side of view. M- Shooting Using the Camcorder in the sequence A > B > C > D. MIC MIC+48V INPUT1 INPUT2 AUTO MANUAL CH-1 AUDIO SELECT CH-2 AUTO MANUAL 0 1 23 ND FILTER ON OFF USER1 USER2 FOCUS ZOOM AF/MF FULL AUTO GAIN WHT.BAL A / B L-...
... The priority order of these levers/rings is pressed down. C Sub zoom lever on the LCD cover D Zoom lever on the top surface B Camcorder's manual ring: This can make use of the four levers/rings below. Press Q.REVIEW again to return to the camera image. Ⅵ Deleting the most...set as a zoom ring when the [FOCUS/ ZOOM] ring switch at the side of view. M- Shooting Using the Camcorder in the sequence A > B > C > D. MIC MIC+48V INPUT1 INPUT2 AUTO MANUAL CH-1 AUDIO SELECT CH-2 AUTO MANUAL 0 1 23 ND FILTER ON OFF USER1 USER2 FOCUS ZOOM AF/MF FULL AUTO GAIN WHT.BAL A / B L-...
Instructions
Page 31
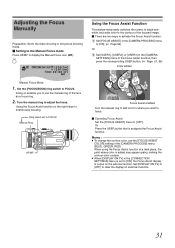
... the [CAMERA PROCESS] menu to [ON]. (A Page 59) Or B Set [USER1], [USER2], or [USER3] in the [CONNECTION SETTINGS] menu is set to FOCUS Manual Ring AF/MF Using the Focus Assist Function This feature temporarily switches the screen to black-andwhite, and adds color to [ON], the Focus Assist... GREEN, RED) When using the Focus Assist function at a dark place, the point where color is assigned the Focus Assist function. Turn the manual ring to display the Manual Focus icon (MF). Set the [FOCUS/ZOOM] ring switch to activate the Focus Assist function. Memo : ● To change the contour color...
... the [CAMERA PROCESS] menu to [ON]. (A Page 59) Or B Set [USER1], [USER2], or [USER3] in the [CONNECTION SETTINGS] menu is set to FOCUS Manual Ring AF/MF Using the Focus Assist Function This feature temporarily switches the screen to black-andwhite, and adds color to [ON], the Focus Assist... GREEN, RED) When using the Focus Assist function at a dark place, the point where color is assigned the Focus Assist function. Turn the manual ring to display the Manual Focus icon (MF). Set the [FOCUS/ZOOM] ring switch to activate the Focus Assist function. Memo : ● To change the contour color...
Instructions
Page 32
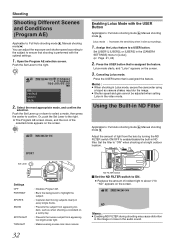
...at a bright outdoor location. Set [USER1], [USER2], or [USER3] in the video mode. Memo : ● When shooting in Lolux mode, secure the camcorder using a tripod as when shooting a snowfield on the screen. 3 . ND SPORT Memo : ● Enabling ND FILTER during shooting may blur the image. &#...in dim surroundings. 1 . Assign the Lolux feature to confirm. Using the Built-in ND Filter Applicable to: Full Auto shooting mode A, Manual shooting mode M Adjust the amount of the selected mode appears on the screen. Open the Program AE selection screen. Canceling Lolux mode. ...
...at a bright outdoor location. Set [USER1], [USER2], or [USER3] in the video mode. Memo : ● When shooting in Lolux mode, secure the camcorder using a tripod as when shooting a snowfield on the screen. 3 . ND SPORT Memo : ● Enabling ND FILTER during shooting may blur the image. &#...in dim surroundings. 1 . Assign the Lolux feature to confirm. Using the Built-in ND Filter Applicable to: Full Auto shooting mode A, Manual shooting mode M Adjust the amount of the selected mode appears on the screen. Open the Program AE selection screen. Canceling Lolux mode. ...
Instructions
Page 33
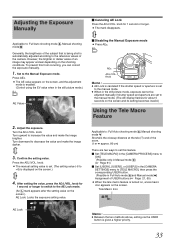
...image may appear unclear depending on the screen and its setting becomes invalid.) Using the Tele Macro Feature Applicable to: Full Auto shooting mode A, Manual shooting mode M Shortens the closeup distance at the tele (T) end of USER buttons:(A Page 21, 65) ● When the tele macro ... or longer. ● The mark disappears. Confirm the setting value. ADJ./VOL ADJ./VOL ADJ./VOL Applicable to: Full Auto shooting mode A, Manual shooting mode M Generally, the brightness of the camera. knob. Turn upward to the reference values of the subject that is being shot is turned...
...image may appear unclear depending on the screen and its setting becomes invalid.) Using the Tele Macro Feature Applicable to: Full Auto shooting mode A, Manual shooting mode M Shortens the closeup distance at the tele (T) end of USER buttons:(A Page 21, 65) ● When the tele macro ... or longer. ● The mark disappears. Confirm the setting value. ADJ./VOL ADJ./VOL ADJ./VOL Applicable to: Full Auto shooting mode A, Manual shooting mode M Generally, the brightness of the camera. knob. Turn upward to the reference values of the subject that is being shot is turned...

Instructions
Page 34
... is set to [ON], the zebra pattern is set as [ZEBRA]. 3 . Shooting Displaying the Zebra Pattern Applicable to: Video shooting mode A Full Auto Shooting Mode M Manual Shooting Mode During video shooting, diagonal lines (zebra pattern) are displayed only at the area that corresponds to the specified luminance level. Press the center...
... is set to [ON], the zebra pattern is set as [ZEBRA]. 3 . Shooting Displaying the Zebra Pattern Applicable to: Video shooting mode A Full Auto Shooting Mode M Manual Shooting Mode During video shooting, diagonal lines (zebra pattern) are displayed only at the area that corresponds to the specified luminance level. Press the center...
Instructions
Page 35
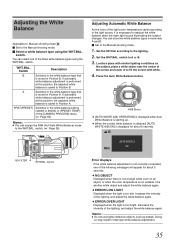
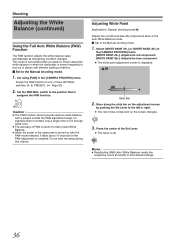
Adjusting the White Balance Applicable to: Manual shooting mode M Ⅵ Set to A or B. 3 . You can assign the FAW (Full Auto White Balance) mode to the light source, it is not correctly completed, ... the light (color temperature) varies according to the WHT.BAL. Switch Description B Switches to the white balance type that is saved to the Manual shooting mode. 1 . switch to the Manual shooting mode. Ⅵ Select a white balance type using the WHT.BAL. Use another white object and adjust the white balance again. ●...
Adjusting the White Balance Applicable to: Manual shooting mode M Ⅵ Set to A or B. 3 . You can assign the FAW (Full Auto White Balance) mode to the light source, it is not correctly completed, ... the light (color temperature) varies according to the WHT.BAL. Switch Description B Switches to the white balance type that is saved to the Manual shooting mode. 1 . switch to the Manual shooting mode. Ⅵ Select a white balance type using the WHT.BAL. Use another white object and adjust the white balance again. ●...
Instructions
Page 36
... Full Auto White Balance (FAW) Function The FAW function adjusts the white balance value automatically as the lighting condition changes. Press the center of the camcorder is set. switches (A, B, PRESET). (A Page 60) 2 . switch to that is displayed. 0 Slide Bar 2 . Caution : ● The FAW ...optimum white balance with a subject outside the FAW adjustment range, for example when it takes about 10 seconds for the FAW adjustment to : Manual shooting mode M Adjusts the red (R) and blue (B) components when in the [CAMERA PROCESS] menu. [WHITE PAINT]: Adjusts the red component....
... Full Auto White Balance (FAW) Function The FAW function adjusts the white balance value automatically as the lighting condition changes. Press the center of the camcorder is set. switches (A, B, PRESET). (A Page 60) 2 . switch to that is displayed. 0 Slide Bar 2 . Caution : ● The FAW ...optimum white balance with a subject outside the FAW adjustment range, for example when it takes about 10 seconds for the FAW adjustment to : Manual shooting mode M Adjusts the red (R) and blue (B) components when in the [CAMERA PROCESS] menu. [WHITE PAINT]: Adjusts the red component....
Instructions
Page 37
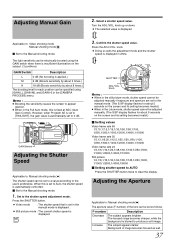
...8549; Set to the shutter speed adjustment mode. However, when Program AE is set to 0 dB. GAIN Switch Adjusting the Shutter Speed Applicable to: Manual shooting mode M The shutter speed can be electrically boosted using [GAIN L], [GAIN M], and [GAIN H] in white. Press the SHUTTER button. &#...dB (Boosts sensitivity by about 3 times.) H 18 dB (Boosts sensitivity by about 8 times.) The boosting level for each position can be adjusted manually. (The S.SP display flashes for about 5 seconds on the screen and its setting becomes invalid.) Ⅵ Setting values Video frame rate 60 ...
...8549; Set to the shutter speed adjustment mode. However, when Program AE is set to 0 dB. GAIN Switch Adjusting the Shutter Speed Applicable to: Manual shooting mode M The shutter speed can be electrically boosted using [GAIN L], [GAIN M], and [GAIN H] in white. Press the SHUTTER button. &#...dB (Boosts sensitivity by about 3 times.) H 18 dB (Boosts sensitivity by about 8 times.) The boosting level for each position can be adjusted manually. (The S.SP display flashes for about 5 seconds on the screen and its setting becomes invalid.) Ⅵ Setting values Video frame rate 60 ...
Instructions
Page 38
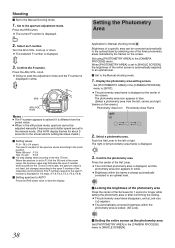
...blue. (Select a photometry area from the preset value. ● When in the still picture mode, aperture cannot be corrected automatically to the Manual shooting mode. 1 . In this case, the aperture value is different from the left, center, and right frames on the screen.) Photometry ...OPEN SHUTTER AE ʶ CLOSE ADJ./ VOL. Display the photometry area setting screen. Set using [PHOTOMETRY AREA] in the [CAMERA PROCESS] menu to the Manual shooting mode. 1 . Set to the left photometry area frame is displayed. Press the IRIS button. ● The current F-number is displayed. 3 ...
...blue. (Select a photometry area from the preset value. ● When in the still picture mode, aperture cannot be corrected automatically to the Manual shooting mode. 1 . In this case, the aperture value is different from the left, center, and right frames on the screen.) Photometry ...OPEN SHUTTER AE ʶ CLOSE ADJ./ VOL. Display the photometry area setting screen. Set using [PHOTOMETRY AREA] in the [CAMERA PROCESS] menu to the Manual shooting mode. 1 . Set to the left photometry area frame is displayed. Press the IRIS button. ● The current F-number is displayed. 3 ...


