

Instructions
Page 4
... can be used to record and play back the time code and user's bit. Ⅵ Built-in viewfinder and color LCD display Displays the status screens, menu screens for settings, and alarm indications, in addition to the camera image and playback image. Ⅵ Built-in monitor speaker for audio checking Ⅵ Recording check function for convenient recording review Ⅵ Camera designed with 3-CCD system for highquality picture Ⅵ Zebra pattern video level indication 4 Ⅵ Full Auto shooting mode Eliminates the need for troublesome switch operations by...
... can be used to record and play back the time code and user's bit. Ⅵ Built-in viewfinder and color LCD display Displays the status screens, menu screens for settings, and alarm indications, in addition to the camera image and playback image. Ⅵ Built-in monitor speaker for audio checking Ⅵ Recording check function for convenient recording review Ⅵ Camera designed with 3-CCD system for highquality picture Ⅵ Zebra pattern video level indication 4 Ⅵ Full Auto shooting mode Eliminates the need for troublesome switch operations by...
Instructions
Page 5
... 19 Charging the Battery 19 Checking the Remaining Battery Power 20 Turning On the Power 20 Lens Cover 20 Setting the Date 21 Setting the Language 21 Assigning Functions to the USER Buttons 21 Viewing the Viewfinder/LCD Screen 22 Inserting an SD Card 23 Formatting the SD Card 24 Resetting the File Number 24 Shooting Selecting a Shooting Mode 25 Selecting the Video/Still Picture Shooting Mode . . . . . 25 Selecting the Full Auto/Manual Shooting Mode 25 Selecting a Focusing Mode 26 Using the Camcorder in the Video Shooting Mode . . . . . 26 Setting the Video Format 26 Displaying...
... 19 Charging the Battery 19 Checking the Remaining Battery Power 20 Turning On the Power 20 Lens Cover 20 Setting the Date 21 Setting the Language 21 Assigning Functions to the USER Buttons 21 Viewing the Viewfinder/LCD Screen 22 Inserting an SD Card 23 Formatting the SD Card 24 Resetting the File Number 24 Shooting Selecting a Shooting Mode 25 Selecting the Video/Still Picture Shooting Mode . . . . . 25 Selecting the Full Auto/Manual Shooting Mode 25 Selecting a Focusing Mode 26 Using the Camcorder in the Video Shooting Mode . . . . . 26 Setting the Video Format 26 Displaying...
Instructions
Page 6
... 54 Saving/Loading Settings 54 Saving Settings to an SD Card 54 Loading Settings from an SD Card 55 Operation Sound and Tally Settings 56 Displaying the Hour Meter 56 Restoring the Default Settings 56 Menu Screens Setting Menu Screens 57 List of Valid Menu Items for Each Operation Mode . . . . . 58 Menu Screens of the Video Shooting Mode 59 Menu Screens of the Still Picture Shooting Mode 67 Menu Screens of Video/Still Picture Playback Modes . . . 69 Others Troubleshooting 70 Warning Displays 72 Estimated Recordable Time/Number 73 Estimated Video Recording Time 73 Estimated Number...
... 54 Saving/Loading Settings 54 Saving Settings to an SD Card 54 Loading Settings from an SD Card 55 Operation Sound and Tally Settings 56 Displaying the Hour Meter 56 Restoring the Default Settings 56 Menu Screens Setting Menu Screens 57 List of Valid Menu Items for Each Operation Mode . . . . . 58 Menu Screens of the Video Shooting Mode 59 Menu Screens of the Still Picture Shooting Mode 67 Menu Screens of Video/Still Picture Playback Modes . . . 69 Others Troubleshooting 70 Warning Displays 72 Estimated Recordable Time/Number 73 Estimated Video Recording Time 73 Estimated Number...
Instructions
Page 7
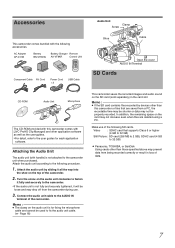
... camcorder saves the recorded images and audio sound on the audio unit clockwise to 32 GB) ● Panasonic, TOSHIBA, or SanDisk Using cards other than this camcorder comes with the following SD cards. Video : SDHC card that are deleted using a PC. AC Adapter AP-V21M Battery BN-VF823U Battery Charger Remote AA-VF8KR Control Unit Component Cable AV Cord Power Cord ן2 USB Cable Audio Unit Clamp Screw Shoe Cable Open the cover AUDIO IN Terminal SD Cards CD-ROM Audio Unit Microphone...
... camcorder saves the recorded images and audio sound on the audio unit clockwise to 32 GB) ● Panasonic, TOSHIBA, or SanDisk Using cards other than this camcorder comes with the following SD cards. Video : SDHC card that are deleted using a PC. AC Adapter AP-V21M Battery BN-VF823U Battery Charger Remote AA-VF8KR Control Unit Component Cable AV Cord Power Cord ן2 USB Cable Audio Unit Clamp Screw Shoe Cable Open the cover AUDIO IN Terminal SD Cards CD-ROM Audio Unit Microphone...
Instructions
Page 8
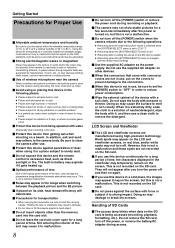
... will not appear after a setting file stored on the screen. When it to malfunction. 8 Ⅵ Do not turn off and then on again. Ⅵ If you use this device continuously for a long period of time, the characters displayed in the viewfinder may appear in a solution of SD Cards Ⅵ The access lamp blinks when data on the SD card is being splashed with...
... will not appear after a setting file stored on the screen. When it to malfunction. 8 Ⅵ Do not turn off and then on again. Ⅵ If you use this device continuously for a long period of time, the characters displayed in the viewfinder may appear in a solution of SD Cards Ⅵ The access lamp blinks when data on the SD card is being splashed with...

Instructions
Page 12
...) G [CAM/MEDIA] Camera shooting/media playback selection button (A Page 25) For setting this lever is used for starting or stopping video recording. When in the playback mode, pressing this button switches between the playback index and date search screens. (A Page 45) M Set Lever When in the shooting mode, this camcorder to this lever is opened : 9 87 6D C CAM / MEDIA USER3 DISPLAY Q.REVIEW MENU COMPONENT OUT A / V OUT 2 34 INDEX T PR W 5 REC ; I [DISPLAY] Display button For switching the displays on the SD card (A Page 27) and the remaining battery power...
...) G [CAM/MEDIA] Camera shooting/media playback selection button (A Page 25) For setting this lever is used for starting or stopping video recording. When in the playback mode, pressing this button switches between the playback index and date search screens. (A Page 45) M Set Lever When in the shooting mode, this camcorder to this lever is opened : 9 87 6D C CAM / MEDIA USER3 DISPLAY Q.REVIEW MENU COMPONENT OUT A / V OUT 2 34 INDEX T PR W 5 REC ; I [DISPLAY] Display button For switching the displays on the SD card (A Page 27) and the remaining battery power...

Instructions
Page 16
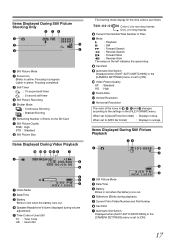
... CUT] menu is set to [OFF]. Getting Started Indications on the LCD Screen and in red when the battery runs out. K Microphone Input Level L Date/Time M Battery Blinks in the Viewfinder (continued) Items Displayed During Video and Still Picture Shooting 2 J I 3 4 ±0 5 6 F5.6 1/4000 10x 7 ND 8 3200K 9 SPORT : CH1 ; N Focus Assist Displayed when [FOCUS ASSIST] in blue. F Mode Indicator RREC : Recording RW : Record Standby mode (Record Pause mode) G Time Code or User's Bit TC : Time Code UB : User's Bit The framing mode display for the time code is...
... CUT] menu is set to [OFF]. Getting Started Indications on the LCD Screen and in red when the battery runs out. K Microphone Input Level L Date/Time M Battery Blinks in the Viewfinder (continued) Items Displayed During Video and Still Picture Shooting 2 J I 3 4 ±0 5 6 F5.6 1/4000 10x 7 ND 8 3200K 9 SPORT : CH1 ; N Focus Assist Displayed when [FOCUS ASSIST] in blue. F Mode Indicator RREC : Recording RW : Record Standby mode (Record Pause mode) G Time Code or User's Bit TC : Time Code UB : User's Bit The framing mode display for the time code is...
Instructions
Page 17
... 0 9 3 A Video Mode B Date/Time C Battery Blinks in red when the battery runs out. When set to [QuickTime file format] : Displays in blue. When set to [ON]. 17 D Speaker/Headphone Volume (displayed during playback) E Current File's Folder Number and File Number F Card Slot G Automatic Slot Switch Displayed when [SLOT AUTO SWITCHING] in the [CAMERA SETTINGS] menu is set to [MP4 file format] : Displays in orange. D Slideshow (Blinks during volume adjustment) E Time Code or User's Bit TC : Time Code UB : User's Bit The framing mode display for the time code is as...
... 0 9 3 A Video Mode B Date/Time C Battery Blinks in red when the battery runs out. When set to [QuickTime file format] : Displays in blue. When set to [ON]. 17 D Speaker/Headphone Volume (displayed during playback) E Current File's Folder Number and File Number F Card Slot G Automatic Slot Switch Displayed when [SLOT AUTO SWITCHING] in the [CAMERA SETTINGS] menu is set to [MP4 file format] : Displays in orange. D Slideshow (Blinks during volume adjustment) E Time Code or User's Bit TC : Time Code UB : User's Bit The framing mode display for the time code is as...
Instructions
Page 18
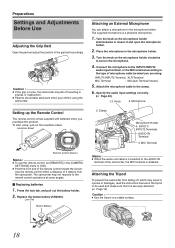
... Tab Button Battery Attaching an External Microphone You can attach a microphone to [ON]. ● Point the front end of microphone cable terminal you purchase this product. Knob 2. Turn the knob on the microphone holder anticlockwise to the type of the remote control toward the sensor. Specify the audio input settings correctly. (A Page 40) 1.3. Attaching the Tripod To prevent the camcorder from the camcorder. Microphone 5. Attach the microphone cable to the remote control operations...
... Tab Button Battery Attaching an External Microphone You can attach a microphone to [ON]. ● Point the front end of microphone cable terminal you purchase this product. Knob 2. Turn the knob on the microphone holder anticlockwise to the type of the remote control toward the sensor. Specify the audio input settings correctly. (A Page 40) 1.3. Attaching the Tripod To prevent the camcorder from the camcorder. Microphone 5. Attach the microphone cable to the remote control operations...
Instructions
Page 19
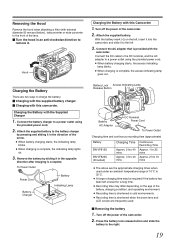
... blinks. ● When charging is complete. Attach the supplied battery to the battery charger by sliding it in the direction of 10°C to a power outlet using the provided power cord. ● When battery charging starts, the access indicating lamp blinks. ● When charging is shortened when the zoom lens and LCD screen are frequently used. Ⅵ Removing the battery 1 . Charging the Battery with this Camcorder 1. Attach the supplied battery. Connect the AC adapter that is provided with external...
... blinks. ● When charging is complete. Attach the supplied battery to the battery charger by sliding it in the direction of 10°C to a power outlet using the provided power cord. ● When battery charging starts, the access indicating lamp blinks. ● When charging is shortened when the zoom lens and LCD screen are frequently used. Ⅵ Removing the battery 1 . Charging the Battery with this Camcorder 1. Attach the supplied battery. Connect the AC adapter that is provided with external...
Instructions
Page 20
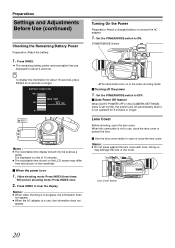
... the LCD screen may damage the lens or the cover. A B Lens Cover Switch 20 PUSH IRIS SHUTTER AE ʶ REC DC Memo : ● The recordable time display should only be used as a guide. H- Still picture shooting mode: Press INDEX once. 2 . Memo : ● When video shooting is in the [CAMERA SETTINGS] menu is not operated for 5 minutes or longer. Turning On the Power Preparation: Attach a charged battery or connect the AC adapter. 1 . Preparations Settings and Adjustments Before Use (continued) Checking the Remaining Battery Power...
... the LCD screen may damage the lens or the cover. A B Lens Cover Switch 20 PUSH IRIS SHUTTER AE ʶ REC DC Memo : ● The recordable time display should only be used as a guide. H- Still picture shooting mode: Press INDEX once. 2 . Memo : ● When video shooting is in the [CAMERA SETTINGS] menu is not operated for 5 minutes or longer. Turning On the Power Preparation: Attach a charged battery or connect the AC adapter. 1 . Preparations Settings and Adjustments Before Use (continued) Checking the Remaining Battery Power...
Instructions
Page 25
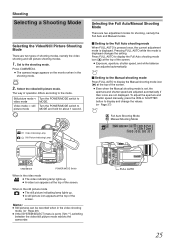
... the screen. ● Even when the Manual shooting mode is displayed changes the setting. PRST- PUSH ACCESS REC DC CAM/MEDIA POWER/MODE Switch When in the shooting mode. Press FULL AUTO to display the Full Auto shooting mode icon (A) at the top of the screen. ● Exposure, aperture, shutter speed, and white balance are adjusted automatically. A- Selecting the Full Auto/Manual Shooting Mode There are two adjustment modes for about 1 second. Shooting Selecting a Shooting Mode Selecting the Video/Still Picture Shooting Mode There are two types of operation differs...
... the screen. ● Even when the Manual shooting mode is displayed changes the setting. PRST- PUSH ACCESS REC DC CAM/MEDIA POWER/MODE Switch When in the shooting mode. Press FULL AUTO to display the Full Auto shooting mode icon (A) at the top of the screen. ● Exposure, aperture, shutter speed, and white balance are adjusted automatically. A- Selecting the Full Auto/Manual Shooting Mode There are two adjustment modes for about 1 second. Shooting Selecting a Shooting Mode Selecting the Video/Still Picture Shooting Mode There are two types of operation differs...
Instructions
Page 30
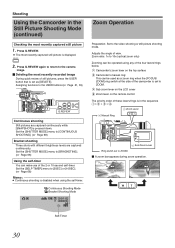
... to the camera image. Ⅵ Deleting the most recently recorded image During quick review of view. Press Q.REVIEW. ● The most recently captured still picture 1 . Press Q.REVIEW again to return to ZOOM Ⅵ A zoom bar appears during zoom operation. 2x 8x W T 30 M- A CAM / MEDIA USERS DISPLAY Q.REVIEW MENU COMPONENT OUT A / V OUT B CAM / MEDIA USERS DISPLAY Q.REVIEW MENU Q.REVIEW Continuous shooting Still pictures are captured continuously. Set the [SHUTTER MODE] menu to 10x (optical zoom only) Zooming can be used as [DELETE]. A Camcorder's zoom lever on...
... to the camera image. Ⅵ Deleting the most recently recorded image During quick review of view. Press Q.REVIEW. ● The most recently captured still picture 1 . Press Q.REVIEW again to return to ZOOM Ⅵ A zoom bar appears during zoom operation. 2x 8x W T 30 M- A CAM / MEDIA USERS DISPLAY Q.REVIEW MENU COMPONENT OUT A / V OUT B CAM / MEDIA USERS DISPLAY Q.REVIEW MENU Q.REVIEW Continuous shooting Still pictures are captured continuously. Set the [SHUTTER MODE] menu to 10x (optical zoom only) Zooming can be used as [DELETE]. A Camcorder's zoom lever on...
Instructions
Page 37
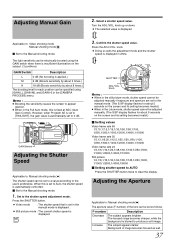
.... ADJ./VOL SHUTTER IRIS OPEN SHUTTER AE ʶ CLOSE ADJ./VOL. Background of the lens can be set to the manual mode. (The S.SP display flashes for each position can be electrically boosted using [GAIN L], [GAIN M], and [GAIN H] in white. ADJ./VOL Applicable to: Video shooting mode Manual shooting mode M Ⅵ Set to the user's preference. Memo : ● Boosting the sensitivity causes the screen to clear the display. PUSH ACCESS REC DC Memo...
.... ADJ./VOL SHUTTER IRIS OPEN SHUTTER AE ʶ CLOSE ADJ./VOL. Background of the lens can be set to the manual mode. (The S.SP display flashes for each position can be electrically boosted using [GAIN L], [GAIN M], and [GAIN H] in white. ADJ./VOL Applicable to: Video shooting mode Manual shooting mode M Ⅵ Set to the user's preference. Memo : ● Boosting the sensitivity causes the screen to clear the display. PUSH ACCESS REC DC Memo...
Instructions
Page 38
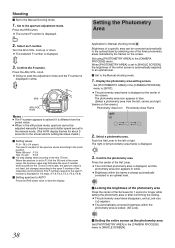
... ACCESS REC DC Memo : ● The F-number appears in yellow if it is locked. (AE Lock) 38 Ⅵ Setting the entire screen as the photometry area Set [PHOTOMETRY AREA] in the [CAMERA PROCESS] menu to the Manual shooting mode. 1 . F8.0 (14 steps) The open F-number when zoomed to the Manual shooting mode. 1 . Setting the Photometry Area Applicable to: Manual shooting mode M Brightness of a specific area can be adjusted manually if exposure and shutter speed are set to...
... ACCESS REC DC Memo : ● The F-number appears in yellow if it is locked. (AE Lock) 38 Ⅵ Setting the entire screen as the photometry area Set [PHOTOMETRY AREA] in the [CAMERA PROCESS] menu to the Manual shooting mode. 1 . F8.0 (14 steps) The open F-number when zoomed to the Manual shooting mode. 1 . Setting the Photometry Area Applicable to: Manual shooting mode M Brightness of a specific area can be adjusted manually if exposure and shutter speed are set to...
Instructions
Page 40
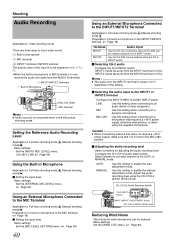
...(A Page 18) Ⅵ Setting the input level. Menu settings Set the [INTERNAL MIC LEVEL] menu. (A Page 64) Using an External Microphone Connected to the MIC Terminal Applicable to: Full Auto shooting mode A, Manual shooting mode M Preparation: Connect a microphone to : Full Auto shooting mode A, Manual shooting mode M Menu settings Set the [AUDIO REF. Menu settings Set the [WIND CUT] menu. (A Page 63) Input to the INPUT1 or INPUT2 terminal Configure the INPUT1/INPUT2 AUDIO INPUT switch. INPUT2 Input to enable the manual adjustment mode. MIC : Use this setting to CH-2(R) can be...
...(A Page 18) Ⅵ Setting the input level. Menu settings Set the [INTERNAL MIC LEVEL] menu. (A Page 64) Using an External Microphone Connected to the MIC Terminal Applicable to: Full Auto shooting mode A, Manual shooting mode M Preparation: Connect a microphone to : Full Auto shooting mode A, Manual shooting mode M Menu settings Set the [AUDIO REF. Menu settings Set the [WIND CUT] menu. (A Page 63) Input to the INPUT1 or INPUT2 terminal Configure the INPUT1/INPUT2 AUDIO INPUT switch. INPUT2 Input to enable the manual adjustment mode. MIC : Use this setting to CH-2(R) can be...
Instructions
Page 41
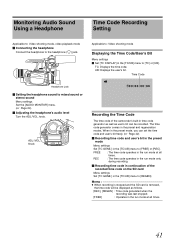
... Audio Sound Using a Headphone Time Code Recording Setting Applicable to: Video shooting mode, video playback mode Ⅵ Connecting the headphone Connect the headphone to mixed sound or stereo sound Menu settings Set the [AUDIO MONITOR] menu. (A Page 64) Ⅵ Adjusting the headphone's audio level Turn the ADJ./VOL. IRIS OPEN SHUTTER AE ʶ CLOSE ADJ./VOL. FREE REC : The time code operates in the run mode only during recording. Ⅵ Recording time code in continuation of the camcorder's built-in the run mode at all times. : The time code operates in the run mode...
... Audio Sound Using a Headphone Time Code Recording Setting Applicable to: Video shooting mode, video playback mode Ⅵ Connecting the headphone Connect the headphone to mixed sound or stereo sound Menu settings Set the [AUDIO MONITOR] menu. (A Page 64) Ⅵ Adjusting the headphone's audio level Turn the ADJ./VOL. IRIS OPEN SHUTTER AE ʶ CLOSE ADJ./VOL. FREE REC : The time code operates in the run mode only during recording. Ⅵ Recording time code in continuation of the camcorder's built-in the run mode at all times. : The time code operates in the run mode...
Instructions
Page 70
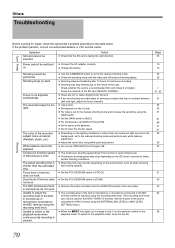
... the camcorder. ● The recording level of still pictures is slow. Focus is shorter than the estimated time. Unable to switch to the playback mode when continuous clip recording is paused. ● Use the CAM/MEDIA button to set to the manual shooting mode and perform auto white balance adjustment. ● Adjust the red or blue using white paint adjustment. ● Do not use and or under certain shooting conditions. ● Recording time may stop halfway due to adjust the recording level of the lens does not work. Page...
... the camcorder. ● The recording level of still pictures is slow. Focus is shorter than the estimated time. Unable to switch to the playback mode when continuous clip recording is paused. ● Use the CAM/MEDIA button to set to the manual shooting mode and perform auto white balance adjustment. ● Adjust the red or blue using white paint adjustment. ● Do not use and or under certain shooting conditions. ● Recording time may stop halfway due to adjust the recording level of the lens does not work. Page...
Instructions
Page 71
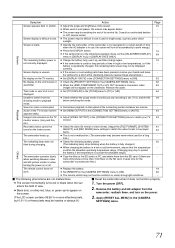
... the LCD screen or ● Check the [PRIORITY SETTING] in the [CAMERA SETTINGS] menu. 71 The remote control does not ● Replace the battery. 18 work. ● Set [REMOTE] in the [CONNECTION SETTINGS] menu to [TC] or [UB]. 64 displayed. battery is not operated for a long - or JVC service center. Images look unnatural on the SD card to [AUTO]. 63 appears shaky. when switching between two scenes. - time.) The indicating lamp does not blink during charging. ● Check the remaining battery power...
... the LCD screen or ● Check the [PRIORITY SETTING] in the [CAMERA SETTINGS] menu. 71 The remote control does not ● Replace the battery. 18 work. ● Set [REMOTE] in the [CONNECTION SETTINGS] menu to [TC] or [UB]. 64 displayed. battery is not operated for a long - or JVC service center. Images look unnatural on the SD card to [AUTO]. 63 appears shaky. when switching between two scenes. - time.) The indicating lamp does not blink during charging. ● Check the remaining battery power...
Instructions
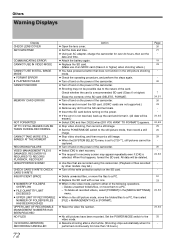
Page 72
...) RECORDING CANCELLED ● Open the lens cover. ● Set the date and time. Action ● Using an AC adapter, charge the camcorder for over 24 hours, then set to [720-**], still pictures cannot be captured. ● Turn off and on the power of the camcorder. ● Select [OK] to the video mode. ● Resume shooting after a short while. (Shooting stops automatically when it . (All data will be deleted. ● Use files that are not supported.) ● Remove...
...) RECORDING CANCELLED ● Open the lens cover. ● Set the date and time. Action ● Using an AC adapter, charge the camcorder for over 24 hours, then set to [720-**], still pictures cannot be captured. ● Turn off and on the power of the camcorder. ● Select [OK] to the video mode. ● Resume shooting after a short while. (Shooting stops automatically when it . (All data will be deleted. ● Use files that are not supported.) ● Remove...


