

Instructions
Page 4
...as audio input terminals for MP4 file format enables the video files to be used widely in different environments. Ⅵ SD card recording This camcorder comes with an HDMI terminal, a component terminal, and an A/V OUT (video/audio output) terminal, which can be used by switching automatically...stored on an SD card, and also playback of these videos or still pictures. Ⅵ Supports various HD video recording formats (1080i, 1080p, and 720p) Shooting can be performed in different HD recording modes, thus supporting a wide variety of compatibility with shooting conditions that change ...
...as audio input terminals for MP4 file format enables the video files to be used widely in different environments. Ⅵ SD card recording This camcorder comes with an HDMI terminal, a component terminal, and an A/V OUT (video/audio output) terminal, which can be used by switching automatically...stored on an SD card, and also playback of these videos or still pictures. Ⅵ Supports various HD video recording formats (1080i, 1080p, and 720p) Shooting can be performed in different HD recording modes, thus supporting a wide variety of compatibility with shooting conditions that change ...
Instructions
Page 5
...25 Selecting the Video/Still Picture Shooting Mode . . . . . 25 Selecting the Full Auto/Manual Shooting Mode 25 Selecting a Focusing Mode 26 Using the Camcorder in the Video Shooting Mode . . . . . 26 Setting the Video Format 26 Displaying the Remaining Space on the SD Card . . . . ... Videos 27 Capturing Still Pictures in the Video Shooting Mode 28 Recording Multiple Clips as a Continuous File . . . . . .28 Using the Camcorder in the Still Picture Shooting Mode 29 Setting the Picture Quality, Recording Size, and Sensitivity 29 Capturing Still Pictures 29 Zoom Operation 30 Adjusting the...
...25 Selecting the Video/Still Picture Shooting Mode . . . . . 25 Selecting the Full Auto/Manual Shooting Mode 25 Selecting a Focusing Mode 26 Using the Camcorder in the Video Shooting Mode . . . . . 26 Setting the Video Format 26 Displaying the Remaining Space on the SD Card . . . . ... Videos 27 Capturing Still Pictures in the Video Shooting Mode 28 Recording Multiple Clips as a Continuous File . . . . . .28 Using the Camcorder in the Still Picture Shooting Mode 29 Setting the Picture Quality, Recording Size, and Sensitivity 29 Capturing Still Pictures 29 Zoom Operation 30 Adjusting the...
Instructions
Page 6
Memo : Describes reference information, such as functions and usage restrictions of this camcorder is intended for private consumer use only. Any commercial use this manual Ⅵ Symbols used in this manual are trademarks or registered ... ● Illustrated designs, specifications and other product names used Caution : Describes precautions concerning the operation of this manual ● All rights reserved by JVC. Getting Started Contents (continued) Playing Still Pictures on the SD Card 48 Viewing Still Pictures in a Slideshow 48 Returning to the Still Picture Index ...
Memo : Describes reference information, such as functions and usage restrictions of this camcorder is intended for private consumer use only. Any commercial use this manual Ⅵ Symbols used in this manual are trademarks or registered ... ● Illustrated designs, specifications and other product names used Caution : Describes precautions concerning the operation of this manual ● All rights reserved by JVC. Getting Started Contents (continued) Playing Still Pictures on the SD Card 48 Viewing Still Pictures in a Slideshow 48 Returning to the Still Picture Index ...
Instructions
Page 7
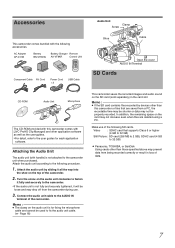
... following accessories. Memo : ● If the SD card contains files recorded by sliding it will be used to the camcorder unit when purchased. Accessories This camcorder comes bundled with [JVC ProHD Clip Manager] and other application software as well as the user guides. Make use . 3 . AC Adapter AP... detail, refer to the user guides for fixing the microphone cable and cannot be loose and may prevent data from the camcorder during use of the camcorder. 2 . Attach the audio unit by devices other than those specified above may drop off from being recorded correctly or result...
... following accessories. Memo : ● If the SD card contains files recorded by sliding it will be used to the camcorder unit when purchased. Accessories This camcorder comes bundled with [JVC ProHD Clip Manager] and other application software as well as the user guides. Make use . 3 . AC Adapter AP... detail, refer to the user guides for fixing the microphone cable and cannot be loose and may prevent data from the camcorder during use of the camcorder. 2 . Attach the audio unit by devices other than those specified above may drop off from being recorded correctly or result...
Instructions
Page 8
... the lens or viewfinder may explode if it is not a camera malfunction. Ⅵ Noise may not show stable pictures for transportation ● When carrying the camcorder, be sure to strong vibrations or unstable surfaces ● In a parked car under direct sunlight or near the camera during access. Do not wipe the...
... the lens or viewfinder may explode if it is not a camera malfunction. Ⅵ Noise may not show stable pictures for transportation ● When carrying the camcorder, be sure to strong vibrations or unstable surfaces ● In a parked car under direct sunlight or near the camera during access. Do not wipe the...
Instructions
Page 9
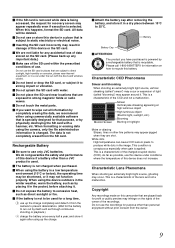
...the camera to prevent deterioration. (Wait for the battery to produce white dots in highlight Moire or aliasing Stripes, lines or other than a JVC product is used for a long time, A use this device under the sun with the doors and windows closed. Ⅵ Do not bend...near thermal equipment, or in a car under conditions where the temperature of this happens, format the SD card. Copyright Any recordings made on this camcorder that is recyclable. This is applied. This is a characteristic of the charged-coupled device (CCD). This is a characteristic of the lens and not...
...the camera to prevent deterioration. (Wait for the battery to produce white dots in highlight Moire or aliasing Stripes, lines or other than a JVC product is used for a long time, A use this device under the sun with the doors and windows closed. Ⅵ Do not bend...near thermal equipment, or in a car under conditions where the temperature of this happens, format the SD card. Copyright Any recordings made on this camcorder that is recyclable. This is applied. This is a characteristic of the charged-coupled device (CCD). This is a characteristic of the lens and not...

Instructions
Page 12
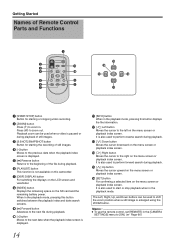
... for Program AE selection and as the zooming lever. (A Page 32) When in the menu setting can be assigned to the user's preference. Press this camcorder to exit the menu screen. I [DISPLAY] Display button For switching the displays on the SD card (A Page 27) and the remaining battery power (A Page... specific feature in the playback mode, this lever is used for menu setting. (A Page 57) Bottom N Tripod mounting holes (A Page 18) ● To prevent the camcorder from falling, attach securely using the rotation prevention hole. ● Use screws with screw length 5 mm and below. 12
... for Program AE selection and as the zooming lever. (A Page 32) When in the menu setting can be assigned to the user's preference. Press this camcorder to exit the menu screen. I [DISPLAY] Display button For switching the displays on the SD card (A Page 27) and the remaining battery power (A Page... specific feature in the playback mode, this lever is used for menu setting. (A Page 57) Bottom N Tripod mounting holes (A Page 18) ● To prevent the camcorder from falling, attach securely using the rotation prevention hole. ● Use screws with screw length 5 mm and below. 12
Instructions
Page 14
... card and the remaining battery power. When in . B [ZOOM] button Press (T) to [ON]. (A Page 66) 14 K [INFO] button When in the playback mode, pressing this camcorder. F [PLAYLIST] button This function is displayed. Press (W) to the beginning of still images. E [/] Reverse button Returns to zoom out. H [INDEX] button Displays the remaining space...
... card and the remaining battery power. When in . B [ZOOM] button Press (T) to [ON]. (A Page 66) 14 K [INFO] button When in the playback mode, pressing this camcorder. F [PLAYLIST] button This function is displayed. Press (W) to the beginning of still images. E [/] Reverse button Returns to zoom out. H [INDEX] button Displays the remaining space...
Instructions
Page 15
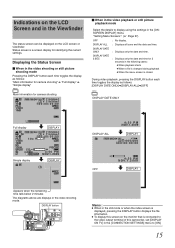
... : ● When in the still mode or when the index screen is displayed, pressing the DISPLAY button displays the file information. ● To display this camcorder, set [DISPLAY ON TV] in the [CONNECTION SETTINGS] menu to [ON]. 15 Indications on the LCD Screen and in the Viewfinder The status screen can...
... : ● When in the still mode or when the index screen is displayed, pressing the DISPLAY button displays the file information. ● To display this camcorder, set [DISPLAY ON TV] in the [CONNECTION SETTINGS] menu to [ON]. 15 Indications on the LCD Screen and in the Viewfinder The status screen can...
Instructions
Page 18
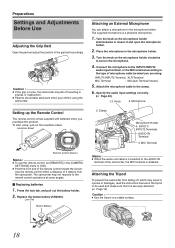
...Terminal 4. Preparations Settings and Adjustments Before Use Adjusting the Grip Belt Open the pad and adjust the position of the camcorder, the MIC terminal is using the camcorder. Use the remote control within a distance of 5 meters from falling off resulting in injuries or damages, read the...of the remote control toward the sensor. Attach the microphone cable to the microphone holder. Caution : ● If the grip is loose, the camcorder may fall off , which may not respond to secure the microphone. 4 . Lock Tab Button Battery Attaching an External Microphone You can attach ...
...Terminal 4. Preparations Settings and Adjustments Before Use Adjusting the Grip Belt Open the pad and adjust the position of the camcorder, the MIC terminal is using the camcorder. Use the remote control within a distance of 5 meters from falling off resulting in injuries or damages, read the...of the remote control toward the sensor. Attach the microphone cable to the microphone holder. Caution : ● If the grip is loose, the camcorder may fall off , which may not respond to secure the microphone. 4 . Lock Tab Button Battery Attaching an External Microphone You can attach ...
Instructions
Page 19
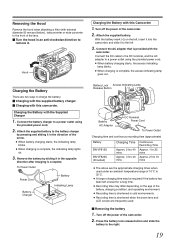
... Hood Remove the hood when attaching a filter (with external diameter 50 mm and below), teleconverter or wide converter to the front of the camcorder. 2 . Remove the battery by pressing and sliding it to the right. 19 Turn off the power of the battery, charging condition, ... out. Connect the battery charger to charge the battery. Ⅵ Charging with the supplied battery charger. Ⅵ Charging with the camcorder. To Power Outlet Power Cord Battery Charger Battery Indicating Lamp Battery Lock Access Indicating Lamp Release Button AUDOIOPEINN MIC Battery AC Adapter DC ...
... Hood Remove the hood when attaching a filter (with external diameter 50 mm and below), teleconverter or wide converter to the front of the camcorder. 2 . Remove the battery by pressing and sliding it to the right. 19 Turn off the power of the battery, charging condition, ... out. Connect the battery charger to charge the battery. Ⅵ Charging with the supplied battery charger. Ⅵ Charging with the camcorder. To Power Outlet Power Cord Battery Charger Battery Indicating Lamp Battery Lock Access Indicating Lamp Release Button AUDOIOPEINN MIC Battery AC Adapter DC ...
Instructions
Page 20
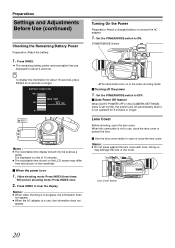
...differ from that shown on 1 . A B Lens Cover Switch 20 Turning On the Power Preparation: Attach a charged battery or connect the AC adapter. 1 . When this camcorder is on the viewfinder. Ⅵ When the power is not in the [CAMERA SETTINGS] menu is not operated for 5 minutes or longer. Memo : ● Do.... It is in the video shooting mode. Ⅵ Turning off automatically when it is set to ON. POWER/MODE Switch MIC ●The camcorder turns on the LCD screen may damage the lens or the cover. Press INDEX to open the lens cover. Video shooting mode: Press INDEX three...
...differ from that shown on 1 . A B Lens Cover Switch 20 Turning On the Power Preparation: Attach a charged battery or connect the AC adapter. 1 . When this camcorder is on the viewfinder. Ⅵ When the power is not in the [CAMERA SETTINGS] menu is not operated for 5 minutes or longer. Memo : ● Do.... It is in the video shooting mode. Ⅵ Turning off automatically when it is set to ON. POWER/MODE Switch MIC ●The camcorder turns on the LCD screen may damage the lens or the cover. Press INDEX to open the lens cover. Video shooting mode: Press INDEX three...

Instructions
Page 21
...!B message will appear every time you turn on the power. ● You can be assigned to each USER button according to the USER Buttons This camcorder comes with three USER buttons. Push the Set Lever up or down to select, then press the center. 5 . CLOCK ADJUST DATE TIME NOV 10 2009...
...!B message will appear every time you turn on the power. ● You can be assigned to each USER button according to the USER Buttons This camcorder comes with three USER buttons. Push the Set Lever up or down to select, then press the center. 5 . CLOCK ADJUST DATE TIME NOV 10 2009...
Instructions
Page 22
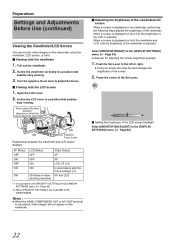
... to a position that enables easy viewing. Preparations Settings and Adjustments Before Use (continued) Viewing the Viewfinder/LCD Screen You can monitor video images on this camcorder using the viewfinder, LCD screen, or both the viewfinder and LCD, only the brightness of the viewfinder is adjusted. Pull out the viewfinder. 2 .
... to a position that enables easy viewing. Preparations Settings and Adjustments Before Use (continued) Viewing the Viewfinder/LCD Screen You can monitor video images on this camcorder using the viewfinder, LCD screen, or both the viewfinder and LCD, only the brightness of the viewfinder is adjusted. Pull out the viewfinder. 2 .
Instructions
Page 23
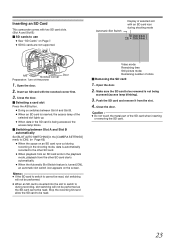
... to switch to be read . Caution : ● Do not touch the metal part of shots Ⅵ Removing the SD card 1 . Inserting an SD Card This camcorder comes with an SD card icon during shooting mode A [5h36m] B [5h36m] A/B Door Notched Corner Preparation: Turn off the power. 1 . Insert an SD card with the...
... to switch to be read . Caution : ● Do not touch the metal part of shots Ⅵ Removing the SD card 1 . Inserting an SD Card This camcorder comes with an SD card icon during shooting mode A [5h36m] B [5h36m] A/B Door Notched Corner Preparation: Turn off the power. 1 . Insert an SD card with the...
Instructions
Page 24
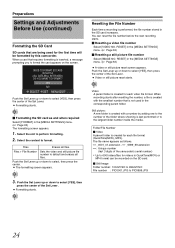
...is created for each file format (QuickTime(MOV), MP4). Push the Set Lever up or down to select [YES], then press the center of the camcorder's serial number) T Up to select [YES], then press the center of the Set Lever. ● Formatting starts. Ⅵ Formatting the SD card... Resetting a video file number Select [VIDEO NO. Still picture: A new folder is created with the smallest number that is created with a number by this camcorder. The file name appears as and when required Select [FORMAT] in the [MEDIA SETTINGS] menu. (A Page 63) ● A video or still picture ...
...is created for each file format (QuickTime(MOV), MP4). Push the Set Lever up or down to select [YES], then press the center of the camcorder's serial number) T Up to select [YES], then press the center of the Set Lever. ● Formatting starts. Ⅵ Formatting the SD card... Resetting a video file number Select [VIDEO NO. Still picture: A new folder is created with the smallest number that is created with a number by this camcorder. The file name appears as and when required Select [FORMAT] in the [MEDIA SETTINGS] menu. (A Page 63) ● A video or still picture ...
Instructions
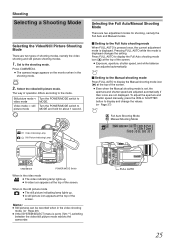
Page 25
... the video shooting mode. (A Page 28) ● If the [SYSTEM SELECT] menu is set to [720-**], switching between the video/still picture mode reboots the camcorder. To adjust the aperture and shutter speed manually, press the IRIS or SHUTTER button to video mode MODE. Memo : ● Still pictures can be recorded...
... the video shooting mode. (A Page 28) ● If the [SYSTEM SELECT] menu is set to [720-**], switching between the video/still picture mode reboots the camcorder. To adjust the aperture and shutter speed manually, press the IRIS or SHUTTER button to video mode MODE. Memo : ● Still pictures can be recorded...
Instructions
Page 26
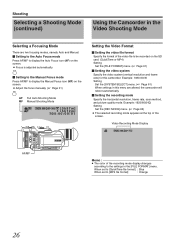
... the Manual Focus mode Press AF/MF to the settings in the Video Shooting Mode Selecting a Focusing Mode There are altered, the camcorder will reboot automatically. Ⅵ Setting the recording mode Specify the horizontal resolution, frame rate, scan method, and picture quality mode. PRST...- B- Video Recording Mode Display Memo : ● The color of the screen. A- H- Shooting Selecting a Shooting Mode (continued) Using the Camcorder in the [FILE FORMAT] menu. Example: 1920/60i(HQ) Setting Set the [REC MODE] menu. (A Page 62) ● The selected recording ...
... the Manual Focus mode Press AF/MF to the settings in the Video Shooting Mode Selecting a Focusing Mode There are altered, the camcorder will reboot automatically. Ⅵ Setting the recording mode Specify the horizontal resolution, frame rate, scan method, and picture quality mode. PRST...- B- Video Recording Mode Display Memo : ● The color of the screen. A- H- Shooting Selecting a Shooting Mode (continued) Using the Camcorder in the [FILE FORMAT] menu. Example: 1920/60i(HQ) Setting Set the [REC MODE] menu. (A Page 62) ● The selected recording ...
Instructions
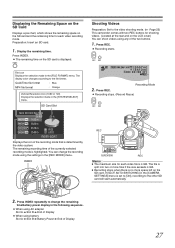
Page 27
... set to [ON], recording to the other SD card will start automatically. 2 . The display color changes according to the video shooting mode. (A Page 25) This camcorder comes with two REC buttons for each video file is no more files if the size exceeds 4 GB. ● Recording stops when there is 4 GB...
... set to [ON], recording to the other SD card will start automatically. 2 . The display color changes according to the video shooting mode. (A Page 25) This camcorder comes with two REC buttons for each video file is no more files if the size exceeds 4 GB. ● Recording stops when there is 4 GB...
Instructions
Page 28
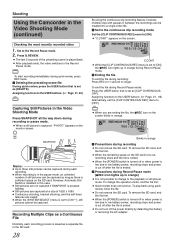
... low battery power, recording stops and power is cut off the power directly by detaching the battery or removing the AC adapter. Shooting Using the Camcorder in this case. ● Still pictures are not captured if SNAPSHOT is pressed halfway. ● Still pictures are captured at a size of 1920 x 1080. ●...
... low battery power, recording stops and power is cut off the power directly by detaching the battery or removing the AC adapter. Shooting Using the Camcorder in this case. ● Still pictures are not captured if SNAPSHOT is pressed halfway. ● Still pictures are captured at a size of 1920 x 1080. ●...


