
Instruction Manual
Page 12
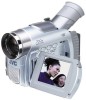
Open the LCD monitor and tilt it upward 180° so that it can also turn on the tape to a computer (GR-D50 only). OFF (CHARGE): Allows you to transfer still/moving images recorded on /off the camcorder. NOTES: ● Focusing may suffer. ● Macro shooting (as close as approx. 5 ...image in image magnification. Zooming To produce the zoom in/out effect, or an instantaneous change in the LCD monitor. finder. It can shoot yourself while viewing your preference using the manual focus (੬ pg. 19), then zoom in or out in the view- Power Switch Position : ...
Open the LCD monitor and tilt it upward 180° so that it can also turn on the tape to a computer (GR-D50 only). OFF (CHARGE): Allows you to transfer still/moving images recorded on /off the camcorder. NOTES: ● Focusing may suffer. ● Macro shooting (as close as approx. 5 ...image in image magnification. Zooming To produce the zoom in/out effect, or an instantaneous change in the LCD monitor. finder. It can shoot yourself while viewing your preference using the manual focus (੬ pg. 19), then zoom in or out in the view- Power Switch Position : ...

Instruction Manual
Page 15
...LCD", "LCD/TV" or "OFF" in the illustration. NOTES: ● It is recommended to use the AC Adapter as the power supply instead of the battery pack (੬ pg. 7). ● To monitor the picture and sound from the camcorder without inserting a tape, set the camcorder's Power Switch y to " " or " ", then set your VCR's instruction manual.... 4 Turn on the camcorder, the VCR and the TV. 5 Set the VCR to its AUX input mode, and set "TIME CODE" to the AV connector, sound cannot be heard from the TV, set "S/AV INPUT" to "OFF" in the Menu Screen (GR-D50 only, ੬...
...LCD", "LCD/TV" or "OFF" in the illustration. NOTES: ● It is recommended to use the AC Adapter as the power supply instead of the battery pack (੬ pg. 7). ● To monitor the picture and sound from the camcorder without inserting a tape, set the camcorder's Power Switch y to " " or " ", then set your VCR's instruction manual.... 4 Turn on the camcorder, the VCR and the TV. 5 Set the VCR to its AUX input mode, and set "TIME CODE" to the AV connector, sound cannot be heard from the TV, set "S/AV INPUT" to "OFF" in the Menu Screen (GR-D50 only, ੬...

Instruction Manual
Page 33
... only). ● Refer to the instruction manuals of the PC and Software. ● The still images can also be transferred to a PC with a DV connector-equipped capture board. ● When using a DV cable, be sure to use the optional JVC VC-VDV206U or VC-VDV204U DV cable depending ... connect the USB cable and the DV cable simultaneously to the camcorder. Connect only the cable you are using. ● When using software equipped with DV connector GR-D50 only: "ACCESSING FILES" appears on the LCD monitor since this camcorder as the power supply instead of your capture board for driver's...
... only). ● Refer to the instruction manuals of the PC and Software. ● The still images can also be transferred to a PC with a DV connector-equipped capture board. ● When using a DV cable, be sure to use the optional JVC VC-VDV206U or VC-VDV204U DV cable depending ... connect the USB cable and the DV cable simultaneously to the camcorder. Connect only the cable you are using. ● When using software equipped with DV connector GR-D50 only: "ACCESSING FILES" appears on the LCD monitor since this camcorder as the power supply instead of your capture board for driver's...


