Instruction Manual
Page 1
DIGITAL VIDEO CAMERA GR-DVF31 Please visit our CyberCam Homepage on the bottom of cabinet. ENGLISH CONTENTS SAFETY PRECAUTIONS 2 - 5 PROVIDED ACCESSORIES 5 GETTING STARTED 6 - 11 Power 6 Date/Time Settings 8 Loading/Unloading A ... SPECIFICATIONS 63 EN LYT0420-001B Serial No. Retain this information for future reference. and Serial No. which is located on the World Wide Web and answer our Consumer Survey (in English only): http://www.jvc-victor.co.jp/english/index-e.html INSTRUCTIONS For Customer Use: Enter below the Model No. Model No.
DIGITAL VIDEO CAMERA GR-DVF31 Please visit our CyberCam Homepage on the bottom of cabinet. ENGLISH CONTENTS SAFETY PRECAUTIONS 2 - 5 PROVIDED ACCESSORIES 5 GETTING STARTED 6 - 11 Power 6 Date/Time Settings 8 Loading/Unloading A ... SPECIFICATIONS 63 EN LYT0420-001B Serial No. Retain this information for future reference. and Serial No. which is located on the World Wide Web and answer our Consumer Survey (in English only): http://www.jvc-victor.co.jp/english/index-e.html INSTRUCTIONS For Customer Use: Enter below the Model No. Model No.
Instruction Manual
Page 2
... well. •Basic and advanced features/operation are separated for easier reference. NO USER-SERVICEABLE PARTS INSIDE. use . You are listed in this digital video camera. ATTENTION (s'applique à l'AA-V20U) POUR ÉVITER LES CHOCS ÉLECTRIQUES, INTRODUIRE LA LAME LA PLUS LARGE DE LA FICHE DANS LA BORNE CORRESPONDANTE...
... well. •Basic and advanced features/operation are separated for easier reference. NO USER-SERVICEABLE PARTS INSIDE. use . You are listed in this digital video camera. ATTENTION (s'applique à l'AA-V20U) POUR ÉVITER LES CHOCS ÉLECTRIQUES, INTRODUIRE LA LAME LA PLUS LARGE DE LA FICHE DANS LA BORNE CORRESPONDANTE...
Instruction Manual
Page 11
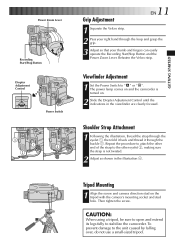
...clearly focused. Viewfinder Adjustment 1 Set the Power Switch to the other eyelet 3, making sure the strap is turned on the tripod with the camera's mounting socket and stud hole. Repeat the procedure to attach the other end of the strap to " " or " ". GETTING STARTED... your thumb and fingers can easily operate the Recording Start/Stop Button and the Power Zoom Lever. Tripod Mounting 1 Align the screw and camera direction stud on . 2 Slide the Diopter Adjustment Control until the indications in the illustration 4. Shoulder Strap Attachment 1 Following the illustration, thread...
...clearly focused. Viewfinder Adjustment 1 Set the Power Switch to the other eyelet 3, making sure the strap is turned on the tripod with the camera's mounting socket and stud hole. Repeat the procedure to attach the other end of the strap to " " or " ". GETTING STARTED... your thumb and fingers can easily operate the Recording Start/Stop Button and the Power Zoom Lever. Tripod Mounting 1 Align the screw and camera direction stud on . 2 Slide the Diopter Adjustment Control until the indications in the illustration 4. Shoulder Strap Attachment 1 Following the illustration, thread...
Instruction Manual
Page 17
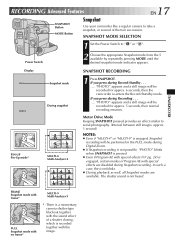
...,e,*,,,, Snapshot mode with no frame* Snapshot mode During snapshot MULTI-4 Multi-Analyzer 4 MULTI-9 Multi-Analyzer 9 * :There is a momentary camera shutter-type blackout together with the sound effect of Program AE with special effects are available. RECORDING Advanced Features EN17 SNAPSHOT Button MODE Button ...Snapshot Use your camcorder like a regular camera to take a snapshot, or several of them in the FULL mode during Digital Zoom. ● If Snapshot recording is not ...
...,e,*,,,, Snapshot mode with no frame* Snapshot mode During snapshot MULTI-4 Multi-Analyzer 4 MULTI-9 Multi-Analyzer 9 * :There is a momentary camera shutter-type blackout together with the sound effect of Program AE with special effects are available. RECORDING Advanced Features EN17 SNAPSHOT Button MODE Button ...Snapshot Use your camcorder like a regular camera to take a snapshot, or several of them in the FULL mode during Digital Zoom. ● If Snapshot recording is not ...
Instruction Manual
Page 19
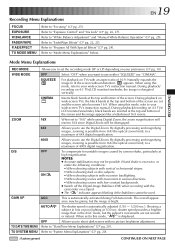
... at the top and bottom of the screen and the image appears like a letterboxed 16:9 movie. DIS OFF To compensate for unstable images caused by camera-shake, particularly at the top and bottom of 400X digital magnification. GAIN UP AGC This is possible from 16X (the optical zoom limit), to 16X...
... at the top and bottom of the screen and the image appears like a letterboxed 16:9 movie. DIS OFF To compensate for unstable images caused by camera-shake, particularly at the top and bottom of 400X digital magnification. GAIN UP AGC This is possible from 16X (the optical zoom limit), to 16X...
Instruction Manual
Page 39
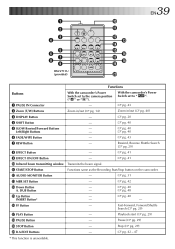
... Connector 2 Zoom (T/W) Buttons 3 DISPLAY Button 4 SHIFT Button 5 SLOW Rewind/Forward Buttons Left/Right Buttons 6 FADE/WIPE Button With the camcorder's Power Switch set to the camera position (" " or " "). - With the camcorder's Power Switch set to " ". ੬ pg. 43 Zoom in /out (੬ pg. 14) - - - - - Stop (੬ pg. 29) - ੬ pg. 42...
... Connector 2 Zoom (T/W) Buttons 3 DISPLAY Button 4 SHIFT Button 5 SLOW Rewind/Forward Buttons Left/Right Buttons 6 FADE/WIPE Button With the camcorder's Power Switch set to the camera position (" " or " "). - With the camcorder's Power Switch set to " ". ੬ pg. 43 Zoom in /out (੬ pg. 14) - - - - - Stop (੬ pg. 29) - ੬ pg. 42...
Instruction Manual
Page 59
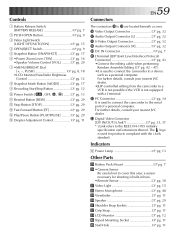
... r Power Lamp pg. 13 Other Parts t Battery Pack Mount pg. 7 y •Camera Sensor Be careful not to a device such as a personal computer. For further details, consult your nearest JVC dealer. a sensor necessary for products compliant with a J terminal. For further details, consult your... nearest JVC dealer. •JLIP-controlled editing from the camcorder to a VCR is not possible ...
... r Power Lamp pg. 13 Other Parts t Battery Pack Mount pg. 7 y •Camera Sensor Be careful not to a device such as a personal computer. For further details, consult your nearest JVC dealer. a sensor necessary for products compliant with a J terminal. For further details, consult your... nearest JVC dealer. •JLIP-controlled editing from the camcorder to a VCR is not possible ...


