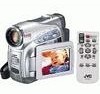
Instruction Manual
Page 5
...Still Playback 20 Shuttle Search 21 Blank Search 21 Connections To A TV Or VCR 22 Playback Using The Remote Control (GR-D290 only 23 DIGITAL STILL CAMERA (D.S.C.) RECORDING & PLAYBACK 25 D.S.C. RECORDING 25 Basic Shooting (D.S.C. PLAYBACK 26 Normal Playback Of Images 26 Auto ...Manual White Balance Adjustment 41 Wipe Or Fader Effects 41 Program AE With Special Effects 42 EDITING 43 Dubbing To A VCR 43 Dubbing To Or From A Video Unit Equipped With A DV Connector (Digital Dubbing 44 Connection To A Personal Computer 45 Audio Dubbing (GR-D290 only 46 Insert Editing (GR-D290...
...Still Playback 20 Shuttle Search 21 Blank Search 21 Connections To A TV Or VCR 22 Playback Using The Remote Control (GR-D290 only 23 DIGITAL STILL CAMERA (D.S.C.) RECORDING & PLAYBACK 25 D.S.C. RECORDING 25 Basic Shooting (D.S.C. PLAYBACK 26 Normal Playback Of Images 26 Auto ...Manual White Balance Adjustment 41 Wipe Or Fader Effects 41 Program AE With Special Effects 42 EDITING 43 Dubbing To A VCR 43 Dubbing To Or From A Video Unit Equipped With A DV Connector (Digital Dubbing 44 Connection To A Personal Computer 45 Audio Dubbing (GR-D290 only 46 Insert Editing (GR-D290...
Instruction Manual
Page 7
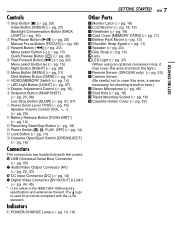
...AV] (੬ pg. 22, 43) R DC Input Connector [DC] (੬ pg. 13) S Digital Video Connector [DV IN/OUT] (i.Link*) (੬ pg. 44, 45) * i.Link refers to cover this area, ...using an optional conversion lens, it may cover this area and block the light.) e Remote Sensor (GR-D290 only) (੬ pg. 23) f Camera Sensor (Be careful not to the IEEE1394-1995 industry ... pg. 27) Backlight Compensation Button [BACK LIGHT] (੬ pg. 40) B Play/Pause Button [4/9] (੬ pg. 20) Manual Focus Button [FOCUS] (੬ pg. 38) C Rewind Button [3] (੬ pg. 20) Menu select Button [-] (੬ ...
...AV] (੬ pg. 22, 43) R DC Input Connector [DC] (੬ pg. 13) S Digital Video Connector [DV IN/OUT] (i.Link*) (੬ pg. 44, 45) * i.Link refers to cover this area, ...using an optional conversion lens, it may cover this area and block the light.) e Remote Sensor (GR-D290 only) (੬ pg. 23) f Camera Sensor (Be careful not to the IEEE1394-1995 industry ... pg. 27) Backlight Compensation Button [BACK LIGHT] (੬ pg. 40) B Play/Pause Button [4/9] (੬ pg. 20) Manual Focus Button [FOCUS] (੬ pg. 38) C Rewind Button [3] (੬ pg. 20) Menu select Button [-] (੬ ...

Instruction Manual
Page 9
... Control Indicator (LCD monitor/ Viewfinder) (੬ pg. 16) L Battery Remaining Power Indicator (੬ pg. 49) M Date/Time (੬ pg. 15) N Manual Focus Adjustment Indicator (੬ pg. 38) During Video Playback 1 2 345 6 12B I T/MI X L MIC BLANK SEARCH PUSH "STOP" BUTTON TO CANCEL 50m VOLUME... Slow-Motion D: Audio Dubbing 9D: Audio Dubbing Pause (Appear while a tape is running.) F Sound Input For Audio Dubbing (੬ pg. 46) (GR-D290 only) G Battery Remaining Power Indicator (੬ pg. 49) H Date/Time (੬ pg. 34, 36) GETTING STARTED EN 9 I GHT 100-0013...
... Control Indicator (LCD monitor/ Viewfinder) (੬ pg. 16) L Battery Remaining Power Indicator (੬ pg. 49) M Date/Time (੬ pg. 15) N Manual Focus Adjustment Indicator (੬ pg. 38) During Video Playback 1 2 345 6 12B I T/MI X L MIC BLANK SEARCH PUSH "STOP" BUTTON TO CANCEL 50m VOLUME... Slow-Motion D: Audio Dubbing 9D: Audio Dubbing Pause (Appear while a tape is running.) F Sound Input For Audio Dubbing (੬ pg. 46) (GR-D290 only) G Battery Remaining Power Indicator (੬ pg. 49) H Date/Time (੬ pg. 34, 36) GETTING STARTED EN 9 I GHT 100-0013...
Instruction Manual
Page 14
...problem with metals, as it is recommended that the camcorder's power is set various recording functions using the Menus. (੬... using NO special effects or manual adjustments. NOTE: The provided AC Adapter features automatic voltage selection in a camcorder malfunction. MENU/DATA Power Switch... is attached and the Power Switch is turned off the camcorder. Do not attempt to take the batteries apart, or ... the display. The "A" indicator appears on the camcorder, set the Power Switch to 240 V. M (Manual Recording): Allows you to display a still image stored...
...problem with metals, as it is recommended that the camcorder's power is set various recording functions using the Menus. (੬... using NO special effects or manual adjustments. NOTE: The provided AC Adapter features automatic voltage selection in a camcorder malfunction. MENU/DATA Power Switch... is attached and the Power Switch is turned off the camcorder. Do not attempt to take the batteries apart, or ... the display. The "A" indicator appears on the camcorder, set the Power Switch to 240 V. M (Manual Recording): Allows you to display a still image stored...

Instruction Manual
Page 15
INFORMATION: The following explanations in this manual supposes the use the viewfinder, close the LCD monitor and pull out the viewfinder fully. If you want to use of LCD monitor in "Language ... desired language, and CAMERA DISPLAY press MENU. 7 Press + or - CLOCK ADJ . Language Settings The language on the display can be turned on or off the camcorder by opening/ closing the LCD monitor or pulling out/pushing in a memory card. ● When the Power Switch is highlighted. 3 Press + or - to select "BRETURN...
INFORMATION: The following explanations in this manual supposes the use the viewfinder, close the LCD monitor and pull out the viewfinder fully. If you want to use of LCD monitor in "Language ... desired language, and CAMERA DISPLAY press MENU. 7 Press + or - CLOCK ADJ . Language Settings The language on the display can be turned on or off the camcorder by opening/ closing the LCD monitor or pulling out/pushing in a memory card. ● When the Power Switch is highlighted. 3 Press + or - to select "BRETURN...

Instruction Manual
Page 16
...Switch + to get caught in the cassette holder, resulting in injury or product damage. ● Once the cassette holder is closed , it manually for best viewability. 3 Turn the Diopter Adjustment Control until the indications in the direction of the viewfinder, pull out the viewfinder fully and set ... appears. touching other parts may cause your fingers. Example: 6 Press + or - Tripod Mounting To attach the camcorder to a tripod, align the direction stud and screw to load or eject a cassette. The camcorder needs to be powered up to the mounting socket and stud hole on the...
...Switch + to get caught in the cassette holder, resulting in injury or product damage. ● Once the cassette holder is closed , it manually for best viewability. 3 Turn the Diopter Adjustment Control until the indications in the direction of the viewfinder, pull out the viewfinder fully and set ... appears. touching other parts may cause your fingers. Example: 6 Press + or - Tripod Mounting To attach the camcorder to a tripod, align the direction stud and screw to load or eject a cassette. The camcorder needs to be powered up to the mounting socket and stud hole on the...

Instruction Manual
Page 19
...the Power Zoom Lever, the quicker the zoom action. Display 10 x W T Digital zoom zone 25X (optical) zoom zone Approximate zoom ratio NOTES: ● Focusing may automatically zoom out depending on the distance between the camcorder and the subject. This will not occur when "TELE MACRO" is set the zoom...cm (2") to the subject) is possible when the Power Zoom Lever is set to "MEMORY". ● Macro shooting (as close as those existing in MANUAL Menu on page 33. ● When shooting a subject close to confirm the location of the recorded scene on the tape during shooting. ● When...
...the Power Zoom Lever, the quicker the zoom action. Display 10 x W T Digital zoom zone 25X (optical) zoom zone Approximate zoom ratio NOTES: ● Focusing may automatically zoom out depending on the distance between the camcorder and the subject. This will not occur when "TELE MACRO" is set the zoom...cm (2") to the subject) is possible when the Power Zoom Lever is set to "MEMORY". ● Macro shooting (as close as those existing in MANUAL Menu on page 33. ● When shooting a subject close to confirm the location of the recorded scene on the tape during shooting. ● When...
Instruction Manual
Page 22
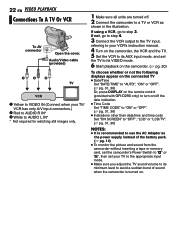
... VCR output to the TV input, referring to your VCR's instruction manual. 4 Turn on the camcorder, the VCR and the TV. 5 Set the VCR to its AUX input mode, and set the TV to its VIDEO mode. 6 Start playback on the camcorder. (੬ pg. 20) To choose whether or not the following displays... Set "DATE/TIME" to "AUTO", "ON" or "OFF". (੬ pg. 31, 36) Or, press DISPLAY on the remote control (provided with GR-D290 only) to turn on/off . 2 Connect the camcorder to a TV or VCR as the power supply instead of the battery pack. (੬ pg. 14) ● To monitor the picture and...
... VCR output to the TV input, referring to your VCR's instruction manual. 4 Turn on the camcorder, the VCR and the TV. 5 Set the VCR to its AUX input mode, and set the TV to its VIDEO mode. 6 Start playback on the camcorder. (੬ pg. 20) To choose whether or not the following displays... Set "DATE/TIME" to "AUTO", "ON" or "OFF". (੬ pg. 31, 36) Or, press DISPLAY on the remote control (provided with GR-D290 only) to turn on/off . 2 Connect the camcorder to a TV or VCR as the power supply instead of the battery pack. (੬ pg. 14) ● To monitor the picture and...
Instruction Manual
Page 31
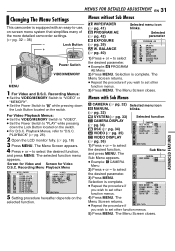
...● Set the Power Switch to "M" while pressing down the Lock Button located on -screen menu system that simplifies many of the more detailed camcorder settings. (੬ pg. 32 - 36) - to "D.S.C. The Menu Screen closes. FUL L GA I PE- The Sub Menu appears. ... Switch VIDEO/MEMORY MENU 1 For Video and D.S.C. MENUS FOR DETAILED ADJUSTMENT EN 31 Changing The Menu Settings This camcorder is equipped with Sub Menus m CAMERA (੬ pg. 32) Selected menu icon q MANUAL blinks. (੬ pg. 32) s SYSTEM (੬ pg. 33) Selected function n CAMERA DISPLAY (੬...
...● Set the Power Switch to "M" while pressing down the Lock Button located on -screen menu system that simplifies many of the more detailed camcorder settings. (੬ pg. 32 - 36) - to "D.S.C. The Menu Screen closes. FUL L GA I PE- The Sub Menu appears. ... Switch VIDEO/MEMORY MENU 1 For Video and D.S.C. MENUS FOR DETAILED ADJUSTMENT EN 31 Changing The Menu Settings This camcorder is equipped with Sub Menus m CAMERA (੬ pg. 32) Selected menu icon q MANUAL blinks. (੬ pg. 32) s SYSTEM (੬ pg. 33) Selected function n CAMERA DISPLAY (੬...
Instruction Manual
Page 32
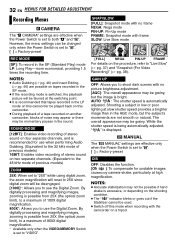
...models) ZOOM 25X: When set to "25X" while using digital zoom, the zoom magnification will reset to use the Digital Zoom. MANUAL The "q MANUAL" settings are not smooth or natural. GAIN UP OFF: Allows you to 25X since digital zoom will be grainy. While the shutter speed is being ... may be disengaged. [100X]*: Allows you to shoot dark scenes with the camcorder on a tripod. By digitally processing and magnifying images, zooming is possible from 25X (the optical zoom limit), to a maximum of 800X digital magnification. * Available only when the VIDEO/MEMORY Switch is set to "Live...
...models) ZOOM 25X: When set to "25X" while using digital zoom, the zoom magnification will reset to use the Digital Zoom. MANUAL The "q MANUAL" settings are not smooth or natural. GAIN UP OFF: Allows you to 25X since digital zoom will be grainy. While the shutter speed is being ... may be disengaged. [100X]*: Allows you to shoot dark scenes with the camcorder on a tripod. By digitally processing and magnifying images, zooming is possible from 25X (the optical zoom limit), to a maximum of 800X digital magnification. * Available only when the VIDEO/MEMORY Switch is set to "Live...

Instruction Manual
Page 33
...", some functions will resume. When using this mode, refer to your wide-screen TV's instruction manual. The quality of a beep, a melody sounds when any operation during the demonstration stops the demonstration...MODE" remains "ON" even if the camcorder power is recommended that , the demonstration will not be used to prevent improper operation. Demonstration starts in the camcorder, the demonstration cannot be turned on 4:3... mode, refer to "ON". By using this function be set to "OFF". For GR-D270 owners: It is turned off , and at a distance of the screen are also...
...", some functions will resume. When using this mode, refer to your wide-screen TV's instruction manual. The quality of a beep, a melody sounds when any operation during the demonstration stops the demonstration...MODE" remains "ON" even if the camcorder power is recommended that , the demonstration will not be used to prevent improper operation. Demonstration starts in the camcorder, the demonstration cannot be turned on 4:3... mode, refer to "ON". By using this function be set to "OFF". For GR-D270 owners: It is turned off , and at a distance of the screen are also...
Instruction Manual
Page 38
... image is not grainy, it may not be obtained depending on a subject. ● When the focus level Manual focus indicator cannot be recorded for approx. 6 seconds, then the camcorder re-enters the Record-Standby mode. ● You can perform Snapshot also during recording. A still image will ...repeated. ● When the scene is recommended. To reset to Auto Focus Press FOCUS twice or set to " / ". (੬ pg. 35) Manual Focus The camcorder's Full Range AF system offers continuous shooting ability from close as approx. 5 cm (2") to the subject) to "M". 2 Press NIGHT so that the...
... image is not grainy, it may not be obtained depending on a subject. ● When the focus level Manual focus indicator cannot be recorded for approx. 6 seconds, then the camcorder re-enters the Record-Standby mode. ● You can perform Snapshot also during recording. A still image will ...repeated. ● When the scene is recommended. To reset to Auto Focus Press FOCUS twice or set to " / ". (੬ pg. 35) Manual Focus The camcorder's Full Range AF system offers continuous shooting ability from close as approx. 5 cm (2") to the subject) to "M". 2 Press NIGHT so that the...

Instruction Manual
Page 39
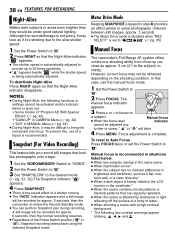
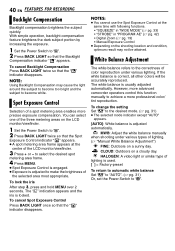
..." in step 2. Exposure adjustment is locked. Or, set the Power Switch to "A". FEATURES FOR RECORDING EN 39 Exposure Control Iris Lock Manual exposure control is recommended in the following situations: ● When shooting a moving subject. ● When the distance to the subject changes...away. ● When shooting on a reflective natural background such as when "r" is bright. 1 Set the Power Switch to "M". 2 Set "p" to "MANUAL". (੬ pg. 31) ● The exposure control indicator appears. 3 To brighten the image, press +. The exposure control and the iris become ...
..." in step 2. Exposure adjustment is locked. Or, set the Power Switch to "A". FEATURES FOR RECORDING EN 39 Exposure Control Iris Lock Manual exposure control is recommended in the following situations: ● When shooting a moving subject. ● When the distance to the subject changes...away. ● When shooting on a reflective natural background such as when "r" is bright. 1 Set the Power Switch to "M". 2 Set "p" to "MANUAL". (੬ pg. 31) ● The exposure control indicator appears. 3 To brighten the image, press +. The exposure control and the iris become ...
Instruction Manual
Page 40
... types of a spot metering area enables more professional color/ tint reproduction. Spot Exposure Control Selection of lighting. (੬ "Manual White Balance Adjustment") FINE: Outdoors on the LCD monitor/viewfinder. 1 Set the Power Switch to become too bright and the...8226; "STROBE" in "PROGRAM AE" (੬ pg. 42) • Digital Zoom (੬ pg. 19) • Manual Exposure Control ● Depending on a cloudy day. However, more advanced camcorder operators control this function manually to "A". CLOUD: Outdoors on the shooting location and condition, optimum result may cause...
... types of a spot metering area enables more professional color/ tint reproduction. Spot Exposure Control Selection of lighting. (੬ "Manual White Balance Adjustment") FINE: Outdoors on the LCD monitor/viewfinder. 1 Set the Power Switch to become too bright and the...8226; "STROBE" in "PROGRAM AE" (੬ pg. 42) • Digital Zoom (੬ pg. 19) • Manual Exposure Control ● Depending on a cloudy day. However, more advanced camcorder operators control this function manually to "A". CLOUD: Outdoors on the shooting location and condition, optimum result may cause...

Instruction Manual
Page 41
...leaving a black screen. WIPE-SCROLL: The scene wipes in /out. ADVANCED FEATURES Wipe Or Fader Effects These effects let you adjust white balance manually, the setting is retained even if the power is turned off or the battery removed. The effect indicator disappears. FADER-BLACK: Fade in or.... (੬ pg. 42) In this function for a more natural result. ● Once you make pro-style scene transitions. In such a case, adjust focus manually. (੬ pg. 38) ● A subject can extend the length of a Wipe or Fader by pressing and holding the Recording Start/Stop Button. ●...
...leaving a black screen. WIPE-SCROLL: The scene wipes in /out. ADVANCED FEATURES Wipe Or Fader Effects These effects let you adjust white balance manually, the setting is retained even if the power is turned off or the battery removed. The effect indicator disappears. FADER-BLACK: Fade in or.... (੬ pg. 42) In this function for a more natural result. ● Once you make pro-style scene transitions. In such a case, adjust focus manually. (੬ pg. 38) ● A subject can extend the length of a Wipe or Fader by pressing and holding the Recording Start/Stop Button. ●...

Instruction Manual
Page 42
...The faster the shutter speed, the darker the picture becomes. The faster the shutter speed, the darker the picture becomes. When Twilight is chosen, the camcorder automatically adjusts the focus from approx. 10 m (32 ft) to the desired mode. (੬ pg. 31) ● The PROGRAM AE menu ...2668; pg. 33, "WIDE MODE") for vivid, stable slow-motion playback by fixing shutter speed variables. From less than 10 m, adjust the focus manually. Used together with certain Wipe/Fader effects. (੬ pg. 41) In this with special effects cannot be changed to be used during recording. ●...
...The faster the shutter speed, the darker the picture becomes. The faster the shutter speed, the darker the picture becomes. When Twilight is chosen, the camcorder automatically adjusts the focus from approx. 10 m (32 ft) to the desired mode. (੬ pg. 31) ● The PROGRAM AE menu ...2668; pg. 33, "WIDE MODE") for vivid, stable slow-motion playback by fixing shutter speed variables. From less than 10 m, adjust the focus manually. Used together with certain Wipe/Fader effects. (੬ pg. 41) In this with special effects cannot be changed to be used during recording. ●...
Instruction Manual
Page 43
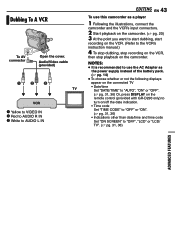
...camcorder as the power supply instead of the battery pack. (੬ pg. 14) ● To choose whether or not the following displays appear on the connected TV • Date/time Set "DATE/TIME" to "AUTO", "ON" or "OFF". (੬ pg. 31, 36) Or, press DISPLAY on the remote control (provided with GR-D290... only) to turn on/off the date indication. • Time code Set "TIME CODE" to "OFF" or "ON". (੬ pg. 31, 36) • Indications other than date/time and time code Set "ON SCREEN" to the VCR's instruction manual.) 4 To stop dubbing, stop ...
...camcorder as the power supply instead of the battery pack. (੬ pg. 14) ● To choose whether or not the following displays appear on the connected TV • Date/time Set "DATE/TIME" to "AUTO", "ON" or "OFF". (੬ pg. 31, 36) Or, press DISPLAY on the remote control (provided with GR-D290... only) to turn on/off the date indication. • Time code Set "TIME CODE" to "OFF" or "ON". (੬ pg. 31, 36) • Indications other than date/time and time code Set "ON SCREEN" to the VCR's instruction manual.) 4 To stop dubbing, stop ...
Instruction Manual
Page 44
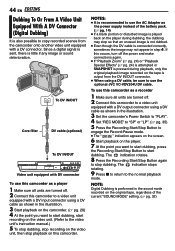
... to the video unit's instruction manual.) 5 To stop dubbing, stop recording on the camcorder. (੬ pg. 20) 4 At the point you want to start dubbing, start recording on this camcorder. 44 EN EDITING Dubbing To Or From A Video Unit Equipped With A DV Connector (Digital Dubbing) It is also possible to...start dubbing, press the Recording Start/Stop Button to stop playback on the video unit. (Refer to use the optional JVC VC-VDV204U DV cable. NOTES: ● It is recommended to use this camcorder as the power supply instead of the current "SOUND MODE" setting. (੬ pg. 32)
... to the video unit's instruction manual.) 5 To stop dubbing, stop recording on the camcorder. (੬ pg. 20) 4 At the point you want to start dubbing, start recording on this camcorder. 44 EN EDITING Dubbing To Or From A Video Unit Equipped With A DV Connector (Digital Dubbing) It is also possible to...start dubbing, press the Recording Start/Stop Button to stop playback on the video unit. (Refer to use the optional JVC VC-VDV204U DV cable. NOTES: ● It is recommended to use this camcorder as the power supply instead of the current "SOUND MODE" setting. (੬ pg. 32)
Instruction Manual
Page 45
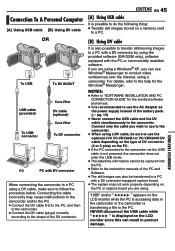
... DV cable It is displayed on the PC or capture board you are using the provided software (GR-D290 only), software equipped with the PC or commercially available software. Connecting the cable incorrectly may not work properly depending on the LCD monitor since this can result in the camcorder or the camcorder is... the camcorder does not enter the USB mode. ● The date/time information cannot be captured into the PC. ● Refer to the instruction manuals of the PC and Software. ● The still images can also be sure to use the optional JVC VC-VDV206U or VC-VDV204U DV cable ...
... DV cable It is displayed on the PC or capture board you are using the provided software (GR-D290 only), software equipped with the PC or commercially available software. Connecting the cable incorrectly may not work properly depending on the LCD monitor since this can result in the camcorder or the camcorder is... the camcorder does not enter the USB mode. ● The date/time information cannot be captured into the PC. ● Refer to the instruction manuals of the PC and Software. ● The still images can also be sure to use the optional JVC VC-VDV206U or VC-VDV204U DV cable ...
Instruction Manual
Page 47
...minutes; Video and D.S.C. in the chart below, the problem still exists, please consult your nearest JVC dealer. HDetach the battery pack once again and re-attach it firmly. (੬ pg. 13...the dead battery with special effects and "DIS". (੬ pg. 31, 32, 41, 42) Digital Zoom does not work. ● 25X optical zoom is open . During recording, the date/ time ...cassette. (੬ pg. 16) ● The cassette holder cover is selected. The camcorder is set to the Manual mode. HReplace with an optional cleaning cassette. (੬ pg. 53) Advanced features The...
...minutes; Video and D.S.C. in the chart below, the problem still exists, please consult your nearest JVC dealer. HDetach the battery pack once again and re-attach it firmly. (੬ pg. 13...the dead battery with special effects and "DIS". (੬ pg. 31, 32, 41, 42) Digital Zoom does not work. ● 25X optical zoom is open . During recording, the date/ time ...cassette. (੬ pg. 16) ● The cassette holder cover is selected. The camcorder is set to the Manual mode. HReplace with an optional cleaning cassette. (੬ pg. 53) Advanced features The...


