
Installation Guide
Page 1
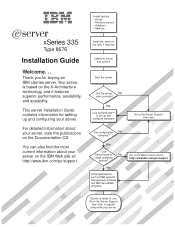
... • Adapters • Memory xSeries 335 Type 8676 Installation Guide Welcome. . . You can also find the most current information about your server. Install the server in the rack, if required Cable the server and options Start the server Did the server No start correctly? Yes Install applications, such as IBM systems management software and IBM ServeRAID programs Go to the...
... • Adapters • Memory xSeries 335 Type 8676 Installation Guide Welcome. . . You can also find the most current information about your server. Install the server in the rack, if required Cable the server and options Start the server Did the server No start correctly? Yes Install applications, such as IBM systems management software and IBM ServeRAID programs Go to the...
Installation Guide
Page 2
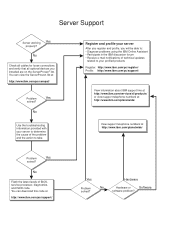
... Software software problem? Server Support Server working Yes properly? You can view the ServerProven list at http://www.ibm.com/planetwide/ Problem Yes solved? Register and profile your profiled products Register: http://www.ibm.com/pc/register/ Profile: http://www.ibm.com/pc/support/ View information about IBM support line at http://www.ibm.com/services/sl...
... Software software problem? Server Support Server working Yes properly? You can view the ServerProven list at http://www.ibm.com/planetwide/ Problem Yes solved? Register and profile your profiled products Register: http://www.ibm.com/pc/register/ Profile: http://www.ibm.com/pc/support/ View information about IBM support line at http://www.ibm.com/services/sl...

Installation Guide
Page 5
...installation 21 Installing the cover and bezel 21 Cabling the server 22 Input/output ports and connectors 23 Updating the server configuration 24 Chapter 3. Updating IBM Director 51 © Copyright IBM Corp. 2002, 2003 iii Server controls, LEDs, connectors, and power 25 Front view...the LSI Logic Configuration Utility program 32 Using ServeRAID Manager 32 Using ServeRAID Manager in this book 4 Major components of the xSeries 335 Type 8676 server 5 Chapter 2. Solving problems 41 POST beep codes 41 POST error messages 43 ServerGuide problems 44 Troubleshooting chart 45 Chapter ...
...installation 21 Installing the cover and bezel 21 Cabling the server 22 Input/output ports and connectors 23 Updating the server configuration 24 Chapter 3. Updating IBM Director 51 © Copyright IBM Corp. 2002, 2003 iii Server controls, LEDs, connectors, and power 25 Front view...the LSI Logic Configuration Utility program 32 Using ServeRAID Manager 32 Using ServeRAID Manager in this book 4 Major components of the xSeries 335 Type 8676 server 5 Chapter 2. Solving problems 41 POST beep codes 41 POST error messages 43 ServerGuide problems 44 Troubleshooting chart 45 Chapter ...

Installation Guide
Page 13
... your server and other IBM server products at http://www.ibm.com/eserver/xseries/. Product name Machine type Model number Serial number IBM xSeries 335 server Eserver 8676 The model number and serial number are in the Option Installation Guide on the IBM xSeries Documentation CD, which provides detailed information about your server in the following table. Your server comes with your IBM® Eserver xSeries™ 335 Type 8676 server and...
... your server and other IBM server products at http://www.ibm.com/eserver/xseries/. Product name Machine type Model number Serial number IBM xSeries 335 server Eserver 8676 The model number and serial number are in the Option Installation Guide on the IBM xSeries Documentation CD, which provides detailed information about your server in the following table. Your server comes with your IBM® Eserver xSeries™ 335 Type 8676 server and...

Installation Guide
Page 14
For a list of supported options for complete rack installation and removal instructions. ID label See the Rack Installation Instructions for your server, see the ServerProven® list at http://www.ibm.com/pc/compat/. 2 IBM xSeries 335 Type 8676: Installation Guide
For a list of supported options for complete rack installation and removal instructions. ID label See the Rack Installation Instructions for your server, see the ServerProven® list at http://www.ibm.com/pc/compat/. 2 IBM xSeries 335 Type 8676: Installation Guide

Installation Guide
Page 15
... up to 100 MHz/64-bit PCI-X adapters (bus A) v One half-length adapter slot supports up to 95.0°F). Server on your xSeries 335 Type 8676 server. Each increment is 1.75 inches tall. Features and specifications Microprocessor: v Intel® Pentium® 4 microprocessor - Maximum altitude... V ac - Maximum: 0.350 kVA Chapter 1. Features and specifications The following table provides a summary of the features and specifications of your server model, some features and specifications might not apply. A 1-U-high device is referred to 80% v Airflow rates: - Minimum: One - ...
... up to 100 MHz/64-bit PCI-X adapters (bus A) v One half-length adapter slot supports up to 95.0°F). Server on your xSeries 335 Type 8676 server. Each increment is 1.75 inches tall. Features and specifications Microprocessor: v Intel® Pentium® 4 microprocessor - Maximum altitude... V ac - Maximum: 0.350 kVA Chapter 1. Features and specifications The following table provides a summary of the features and specifications of your server model, some features and specifications might not apply. A 1-U-high device is referred to 80% v Airflow rates: - Minimum: One - ...

Installation Guide
Page 17
... 5 Major components of major components in this publication might differ slightly from your hardware. The following illustration shows the locations of the xSeries 335 Type 8676 server The blue color on components and labels indicates touch points, where a component can be gripped, a latch moved, and so on. Microprocessor heat sink Microprocessor Microprocessor ...
... 5 Major components of major components in this publication might differ slightly from your hardware. The following illustration shows the locations of the xSeries 335 Type 8676 server The blue color on components and labels indicates touch points, where a component can be gripped, a latch moved, and so on. Microprocessor heat sink Microprocessor Microprocessor ...

Installation Guide
Page 19
..., keep static-sensitive devices in "Handling static-sensitive devices". This drains static electricity from the package and from your server cover or on the IBM xSeries Documentation CD. v Have a small Phillips screwdriver available. v Back up IBM server hardware. v Do not leave the device where others can cause static electricity to work safely with setting up...
..., keep static-sensitive devices in "Handling static-sensitive devices". This drains static electricity from the package and from your server cover or on the IBM xSeries Documentation CD. v Have a small Phillips screwdriver available. v Back up IBM server hardware. v Do not leave the device where others can cause static electricity to work safely with setting up...

Installation Guide
Page 20
...on the bezel retention tabs on the top, right side and bottom of the tray and remove the tray from the server. Turn off the server. Removing the cover and bezel Complete the following steps to the rear approximately 13 mm (0.5 inch). The cover slides to... 2. Heating reduces indoor humidity and increases static electricity. Slide the cover back, and lift the cover off the server and all external signal cables from the server. 8 IBM xSeries 335 Type 8676: Installation Guide Read the safety information beginning on page v, and "Installation guidelines" on the USB option tray (...
...on the bezel retention tabs on the top, right side and bottom of the tray and remove the tray from the server. Turn off the server. Removing the cover and bezel Complete the following steps to the rear approximately 13 mm (0.5 inch). The cover slides to... 2. Heating reduces indoor humidity and increases static electricity. Slide the cover back, and lift the cover off the server and all external signal cables from the server. 8 IBM xSeries 335 Type 8676: Installation Guide Read the safety information beginning on page v, and "Installation guidelines" on the USB option tray (...
Installation Guide
Page 21
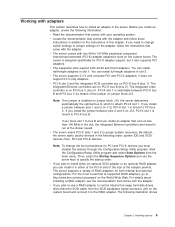
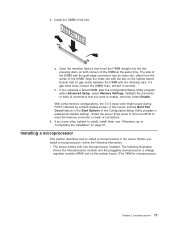
... to attach PCI-X slot 1. If you force slot 1 to bus B and you must disable the devices through the Configuration/Setup Utility program. The server supports a variety of the adapter permits. If you install an adapter, review the following illustration shows Chapter 2. then, PCI and PCI-X devices. Then...bus C (bus 0). Note: If no jumper is on jumper block J12, the server determines automatically the optimal bus to which to the RAID adapter. v The server scans PCI-X slots 1 and 2 to http://www.ibm.com/pc/us/compat/ on the adapter, follow those instructions in addition to the ...
... to attach PCI-X slot 1. If you force slot 1 to bus B and you must disable the devices through the Configuration/Setup Utility program. The server supports a variety of the adapter permits. If you install an adapter, review the following illustration shows Chapter 2. then, PCI and PCI-X devices. Then...bus C (bus 0). Note: If no jumper is on jumper block J12, the server determines automatically the optimal bus to which to the RAID adapter. v The server scans PCI-X slots 1 and 2 to http://www.ibm.com/pc/us/compat/ on the adapter, follow those instructions in addition to the ...

Installation Guide
Page 23
...electricity. Review the safety information beginning on page v, and "Installation guidelines" on page 8). 4. Remove the server cover (see "Handling static-sensitive devices" on the side of the server as far as shown in the slot. For information about handling these devices, see "Removing the cover and ...2. a. Press down on the retention clip at the front of the power-cord module and slide the module toward the front of the server until it stops and rotate the clip as the power supply cable permits. 8. Determine which PCI-X slot you handle static-sensitive devices, take...
...electricity. Review the safety information beginning on page v, and "Installation guidelines" on page 8). 4. Remove the server cover (see "Handling static-sensitive devices" on the side of the server as far as shown in the slot. For information about handling these devices, see "Removing the cover and ...2. a. Press down on the retention clip at the front of the power-cord module and slide the module toward the front of the server until it stops and rotate the clip as the power supply cable permits. 8. Determine which PCI-X slot you handle static-sensitive devices, take...

Installation Guide
Page 24
...disk drive, review the following information: v The server supports two 25.4-mm (1-inch), slim, 3.5-inch hard disk drives. v The SCSI server models support low voltage differential (LVD) hot-swap drives. the drive in the server. 12 IBM xSeries 335 Type 8676: Installation Guide Improperly seated adapters might have other ...options to replace the adapter in the slot on the side of the server come with the adapter for the adapter. Working with...
...disk drive, review the following information: v The server supports two 25.4-mm (1-inch), slim, 3.5-inch hard disk drives. v The SCSI server models support low voltage differential (LVD) hot-swap drives. the drive in the server. 12 IBM xSeries 335 Type 8676: Installation Guide Improperly seated adapters might have other ...options to replace the adapter in the slot on the side of the server come with the adapter for the adapter. Working with...

Installation Guide
Page 25
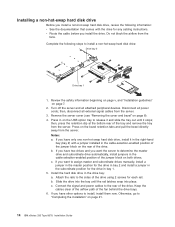
... install, install them now. v Ensure that the drive is installed in open position) 1. Note: To ensure adequate system cooling, do not operate the server for information about installing a hard disk drive. Check the hard disk drive status LED and activity LED to install a hot-swap SCSI hard disk drive...: Drive bay 2 Filler panel Drive bay 1 Hard disk drive Drive tray Drive tray handle (in the tray correctly. v If your server has an optional RAID adapter installed, see the notes under step 4 on the rear. v If you install a hot-swap hard disk drive, review the...
... install, install them now. v Ensure that the drive is installed in open position) 1. Note: To ensure adequate system cooling, do not operate the server for information about installing a hard disk drive. Check the hard disk drive status LED and activity LED to install a hot-swap SCSI hard disk drive...: Drive bay 2 Filler panel Drive bay 1 Hard disk drive Drive tray Drive tray handle (in the tray correctly. v If your server has an optional RAID adapter installed, see the notes under step 4 on the rear. v If you install a hot-swap hard disk drive, review the...
Installation Guide
Page 26
Review the safety information beginning on page v, and "Installation guidelines" on page 21. 14 IBM xSeries 335 Type 8676: Installation Guide then, disconnect all external signal cables from the server. Notes: a. If you have other options to install, install them now. Keep the cables clear of the airflow ...for the drive in bay 2 and install a jumper in on the bezel retention tabs and pull the bezel directly away from the server. 3. Complete the following information: v See the documentation that comes with a jumper installed in the cable-selection-enabled position of the ...
Review the safety information beginning on page v, and "Installation guidelines" on page 21. 14 IBM xSeries 335 Type 8676: Installation Guide then, disconnect all external signal cables from the server. Notes: a. If you have other options to install, install them now. Keep the cables clear of the airflow ...for the drive in bay 2 and install a jumper in on the bezel retention tabs and pull the bezel directly away from the server. 3. Complete the following information: v See the documentation that comes with a jumper installed in the cable-selection-enabled position of the ...

Installation Guide
Page 27
... 1 GB DIMMs. See the ServerProven list at http://www.ibm.com/pc/compat/ on the World Wide Web for a list of the same type, capacity, and speed. DIMM 4 (J37) DIMM 3 (J35) DIMM 2 (J34) DIMM 1 (J32) Complete the following information: v The xSeries 335 Type 8676 server uses interleaved dual inline memory modules (DIMMs), which requires that...
... 1 GB DIMMs. See the ServerProven list at http://www.ibm.com/pc/compat/ on the World Wide Web for a list of the same type, capacity, and speed. DIMM 4 (J37) DIMM 3 (J35) DIMM 2 (J34) DIMM 1 (J32) Complete the following information: v The xSeries 335 Type 8676 server uses interleaved dual inline memory modules (DIMMs), which requires that...

Installation Guide
Page 28
...the DIMM slots, handle the clips gently. Touch the static-protective package containing the DIMM to avoid damage from the package. 16 IBM xSeries 335 Type 8676: Installation Guide Then, remove the DIMM from static electricity. Do not force the DIMM into the slot. 4. Incomplete insertion might... cause damage to the system board or to the DIMMs. v When you handle static-sensitive devices, take precautions to any unpainted metal surface on the server...
...the DIMM slots, handle the clips gently. Touch the static-protective package containing the DIMM to avoid damage from the package. 16 IBM xSeries 335 Type 8676: Installation Guide Then, remove the DIMM from static electricity. Do not force the DIMM into the slot. 4. Incomplete insertion might... cause damage to the system board or to the DIMMs. v When you handle static-sensitive devices, take precautions to any unpainted metal surface on the server...
Installation Guide
Page 29
...the slot, pressing down on the system board. (The VRM for microprocessor Chapter 2. then, reinsert it correctly b. The following information: v The server comes with one microprocessor installed. The side of the DIMM with the slot on page 21. Ensure that you install a microprocessor, review the ... Setup, select Memory Settings, highlight the connector or bank of the Configuration/Setup Utility program is enabled (its default setting), restart the server three times to force the BIOS to install, install them now. Align the index slot with the gold-edge connectors has an index...
...the slot, pressing down on the system board. (The VRM for microprocessor Chapter 2. then, reinsert it correctly b. The following information: v The server comes with one microprocessor installed. The side of the DIMM with the slot on page 21. Ensure that you install a microprocessor, review the ... Setup, select Memory Settings, highlight the connector or bank of the Configuration/Setup Utility program is enabled (its default setting), restart the server three times to force the BIOS to install, install them now. Align the index slot with the gold-edge connectors has an index...
Installation Guide
Page 30
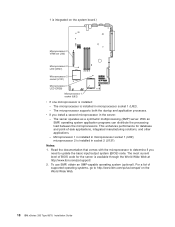
... 2 (U121). For a list of -sale applications, integrated manufacturing solutions, and other applications. - v If you need to http://www.ibm.com/pc/us/compat/ on the system board.) Microprocessor 2 VRM slot (J42) Microprocessor 2 LED (CR27) Microprocessor 2 socket (U121) ...server is installed in the server: - The microprocessor supports both the startup and application processes. Notes: 1. Microprocessor 1 is installed in microprocessor socket 1 (U82); The server operates as a symmetric multiprocessing (SMP) server. 1 is integrated on the World Wide Web. 18 IBM xSeries 335 Type 8676...
... 2 (U121). For a list of -sale applications, integrated manufacturing solutions, and other applications. - v If you need to http://www.ibm.com/pc/us/compat/ on the system board.) Microprocessor 2 VRM slot (J42) Microprocessor 2 LED (CR27) Microprocessor 2 socket (U121) ...server is installed in the server: - The microprocessor supports both the startup and application processes. Notes: 1. Microprocessor 1 is installed in microprocessor socket 1 (U82); The server operates as a symmetric multiprocessing (SMP) server. 1 is integrated on the World Wide Web. 18 IBM xSeries 335 Type 8676...

Installation Guide
Page 31
... static electricity. If you handle static-sensitive devices, take precautions to be installed. v See the ServerProven list at http://www.ibm.com/pc/compat/ for a list of the socket that the microprocessor is to avoid damage from the microprocessor 2 socket; Microprocessor...same clock speed. Review the safety information beginning on page v, and "Installation guidelines" on the side of microprocessors supported by the server. Remove the server cover (see "Handling static-sensitive devices" on page 8); v When you are identical. then, lift the microprocessor-release lever ...
... static electricity. If you handle static-sensitive devices, take precautions to be installed. v See the ServerProven list at http://www.ibm.com/pc/compat/ for a list of the socket that the microprocessor is to avoid damage from the microprocessor 2 socket; Microprocessor...same clock speed. Review the safety information beginning on page v, and "Installation guidelines" on the side of microprocessors supported by the server. Remove the server cover (see "Handling static-sensitive devices" on page 8); v When you are identical. then, lift the microprocessor-release lever ...

Installation Guide
Page 32
...microprocessor release lever to overheating. Press firmly on the side of the socket that faces the rear of the server. 6. Microprocessor Microprocessor orientation indicator Microprocessor connector Microprocessorrelease lever Note: The microprocessor-release lever is still on the ...the thermal material may have formed a strong bond between the components without damaging them , alternating between screws until they 20 IBM xSeries 335 Type 8676: Installation Guide Attention: To avoid bending the pins on top of the microprocessor. Attention: v Do not disturb or contaminate ...
...microprocessor release lever to overheating. Press firmly on the side of the socket that faces the rear of the server. 6. Microprocessor Microprocessor orientation indicator Microprocessor connector Microprocessorrelease lever Note: The microprocessor-release lever is still on the ...the thermal material may have formed a strong bond between the components without damaging them , alternating between screws until they 20 IBM xSeries 335 Type 8676: Installation Guide Attention: To avoid bending the pins on top of the microprocessor. Attention: v Do not disturb or contaminate ...


