Owners Guide
Page 1
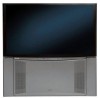
Version: 2 (February 25, 2008) has determined that this product meets the Energy Star® guidelines for 51F59, 51F59A 51F59J, 57F59, 57F59A, 57F59J 65F59, 65F59A, 65F59J. CH1 Added notes about Optical Audio Output only available when viewing a Digital Channel via the Digital Tuner. IMPORTANT... SAFETY INSTRUCTIONS 2-3 FIRST TIME USE ...4-17 THE REMOTE CONTROL ...18-31 ON-SCREEN DISPLAY ...32-60 USEFUL INFORMATION...61-71 END USER LICENSE AGREEMENT FOR HITACHI DTV SOFTWARE 71 INDEX ...72 As an Energy Star® Partner, Hitachi, Ltd. Page 10, Page 11, Page 13, and Page 39 PROJECTION COLOR...
Version: 2 (February 25, 2008) has determined that this product meets the Energy Star® guidelines for 51F59, 51F59A 51F59J, 57F59, 57F59A, 57F59J 65F59, 65F59A, 65F59J. CH1 Added notes about Optical Audio Output only available when viewing a Digital Channel via the Digital Tuner. IMPORTANT... SAFETY INSTRUCTIONS 2-3 FIRST TIME USE ...4-17 THE REMOTE CONTROL ...18-31 ON-SCREEN DISPLAY ...32-60 USEFUL INFORMATION...61-71 END USER LICENSE AGREEMENT FOR HITACHI DTV SOFTWARE 71 INDEX ...72 As an Energy Star® Partner, Hitachi, Ltd. Page 10, Page 11, Page 13, and Page 39 PROJECTION COLOR...
Owners Guide
Page 3
...60 Hz outlet.The power cord is used as improper changes or modifications not expressly approved by Hitachi America, Ltd. Modifications The FCC requires the user to be placed on -screen displays such as this apparatus to rain or moisture. • The television should only be ...exposed to a cable system providing such programming. FOR MORE INFORMATION, CALL 1-800-HITACHI. 3 Images should not be notified that any interference...
...60 Hz outlet.The power cord is used as improper changes or modifications not expressly approved by Hitachi America, Ltd. Modifications The FCC requires the user to be placed on -screen displays such as this apparatus to rain or moisture. • The television should only be ...exposed to a cable system providing such programming. FOR MORE INFORMATION, CALL 1-800-HITACHI. 3 Images should not be notified that any interference...
Owners Guide
Page 5
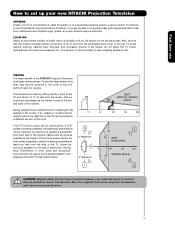
... from the side of the receiver. VIEWING The major benefit of the HITACHI Projection Television is its best, test various locations in the room to a Hi-Fi system's external speakers, the best audio performance will not fall directly on the screen. If the TV's audio output will require some experimentation with speaker...
... from the side of the receiver. VIEWING The major benefit of the HITACHI Projection Television is its best, test various locations in the room to a Hi-Fi system's external speakers, the best audio performance will not fall directly on the screen. If the TV's audio output will require some experimentation with speaker...

Owners Guide
Page 7
...BUTTONS (TV, DVD, CBL, SAT, VCR) Used to manually enter the TV channel, and used for a complete description of all of the functions on your HITACHI Projection TV, the new remote control is included in -Picture mode. LAST CHANNEL (LC) BUTTON (TV, CBL, SAT) Switches between DAY and NIGHT mode. ...: STB precode is designed to Select/Activate the highlighted menu item. POWER BUTTON (TV, CBL, VCR, DVD, SAT) Turns the selected device on the screen. MUTE BUTTON (TV) Reduces the audio level to 50% if pressed once, and to restore audio level. INPUTS BUTTON (TV) Accesses the INPUTS menu ...
...BUTTONS (TV, DVD, CBL, SAT, VCR) Used to manually enter the TV channel, and used for a complete description of all of the functions on your HITACHI Projection TV, the new remote control is included in -Picture mode. LAST CHANNEL (LC) BUTTON (TV, CBL, SAT) Switches between DAY and NIGHT mode. ...: STB precode is designed to Select/Activate the highlighted menu item. POWER BUTTON (TV, CBL, VCR, DVD, SAT) Turns the selected device on the screen. MUTE BUTTON (TV) Reduces the audio level to 50% if pressed once, and to restore audio level. INPUTS BUTTON (TV) Accesses the INPUTS menu ...
Owners Guide
Page 8
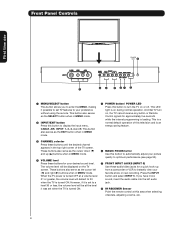
... when in MENU mode. · INPUT/EXIT button Press this area when selecting channels, adjusting volume, etc. 8 This is a normal default operation of the TV screen. Front Panel Controls First time use POWER LED º ¶ ³ MENU/SELECT button This button allows you have mono sound, insert the audio cable...button when in MENU mode. The volume level will be at a volume level 31 or greater, the volume level will be displayed on the TV screen. Press the INPUT button and select INPUT 5. However, if it is set when the TV is loading. At initial TV turn the TV on during...
... when in MENU mode. · INPUT/EXIT button Press this area when selecting channels, adjusting volume, etc. 8 This is a normal default operation of the TV screen. Front Panel Controls First time use POWER LED º ¶ ³ MENU/SELECT button This button allows you have mono sound, insert the audio cable...button when in MENU mode. The volume level will be at a volume level 31 or greater, the volume level will be displayed on the TV screen. Press the INPUT button and select INPUT 5. However, if it is set when the TV is loading. At initial TV turn the TV on during...
Owners Guide
Page 10
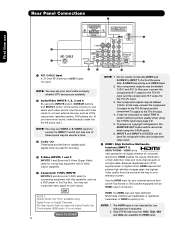
... inputs (see page 34). 5. No other input's Audio is not output. NOTE: 1. The HDMI input is the next-generation all the way to your television screen. HDMI enables the secure distribution of these inputs may be used for recording. ¿ S-Video INPUTS 1 and 2 INPUTS 1 and 2 provide S-Video (Super Video) jacks for...
... inputs (see page 34). 5. No other input's Audio is not output. NOTE: 1. The HDMI input is the next-generation all the way to your television screen. HDMI enables the secure distribution of these inputs may be used for recording. ¿ S-Video INPUTS 1 and 2 INPUTS 1 and 2 provide S-Video (Super Video) jacks for...

Owners Guide
Page 18
... control at the remote sensor of the cable box and press the CABLE (CBL) button. To operate your cable box, point the remote at the screen of the TV and press the TV button. The remote will now control your DVD player (see page 29 for instruction on how to program... the remote to control your DVD player). 18 The Remote Control The Remote Control In addition to controlling all the functions on your HITACHI Projection TV, the new remote control is designed to operate different types of VCRs, CATV (Cable TV) converters, set-top-boxes, satellite receivers (SAT) and...
... control at the remote sensor of the cable box and press the CABLE (CBL) button. To operate your cable box, point the remote at the screen of the TV and press the TV button. The remote will now control your DVD player (see page 29 for instruction on how to program... the remote to control your DVD player). 18 The Remote Control The Remote Control In addition to controlling all the functions on your HITACHI Projection TV, the new remote control is designed to operate different types of VCRs, CATV (Cable TV) converters, set-top-boxes, satellite receivers (SAT) and...

Owners Guide
Page 21
...PBPR Input is blocked. 21 INPUT 2 Select to choose Input 5. AIR/ CABLE Select to INPUT 3 ¸ CURSOR buttons/SELECT button INFO All the On-Screen Display features can be set . INPUT 5 Select to choose Input 2. Mainly it is connected to choose Air or Cable signal. ¶ PICTURE-IN-PICTURE ...numeric entries. IN : 1 TV-PG DLSV Day AUTO VIEW --:--AM --:--AM HD 1080i 16:9 Standard µ EXIT button This button will start the On-Screen Display. ¾ GUIDE button [Cable Box (CBL), Satellite Receiver (SAT)/ Set-Top-Box (STB) mode only] The use of this button to scroll ...
...PBPR Input is blocked. 21 INPUT 2 Select to choose Input 5. AIR/ CABLE Select to INPUT 3 ¸ CURSOR buttons/SELECT button INFO All the On-Screen Display features can be set . INPUT 5 Select to choose Input 2. Mainly it is connected to choose Air or Cable signal. ¶ PICTURE-IN-PICTURE ...numeric entries. IN : 1 TV-PG DLSV Day AUTO VIEW --:--AM --:--AM HD 1080i 16:9 Standard µ EXIT button This button will start the On-Screen Display. ¾ GUIDE button [Cable Box (CBL), Satellite Receiver (SAT)/ Set-Top-Box (STB) mode only] The use of this button to scroll ...
Owners Guide
Page 24
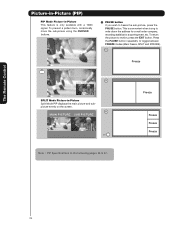
... SUB PICTURE EXIT Freeze Freeze Freeze Freeze Freeze Note : PIP Specifications in -Picture Split Mode PIP displays the main picture and subpicture evenly on the screen. Press the PAUSE button repeatedly to motion, press the EXIT button. The Remote Control Picture-in-Picture (PIP) PIP Mode Picture-in-Picture This feature...
... SUB PICTURE EXIT Freeze Freeze Freeze Freeze Freeze Note : PIP Specifications in -Picture Split Mode PIP displays the main picture and subpicture evenly on the screen. Press the PAUSE button repeatedly to motion, press the EXIT button. The Remote Control Picture-in-Picture (PIP) PIP Mode Picture-in-Picture This feature...
Owners Guide
Page 32
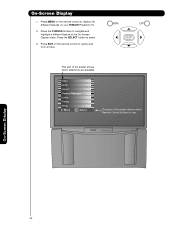
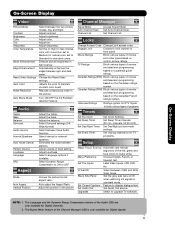
On-Screen Display 1. Press EXIT on your HITACHI Projection TV. 2. This part of the On-Screen Display menu. On-Screen Display 32 Press the SELECT button to use. Press MENU on the remote control to display the different features on the remote control to quickly exit from a menu. Press the CURSOR buttons to navigate and highlight a different feature of the screen shows which Remote Control buttons to select. 3. Video Audio Aspect Channel Manager Locks Timers Setup Move SEL Select This part of the screen shows which selections are available.
On-Screen Display 1. Press EXIT on your HITACHI Projection TV. 2. This part of the On-Screen Display menu. On-Screen Display 32 Press the SELECT button to use. Press MENU on the remote control to display the different features on the remote control to quickly exit from a menu. Press the CURSOR buttons to navigate and highlight a different feature of the screen shows which Remote Control buttons to select. 3. Video Audio Aspect Channel Manager Locks Timers Setup Move SEL Select This part of the screen shows which selections are available.
Owners Guide
Page 33
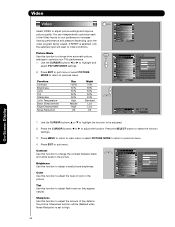
On-Screen Display Video Picture Mode Contrast Brightness Color Tint Sharpness Color Temperature Black Enhancement Edge Enhancement Reset Video Settings Auto Color Noise Reduction Auto Movie Mode ... Night. Locks Change Access Code Change Lock access code. Movie Ratings Block various types of movies and television programming based on motion picture ratings. On-Screen Display NOTE: 1. Select internal or external speakers. Select Dynamic Range Compression to display dialogue/text. Set Auto Channel Scan. Set Sleep Timer intervals (30 min...
On-Screen Display Video Picture Mode Contrast Brightness Color Tint Sharpness Color Temperature Black Enhancement Edge Enhancement Reset Video Settings Auto Color Noise Reduction Auto Movie Mode ... Night. Locks Change Access Code Change Lock access code. Movie Ratings Block various types of movies and television programming based on motion picture ratings. On-Screen Display NOTE: 1. Select internal or external speakers. Select Dynamic Range Compression to display dialogue/text. Set Auto Channel Scan. Set Sleep Timer intervals (30 min...
Owners Guide
Page 34
... 50% Color Temperature High Black Enhancement Middle Edge Enhancement High Reset Video Settings Move SEL Return Picture Mode Next/Prev Select Day SEL Return On-Screen Display 1. Press EXIT to optimize your preference to initial conditions. Sharpness function will reset to increase viewing performance and pleasure depending upon the video program...
... 50% Color Temperature High Black Enhancement Middle Edge Enhancement High Reset Video Settings Move SEL Return Picture Mode Next/Prev Select Day SEL Return On-Screen Display 1. Press EXIT to optimize your preference to initial conditions. Sharpness function will reset to increase viewing performance and pleasure depending upon the video program...
Owners Guide
Page 35
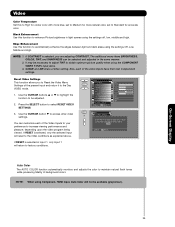
... share a Video setting. You can be necessary to adjust TINT to obtain optimum picture quality when using the settings off, low, middle and high. On-Screen Display 35 If RESET is selected, you to Reset the Video Menu Settings of background colors. Video Color Temperature Set this function to enhance Picture...
... share a Video setting. You can be necessary to adjust TINT to obtain optimum picture quality when using the settings off, low, middle and high. On-Screen Display 35 If RESET is selected, you to Reset the Video Menu Settings of background colors. Video Color Temperature Set this function to enhance Picture...
Owners Guide
Page 36
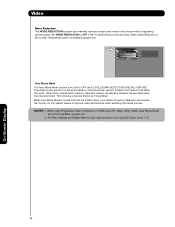
Set NOISE REDUCTION to High, Sharpness function is turned ON from the VIDEO menu, your Hitachi Projection Television will not be reconciled. When Auto Movie Mode is disabled (grayed out). NOTES: 1. All Video settings are shot on film at 24 frames ... Movie Mode function turns ON or OFF the 3:2 PULLDOWN DETECTION SPECIAL FEATURE. Theatrical movies are independent of 30 frames or 60 fields like video. On-Screen Display 36 Video Noise Reduction The NOISE REDUCTION function automatically reduces conspicuous noise in the picture without degrading picture quality.
Set NOISE REDUCTION to High, Sharpness function is turned ON from the VIDEO menu, your Hitachi Projection Television will not be reconciled. When Auto Movie Mode is disabled (grayed out). NOTES: 1. All Video settings are shot on film at 24 frames ... Movie Mode function turns ON or OFF the 3:2 PULLDOWN DETECTION SPECIAL FEATURE. Theatrical movies are independent of 30 frames or 60 fields like video. On-Screen Display 36 Video Noise Reduction The NOISE REDUCTION function automatically reduces conspicuous noise in the picture without degrading picture quality.

Owners Guide
Page 37
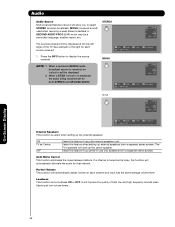
.... 3. Use cursor ̇ or ̈ to improve the s ound quality. 1. Normal Surround : Provides the surround effect by locating two or more realistic audio environment. 1.- On-Screen Display 37 Audio Audio Select AUDIO to adjust the TV to your preference and to select Off,Normal or Wide. Wide surround enable users to...
.... 3. Use cursor ̇ or ̈ to improve the s ound quality. 1. Normal Surround : Provides the surround effect by locating two or more realistic audio environment. 1.- On-Screen Display 37 Audio Audio Select AUDIO to adjust the TV to your preference and to select Off,Normal or Wide. Wide surround enable users to...
Owners Guide
Page 38
... audio being received will be both low and high frequency sounds when listening at the top left edge of both STEREO and SECOND AUDIO. On-Screen Display 38 See example to display the source received. Select this feature when setting up the external speakers. Perfect Volume This function will work as...
... audio being received will be both low and high frequency sounds when listening at the top left edge of both STEREO and SECOND AUDIO. On-Screen Display 38 See example to display the source received. Select this feature when setting up the external speakers. Perfect Volume This function will work as...
Owners Guide
Page 39
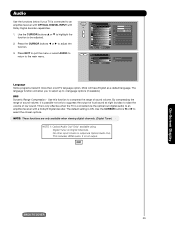
... input's Audio is output via the optical out (digital audio) to an amplifier/receiver with OPTICAL DIGITAL INPUT with a Dolby® Digital decoder. CH1 On-Screen Display BACK TO COVER 39 Audio Use the functions below if your TV is connected to an amplifier/receiver with Dolby Digital decoder capabilities. 1. Most...
... input's Audio is output via the optical out (digital audio) to an amplifier/receiver with OPTICAL DIGITAL INPUT with a Dolby® Digital decoder. CH1 On-Screen Display BACK TO COVER 39 Audio Use the functions below if your TV is connected to an amplifier/receiver with Dolby Digital decoder capabilities. 1. Most...

Owners Guide
Page 40
...+10 Move SEL Select Auto Aspect Automatically adjust the Aspect Ratio depending on the input signal to +10 (video center is toward top of screen). The Auto Aspect function is toward bottom of the picture with these modes. Adjustable range is -10 (video center is recommended on COMPOSITE ...in 4:3 STANDARD and 16:9 STANDARD MODES. 4. Press MENU to return to main menu or select ASPECT to return to highlight the ASPECT MODE. 2. On-Screen Display 40 Use the CURSOR buttons ̆ or ̄ to previous menu. 5. The Auto Aspect function is either 4:3 EXPANDED/ZOOM1/ZOOM2 or 16:9...
...+10 Move SEL Select Auto Aspect Automatically adjust the Aspect Ratio depending on the input signal to +10 (video center is toward top of screen). The Auto Aspect function is toward bottom of the picture with these modes. Adjustable range is -10 (video center is recommended on COMPOSITE ...in 4:3 STANDARD and 16:9 STANDARD MODES. 4. Press MENU to return to main menu or select ASPECT to return to highlight the ASPECT MODE. 2. On-Screen Display 40 Use the CURSOR buttons ̆ or ̄ to previous menu. 5. The Auto Aspect function is either 4:3 EXPANDED/ZOOM1/ZOOM2 or 16:9...

Owners Guide
Page 41
... Signal Meter Auto Channel Scan Channel List Move SEL Return Channel Manager Signal Meter Channel Strength Peak 15-1 91 91 Close Move SEL Return On-Screen Display 41 Press the SELECT button or CURSOR button ̈ to optimize signal reception. 1. This feature will not be adjusted. 2. MENU Video Audio Aspect Channel...
... Signal Meter Auto Channel Scan Channel List Move SEL Return Channel Manager Signal Meter Channel Strength Peak 15-1 91 91 Close Move SEL Return On-Screen Display 41 Press the SELECT button or CURSOR button ̈ to optimize signal reception. 1. This feature will not be adjusted. 2. MENU Video Audio Aspect Channel...

Owners Guide
Page 42
... the CURSOR buttons ̇ or ̈ to set or remove the FAVORITES settings. 5. Press the FAV button to highlight the START or RESET option. 3. On-Screen Display 42 Channel Manager Auto Channel Sc an OR S ource Air C able(1) C able(2) Auto C hannel S c an S tart R eset Move SEL R eturn 1. Channel List This function...
... the CURSOR buttons ̇ or ̈ to set or remove the FAVORITES settings. 5. Press the FAV button to highlight the START or RESET option. 3. On-Screen Display 42 Channel Manager Auto Channel Sc an OR S ource Air C able(1) C able(2) Auto C hannel S c an S tart R eset Move SEL R eturn 1. Channel List This function...


