Owners Guide
Page 57
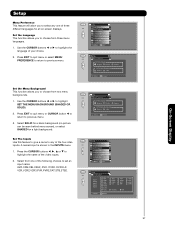
... CBL2 Reset Auto Link DVD DVD2 DVD3 LD PVR PVR2 SAT STB STB2 VCR VCR2 VCR3 Auto Remote Off Move SEL Return On-Screen Display 57 Setup Menu Preference This feature will allow you to select any of the five video inputs. Set The Inputs Use this feature to give a name...
... CBL2 Reset Auto Link DVD DVD2 DVD3 LD PVR PVR2 SAT STB STB2 VCR VCR2 VCR3 Auto Remote Off Move SEL Return On-Screen Display 57 Setup Menu Preference This feature will allow you to select any of the five video inputs. Set The Inputs Use this feature to give a name...
Owners Guide
Page 61
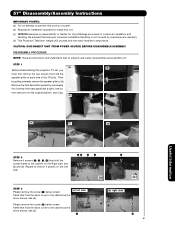
...61 Remove the front decoration panels by manufacturer's warranty. (d) This Projection Television weighs 205 pounds and has many sensitive components. 57" Disassembly/Assembly Instructions IMPORTANT POINTS: (a) Do not attempt to perform this work by pulling outwards remove the speaker grille (c)(d). CAUTION...instructions and understand how to properly and safely disassemble and assemble unit STEP 1 (a) (b) Before disassembling this unit. (c) HITACHI assumes no responsibility or liability for injury/damage as a result of the TV(a)(b). Then by yourself. (b) Request an ...
...61 Remove the front decoration panels by manufacturer's warranty. (d) This Projection Television weighs 205 pounds and has many sensitive components. 57" Disassembly/Assembly Instructions IMPORTANT POINTS: (a) Do not attempt to perform this work by pulling outwards remove the speaker grille (c)(d). CAUTION...instructions and understand how to properly and safely disassemble and assemble unit STEP 1 (a) (b) Before disassembling this unit. (c) HITACHI assumes no responsibility or liability for injury/damage as a result of the TV(a)(b). Then by yourself. (b) Request an ...
Owners Guide
Page 62
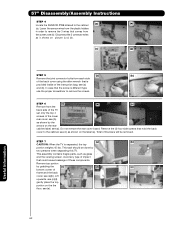
... cause breakage of frame and the back cover, see (a). STEP 7 (a) (b) CAUTION: When the TV is different type use the proper screwdriver to remove the screws. 57" Disassembly/Assembly Instructions STEP 4 Locate the SENSOR PWB attaced to the cabinet, see (c) as shown on the the floor, see (c)(d), gently place the top portion...
... cause breakage of frame and the back cover, see (a). STEP 7 (a) (b) CAUTION: When the TV is different type use the proper screwdriver to remove the screws. 57" Disassembly/Assembly Instructions STEP 4 Locate the SENSOR PWB attaced to the cabinet, see (c) as shown on the the floor, see (c)(d), gently place the top portion...
Owners Guide
Page 63
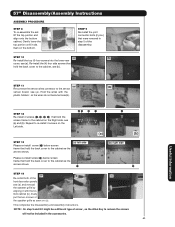
... top portion until it with the plastic holders ; Repeat to re-install 4 screws on the Right side, see (a). This completes the Disassembly and Assembly instructions. 57" Disassembly/Assembly Instructions ASSEMBLY PROCEDURE STEP 8 To re-assemble the set, lift the top portion and align onto the bottom cabinet. STEP 9 Re-install the...
... top portion until it with the plastic holders ; Repeat to re-install 4 screws on the Right side, see (a). This completes the Disassembly and Assembly instructions. 57" Disassembly/Assembly Instructions ASSEMBLY PROCEDURE STEP 8 To re-assemble the set, lift the top portion and align onto the bottom cabinet. STEP 9 Re-install the...
