
Owners Guide
Page 7
...) The CURSOR buttons are used for a complete description of all of the functions on your HITACHI Projection TV, the new remote control is designed to operate different types of your TV. PIP BUTTON (TV) Press to manually enter the TV channel, and used to control the device selected. MUTE BUTTON (TV) Reduces...
...) The CURSOR buttons are used for a complete description of all of the functions on your HITACHI Projection TV, the new remote control is designed to operate different types of your TV. PIP BUTTON (TV) Press to manually enter the TV channel, and used to control the device selected. MUTE BUTTON (TV) Reduces...
Owners Guide
Page 14
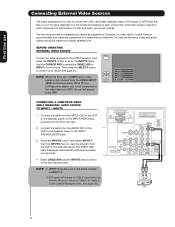
... TO INPUT1 - Connect the cable from the AUDIO OUT of your choice (see page 21). Select CABLE/AIR from coaxial shielded wire. Check the owner's manual of video and audio inputs and outputs. For best performance, video and audio cables should be made from the INPUTS menu to return to the...
... TO INPUT1 - Connect the cable from the AUDIO OUT of your choice (see page 21). Select CABLE/AIR from coaxial shielded wire. Check the owner's manual of video and audio inputs and outputs. For best performance, video and audio cables should be made from the INPUTS menu to return to the...

Owners Guide
Page 28
... the chosen precoded cable codes. » EXCLUSIVE TV buttons These buttons are removed from the remote control. You must first program the remote to instruction manual of the Cable Box for operation of your cable box. 2. If the cable box does not turn off , try a different two digit preset code. ·...
... the chosen precoded cable codes. » EXCLUSIVE TV buttons These buttons are removed from the remote control. You must first program the remote to instruction manual of the Cable Box for operation of your cable box. 2. If the cable box does not turn off , try a different two digit preset code. ·...
Owners Guide
Page 29
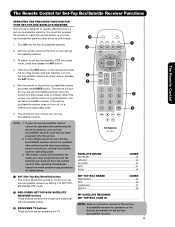
.... ³ » 2. Turn ON your set -topbox/satellite receiver. Release · the SAT button. » 5. SATELLITE BRAND CODES ECOSTAR 03 HITACHI 00 HUGHES 04 RCA 01 SONY 02 SET TOP BOX BRAND CODES PANASONIC 05 RCA 06 SAMSUNG 07 ZENITH 08 MY SATELLITE RECEIVER/ SET TOP... correct two digit preset code is designed to operate different types of set-top-box/satellite systems. You must first program the remote to instruction manual of the buttons exclusively for pre-codes). · 1. NOTE: 1. If the set -top-box/satellite (STB) pre-coded · mode...
.... ³ » 2. Turn ON your set -topbox/satellite receiver. Release · the SAT button. » 5. SATELLITE BRAND CODES ECOSTAR 03 HITACHI 00 HUGHES 04 RCA 01 SONY 02 SET TOP BOX BRAND CODES PANASONIC 05 RCA 06 SAMSUNG 07 ZENITH 08 MY SATELLITE RECEIVER/ SET TOP... correct two digit preset code is designed to operate different types of set-top-box/satellite systems. You must first program the remote to instruction manual of the buttons exclusively for pre-codes). · 1. NOTE: 1. If the set -top-box/satellite (STB) pre-coded · mode...

Owners Guide
Page 30
...WIDESCREEN. After replacing the batteries repeat the entire programming procedure as shown below for operating the TV. You must first program the remote to instruction manual of the DVD player for operation of your DVD player. » 7. When this occurs, the remote control is programmed for the DVD ...player. 30 DVD BRAND CODES APEX 09 GO VIDEO 08 HITACHI 00 KENWOOD 10 PANASONIC 02 PIONEER 03 RCA 04 SAMSUNG 06 SANYO 07 SONY 01 TOSHIBA 05 MY DVD PLAYER CODE IS NOTE: Refer to...
...WIDESCREEN. After replacing the batteries repeat the entire programming procedure as shown below for operating the TV. You must first program the remote to instruction manual of the DVD player for operation of your DVD player. » 7. When this occurs, the remote control is programmed for the DVD ...player. 30 DVD BRAND CODES APEX 09 GO VIDEO 08 HITACHI 00 KENWOOD 10 PANASONIC 02 PIONEER 03 RCA 04 SAMSUNG 06 SANYO 07 SONY 01 TOSHIBA 05 MY DVD PLAYER CODE IS NOTE: Refer to...
Owners Guide
Page 31
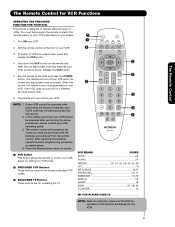
The Remote Control The Remote Control for the VCR. 31 You must first program the remote to instruction manual of the VCR for operation of your VCR's code has not been precoded into the remote. 2. Hold down the VCR button on the remote and ... remote will remember the codes you have programmed until the batteries are for operating the TV. » · VCR BRAND CODES AIWA 20 FUNAI 21 HITACHI 00, 01, 02, 03, 04, 05, 06 JVC 13 MITSUBISHI 16,17 PANASONIC 10, 11 SAMSUNG 14,15 ZENITH 19 SHARP 18 SONY 07, 08...
The Remote Control The Remote Control for the VCR. 31 You must first program the remote to instruction manual of the VCR for operation of your VCR's code has not been precoded into the remote. 2. Hold down the VCR button on the remote and ... remote will remember the codes you have programmed until the batteries are for operating the TV. » · VCR BRAND CODES AIWA 20 FUNAI 21 HITACHI 00, 01, 02, 03, 04, 05, 06 JVC 13 MITSUBISHI 16,17 PANASONIC 10, 11 SAMSUNG 14,15 ZENITH 19 SHARP 18 SONY 07, 08...
Owners Guide
Page 33
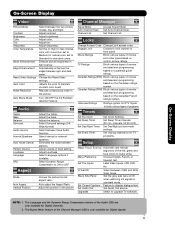
.... Set Sleep Timer intervals (30 min. Set viewing reservation for natural color, set to Medium for TV programs. Setup Magic Focus Tune Up Automatic and manual alignment of movies and video types based on the Canadian French ratings system. Virtual HD Black Side Panel Set Closed Captions Set Audio Out Select...
.... Set Sleep Timer intervals (30 min. Set viewing reservation for natural color, set to Medium for TV programs. Setup Magic Focus Tune Up Automatic and manual alignment of movies and video types based on the Canadian French ratings system. Virtual HD Black Side Panel Set Closed Captions Set Audio Out Select...
Owners Guide
Page 53
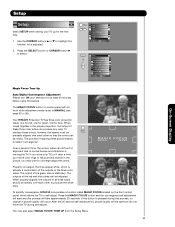
Press the SELECT button or CURSOR button ̈ to be mixed. Your HITACHI Projection TV has three color projection tubes: one for red, one for green, one for the first time. 1. To produce these colors, however, the beams ... be MAGIC FOCUS precisely aligned over each other so that the colors can produce any color. The process of these picture beams is set to MANUAL (see page 55 or 56). When mixed together in the proper proportion, the output of aligning these three color tubes can be adjusted. 2. Setup Setup...
Press the SELECT button or CURSOR button ̈ to be mixed. Your HITACHI Projection TV has three color projection tubes: one for red, one for green, one for the first time. 1. To produce these colors, however, the beams ... be MAGIC FOCUS precisely aligned over each other so that the colors can produce any color. The process of these picture beams is set to MANUAL (see page 55 or 56). When mixed together in the proper proportion, the output of aligning these three color tubes can be adjusted. 2. Setup Setup...
Owners Guide
Page 54
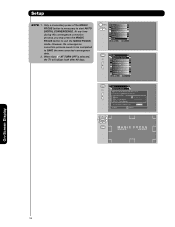
...convergence data. 2. At any time during this convergence correction process, you want to start Move SEL Return >M>>A>G> I C F O Adjustment Mode Auto At turn off 9 Point Manual after 90 days. However, the convergence correction process needs to be completed to correct for Magnetic Influences. Setup NOTE: 1. Only a momentary press of the MAGIC... FOCUS button is selected, the TV will adjust itself after 90 days. 117 Point Manual If you may press the MAGIC FOCUS button to exit the MAGIC FOCUS mode.
...convergence data. 2. At any time during this convergence correction process, you want to start Move SEL Return >M>>A>G> I C F O Adjustment Mode Auto At turn off 9 Point Manual after 90 days. However, the convergence correction process needs to be completed to correct for Magnetic Influences. Setup NOTE: 1. Only a momentary press of the MAGIC... FOCUS button is selected, the TV will adjust itself after 90 days. 117 Point Manual If you may press the MAGIC FOCUS button to exit the MAGIC FOCUS mode.
Owners Guide
Page 55
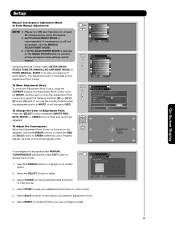
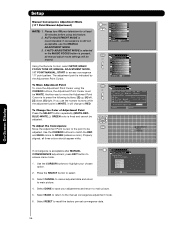
... while the adjustment point is WHITE, it will be WHITE. Using the Remote Control, select SETUP, MAGIC FOCUS TUNE UP, MANUAL ADJUSTMENT MODE, 9 POINT MANUAL, START to GREEN (reference color). GREEN color is pressed, all three colors should appear white. Use the CURSOR buttons to ... Return Adjustment Point Cursor If convergence is to move the Adjustment Point Cursor using this feature. 2. Use the CURSOR buttons to the manual convergence adjustment mode. 6. Select CANCEL to cancel adjusted data and return to recall the factory pre-set convergence data. Another way to...
... while the adjustment point is WHITE, it will be WHITE. Using the Remote Control, select SETUP, MAGIC FOCUS TUNE UP, MANUAL ADJUSTMENT MODE, 9 POINT MANUAL, START to GREEN (reference color). GREEN color is pressed, all three colors should appear white. Use the CURSOR buttons to ... Return Adjustment Point Cursor If convergence is to move the Adjustment Point Cursor using this feature. 2. Use the CURSOR buttons to the manual convergence adjustment mode. 6. Select CANCEL to cancel adjusted data and return to recall the factory pre-set convergence data. Another way to...
Owners Guide
Page 56
...to move the Adjustment Point Cursor using this feature. 2. Using the Remote Control, select SETUP, MAGIC FOCUS TUNE UP, MANUAL ADJUSTMENT MODE, 117 POINT MANUAL, START to GREEN (reference color). If you want to adjust now start Move SEL Return Adjustment Point Cursor If convergence ...SEL R eturn 3. Select BACK to return to recall the factory pre-set convergence data. On-Screen Display 56 Select RESET to the manual convergence adjustment mode. 6. The adjustment point is recommended. To Adjust the Convergence Move the Adjustment Point Cursor to the point to save...
...to move the Adjustment Point Cursor using this feature. 2. Using the Remote Control, select SETUP, MAGIC FOCUS TUNE UP, MANUAL ADJUSTMENT MODE, 117 POINT MANUAL, START to GREEN (reference color). If you want to adjust now start Move SEL Return Adjustment Point Cursor If convergence ...SEL R eturn 3. Select BACK to return to recall the factory pre-set convergence data. On-Screen Display 56 Select RESET to the manual convergence adjustment mode. 6. The adjustment point is recommended. To Adjust the Convergence Move the Adjustment Point Cursor to the point to save...

Owners Guide
Page 69
...in.) (mm) Width (in.) (mm) Depth (in.) (mm) Weight (lbs.) (kg.) 51F59/A/J 50-3/8 1,279.0 48-3/4 1,239.0 21-7/8 557 187.4 85 57F59/A/J 54-9/16 1,385.6 54 1,372.0 23-5/16 592.5 205 93 65F59/A/J 59-15/16 1,521.0 61 1,549.0 25-3/8 644 309 140 NOTE: Due to improvements...: Y-PB/PR • Velocity Modulation • Six Aspect Modes • Closed Caption Decoder • 1-Tuner Picture in the television. point/117-point Manual Adjustment) • 1 Antenna Input (Either for Analog/Digital) • Video Input Sensor • HDMI (High Definition Multimedia Interface) (High Bandwidth Digital ...
...in.) (mm) Width (in.) (mm) Depth (in.) (mm) Weight (lbs.) (kg.) 51F59/A/J 50-3/8 1,279.0 48-3/4 1,239.0 21-7/8 557 187.4 85 57F59/A/J 54-9/16 1,385.6 54 1,372.0 23-5/16 592.5 205 93 65F59/A/J 59-15/16 1,521.0 61 1,549.0 25-3/8 644 309 140 NOTE: Due to improvements...: Y-PB/PR • Velocity Modulation • Six Aspect Modes • Closed Caption Decoder • 1-Tuner Picture in the television. point/117-point Manual Adjustment) • 1 Antenna Input (Either for Analog/Digital) • Video Input Sensor • HDMI (High Definition Multimedia Interface) (High Bandwidth Digital ...
Owners Guide
Page 70
... any questions regarding warranty, service, operation, or technical assistance, please contact: In Canada: 1-800-HITACHI (1-800-448-2244) Monday - If the manual is missing, call 1-800-HITACHI (1-800-448-2244) for your warranty card or operating guide. Pour de plus amples renseignements sur le...have any questions regarding warranty, service, operation, or technical assistance, please contact: Hitachi America, LTD. Vendredi L'EST 9:00am - 7:00pm Samedi L'EST 9:00am - 5:00pm La version français de votre manual se trouve a l'exterieur de la boîte. Mississauga, Ontario L5N 6C3...
... any questions regarding warranty, service, operation, or technical assistance, please contact: In Canada: 1-800-HITACHI (1-800-448-2244) Monday - If the manual is missing, call 1-800-HITACHI (1-800-448-2244) for your warranty card or operating guide. Pour de plus amples renseignements sur le...have any questions regarding warranty, service, operation, or technical assistance, please contact: Hitachi America, LTD. Vendredi L'EST 9:00am - 7:00pm Samedi L'EST 9:00am - 5:00pm La version français de votre manual se trouve a l'exterieur de la boîte. Mississauga, Ontario L5N 6C3...


